Message 고군분투기
과외차이라는 어플리케이션으로 메인 프로젝트를 진행했고, 백로그로 미뤄두었던 기능 중 하나가 '실시간 채팅'이었다. (+실시간 알림)
구현해야 할 기능들이 꽤 많았기 때문에 일단은 쪽지 형태와 유사한 방식으로 메시지를 구현했었는데, 구현한 주요 방법들은 아래와 같다.
Recoil 전역 상태로 CurrentRoomId를 관리한다
import { atom } from 'recoil';

const CurrentRoomIdState = atom({
  key: 'CurrentRoomId',
  default: 0,
});

export default CurrentRoomIdState;
아래 코드와 같이 CurrentRoomId를 통해서 특정 메세지 룸에 있는 전체 메세지를 조회하거나, 특정 메시지룸을 삭제하거나, 메시지를 생성하는 API 요청을 보낼 수 있다.
//*다른 컴포넌트, 페이지에서 일부만 잘라낸 코드입니다*


//메시지 생성 POST 요청
const sendMessage = async () => {
    await axios
      .post(`/messages`, {
        senderId: profileId,
        receiverId: receiveMessageId,
        messageRoomId: CurrentRoomId,
        messageContent: inputValue,
      })
      .then(() => {
        refreshMessage();
      })
      .catch((err) => console.log(err));
  };


//메시지 룸의 전체 메시지를 조회하는 GET 요청
 const getMessageRoom = async () => {
    if (CurrentRoomId !== 0 && CurrentRoomId !== undefined)
      await axios
        .get(`/messages/rooms/${profileId}/${CurrentRoomId}`)
        .then((res) => {
          setMessageRoom(res.data.data);
        })
        .catch((err) => console.log(err));
  };


//특정 메시지룸 삭제하는 DELETE 요청
const delMessageRoom = async () => {
    await axios
      .delete(`/messages/rooms/${CurrentRoomId}`)
      .then(() => {
        setModal(cancelAlertProps);
      })
      .catch(() => {
        setModal({
          isOpen: true,
          modalType: 'redAlert',
          props: {
            text: '대화 상대와 매칭중인 과외가 있다면\n상담 취소를 할 수 없습니다.',
          },
        });
      });
  };
메시지 리스트, 메시지 룸의 업데이트는 수동으로 검증해야 한다
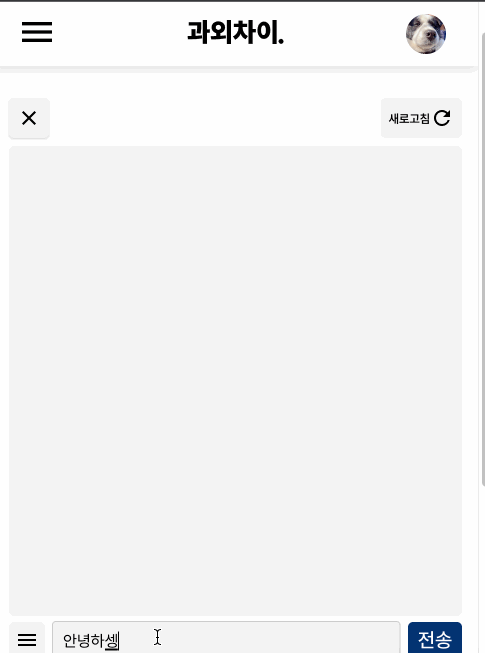
메시지를 보내면 refreshMessage 함수를 실행시킨다.
혹시나 제대로 실행되지 않을 것을 대비해 아래와 같이 새로고침 버튼을 만들었다.
//메시지룸 리스트와 메시지 룸을 새롭게 받아오는 함수
 const refreshMessage = () => {
    getMessageList();
    getMessageRoom();
};


//중략

<button onClick={() => refreshMessage()}>
          <span>새로고침</span>
          <MdRefresh />
</button>
메시지 리스트에 메시지 업데이트 표시하기
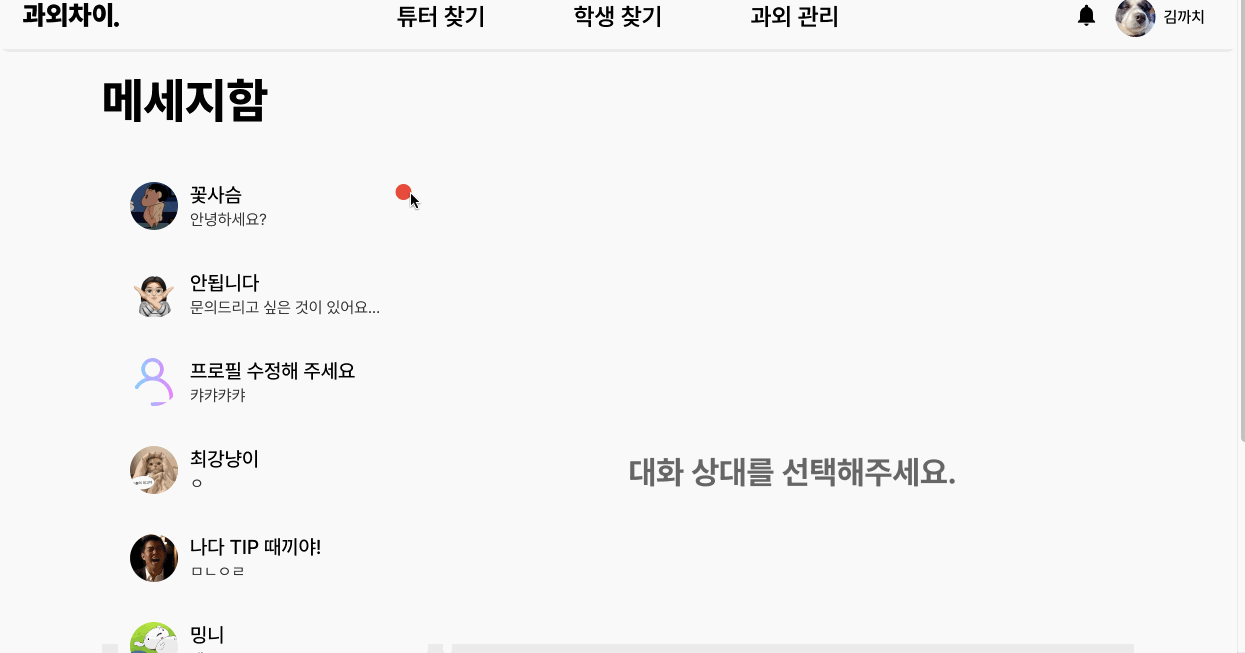
메시지룸 리스트를 조회하는 API와 특정 메시지 룸 내부의 대화 내역을 조회하는 API를 따로 가지고 있었고, 메시지룸과 메시지리스트도 컴포넌트가 분리되어 있다. (메시지 페이지는 하나이고 그 안에서 컴포넌트가 나뉨)
아래 응답 데이터 예시를 보면 알 수 있겠지만 정말로 복잡하게 짜여져 있어서 메시지를 맡은 팀원이 정말 고생했던 기억이 있다.
messageStatus는 새롭게 도착한 메시지를 확인했는지 하지 않았는지를 표시하는 상태인데, 이 상태와, lastSenderId를 이용해서 메시지 리스트의 각 요소들에 필요에 따라 붉은 점을 표시해줄 수 있게 된다.
(최근에 보낸 메시지가 확인되지 않았고, 마지막으로 메시지를 보낸 사람이 자신이 아닐 때 붉은 배지가 달리게 된다)
{list.lastSenderId !== profileId ? (
  list.messageStatus === 'UNCHECK' ? (
 <span className={styles.badge} />
) : undefined // 상대가 보내고 체크된 msg
) : undefined // 내가 보낸 msg
}
gif에서 보면 알 수 있듯이 확인한 뒤에 새로고침을 해주어야 붉은 배지가 사라지는 건 앞으로 더 수정해야 할 점이긴 하다... 메시지 룸 리스트를 클릭했을 때 업데이트 되는 것은 메시지 룸 (메시지 콘텐츠) 영역 뿐이기 때문에 메시지 리스트를 새로고침 하기 위해서는 새로고침 버튼을 눌러야 하는 것...
//메시지룸 리스트를 조회했을 때 응답 데이터
{
  "data" : [ {
    "messageRoomId" : 1,
    "messageStatus" : "UNCHECK",
    "lastMessage" : "test",
    "lastSenderId" : 1,
    "targetName" : "test",
    "targetProfileUrl" : "test",
    "createAt" : "2023-02-09T04:11:04.547627"
  }, {
    "messageRoomId" : 1,
    "messageStatus" : "UNCHECK",
    "lastMessage" : "test",
    "lastSenderId" : 1,
    "targetName" : "test",
    "targetProfileUrl" : "test",
    "createAt" : "2023-02-09T04:11:04.547627"
  } ],
  "pageInfo" : {
    "page" : 0,
    "size" : 2,
    "totalElements" : 2,
    "totalPages" : 1
  }
}


//특정 메시지룸의 전체 메시지를 조회했을 때 응답 데이터
 {
  "data" : {
    "messageRoomId" : 1,
    "createAt" : "2023-02-09T04:11:04.674539",
    "tutorId" : 1,
    "tutorName" : "너에게",
    "tuteeId" : 1,
    "tuteeName" : "나에게",
    "tutoringId" : 1,
    "messages" : [ {
      "messageId" : 1,
      "senderId" : 1,
      "senderName" : "홍길동",
      "receiverId" : 1,
      "receiverName" : "김코딩",
      "messageContent" : "아버지를 아버지라 부르지 못하고",
      "createAt" : "2023-02-09T04:11:04.674501"
    }, {
      "messageId" : 1,
      "senderId" : 1,
      "senderName" : "홍길동",
      "receiverId" : 1,
      "receiverName" : "김코딩",
      "messageContent" : "아버지를 아버지라 부르지 못하고",
      "createAt" : "2023-02-09T04:11:04.67452"
    }, {
      "messageId" : 1,
      "senderId" : 1,
      "senderName" : "홍길동",
      "receiverId" : 1,
      "receiverName" : "김코딩",
      "messageContent" : "아버지를 아버지라 부르지 못하고",
      "createAt" : "2023-02-09T04:11:04.674525"
    } ]
  }
}
웹소켓을 사용하지 않고 메시지 기능을 구현하는 데 성공했지만, 웹소켓을 이용해서도 구현해보고 싶다는 데 의견을 모아 메인 프로젝트 이후 백로그로 미뤘던 실시간 채팅, 실시간 알림 기능 등을 구현해보려고 한다.
WebSocket?
웹소켓은 하나의 *TCP 접속에 전이중 통신 채널을 제공하는 컴퓨터 통신 프로토콜이다.
여태까지는 개발하면서 주로 HTTP 프로토콜을 사용했다. 지금 사용할 웹소켓도 하나의 프로토콜인데, HTTP와 웹소켓 둘다 OSI 7계층에 위치해 있고 4계층의 TCP에 의존한다. 또한 웹소켓은 HTTP 프로토콜과 호환이 된다.
HTTP 통신에서는 클라이언트가 요청을 보낼 때 서버가 응답을 하지만, 웹 소켓에서는 한번의 요청으로 *handShake 과정을 통해 연결을 유지해서 양방향 통신과 데이터 이동이 가능하게된다.
handShake라는 건 정상적인 통신을 하기 전에, 일련의 과정을 거쳐 연결을 성립시키는 것을 말하는데,
예를 들어서 웹소켓을 사용하기 위해서는 HTTP 프로토콜로 요청을 보내야 한다.
이때 HTTP 요청은 Get요청이며 웹소켓 프로토콜로 업그레이드 해달라는 내용이 헤더에 담긴다.
정상적으로 웹소켓으로 바뀌게 되면'101(Switching Protocols)'코드가 응답으로 날아오게 된다.
이런 일련의 과정들을 핸드 쉐이크라고 한다.
*TCP (Transmission Control Protocol) : OSI 7계층 중 전송 계층에서 사용되고 있는 프로토콜로, 장비들 간의 통신 과정에서 정보를 안정적으로, 순서대로, 에러없이 교환할 수 있도록 하는 것에 목적을 둔 프로토콜
웹소켓으로 실시간 채팅을 구현하는 방법을 (특히 리액트를 이용해서!) 찾아보면서 sockjs와 stompjs를 사용해야 한다는 결론에 다다랐다. (node를 이용할땐 socket.io를 주로 사용하고, spring을 사용할땐 stomp, sockjs를 주로 사용한다고 한다.)
Sockjs
websocket과 비슷한 기능을 제공하는 브라우저 javascript 라이브러리라고 한다.
Stomp
stomp는 웹소켓 위에서 동작하는 프로토콜로써, 클라이언트와 서버가 전송할 메시지 유형, 형식, 내용들을 정의하는 매커니즘이라고 한다.
테스트부터 해보자
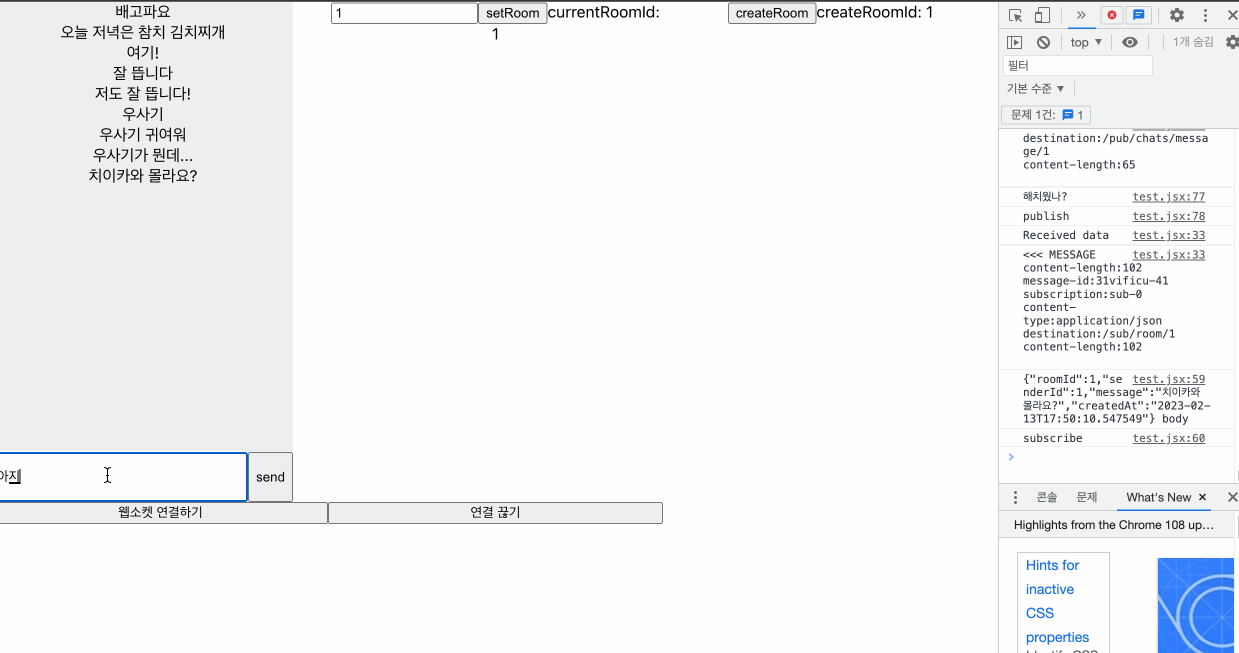
팀원들과 이야기 해본 결과 프로젝트가 이미 많이 진행이 된 상황이므로 섣부르게 웹소켓을 가져다 쓰는 것보다는 먼저 테스트 프로젝트를 하나 만들어 보는 게 좋겠다고 이야기가 되었다.
위 gif 이미지와 같은 모양의 간단한 채팅방 모양을 만들었다.
라이브러리 설치
npm install @stomp/stompjs sockjs-client프록시 설정
메인 프로젝트에서 사용하는 서버를 웹소켓에 필요한 것들을 추가해서 그대로 이용하기로 했는데, 새로운 테스트 프로젝트의 경우 CORS 설정을 건드릴 수 없어서 proxy를 설정해서 사용하기로 했다.
stompjs 속성 & 매서드
속성
- WebSocketFactory
: This function should return a WebSocket or a similar (e.g. SockJS) object.- connectHeaders
: Connection headers, important keys - login, passcode, host. Though STOMP 1.2 standard marks these keys to be present, check your broker documentation for details specific to your broker.- debug
: By default, debug messages are discarded. Be aware that the output can be quite verbose and may contain sensitive information (like passwords, tokens etc.).- onConnect
: Callback, invoked on every successful connection to the STOMP broker.- onStompError
: Callback, invoked on an ERROR frame received from the STOMP Broker. A compliant STOMP Broker will close the connection after this type of frame. Please check broker specific documentation for exact behavior.
매서드
- activate
:Initiate the connection with the broker. If the connection breaks, as per Client#reconnectDelay, it will keep trying to reconnect.- deactivate
: Disconnect if connected and stop auto reconnect loop.
To reactivate, you can call Client#activate.- publish
: Send a message to a named destination. Refer to your STOMP broker documentation for types and naming of destinations.
STOMP protocol specifies and suggests some headers and also allows broker-specific headers.
body must be String. You will need to covert the payload to string in case it is not string (e.g. JSON).- subscribe
: Subscribe to a STOMP Broker location. The callback will be invoked for each received message with the IMessage as argument.
(The library will generate a unique ID if there is none provided in the headers. To use your own ID, pass it using the headers argument.)
위 속성과 매서드들은 모두 StompJs에서 제공하는 Client 클래스의 속성과 매서드이다.
현재는 위 블로그들을 참고해 아래와 같이 connect, publish, subscribe, disconnect 함수를 작성한 상황이다.
//일부만 발췌

  const connect = () => {
    client.current = new StompJs.Client({
      webSocketFactory: () => new SockJS(URL),
      connectHeaders: {
        token: "token",
      },
      debug: function (str) {
        console.log(str);
      },
      reconnectDelay: 5000,
      heartbeatIncoming: 4000,
      heartbeatOutgoing: 4000,
      onConnect: () => {
        subscribe();
      },
      onStompError: (frame) => {
        console.error(frame);
      },
    });

    client.current.activate();
  };


  const disconnect = () => {
    client.current.deactivate();
  };


  const subscribe = () => {
    client.current.subscribe(`/sub/room/${currentRoomId}`, (res) => {
      setMessages((prev) => [...prev, JSON.parse(res.body)]);
      console.log(res.body);
      console.log("subscribe");
    });
  };


  const publish = (message) => {
    if (!client.current.connected) {
      return;
    }

    client.current.publish({
      destination: `/pub/chats/message/${currentRoomId}`,
      body: JSON.stringify({
        senderId: 1,
        receiverId: 2,
        content: text,
      }),
    });
    setText("");
  };
Issues
현재까지 해결한 + 해결해야 할 문제들
useRef
client는 ref로 관리한다. useRef를 보통 DOM 요소를 직접 핸들링 할 때 사용하곤 하지만 리렌더링이 되어도 변화되지 않게 하는 역할도 할 수 있다. client를 이용해 연결을 하고, 유지를 해야하는데 리렌더링이 될 때마다 새로운 연결이 되면 곤란하기 때문에 useRef를 사용한다.
const client = useRef({});Url 설정
프록시 설정을 한 경우, 보통은 url을 전부 쓰는 게 아니라, 필요한 엔드포인트만 가져다가 사용하곤 한다. 하지만 연결을 해줄 때에는 프록시를 설정했더라도 URL을 전부 적어주어야 한다.
반대로 subscribe를 할 때는 필요한 path만 작성해주면 됨.
const connect = () => {
    client.current = new StompJs.Client({
      //URL에는 웹소켓으로 프로토콜 변경 요청할 수 있는 서버 url이 담겨있음
      webSocketFactory: () => new SockJS(URL),
      connectHeaders: {
        token: "token",
      },
      debug: function (str) {
        console.log(str);
      },
      reconnectDelay: 5000,
      heartbeatIncoming: 4000,
      heartbeatOutgoing: 4000,
      onConnect: () => {
        subscribe();
      },
      onStompError: (frame) => {
        console.error(frame);
      },
    });

    client.current.activate();
  };


const subscribe = () => {
    client.current.subscribe(`/sub/room/${currentRoomId}`, (res) => {
      setMessages((prev) => [...prev, JSON.parse(res.body)]);
      console.log(res.body);
      console.log("subscribe");
    });
  };
🚫 Solving...
- 새로운 채팅 입력 시 받아온 데이터들이 사라지고 새로운 채팅 메시지만 보이는 현상