Redux란 ?
가장 사용률이 높은 상태관리 라이브러리이다. 컴포넌트들의 상태 관련 로직들을 다른 파일로 분리시켜서 효율적으로 관리할 수 있고, 컴포넌트끼리 상태를 공유할 때 여러 컴포넌트를 거치지 않고도 손쉽게 상태 값을 전달 할 수 있게 해준다.
개념은 이렇다. 사용법이 더 궁금하면 다른 좋은 글들을 참고!!
저는 Next.js에서 간단히 Redux를 사용해 볼 것입니다!!
Next.js에서 Redux 사용해보기
npm install redux react-redux기본적으로 redux, redux와 react를 연결하는데 많은 도움을 주는 react-redux라이브러리를 설치한다.
그림고 Next에서 react를 연결하기 위해서는 next-redux-wrapper가 필요하기 때문에 설치를 해준다.
npm install next-redux-wrapper그리고 redux를 사용할 때 유용한 redux devtools를 사용하기 위해 redux-devtools-extension을 설치해준다.
npm install -D redux-devtools-extension그러면 이제 굳이 redux를 쓸 필요는 없지만 간단히 Next redux를 연결한 것을 보여주기 위해 count 예제를 작성해본다.
/pages/_app.js
import React from "react";
import withRedux from 'next-redux-wrapper';
import { Provider } from 'react-redux';
import { createStore, compose, applyMiddleware } from 'redux';
import reducer from '../reducers';
import { composeWithDevTools } from 'redux-devtools-extension';

const Test = ({ Component, store }) => {
  return (
    <Provider store={store}>
      <Component/>
    </Provider>
  );
};

const configureStore = (initialState, options) => {
  const middlewares = []; // 미들웨어들을 넣으면 된다.
  const enhancer = process.env.NODE_ENV === 'production' ?
    compose(applyMiddleware(...middlewares)) :
        composeWithDevTools(
          applyMiddleware(...middlewares)
        );
  const store = createStore(reducer, initialState, enhancer);
  return store;

}

export default withRedux(configureStore)(Test);
_app.js는 이렇게 작성하면 된다. react-redux의 Provider로 Component를 묶어주면 모든 컴포넌트에서 redux store를 사용할 수 있게 된다. store는 아래의 withRedux를 통해 props로 주입된다.
configureStore에서 store에 관한 설정들을 해준다. enhancer로 미들웨어들에 대한 설정을 넣어줄 수 있는데 compose 또는 composeWithDevTools로 여러 미들웨어들을 합칠 수 있다. 비동기를 처리할 수 있는 thunk 나 saga 그리고 로깅미들웨어 등등을 넣을 수 있다. 위 코드는 배포 환경일 땐 그냥 미들웨어들을 사용하고 개발 환경일 땐 redux-devtools를 사용할 수 있게 한 것이다.
그리고 저렇게 export default withRedux(configureStore)(Test);를 해주게 되면 리덕스와 함께 정상적으로 작동하게 될 것이다. 이렇게 withRedux로 감싸주는 것 빼고는 다를게 별로 없을 것이다.
그럼 이제 reducer와 기본적인 count 예제를 보이고 마친다.
/pages/index.js
import React, { useCallback } from 'react'
import { useDispatch, useSelector } from 'react-redux';
import { countPlusAction, countMinusAction } from '../reducers/count';
const Home = () => {
  const dispatch = useDispatch(); // dispatch를 사용하기 쉽게 하는 hook
  const count = useSelector(state => state.count); // store의 state를 불러오는 hook   store의 state 중에서 count의 state를 불러온다.

  const onClickPlus = useCallback(() => { // useCallback은 최적화를 위한 hook이다 이 앱에선 굳이 사용 안 해도 되는데 습관이 들면 좋기에 사용.
    dispatch(countPlusAction());
  }, []);

  const onClickMinus = useCallback(() => {
    dispatch(countMinusAction());
  }, []);

  return (
    <div>
      카운트 :  {count}
      <button onClick={onClickPlus}>+</button>
      <button onClick={onClickMinus}>-</button>
    </div>
  )
}

export default Home
/reducers/index.js
import { combineReducers } from 'redux'; // 여러 리듀서들을 하나로 합쳐준다.
import count from './count';

const rootReducer = combineReducers({
    count, // 여기에 다른 리듀서들을 더 적으면 된다!
});

export default rootReducer; // _app.js에서 reducer로 사용된다!
/reducers/count.js
export const initialState = 0; // 처음 state값으로 count 0을 주었다. state값은 객체, 배열로도 사용할 수 있다.

export const COUNT_PLUS = 'COUNT_PLUS'; // count 1을 증가시킬 액션 타입이다.
export const COUNT_MINUS = 'COUNT_MINUS'; // count 1을 감소시킬 액션 타입이다.

export const countPlusAction = () => ({ // 액션 생성 함수
    type : COUNT_PLUS
});

export const countMinusAction = () => ({
    type : COUNT_MINUS
})

const reducer = (state=initialState, action) => { // 리듀서
    switch (action.type) {  // 액션의 type이 COUNT_PLUS일땐 state에 + 1 COUNT_MINUS 일 땐 state에 -1
        case COUNT_PLUS:
            return state + 1;
        case COUNT_MINUS:
            return state - 1;
        default:
            return state;
    }
};

export default reducer;
이렇게 작성을 하면 끝난다!

그러면 이렇게 간단한 화면이 나타나게된다.

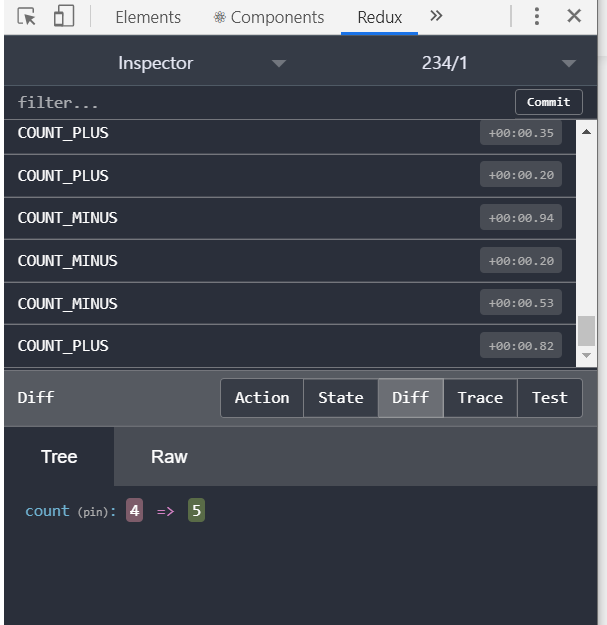
그리고 아까 설정한 redux-devtools로 이렇게 어떤 액션들이 dispatch 되었고 state 값이 어떻게 바뀌었는지 알 수가 있어 엄청 편리하게 작업할 수 있다.
다음에는 saga까지 연결해 보겠다!!


ssr 적용은 안하신 거죠?
next 9.3 버전 되고 서버쪽에 reducer 붙이는 곳이 없어서..