이번 주의 목표
TYPEORM을 이용한 1:1, 1:N, N:M관계의 연결을 시도해보자.
TYPEORM-One-to-One(1대1 관계 연결)
이번엔 1대1 관계를 연결하는 법에 대해 알아보자.
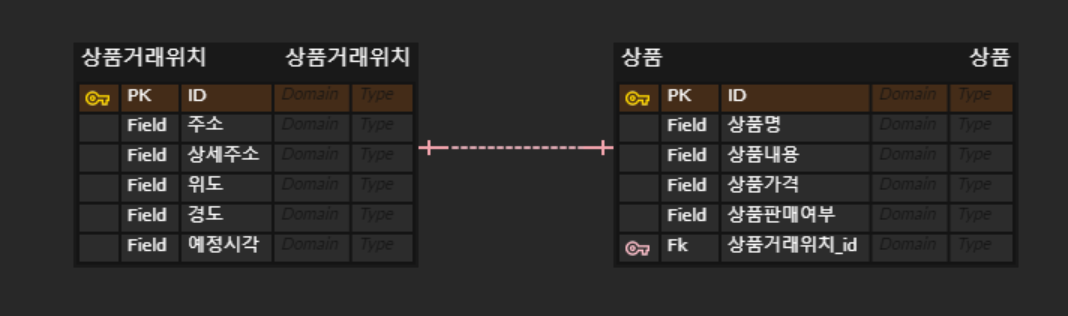
중고마켓을 설계한다고 가정했을 때 우리는 상품을 어디서 거래할지 위치를 정해주어야한다. 이때 상품 하나 당 거래 위치는 한 곳이라고 가정을 했다. 상품에 대한 정보를 새로 생성할 때 상품 거래 위치를 한 번에 입력할 수 있도록 설계해보자.
그러기 위해선 프론트엔드부터 시작해야 이해하기 쉽다.
처음 상품을 입력하는 브라우저에서 상품과 상품거래위치를 한 번에 입력해서 백엔드 서버로 보낸다고 생각을 해보자.
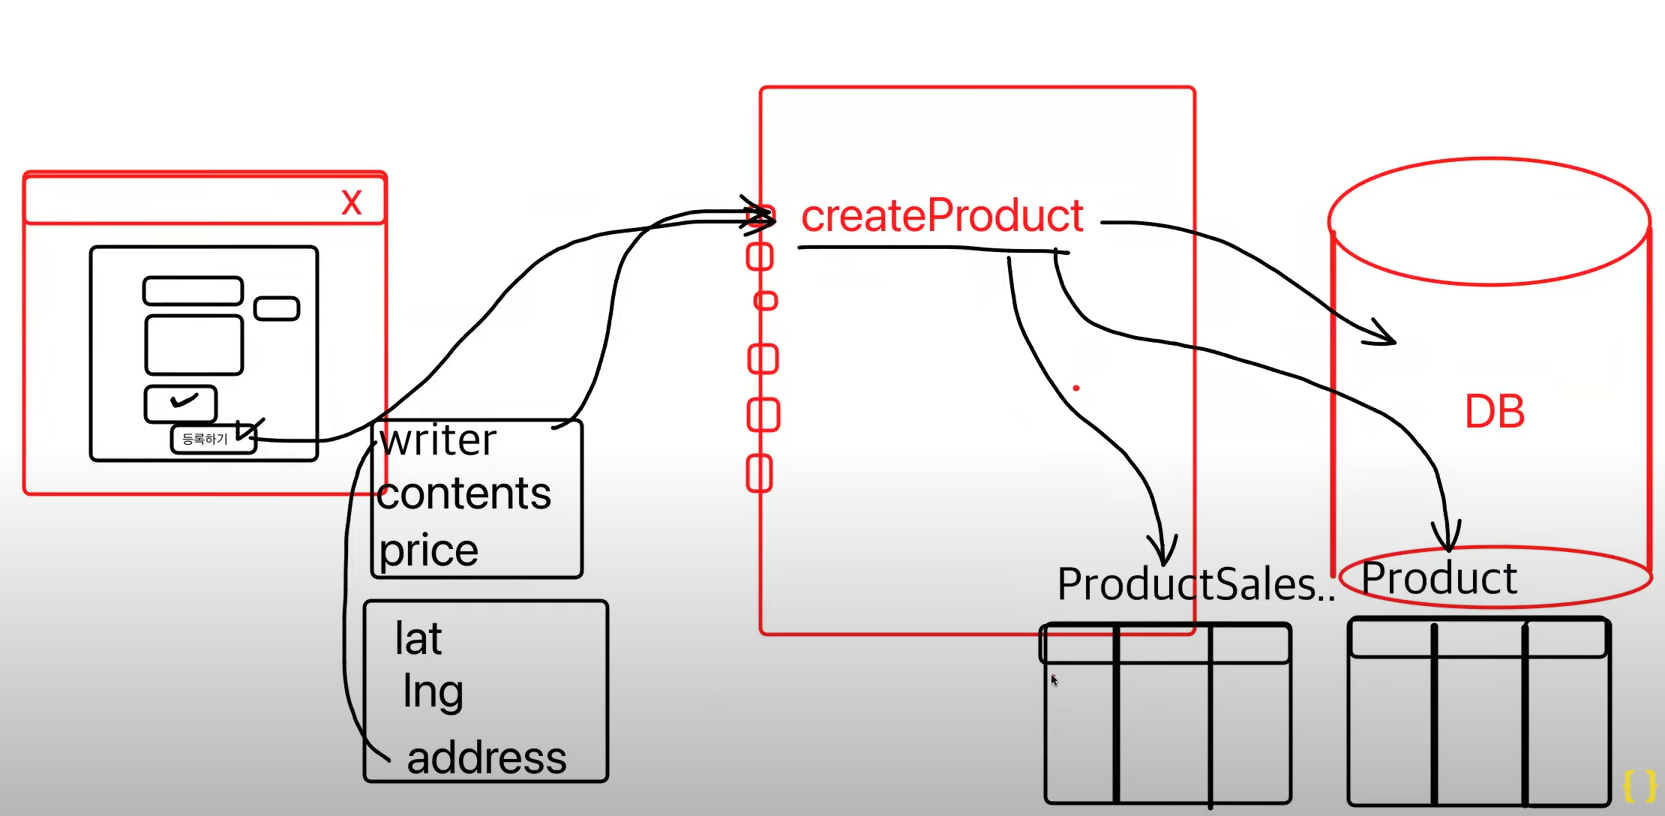
위 그림처럼 등록을 했을 때 createProduct_API에서 productSaleslocation과 product에 나눠서 정보를 담아야한다. 그 후 join컬럼을 통해 두 관계를 1대1로 연결해주면 우선 1대1 관계를 형성하는 방법은 끝이다. 실제 코드에 적용해보자.
// product.service.ts
import {
  HttpException,
  HttpStatus,
  Injectable,
  UnprocessableEntityException,
} from '@nestjs/common';
import { InjectRepository } from '@nestjs/typeorm';
import { Repository } from 'typeorm';
import { Product } from './entities/product.entity';

@Injectable()
export class ProductService {
  constructor(
    @InjectRepository(Product)
    private readonly productRepository: Repository<Product>,
  ) {}

  async create({ createProductInput }) {
    // 상품을 데이터베이스에 저장
    const result = await this.productRepository.save({
      ...createProductInput,

      // 하나하나 직접 나열하기
      // name: createProductInput.name,
      // description: createProductInput.description,
      // price: createProductInput.price,
    });
    console.log(result);

    return result;
  }
기존엔 create를 할 때 name, description, price 세 가지만 담아서 저장했었다. 이번엔 상품거래위치도 포함해서 보내보자.
그러기 위해선 productSaleslocation.input.ts 파일을 만들어서 input형식을 정해주어야한다.
//productSaleslocation.input.ts
import { InputType, OmitType } from "@nestjs/graphql";
import { ProductSaleslocation } from "../entities/productSaleslocation.entity";

@InputType()
export class ProductSaleslocationInput extends OmitType(
  ProductSaleslocation, ['id'], InputType){ }
// ProductSaleslocation의 엔티티를 상속받아
// OmitType을 통해 id를 제외한 값들을 inputtype으로 받을 수 있도록 설정하였다.
그리고 createProduct.input파일을 수정하여 상품위치도 입력받을 수 있게 되었다.
// createProduct.input.ts
import { InputType, Field, Int } from '@nestjs/graphql';
import { ProductSaleslocationInput } from
'src/apis/productsSaleslocation/dto/productSaleslocation.input';

@InputType()
export class CreateProductInput {
  @Field(() => String)
  name: string

  @Field(() => String)
  description: string

  @Field(() => Int)
  price: number

  @Field(()=> ProductSaleslocationInput)
  productSaleslocation: ProductSaleslocationInput
}
이제 상품의 서비스를 수정해보자. 상품 뿐만 아니라 상품의 위치를 저장하기 위해 상품 위치를 주입받아야 하고, 상품을 db에 저장할 때 상품위치 아이디가 필요하므로 상품 위치를 먼저 db에 저장하고 상품을 저장하는 순서로 진행한다.
// product.service.ts
import {
  HttpException,
  HttpStatus,
  Injectable,
  UnprocessableEntityException,
} from '@nestjs/common';
import { InjectRepository } from '@nestjs/typeorm';
import { Repository } from 'typeorm';
import { ProductSaleslocation } from
'../productsSaleslocation/entities/productSaleslocation.entity';
import { Product } from './entities/product.entity';

@Injectable()
export class ProductService {
  constructor(
    @InjectRepository(Product)
    private readonly productRepository: Repository<Product>,
    @InjectRepository(ProductSaleslocation)//ProductSaleslocation 사용을 위해 주입
    private readonly productSaleslocationRepository: Repository<ProductSaleslocation>
  ) {}

  async create({ createProductInput }) {
    //rest 연산자를 사용해 input받은 데이터 분리
    const { productSaleslocation, ...product} = createProductInput

    //상품위치 id를 상품에 담아 저장해야하므로 먼저 상품위치 저장
    const result = await this.productSaleslocationRepository.save({
      ...productSaleslocation
    })

    // 저장한 상품거래위치를 상품에 담아 저장.
    return await this.productRepository.save({
      ...product,
      productSaleslocation: result,
    })
  }
마지막으로 product.module에 주입을 해주면 완성된다.
import { Module } from '@nestjs/common';
import { TypeOrmModule } from '@nestjs/typeorm';
import { ProductSaleslocation } from '../productsSaleslocation/entities/productSaleslocation.entity';
import { Product } from './entities/product.entity';
import { ProductResolver } from './product.resolver';
import { ProductService } from './product.service';
@Module({
imports: [TypeOrmModule.forFeature([Product, ProductSaleslocation])],
providers: [
ProductResolver, //
ProductService,
],
})
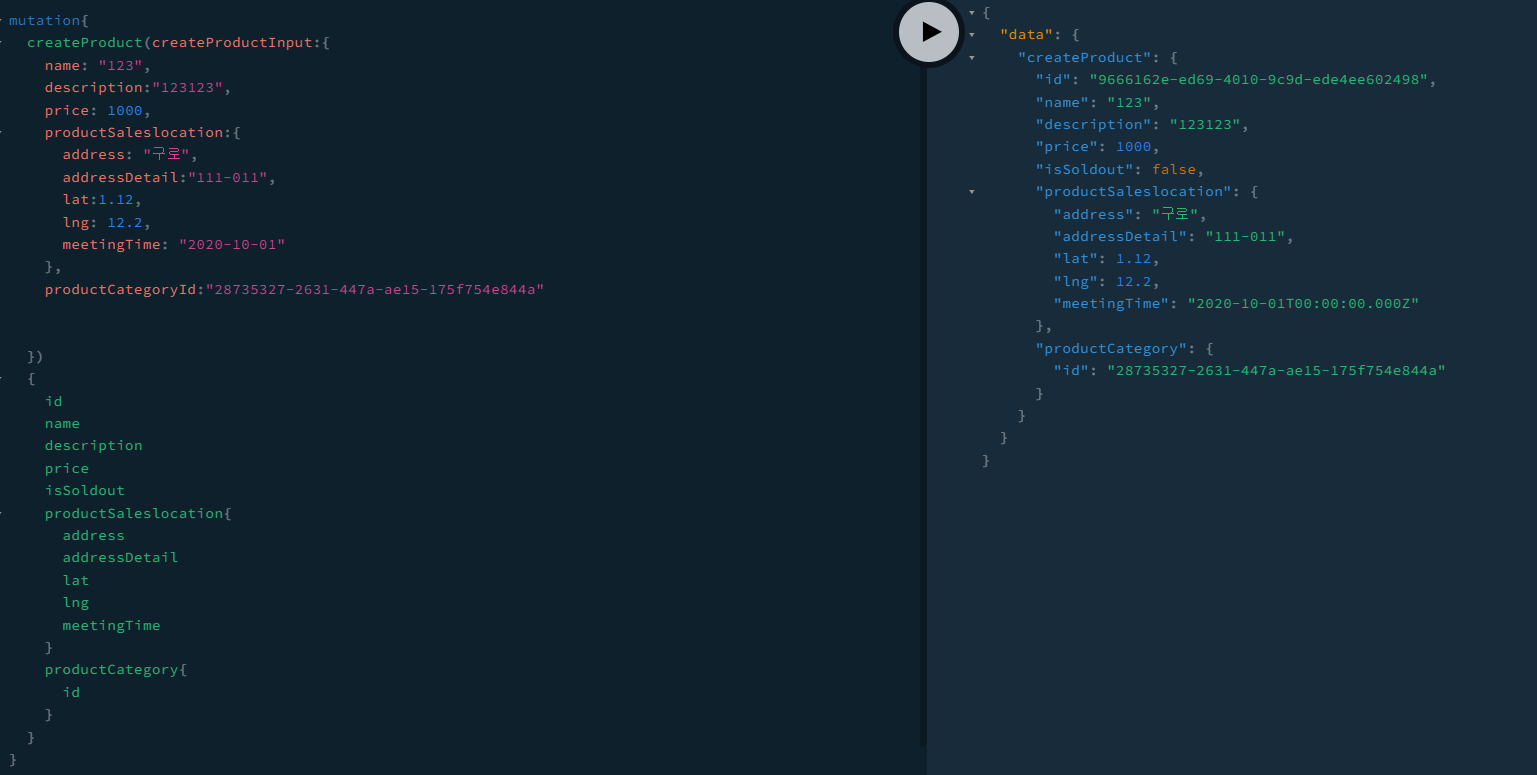
export class ProductModule {}그럼 playground에서 확인해보자.
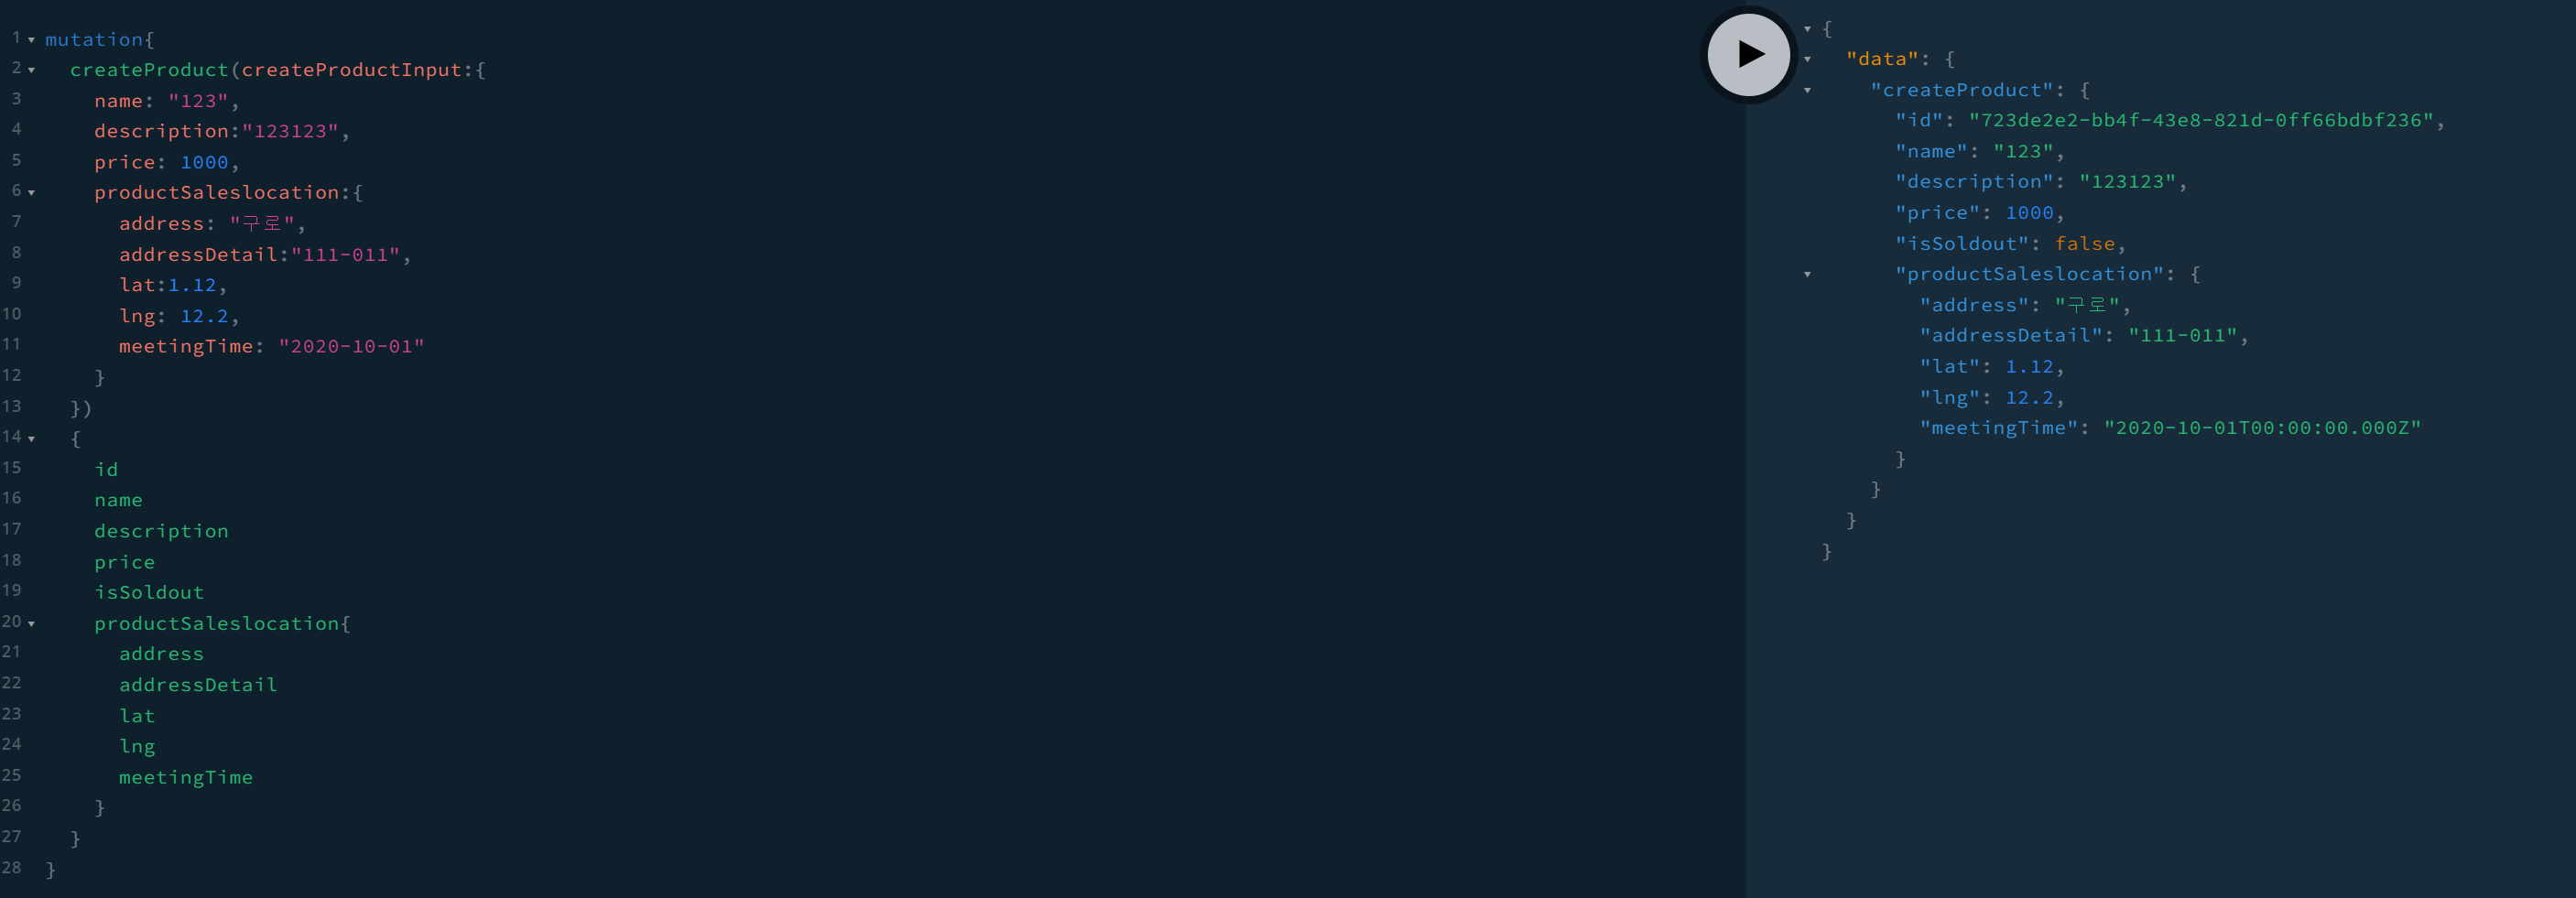
실제로 잘 들어오는 것을 볼 수 있고, db에서도 확인 가능하다.

그럼 query문을 사용해서 조회할 때 어떻게 코드를 작성해야하는지 알아볼 것이다.(왼:service, 오:resolver)

query(데이터 조회)
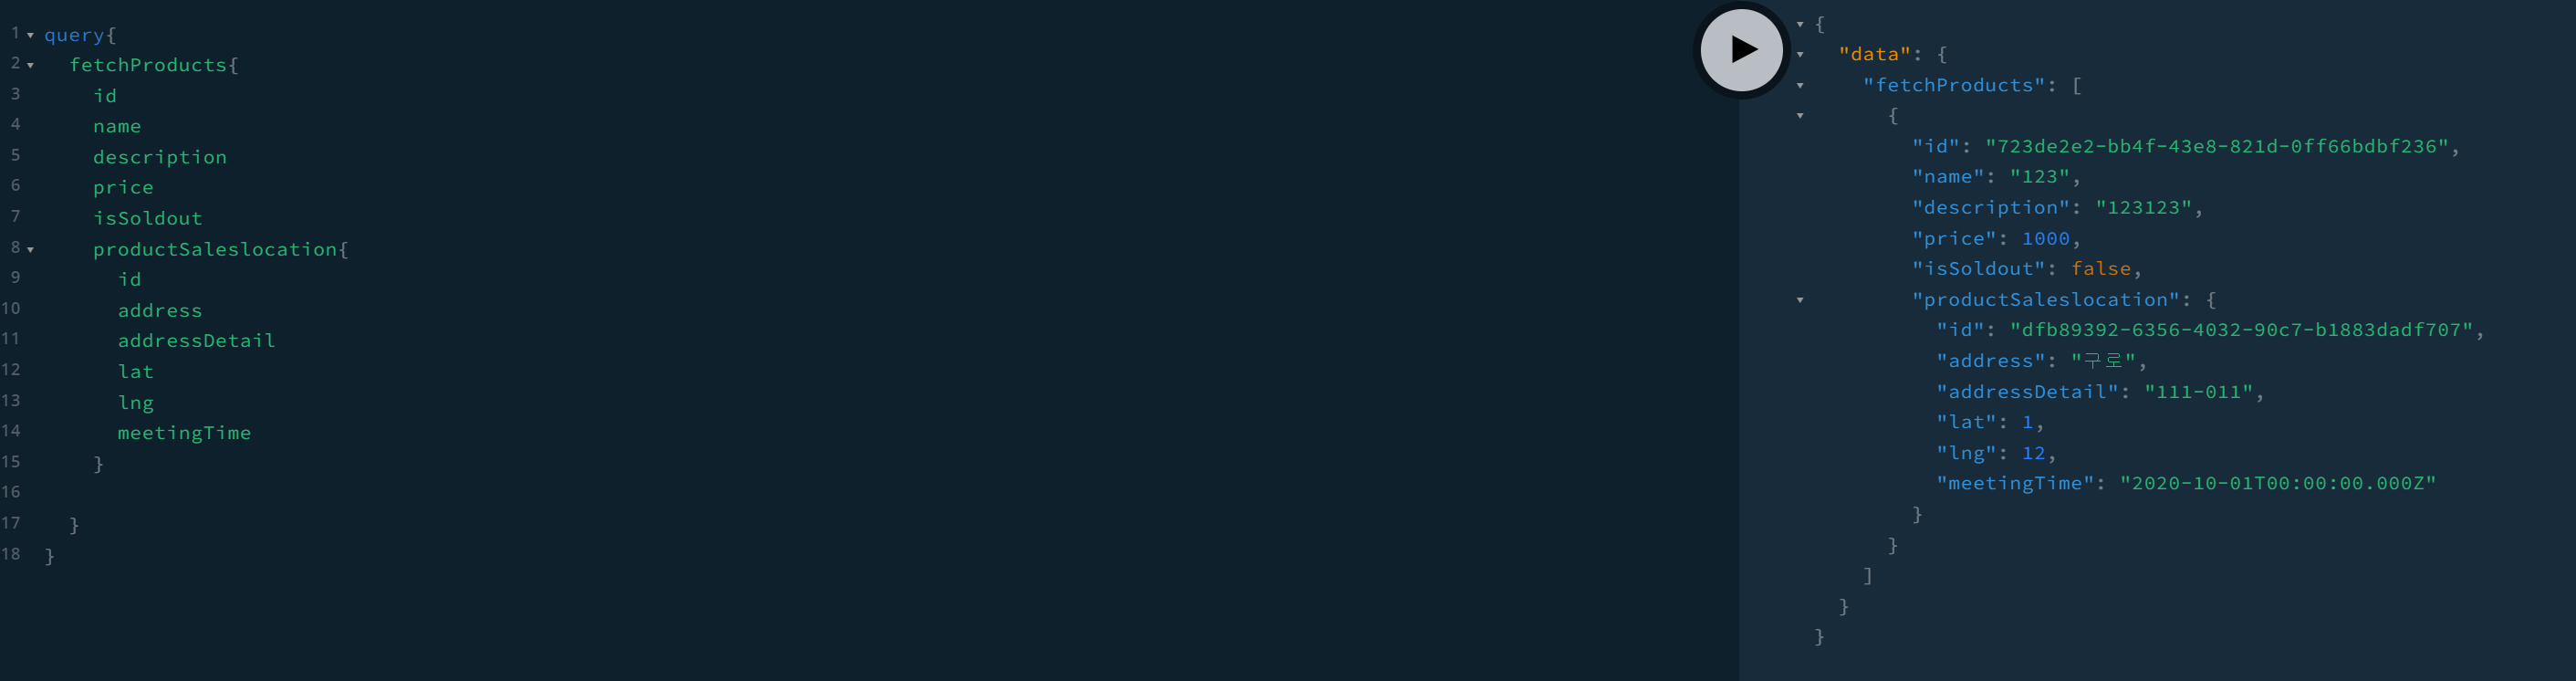
기존에는 product만 받아오면 됐었는데 location도 받아와야하므로 relations를 이용해서 관계를 형성하여 같이 가져오도록 해보자.
//product.service.ts
  async findAll() {
    return await this.productRepository.find({
      relations: ['productSaleslocation']});
  }

  async findOne({ productId }) {
    return await this.productRepository.findOne({ where: { id: productId },
      relations: ['productSaleslocation'] });
  }
그럼 잘 나오는 것을 확인할 수 있다!
TYPEORM-One-to-Many(1 대 다 관계 연결)
그럼 이번엔 상품을 등록할 때 카테고리도 같이 등록해보자. 우리는 그저 만들어진 카테고리의 id를 같이 등록하기만 하면 된다.
아까와 같이 createProduct.input파일을 수정하자.
import { InputType, Field, Int } from '@nestjs/graphql';
import { ProductSaleslocationInput } from 'src/apis/productsSaleslocation/dto/productSaleslocation.input';

@InputType()
export class CreateProductInput {
  @Field(() => String)
  name: string

  @Field(() => String)
  description: string

  @Field(() => Int)
  price: number

  @Field(()=> ProductSaleslocationInput)
  productSaleslocation: ProductSaleslocationInput

  @Field(()=> String)
  productCategoryId: string
}
이제 service에서 db에 등록하는 부분을 수정해보자.
  async create({ createProductInput }) {
    // 상품을 데이터베이스에 저장
    const { productSaleslocation, productCategoryId, ...product} = createProductInput
    const result = await this.productSaleslocationRepository.save({
      ...productSaleslocation
    })

    return await this.productRepository.save({
      ...product,
      productSaleslocation: result,
      productCategory: { id : productCategoryId},
    })
  }
카테고리 id도 같이 저장할 수 있도록 하였고, 조회를 위해 relations만 설정해주면 끝이난다.
  async findAll() {
    return await this.productRepository.find({
      relations: ['productSaleslocation', 'productCategory']});
  }

  async findOne({ productId }) {
    return await this.productRepository.findOne({ where: { id: productId },
      relations: ['productSaleslocation', 'productCategory'] });
  }
카테고리를 만들고 상품에 카테고리 id를 넣어 확인해보자.
카테고리 만들기

상품 만들기
TYPEORM-Many-to-Many(다대다 관계 연결)
위에서는 카테고리나 상품거래위치 등의 관계를 구현해보았다. 이번엔 상품과 상품태그를 다대다 관계로 구현해보자.
상품의 태그는 #전자제품, #구로, #키보드와 같은 형식으로 만들것이다.
그럼 먼저 createProductInput을 수정해보자.
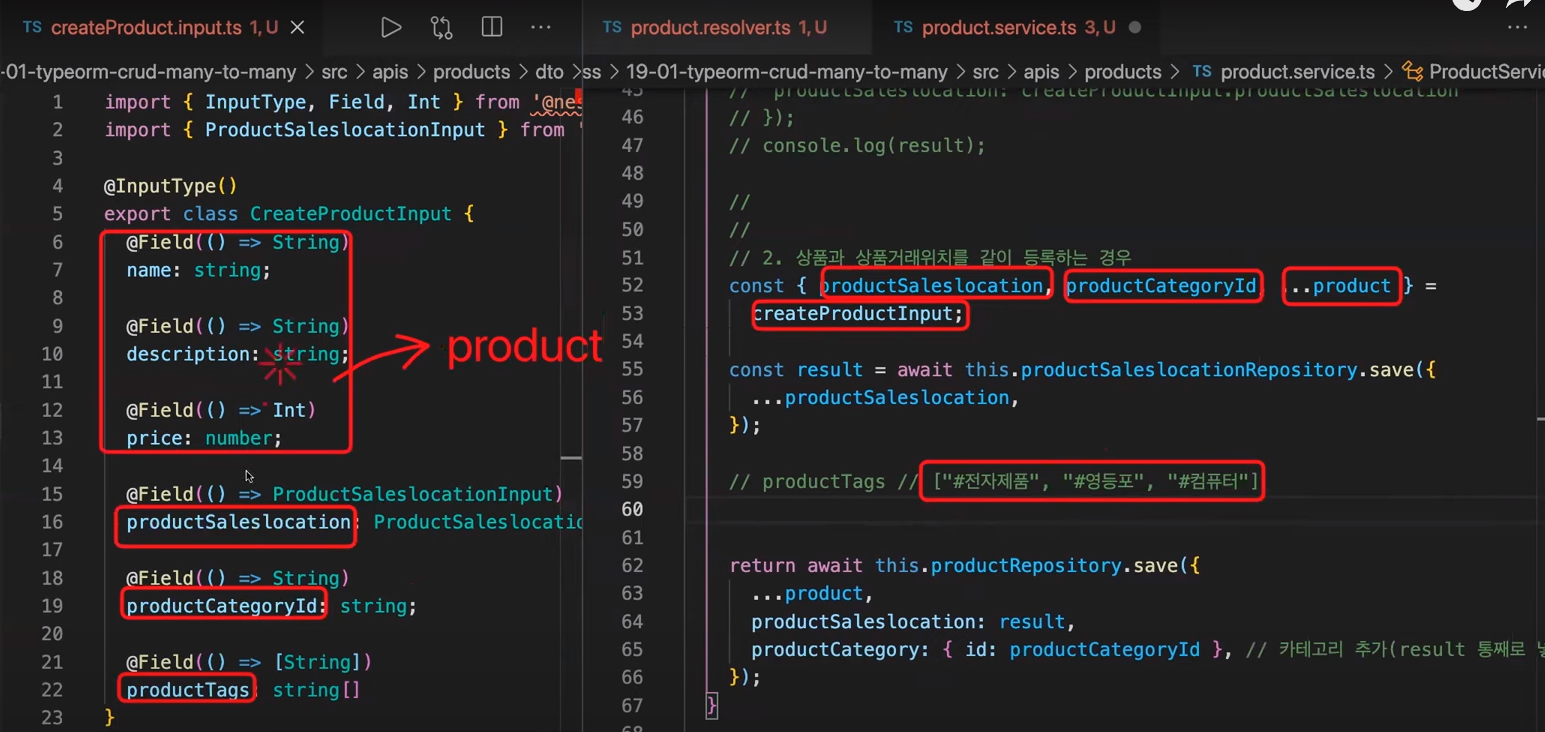
위 사진과 같이 productTags를 추가해주자. 그러면 service도 수정해야하는데 service에서는 기존에 상품과 상품 거래위치, 카테고리 id를 조금씩 다른 방식으로 저장했는데 태그는 상품거래위치와 같이 등록할 때 추가하는 것이므로 둘이 비슷한 방식으로 진행된다.
상품등록(태그를 포함한)
우선 ProductTag를 사용해야하므로 주입을 해주자
//product.service.ts
export class ProductService {
  constructor(
    @InjectRepository(Product)
    private readonly productRepository: Repository<Product>,

    @InjectRepository(ProductSaleslocation)
    private readonly productSaleslocationRepository: Repository<ProductSaleslocation>,

    @InjectRepository(ProductTag)
    private readonly productTagRepository: Repository<ProductTag>
  ) {}
이렇게 사용하기로 하였으니 모듈에도 명시를 해주어야한다.
//product.module.ts
@Module({
  imports: [TypeOrmModule.forFeature([
    Product,
    ProductSaleslocation,
    ProductTag,
  ])],
  providers: [
    ProductResolver, //
    ProductService,
  ],
})
export class ProductModule {}
그럼 본격적으로 service를 수정해보자
//product.service.ts
  async create({ createProductInput }) {
    // 상품을 데이터베이스에 저장
    const { productSaleslocation, productCategoryId, productTags, ...product} = createProductInput
    const result = await this.productSaleslocationRepository.save({
      ...productSaleslocation
    })

    //상품 태그 저장
    // productTags// ["#전자제품"]

    const result2 = []
    for(let i=0; i<productTags.lenght;i++){
      const tagname = productTags[i].replace("#", "")//#을 제거

      // 이미 등록된 태그인지 확인해보기
      const prevTag = await this.productTagRepository.findOne({name: tagname})

      //태그 존재
      if(prevTag){
        result2.push(prevTag)
      }else{
      //태그 존재 x
      const newTag = await this.productTagRepository.save({name:tagname})
      result2.push(newTag)
      }

    return await this.productRepository.save({
      ...product,
      productSaleslocation: result,
      productCategory: { id : productCategoryId},
      productTags: result2,
    })
  }
상품 태그를 저장하기 위한 for문 처리를 해주었다. 상품 등록은 끝났다.
이처럼 for문에서 await을 쓰는 상황에서는 forEach, map을 사용하는 것이 더 빠르다. 그러나 모든 요청을 처리하고 한 번에 저장해야하므로 기다려야한다. 이를 위해선 promiseAll이란 개념을 다루어야한다. 이번엔 for문을 사용해보기로 하자.
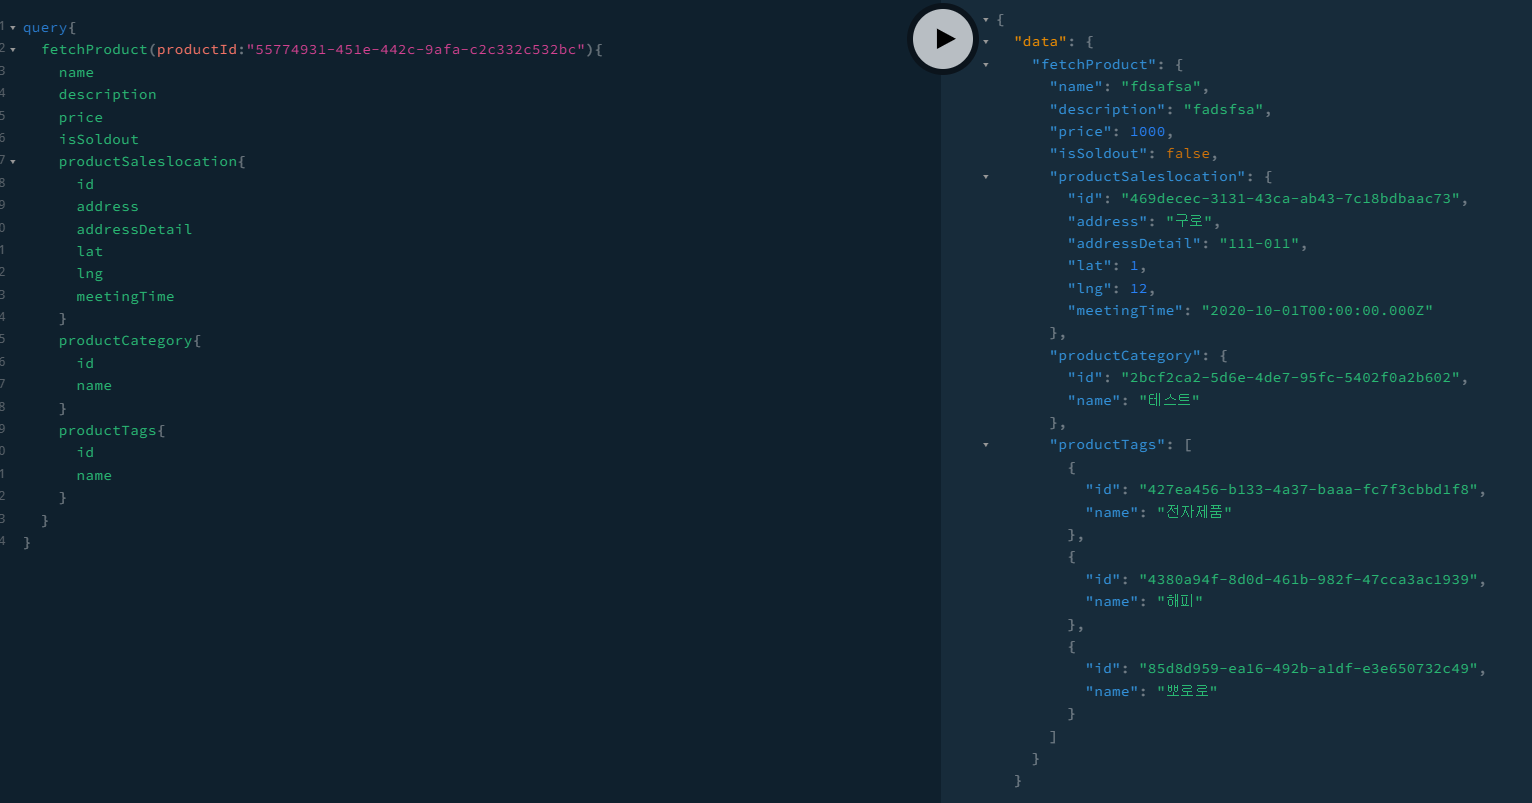
상품 조회(태그를 포함한)
상품 조회는 정말 간단하다. 기존에 작성한 find와 findall을 수정해주면 된다.
//product.service.ts
  async findAll() {
    return await this.productRepository.find({
      relations: ['productSaleslocation', 'productCategory', 'productTags']});
  }

  async findOne({ productId }) {
    return await this.productRepository.findOne({ where: { id: productId },
      relations: ['productSaleslocation', 'productCategory', 'productTags'] });
  }
이제 결과를 확인해보자.
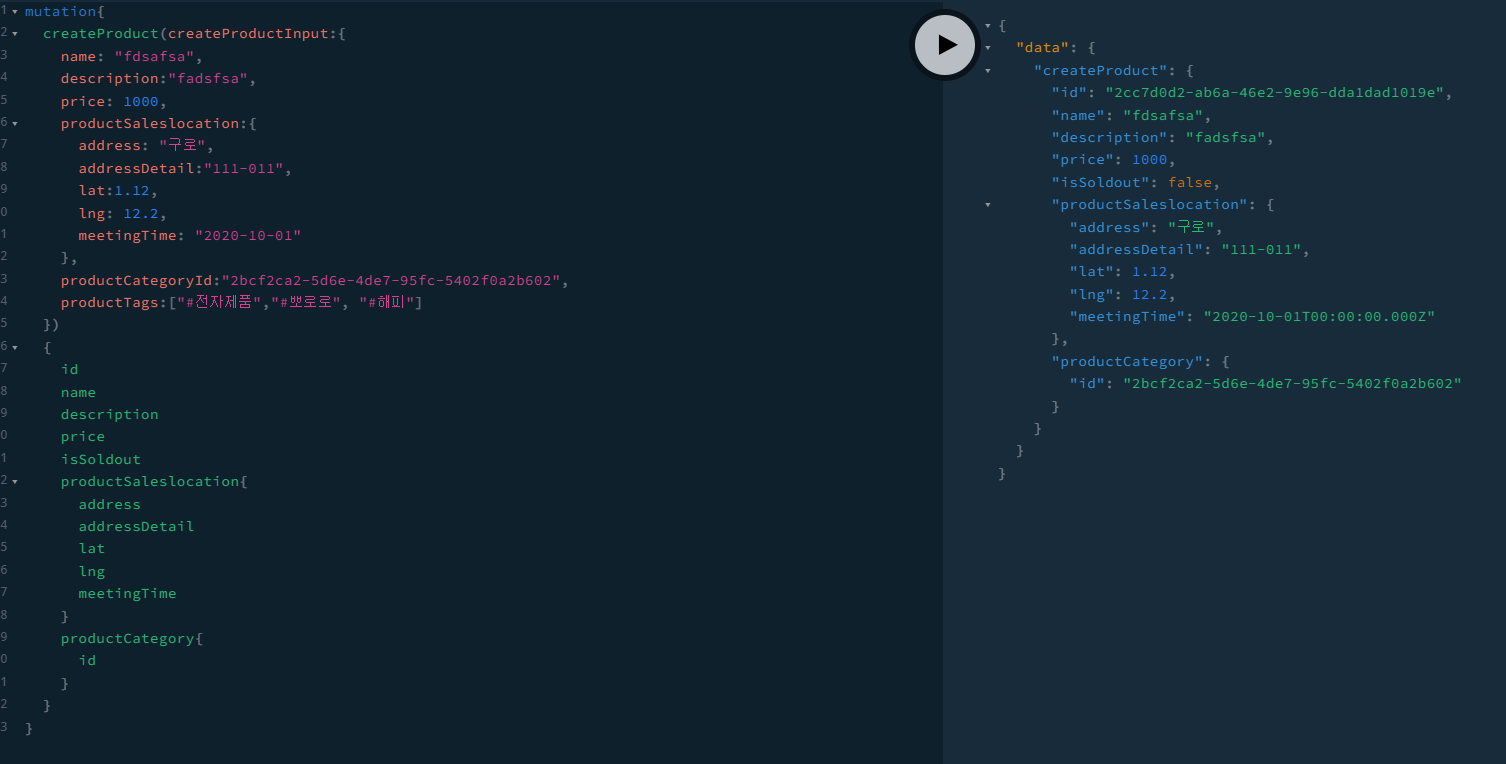
잘 만들어지고 잘 확인된다.
로그인을 위한 회원가입(유저 만들기)
우선 user의 엔티티를 만들어준다.
import { Field, ObjectType } from '@nestjs/graphql'
import { Column, PrimaryGeneratedColumn, Entity } from 'typeorm'


@Entity()
@ObjectType()
export class User {
  @PrimaryGeneratedColumn("uuid")
  @Field(()=>String)
  id: string

  @Column()
  // @Field(()=>String)비밀번호는 보내면 안 됌
  password: string

  @Column()
  @Field(()=>String)
  email: String

  @Column()
  @Field(()=>String)
  phone: String

  @Column()
  @Field(()=>String)
  address: String

  @DeleteDateColumn()
  deletedAt: Date

  @Column()
  @Field(()=>String)
  presonal: String

  @Column()
  @Field(()=>String)
  nickname: String

  @Column()
  @Field(()=>String)
  profilePhoto: String

  @Column()
  @Field(()=>Boolean)
  isPhoto: boolean

  @Column()
  @Field(()=>String)
  firstMessage: String
}
비밀번호는 프론트엔드로 보내면 안 되므로 처리를 해준다.
그리고 module, resolver, service를 만들어준다.
// module
import { Module } from '@nestjs/common';
import { TypeOrmModule } from '@nestjs/typeorm';
import { User } from './entities/user.entity';
import { UserResolver } from './user.resolver';
import { UserService } from './user.service';

@Module({
  imports: [TypeOrmModule.forFeature([User])],
  providers: [
    UserResolver, //
    UserService,
  ],
})
export class UserModule {}
//resolver
import { Args, Mutation, Query, Resolver } from '@nestjs/graphql';
import { CreateUserInput } from './dto/createUser.input';
import { User } from './entities/user.entity';
import { UserService } from './user.service';
@Resolver()
export class UserResolver {
constructor(private readonly userService: UserService) {}
@Mutation(() => User)
async createUser(
@Args('createUserInput') createUserInput: CreateUserInput, //
) {
return this.userService.create({ createUserInput });
}
@Query(()=> [User])
fetchusers() {
return this.userService.findAll()
}
@Query(()=>User)
fetchuser(
@Args('userId') userId: string,
){
return this.userService.findOne({userId})
}
@Mutation(()=>User)
createuser(
@Args('createUserInput') createUserInput: CreateUserInput,
){
return this.userService.create({ createUserInput })//서비스에서 리턴한 값이 여기로 옴.=> 이걸 프론트엔드로 보냄.
}
@Mutation(()=>User)
async updateuser(
@Args('userId') userId: string,
@Args('updateuserInput') updateuserInput: UpdateuserInput,
){
//유저가 존재하는지 확인해보기
await this.userService.checkUser({userId})
//수정하기
return await this.userService.update({userId, updateuserInput})
}
@Mutation(()=> Boolean)
deleteuser(
@Args('userId') userId: string, //
) {
return this.userService.delete({ userId });
}
}import { CreateUserInput } from './dto/createUser.input';
import { ConflictException, Injectable, UnauthorizedException } from '@nestjs/common';
import { InjectRepository } from '@nestjs/typeorm';
import { Repository } from 'typeorm';
import { User } from './entities/user.entity';
@Injectable()
export class UserService {
constructor(
@InjectRepository(User) private readonly userRepository: Repository<User>,
) {}
async findAll(){
return await this.userRepository.find({withDeleted:true})
}
async findOne({userId}){
return await this.userRepository.findOne({where:{id: userId}, withDeleted:true})
}
async create({ createUserInput }) {
const user = await this.userRepository.findOne({...createUserInput.email})
if(user) throw new ConflictException('이미 등록된 이메일입니다.')
return await this.userRepository.save({ ...createUserInput });
}
async update({userId, updateUserInput}){
const user= await this.userRepository.findOne(
{where: {id: userId}})
const newUser ={
...user,
...updateUserInput
}
return await this.userRepository.save(newUser)
}
async checkUser({userId}){
const user = await this.userRepository.findOne(
{where:{id:userId}})
if(!user)
throw new UnauthorizedException('존재하지 않는 유저입니다.')
}
async delete({userId}){
const result = await this.userRepository.softDelete({ id: userId }); // 다양한 조건으로 삭제 가능!!
return result.affected ? true : false;
}
async restoreDeletedProduct({userId}){
const restoreRes = await this.userRepository.restore(userId)
return restoreRes
}
}본 소스코드는 user의 생성, 업데이트, 목록확인, 삭제 등이 가능하다. 중간중간 예외처리가 아직 미숙하지만 점차 수정해나갈 예정이다.