1. Counter를 만들면서 Redux를 적용해보자
※ 컴포넌트 구조
Redux를 처음 배울 때 redux/toolkit을 같이 학습했고, useSelector, useDispatch Hook을 이용해서 직접 Store에 접근했고 dispatch 함수도 바로 사용했었다.
그런데 React Hook이 등장하기 전에는 Redux를 사용할 때 컴포넌트를 View를 담당하는 Presentational 컴포넌트와 Work를 담당하는 Container 컴포넌트로 분리하여 작성하는 패턴이 소개되었고 자주 사용되었다고 한다.
다만, 위 구조를 소개한 Dan Abramov는 해당 article(Presentational and Container Components)을 Hooks의 도입으로 임의의 도입 없이 동일한 작업을 수행할 수 있으므로 더이상 분할하지 않는 것이 좋다고 수정했다.
그러나 이 패턴은 Hook의 도입 이전에 사용되었고 사용한 이유가 있었을 것이다. 이번에 복습해볼 때는 Presentational 컴포넌트와 Container 컴포넌트로 나누어 작성해보자.
- Presentational 컴포넌트:
- 컴포넌트의
View(Look)를 담당한다. - state를 가지고 있지 않고, props로 데이터를 받는다.
- Container 컴포넌트로부터 State를 props로 받아 사용한다.
- 컴포넌트의
- Container 컴포넌트:
- 컴포넌트의
State(Work)를 담당한다. - DOM과 관련된 마크업이나 Style과 관련된 코드는 사용하지 않는다.
- Presentational 컴포넌트에 State를 Provide해준다.
- 컴포넌트의
1-1) Counter 컴포넌트(Presentational Component)
src/components/Counter.js
const Counter = ({ number, onIncrease, onDecrease }) => {
  return (
    <div>
      <p>
        clicked: <span>{number}</span> times
      </p>
      <button onClick={onIncrease}>+1</button>
      <button onClick={onDecrease}>-1</button>
    </div>
  );
};

export default Counter;
Redux 공식문서에서 필요한 부분만 가져온 간단한 코드이다.
이제 Counter의 Container Component에서 number, onIncrease, onDecrease를 Props로 넘겨줄 것이다.
1-2) Container Redux Reducer 만들기
src/modules/counter.js
const INCREASE = 'counter/INCREASE';
const DECREASE = 'counter/DECREASE';

export const increase = () => ({ type: INCREASE });
export const decrease = () => ({ type: DECREASE });

const initialState = {
  number: 0,
};

const counter = (state = initialState, action) => {
  switch (action.type) {
    case INCREASE:
      return {
        number: state.number + 1,
      };
    case DECREASE:
      return {
        number: state.number - 1,
      };
    default:
      return state;
  }
};

export default counter;
action 함수를 호출할 때의 type을 상수로 따로 빼서 관리하고 있는데, 네이밍을 모듈/함수 형태로 하고있다.
const INCREASE = "INCREASE"이렇게 작성할 수도 있지만, 여러 reducer를 만들다보면 INCREASE라는 type이 겹칠 수도 있다. 이를 예방하기 위해 앞에 모듈 이름(여기선 counter)를 붙여줌으로써 중복되는 상황을 피할 수 있다.
increase = () ⇒ ({ type: INCREASE }) 함수는 호출 시 type이 INCREASE인 객체를 반환하고 이를 그대로 dispatch해주면 action의 type이 INCREASE인 상태로 호출되어 간단하게 사용할 수 있는 액션 생성 함수이다.
1-3) store를 Provider로 감싸주기
src/index.js
import { Provider } from 'react-redux';
import { createStore } from 'redux';
import App from './App';
import counter from './modules/counter';

const store = createStore(counter);

ReactDOM.render(
  <Provider store={store}>
    <App />
  </Provider>,
  document.getElementById('root'),
);
생성한 reducer를 사용하려면 redux에서 createStore를 import하여 reducer를 파라미터로 넘겨주고, 생성된 store를 Provider의 prop으로 넘겨주면 이제 App 컴포넌트에서 사용할 수 있게 된다.
1-4) Counter Container Component 만들기
src/container/CounterContainer.js
import Counter from 'src/components/Counter';
import { connect } from 'react-redux';
import { increase, decrease } from 'src/modules/counter';

const CounterContainer = ({ number, increase, decrease }) => {
  return (
    <Counter number={number} onIncrease={increase} onDecrease={decrease} />
  );
};

export default connect(
  (state) => ({
    number: state.number,
  }),
  {
    increase,
    decrease,
  },
)(CounterContainer);
connect함수는 mapStateToProps, mapDispatchToProps 를 파라미터로 받아 호출하면 컴포넌트를 Wrapping할 수 있는 함수를 반환한다.
connect(mapStateToProps, mapDispatchToProps)(Component)- 더 정확하게는
connect(mapStateToProps?, mapDispatchToProps?, mergeProps?, options?)이고, 4가지 항목 모두 Optional이다.
- mapStateToProps
- Store가 update되면 호출되어 Wrapping한 컴포넌트에 Props를 넘겨준다.
- mapDispatchToProps
- Wrapping한 컴포넌트에서 사용할 dispatch 함수를 Props로 넘겨준다.
- 함수 형태로 작성할 수도 있고, 객체로 작성할 수도 있는데, 객체로 작성하면 redux에서 dispatch 함수를 바인딩하여 넘겨준다.
        /* 함수 형태 */
        const mapDispatchToProps = (dispatch) => {
          return {
            // dispatching plain actions
            increment: () => dispatch({ type: 'INCREMENT' }),
            decrement: () => dispatch({ type: 'DECREMENT' }),
            reset: () => dispatch({ type: 'RESET' }),
          }
        }

        /* 객체 형태 */
        const mapDispatchToProps = {
          addTodo,
          deleteTodo,
          toggleTodo,
        }
1-5) App.js에서 Container Component 사용하여 확인하기
import CounterContainer from './container/CounterContainer';

function App() {
  return (
    <div>
      <CounterContainer />
    </div>
  );
}

export default App;
- 잘 동작하는 것을 확인할 수 있다.
2. redux-actions 사용하기
redux-actions 라이브러리를 사용해서 액션 생성 함수와 reducer를 더 간단하게 사용할 수 있다. 그런데 redux-actions 공식 문서를 살펴보니 해당 라이브러리를 유지보수할 사람을 찾고 있는 중이었고, 마지막 업데이트는 3년 전이었다. 3년 동안 업데이트되지 않은 것을 보면 유지보수할 사람도 못구한 것 같다.
- 아직은 기능을 사용할 수 있으니 알고만 있자.
yarn add redux-actions2-1) createAction | handleActions
src/modules/counter.js
import { createAction, handleActions } from 'redux-actions';

const INCREASE = 'counter/INCREASE';
const DECREASE = 'counter/DECREASE';

export const increase = createAction(INCREASE);
export const decrease = createAction(DECREASE);

const initialState = {
  number: 0,
};

const counter = handleActions(
  {
    [INCREASE]: (state, action) => ({ number: state.number + 1 }),
    [DECREASE]: (state, action) => ({ number: state.number - 1 }),
  },
  initialState,
);

export default counter;
type 정보를 담은 객체를 반환하는 액션 생성 함수는 type을 그대로 넘겨주면 되고, switch문으로 작성했던 reducer는 type별 함수를 작성할 수 있게되어 코드가 간단해졌다.
- 이후 잘 동작하는 것을 확인할 수 있었다.
※ redux-actions를 사용하면서 만난 에러
1) defaultState for reducer handling [object Object] should be defined
redux-actions 라이브러리를 설치하고 기존의 switch문으로 작성된 함수에서 handleActions 함수로 변경했는데, 아래와 같은 에러가 발생했다.

defaultState가 반드시 정의되어야 한다는 의미 같은데, 작성한 코드는 아래와 같다.
import { handleAction } from 'redux-actions';

const counter = handleAction(
    /* Actions 작성 코드 */
);
어떤 의미인지 확인하고자 redux-actions 공식 홈페이지에 접속해서 확인해봤다.

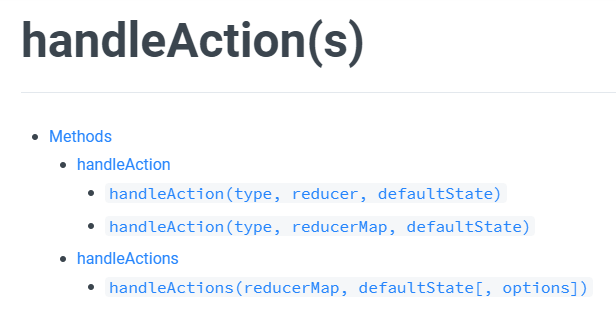
확인해보니 handleAction(s)... 로 action을 단일로 사용할 때는 handleAction, action을 2개 이상 사용할 때는 handleActions로 작성해줘야 한다. 그래서 handleAction에서 s를 붙여 handleActions로 변경해줬다. 그랬더니...
2) defaultState for reducer handling counter/INCREASE should be defined

잘 바꿔줬다고 생각했는데, [object Object] 부분만 바뀌었지 에러는 그대로다. handleActions의 정의를 다시 살펴보니
`handleActions(reducerMap, defaultState[, options])`3개의 파라미터를 받고 있다. 그런데, 다시 내 코드를 살펴보니 1개의 파라미터만 작성해놓고 있었다..!
const counter = handleActions({
  [INCREASE]: (state, action) => ({ ...state, input: action.payload }),
	/* ... */
  initialState,
});
initialState를 2번째 파라미터로 넣은게 아니라 reducerMap 파라미터에 넣어버려서 action을 1개 추가한 셈이 돼버린 것이다.
이를 다음과 같이 수정하니 잘 해결되었고, 별거 아닌 에러일 수 있지만 앞으로는 꼼꼼히 확인해보자
const counter = handleActions(
  {
    [INCREASE]: (state, action) => ({ number: state.number + 1 }),
		/* ... */
  },
  initialState,
);
3. Redux DevTools 사용해보기
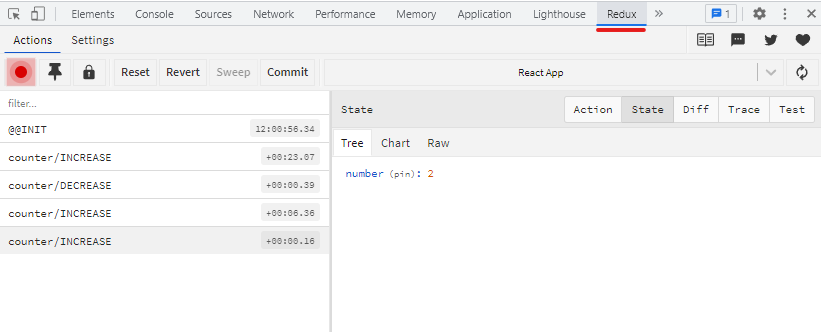
Redux는 DevTools라는 개발자 도구를 지원하고 있는데 Dispatch 함수가 호출됐을 때 로그를 보거나 State를 확인할 수 있게 해줘서 redux를 더 수월하게 사용할 수 있게 해준다.
redux-devtools-extension 라이브러리를 설치하고 composeWithDevTools 함수를 Store 생성 함수의 두 번째 파라미터로 넘겨주면 사용할 수 있게 된다.
yarn add redux-devtools-extensionimport { composeWithDevTools } from 'redux-devtools-extension';
import ReactDOM from 'react-dom';
import { Provider } from 'react-redux';
import { createStore } from 'redux';
import App from './App';
import counter from './modules/counter';
const store = createStore(counter, composeWithDevTools());
ReactDOM.render(
<Provider store={store}>
<App />
</Provider>,
document.getElementById('root'),
);
4. combineReducers로 Reducer 여러개 사용하기
redux를 사용하면 store를 한개만 사용해야하고, createStore는 reducer를 한개만 파라미터로 받는다. 그래서 module별로 store로 나눠 reducer를 작성한다면 combineReducers 함수를 사용해서 2개 이상의 reducer를 하나로 묶을 수 있다.
src/modules/index.js
import { combineReducers } from 'redux';
import counter from './counter';
import todos from './todos';

const rootReducer = combineReducers({
  counter,
  todos,
});

export default rootReducer;
최초 createStore(counter) 형태로 reducer를 하나만 넘겨줬을 때는 state에 접근할 때 state.number로 바로 접근할 수 있었는데 combineReducers를 통해 합치게 되면state.counter.number 형태로 사용해야 한다.
5. 정리
- Redux의 기본 사용 방법에 대해서 정리해봤다.
- Presentational | Container 컴포넌트로 나뉘는게 확실히 각각의 역할에 집중할 수 있게돼서 유지보수성을 높여줄 수 있겠다고 느꼈다.
- 특히 Presentational 컴포넌트의 경우 초기에 셋팅만 적절하게 해주면 차후 수정할 일이 많이 없을것 같다는 생각이 들었다.
.png)
