- 자바스크립트 디버깅 도구
- 테스트 생성 기법
- 테스트 스위트 작성 방법
- 비동기 작업을 테스트하는 방법
1. 코드 디버깅
주요 브라우저의 디버깅 툴
- FireBug - 파이어 폭스의 개발자 확장 도구 (시초)
- IE Developer Tolls - IE 8 이후
- Opera Dragonfly - 오페라 9.5 이후
- Webkit Developer Tools - 사파리 3 이후, 4에서 극적인 성능 향상, 크롬에서 사용 가능
로깅
로깅 구문(console.log())은 코드의 일부분이며, 크로스 부라우저 상황에서 유용하다.
아래와 같은 모든 브라우저에서 동작하는 고수준 로깅 메서드를 구현할 수 있다.
function log(){
	try{
		console.log.apply(console, arguments); //1. 대부분의 브라우저에서 작동하는 console.log 로 로깅 시도
	}catch(e){ //2. 1이 동작하지 않으면 해당 예외를 감지하고, 오페라 전용함수로 로깅을 시도한다.
		try{
			opera.postError.apply(opera, arguments); //
		}
		catch(e){ //3. 두가지 방법 모두 실패시에는 alert로 에러를 처리한다.
			alert(Array.prototype.join.call(arguments, " "));
		}
	}
}
더 자세한 방법은 http://patik.com/blog/complete-cross-browser-console-log/ -> http://patik.com/blog/?p=153 참고
중단점
※ Chrome을 기준을 작성합니다.
코드의 특정한 위치에서 스크립트의 실행을 중지시키고, 브라우저를 멈춘다. 중지된 상태에서 조사할 수 있는 상태는 중지한 위치에서 접근할 수 있는 모든 변수, 콘텍스트, 유효범위를 포함한다.
아래와 같은 코드를 작성하고,
<!DOCTYPE html>
<html lang="en">
<head>
    <title>Listing 2.2</title>
    <script type="text/javascript" src="log.js"></script>
    <script type="text/javascript">
    var x = 213;
    log(x); //중단점 설정할 라인
    </script>
</head>
<body>
</body>
</html>
원하는 라인에 좌측(줄번호)를 클릭하면 파란색으로 표시된다. 이곳에서 멈추게 된다.
여러개를 선택하면 Breakpoints에 목록이 생기고 해당 위치로 이동하거나 체크박스로 활성/비활성화할 수 있다.
자세한 내용은 https://developer.chrome.com/docs/devtools/ 에서 확인하기.(javascript section, 넘나 친절하다)
debugger 명령어
아래 예시처럼 스크립트 내에
debugger명령어를 적어주면 중단점을 설정한 것과 같은 효과를 봅니다.function hello(name) { let phrase = `Hello, ${name}!`; debugger; // <-- 여기서 실행이 멈춥니다.* say(phrase); }
코드를 디버깅하는 것은 디버깅 본래의 목적 (버그를 찾고 수정)을 달성하는 것이기도 하지만, 효율적인 테스트 케이스를 만드는 데 도움이 된다.
2. 테스트 생성
좋은 테스트는 다음 세가지 특성을 갖는다
- 반복성 - 테스트 결과는 항상 재현 가능해야한다. 테스트가 반복적으로 실행되면, 항상 정확히 같은 결과를 내야한다. 이는 테스트가 네트워크나 CPU 부하 등의 외부 요인과 독립적이라는 것을 보장하기도 한다.
- 간결성 - 테스트는 테스트 하는 것에만 집중해야한다. 테스트 코드의 의도를 훼손하지 않는 한, 가능한 많은 HTML 마크업, CSS, 자바스크립트를 제거하기 위해 노력해야한다. 더 많이 제거할수록 테스트 대상이 아닌 코드가 테스트 케이스에 영향을 줄 확률이 낮아진다.
- 독립성 - 각 테스트는 독립적으로 동작해야한다. 가능한 작은 단위로 분리하여 에러가 났을때 정확한 버그의 원인을 찾도록 하자.
테스트를 만드는 방법
-
제거적 테스트 케이스 - 문제를 격리하기 위해 테스트와 상관 없는 모든 것을 제거한다. 위의 세가지 특성을 얻는데 도움이 된다. 추가적인 마크업, css, JS를 제서한 웹사이트로 테스트를 시작할 수 있다.
-
추가적 테스트 케이스 - 올바르다고 알고있는, 작은 테스트 케이스를 가지고 확인하려는 버그가 재현될 때까지 테스트 케이스를 늘려 나간다. 간단한 테스트 파일들과 코드의 깨끗한 사본을 가지고 테스트를 생성해야한다.
3. 테스트 프레임워크
테스트 요건에 따라 자바스크립트의 단위(unit) 테스트 프레임워크에 요구되는 몇 가지 기능은 다음과 같다.
- 브라우저의 행동(클릭, 키 입력 등)을 흉내내는 기능
- 테스트 일시 정지와 재개를 지원
- 비동기 테스트에 대한 타임아웃 처리
- 실행되어야 하는 테스트들에 대한 필터링 기능
2021 현재의 테스트 프레임워크
책에서는 테스팅 프레임 워크로 QUnit, YUI Test, JsUnit(Jasmine)을 소개했다. 아쉽게도 출판된지(2014) 7년이 지난 지금 시점과는 아주 많이 다르다.
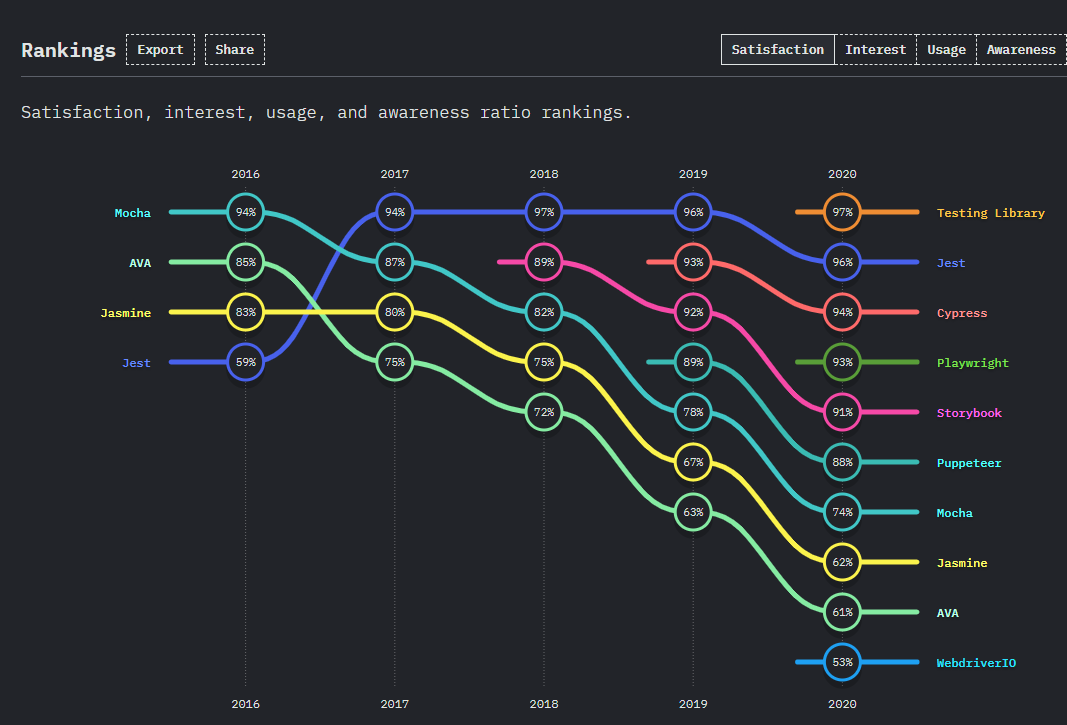 출처: https://2020.stateofjs.com/en-US/technologies/testing/
그리고 실제 테스팅을 수행하는 개발자의 비율이 48%에 그친다고 실망스러워했는데, 정확한 수치는 찾지 못했지만 요즘 채용공고를 보면서 느낀 바로는 거의 대부분의 회사가 테스팅을 중요하게 여기고 있었다. 존 레식님이 좋아합니다. 👍
지난 4년간 독보적인 랭킹을 보유하고 있는 Jest와 그 Jest를 추월한 Testing Library가 눈에 띈다. Testing Library를 검색하면 React가 꼭 따라다니는데 아래와 같이 React 공식문서에서도 Test Utilities에서 Jest와 testing library언급하고 있다. 참고로 react-create-app을 사용하면 testing-library는 기본으로 설치된다고 한다.
Test Utilities
ReactTestUtilsmakes it easy to test React components in the testing framework of your choice. At Facebook we use Jest for painless JavaScript testing. Learn how to get started with Jest through the Jest website’s React Tutorial.Note:
We recommend using React Testing Library which is designed to enable and encourage writing tests that use your components as the end users do.
Alternatively, Airbnb has released a testing utility called Enzyme, which makes it easy to assert, manipulate, and traverse your React Components’ output.
Jest
Jest is a delightful JavaScript Testing Framework with a focus on simplicity.
Testing library
The
@testing-libraryfamily of packages helps you test UI components in a user-centric way.
각자의 introduction을 보면 용도에 다소 차이가 있어보인다. 실제로 Jest + Testing Library 조합으로 많이 쓰이고 있는 것 같다. 이 부분은 추후에 TDD나 테스팅을 따로 공부하면서 포스팅하도록 하자.
아래부터는 다시 책의 내용에 집중하도록 하겠다.
4. 테스트 스위트의 기본
테스트 스위트의 주된 목적은 개별 테스트를 묶어 하나의 자원으로 제공함으로써 여러 테스트를 한번에 실행할 수 있게 그리고 반복해서 간단히 실행할 수 있게 하는 것이다.
검증조건
단쉬 테스트 프레임워크의 핵심은 검증 메서드로, 이 메서드의 이름은 일반적으로 assert()다.
<html>
    <head>
        <title>Test Suite</title>
        <script>
            function assert(value, desc){
                var li=document.createElement("li");
                li.className = value ? "pass": "fail";
                li.appendChild(document.createTextNode(desc));
                document.getElementById("results").appendChild(li);
            }

            window.onload = function(){
                assert(true, "The test suite is running.");
                assert(false, "Fail");
            }
        </script>
        <style>
            #results li.pass{color:green;}
            #results li.fail{color:red;}
        </style>
    </head>

    <body>
        <ul id="results"></ul>
    </body>
</html>- 설명을 포함하는 새로운 li엘리먼트를 생성한다. 다음으로 검증 표현식 매개변수의 값에 따라, pass 또는 fail이라고 정의된 CSS 클래스를 할당한다. 그리고나서 results 엘리먼트의 자식으로 해당 li 엘리먼트를 추가한다.
assert() 함수는 아주 단순하지만, 이 책에서는 이를 이용하여 여러 코드 조각들을 테스트하고, 정상적으로 동작하는지 확인할 것이다.
테스트 그룹
테스트 내용에 따라서 테스트를 그룹으로 묶는 것은 매우 유용하다.
단위 테스트에서, 하나의 테스트 그룹은 API나 애플리케이션에서 주로 어떤 한 메서드와 연관된 검증 조건들의 집합을 나타낸다.
행위주도개발(Behavior-driven-development)을 한다면, 테스트 그룹은 태스크 대한 검증 조건의 집합이 될 것이다.
어쨋거나 두 경우 모두 태스트 그룹을 구현하는 방식은 거의 동일하다. 다음 테스트 스위트 예제는 테스트 그룹을 제공하고, 테스트 그룹 내에 포함된 각 검증 조건에 대한 결과는 results에 저장된다. 어떤 검증 조건이 하나라도 실패하면, 전체 테스트 그룹은 실패로 표시된다.
꽤 간단하지만, 몇단계의 동적 제어(테스트 그룹 내에 실패한 테스트가 있는 경우, 테스트 그룹을 확장/축소하거나 필터링하는 것)는 실제로 매우 유용하다.
<html>
    <head>
        <title>Test Suite</title>
        <script>
          (function(){
              var results;
              this.assert = function assert(value, desc){
                var li=document.createElement("li");
                li.className = value ? "pass": "fail";
                li.appendChild(document.createTextNode(desc));

                results.appendChild(li);
                if(!value) li.parentNode.parentNode.className = "fail";
                return li;
              }
              this.test = function test(name,fn){
                  results = document.getElementById("results");
                  results = assert(true, name).appendChild(document.createElement("ul"));
                  fn();
              };
            })();

            window.onload = function(){
                test("A test.", function(){
                    assert(true, "First assertion completed");
                    assert(true, "Second assertion completed");
                    assert(true, "Third assertion completed");
                });

                test("Another Test.", function(){
                    assert(null, "fail");
                    assert(5, "Pass");
                });

                test("Third Test.", function(){
                    assert(true, "First test completed");
                    assert(false, "Secont test failed");
                    assert(true, "Third assertion completed");
                })
            };


        </script>
        <style>
            #results li.pass{color:green;}
            #results li.fail{color:red;}
        </style>
    </head>

    <body>
        <ul id="results"></ul>
    </body>
</html>
assert() 함수의 로깅구현과 크게 다르지 않지만, 가장 큰 차이는 현재 테스트 그룹을 찹조하는 results변수를 포함하고 있느냐다.
비동기 테스트
많은 개발자들이 js 테스트 스위트 개발 중에 만나는 힘들고 복잡한 작업은 비동기 테스트다. Ajax 요청이나, 애니메이션처럼, 비동기 테스트는 예측할 수 없는 시간이 지난 후에야 결과를 받게 될 것이다.
비동기 테스트의 이러한 이슈를 다루는 작업은 오버엔지니어링이 되기 십상이고, 필요 이상으로 일을 복잡하게 만들기도 한다. 비동기 테스트를 다루려면 다음 단계를 따라야 한다.
- 동일한 비동기 연산에서 사용해야하는 검증 조건은 같은 테스트 그룹으로 묶어야한다.
- 각 테스트 그룹은 하나의 큐에 존재해야하고, 이전 테스트 그룹이 모두 종료한 뒤에 실행되어야 한다.
<html>
    <head>
        <title>Test Suite</title>
        <script>
          (function(){
              var queue = [], paused=false, results;
              this.test = function(name,fn){
                  queue.push( function(){
                      results = document.getElementById("results");
                      results = assert(true,name).appendChild(document.createElement("ul"));
                      fn();
                  });
                runTest();
              };

              this.pause = function(){
                  paused=true;
              };
              this.resume=function(){
                  paused = true;
              }
              this.resume=function(){
                  paused = false;
                  setTimeout(runTest,1);
              };

              function runTest(){
                  if(!paused&&queue.length){
                      queue.shift()();
                      if(!paused){
                          resume();
                      }
                  }
              }

             this.assert = function assert(value, desc){
                var li=document.createElement("li");
                li.className = value ? "pass": "fail";
                li.appendChild(document.createTextNode(desc));
                results.appendChild(li);

                if(!value){
                    li.parentNode.parentNode.className="fail";
                }return li;
            }
        })();


            window.onload = function(){
                test("Async Test #1", function(){
                    pause();
                    setTimeout(function(){
                        assert(true, "First test Completed");
                        resume();

                    }, 1000);
                })


                test("Async Test #2", function(){
                    pause();
                    setTimeout(function(){
                        assert(true, "Second test Completed");
                        resume();

                    }, 1000);
                })
            }

        </script>
        <style>
            #results li.pass{color:green;}
            #results li.fail{color:red;}
        </style>
    </head>

    <body>
        <ul id="results"></ul>
    </body>
</html>
외부에서 사용가능한 test(), pause(), resume() 함수 세개가 있다. 이 세 함수는 다음 특성을 따른다.
- test(fn)은 다수의 검증 조건을 가지고 있는 함수를 인자로 받고, 이 함수를 테스트 실행을 하기 위한 큐에 저장한다. 함수가 가지고 있는 검증 조건은 동기나 비동기로 실행될 것이다.
- pause()는 테스트 함수안에서 호출된다. 현재 테스트 그룹의 실행이 완료될 때까지, 테스트 스위트에 실행 중인 전체 테스트를 정지하라고 알려준다.
- resume()은 테스트를 재개하고, 이전 테스트 코드가 오래 실행되어 전테 코드가 멈추는 것을 방지하기 위해서 잠시 동안의 딜레이를 준 다음 테스트를 시작한다.
내부적인 구현함수는 runTest()이며 테스트가 큐에 저장되거나 빠질 때 호출된다. 테스트 스위트가 현재 정지되지 않았는지를 체크하고, 큐 안에 테스트가 있다면, 테스트를 큐에서 빼서 실행을 시도한다. 게다가 테스트 그룹의 실행이 종료된 후에 runTest()는 테스트가 현재 정지되어 있는지를 검사하고, 그렇지않다면(테스트 그룹 안에 비동기 테스트만 실행되고 있다면) runTest()는 다음 테스트 그룹을 실행하기 시작한다. 지연 실행에 대해서는 자바 스크립트 지연 실행 방법에 대해 상세하게 다루고 있는 8장에서 다시 살펴본다.