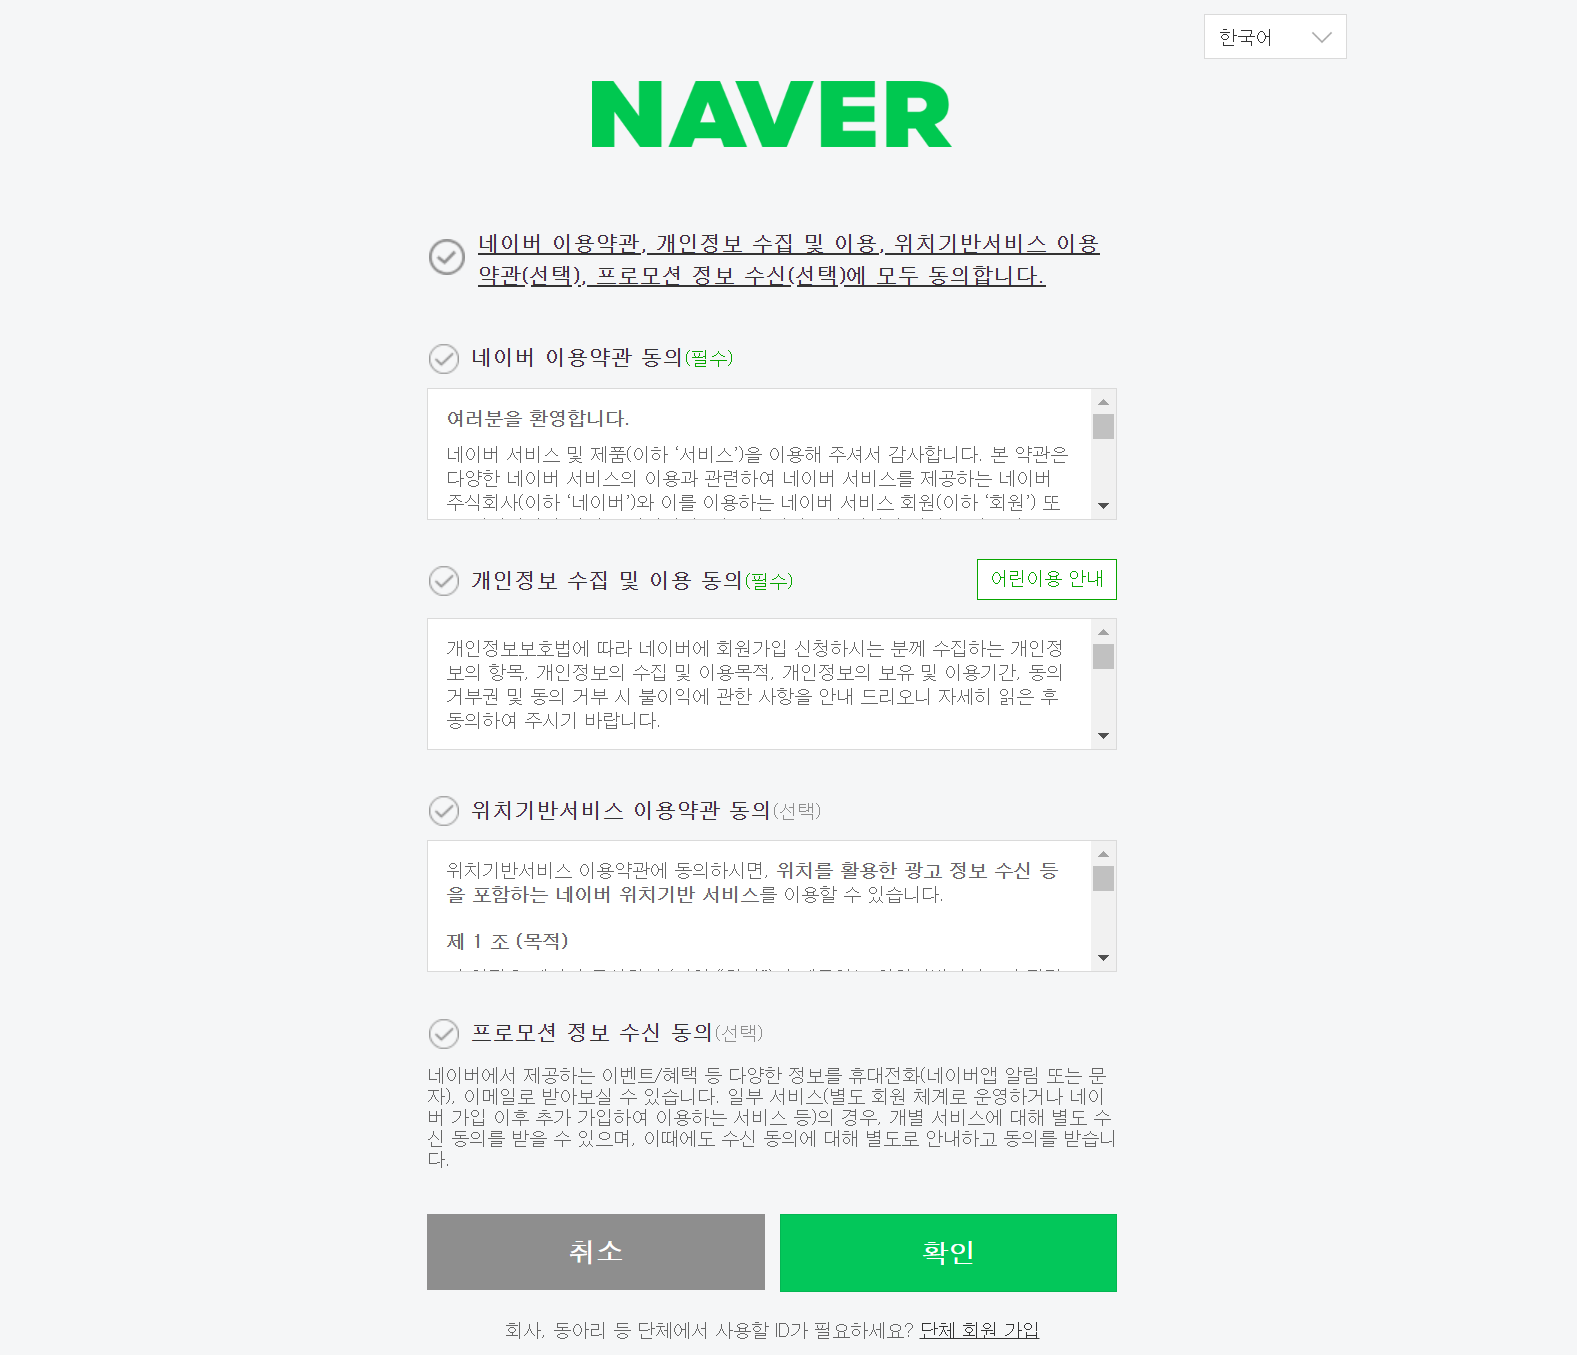
네이버 회원가입 홈페이지 만들기
HTML / CSS _ basic 게시물을 바탕으로 기본 태그 활용하여 작성
01 Head
a. meta tag
웹 화면에 보이지는 않지만 중요한 정보를 표기하는 태그
- 문자 인코딩 방식
인코딩 : 컴퓨터가 코드를 잘 이해하기 위해 변환하는 과정
UTF-8 이 인코딩 방식 중 하나인 것
<meta charset="UTF-8">- 브라우저 호환성
Internet Explorer 에서 작성한 페이지가 잘 보여지도록 하기 위한 것
<meta http-equiv="X-UA-Compatible" content="IE=edge">- 뷰포트 설정
모든 기기에서 사이트가 잘 보여지도록 하기 위해 설정하는 것
<meta name="viewport" content="width=device-width, initial-scale=1.0">b. 문서 제목
네이버 회원가입 페이지를 만들 것이므로 문서 제목은 다음과 같이 작성
<title>Naver : 회원가입</title>c. link
현재 문서와 외부 문서와의 관계를 명시할 때 사용하는 요소
<link rel="stylesheet" href="join.css">02 Body
a. 각 태그 및 요소
- id = ''
태그의 id 속성 값으로 요소 구분
- a href = " "
하이퍼 링크 제공해주는 역할
- class = ''
태그의 class 속성 값으로 요소 구분
중복 유무에 따라 id ( 중복 X ), class ( 중복 O ) 나뉘어짐
- h3
의미상 구분 단위 , 입력폼의 제목
- span
입력폼 전체를 묶었다는 의미
- label
글자 클릭시 입력폼에 포커스가 되는 기능
b. header
<div id="header">
        <a href="https://nid.naver.com/user2/V2Join.nhn?m=agree#agreeBottom" target="_parent" title="네이버 회원가입 페이지 보러가기">
            <img src="NAVER_CI_Green.png" id="logo">
        </a>
</div>
id="header"
회원가입 페이지에서 상단부에 NAVER 마크를 띄우기 위해 임의로 지정
a href = " "
NAVER 마크를 누르면 회원가입 페이지로 바로 넘어갈 수 있도록 링크 삽입
NAVER 마크는 이미지로 지정해주었기 때문에 img 링크 삽입
result _ naver logo click
c. ID / PW / NAME
ID / PW / NAME 코드 작성 전에 css 를 보다 편하게 적용시키기 위해 다음과 같이 태그로 지정해주도록 함
<!-- wrapper -->
<div id="wrapper">
    <!-- content -->
    <div id="content">
ID 코드 작성
 <!-- ID -->

 <div>
     <h3 class="join_title">
         <label for="id">아이디</label>
     </h3>
     <span class="box info_id">
         <input type="text" id="id" class="info" maxlength="20">
         <span class="auto_url">@naver.com</span>
     </span>
     <span class="error_next_box"></span>
 </div>
- span class="error_next_box"
ID값 잘못 입력시 입력 폼 아래에 에러메시지 표기 부분 나타내기 위한 것
result
아이디
@naver.comPASSWORD 코드 작성
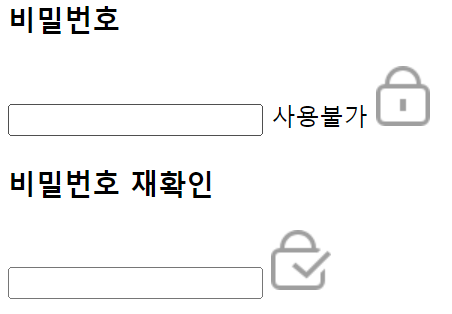
<!-- PW1 -->

<div>
    <h3 class="join_title">
        <label for="pw1">비밀번호</label>
    </h3>
    <span class="box state_pass">
        <input type="password" id="pw1" class="info" maxlength="20">
        <span id="alertTxt">사용불가</span>
        <img src="m_icon_pass.png" id="pw1_img1" class="pwImg">
    </span>
    <span class="error_next_box" id="pwMsg"></span>
</div>


<!-- PW2  -->

<div>
    <h3 class="join_title">
        <label for="pw2">비밀번호 재확인</label>
    </h3>
    <span class="box state_check">
        <input type="password" id="pw2" class="info" maxlength="20">
        <img src="m_icon_check_disable.png" id="pw2_img1" class="pwImg">
    </span>
    <span class="error_next_box"></span>
</div>
result
NAME 코드 작성
<!-- NAME -->

<div>
    <h3 class="join_title">
        <label for="name">이름</label>
    </h3>
    <span class="box name">
        <input type="text" id="name" class="info" maxlength="20">
    </span>
    <span class="error_next_box"></span>
</div>
result
이름
d. BIRTH
BIRTH_YY 코드 작성
- input
태어난 연도를 입력 받을 수 있도록 설정 - maxlength
최대 글자수 설정
<!-- BIRTH_YY -->

<div id="bir_yy">
    <span class="box">
        <input type="text" id="yy" class="info" maxlength="4" placeholder="년(4자)">
    </span>
</div>
result
BIRTH_MM 코드 작성
- select
아래로 펼쳐지는 목록 상자 , 입력 홈에서 자주 들어가는 태그
선택자 내용이 많은 경우에 사용되는 특징
- option
html select 내부의 항목
value 속성 값은 해당 옵션이 선택되었을 때 서버로 제출되는 값을 명시
<!-- BIRTH_MM -->

<div id="bir_mm">
    <span class="box">
        <select id="mm" class="sel">
            <option>월</option>
            <option value="01">1</option>
            <option value="02">2</option>
            <option value="03">3</option>
            <option value="04">4</option>
            <option value="05">5</option>
            <option value="06">6</option>
            <option value="07">7</option>
            <option value="08">8</option>
            <option value="09">9</option>
            <option value="10">10</option>
            <option value="11">11</option>
            <option value="12">12</option>
        </select>
    </span>
</div>
result
1월부터 12월까지 선택할 수 있는 형태

BIRTH_DD 코드 작성
<!-- BIRTH_DD -->

<div id="bir_dd">
    <span class="box">
        <input type="text" id="dd" class="info" maxlength="2" placeholder="일">
    </span>
</div>
result
e. GENDER
<!-- GENDER -->

<div>
    <h3 class="join_title">
        <label for="gender">성별</label>
    </h3>
    <span class="box gender">
        <select id="gender" class="sel">
            <option value selected>성별</option>
            <option value="M">남자</option>
            <option value="F">여자</option>
            <option value="U">선택안함</option>
         </select>
     </span>
</div>
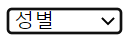
result
여자 / 남자 / 선택 안 함 중에 선택할 수 있는 형태
f. MOBILE / BTN
<!-- MOBILE -->

<div>
    <h3 class="join_title">
        <label for="phoneNum">휴대전화</label>
    </h3>
    <span class="box mobile">
        <input type="text" id="mobile" class="info" maxlength="16" placeholder="전화번호 입력">
    </span>
    <span class="error_next_box"></span>
</div>
<!-- JOIN_BTN -->

<div class="btn_area">
    <button type="button" id="btnJoin">
        <span>가입하기</span>
    </button>
</div>
result _ mobile
휴대전화
result _ btn

g. js connection
<script src="join.js"></script>모든 html 내부 요소들을 작성한 후 body 태그 닫기 전에 , 사용자가 잘못된 데이터 입력시 에러 메세지 구현할 수 있도록 join.js 연결
/ 본 게시물에서는 자바스크립트 부분에 있어서는 설명 생략 /
03 CSS
- 전체적인 css 를 설정한 후 class ( .class 이름 ) / id ( #id 이름 ) 에 따라 개별적으로 지정
- 상위 태그 속성을 기준으로 삼아 속성 적용되는 것
html {
    height: 100%;
}

body {
    margin: 0;
    height: 100%;
    background: #f3f6f7;
    font-family: Dotum, '돋움', Helvetica, sans-serif;
}

#logo {
    width: 240px;
    height: 44px;
    cursor: pointer;
}

#header {
    padding-top: 62px;
    padding-bottom: 20px;
    text-align: center;
}

#wrapper {
    position: relative;
    height: 100%;
}

#content {
    position: absolute;
    left: 50%;
    transform: translate(-50%);
    width: 460px;
}

label {
    cursor: pointer;
}
- height
% : 상위 태그의 높이를 기준으로 높이 설정
- header _ text align
네이버 로고 센터 정렬
- outline: none;
포커스 될 시 , 선이 보이지 않게 설정
/* input */
input:focus {
    outline: none;
}

/* basic part _ h3, .box, .info */
h3 {
    margin: 19px 0 8px;
    font-size: 14px;
    font-weight: 700;
}

.box {
    display: block;
    width: 100%;
    height: 51px;
    border: solid 1px #dadada;
    padding: 10px 14px 10px 14px;
    box-sizing: border-box;
    background: #fff;
    position: relative;
}

.info {
    display: block;
    position: relative;
    width: 100%;
    height: 29px;
    border: none;
    background: #fff;
    font-size: 15px;
}
- display
요소를 어떻게 표시할 것인가에 대한 것
- box-sizing
box의 크기를 어떤 기준으로 계산할지 정하는 속성
border-box 테두리 포함 계산 / content-box ( 기본값 ) 테두리 제외 계산
input {
    font-family: Dotum, '돋움', Helvetica, sans-serif;
}

.box.info_id {
    padding-right: 110px;
}

.box.state_pass {
    padding-right: 40px;
}

.box.state_check {
    padding-right: 40px;
}

/* @naver.com */
.auto_url {
    position: absolute;
    top: 16px;
    right: 13px;
    font-size: 15px;
    color: #8e8e8e;
}

/* lock img */
.pwImg {
    width: 18px;
    height: 20px;
    display: inline-block;
    position: absolute;
    top: 50%;
    right: 16px;
    margin-top: -10px;
    cursor: pointer;
}
- 아이디 입력폼의 경우
padding-right 설정하는 이유 : @naver.com이 들어갈 공간 필요
- 비밀번호 / 비밀번호 재확인 입력폼의 경우
padding-right 설정하는 이유 : 자물쇠 이미지가 들어갈 오른쪽 공간 필요
/* birth */
#bir_wrap {
    display: table;
    width: 100%;
}

#bir_yy {
    display: table-cell;
    width: 147px;
}

#bir_mm {
    display: table-cell;
    width: 147px;
    vertical-align: middle;
}

#bir_dd {
    display: table-cell;
    width: 147px;
}

#bir_mm, #bir_dd {
    padding-left: 10px;
}

.sel {
    width: 100%;
    height: 29px;
    font-size: 15px;
    line-height: 18px;
    color: #000;;
    background: #fff url(https://static.nid.naver.com/images/join/pc/sel_arr_2x.gif) 100% 50% no-repeat;
    background-size: 20px 8px;
    -webkit-appearance: none;
    display: inline-block;
    text-align: start;
    border: none;
    border-radius: 0;
    cursor: default;
    font-family: Dotum, '돋움', Helvetica,sans-serif;
}
- display : table / display : table-cell
갯수가 몇 개가 되던 동일한 간격의 영역 차지
- vertical-align: middle
나머지 두 셀과 높이를 맞춰주기 위해서 middle 사용
- appearance
네이티브 요소 디자인 해제 / 변경
- border
요소의 테두리 설정
/* error_message */
.error_next_box {
    margin-top: 9px;
    font-size: 9px;
    color: red;
    display: none;
}

/* pw_message  */
#alertTxt {
    position: absolute;
    top: 10px;
    right: 38px;
    font-size: 12px;
    color: red;
    display: none;
}

/* button */
.btn_area {
    margin: 30px 0 91px;
}

#btnJoin {
    display: block;
    width: 100%;
    padding: 15px 0 15px;
    border: solid 1px rgba(0, 0, 0, .08);
    cursor: pointer;
    color: #fff;
    background-color: #03c75a;

    font-size: 18px;
    text-align: center;
    font-weight: 700;
    box-sizing: border-box;
    font-family: Dotum, '돋움, Helvetica, sans-serif';
}
위의 html 구조에 css 를 적용한 후 js 까지 연결시키면 최종적으로 다음과 같이 페이지가 보이게 되는 것을 알 수 있음
result
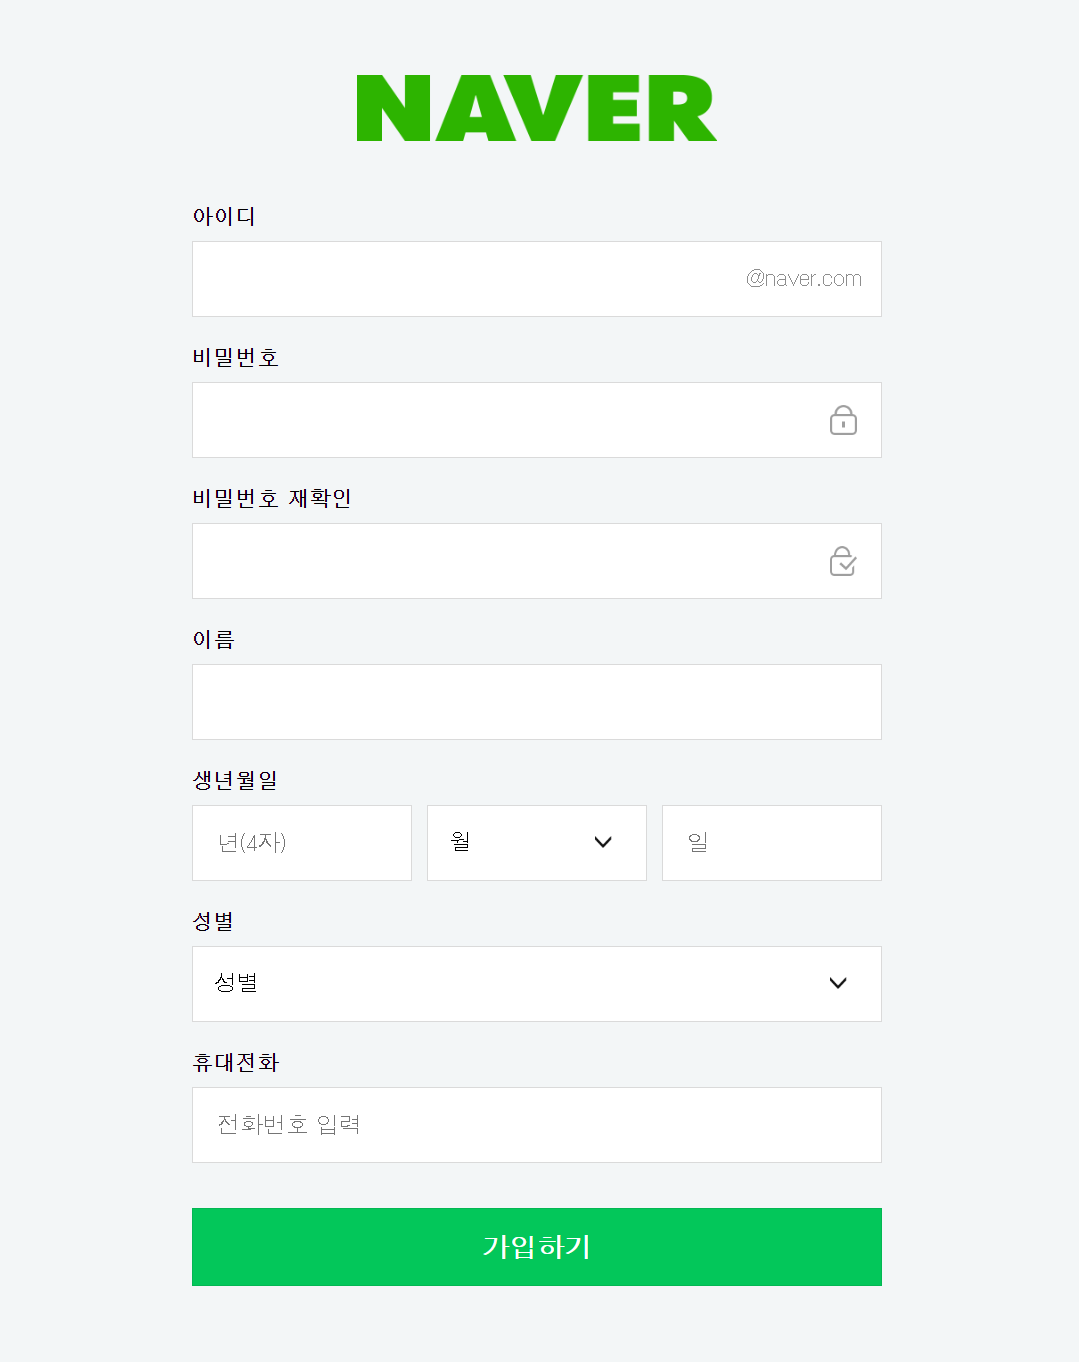
ex_ result
join.html 을 실행해 아이디 칸에 본인 이름을 쓰고 비밀번호 칸 밑에는 에러 문구가 나오게 capture

HTML / CSS _ basic 을 바탕으로 네이버 회원가입 홈페이지 제작하기
기본적인 태그 속성에 대한 이해 및 활용 스터디