USE: Java17
사실 별거 아닌데 구현을 되게 거창하게 해놨다... 배보다 배꼽이 더 큰
자기만족 백업용 😃
👉 RestTemplate ?
RestTemplate이 무엇인지는 역시 남의 글을 애용함이 좋다. 👍
시작은 분명 그냥 서버끼리 통신하는 예제였는데 어쩌다보니 타임리프까지 썼음...


일단 이렇게 구현을 하게 된 의식의 흐름은 다음과 같다.
1) RestTemplate으로 서버끼리 통신하는 서비스를 만들고, 네이버 open api를 호출
2) [deprecated] 카카오 Karlo 이미지 생성 AI api로 AI 이미지 생성
3) OpenAI api로 ChatGPT를 번역기 및 이미지 생성기로 사용
번역기 open api를 찾아봤는데 죄다 유료 또는 기간제 무료여서 슬퍼하던 와중...
GPT를 번역기로 쓰면 되지 않나? 싶어서 무지성으로 구현부터 하고봤는데
호출하자마자 429 에러가 났다.
찾아보니 결제하란다...5$ 썼다.😂
이럴거면 진작에 12개월 동안 무료인 bing 번역 API를 쓰지 그랬니
👇 429 Too Many Request
신규 가입계정은 3개월간 사용할 수 있는 5$ 토큰을 무료로 준다고하니
나처럼 결제하지말고 계정을 새로 파는 것을 추천한다.
build.gradle
implementation 'org.apache.httpcomponents.client5:httpclient5'
implementation 'org.springframework.boot:spring-boot-starter-web'
implementation 'org.apache.commons:commons-text:1.9'
implementation group: 'com.google.code.gson', name: 'gson', version: '2.8.7'
implementation 'com.theokanning.openai-gpt3-java:service:0.18.2'
implementation 'org.springframework.boot:spring-boot-starter-thymeleaf'
compileOnly 'org.projectlombok:lombok'
annotationProcessor 'org.projectlombok:lombok'
testImplementation 'org.springframework.boot:spring-boot-starter-test'
application.yml
api:
  naver:
    client-id: your-naver-client-id
    client-key: your-naver-client-key
#  kakao:
#    key: your-kakao-api-key
  gpt:
    key: your-gpt-api-key
📌 key 발급받기
- https://developers.naver.com/apps/#/register
- https://developers.kakao.com/console/app
- https://platform.openai.com/api-keys
보통 애플리케이션 등록하면 키를 보여준다.
참고로 gpt는 키 생성 후 바로 창을 닫아버리면 다시는...키를 확인할 수 없다.(재발급 받아야함)
미리 복사해두자.
1. Client
client 폴더에 데이터 전송과 관련된 객체를 담아둔다.
RestTemplateConfig.java
import org.springframework.context.annotation.Bean;
import org.springframework.context.annotation.Configuration;
import org.springframework.http.client.HttpComponentsClientHttpRequestFactory;
import org.springframework.web.client.RestTemplate;

import java.time.Duration;

@Configuration
public class RestTemplateConfig {

    private Duration duration = Duration.ofSeconds(60);

    @Bean
    public RestTemplate restTemplate(){
        RestTemplate restTemplate = new RestTemplate();
        HttpComponentsClientHttpRequestFactory httpRequestFactory = new HttpComponentsClientHttpRequestFactory();
        httpRequestFactory.setConnectionRequestTimeout(duration); // 요청 시간
        httpRequestFactory.setConnectTimeout(duration); // tcp 연결 시간
        restTemplate.setRequestFactory(httpRequestFactory);
        return restTemplate;
    }
}
👇 아래 글 참고함. Bean으로 RestTemplate 객체를 등록해주었다.
RestTemplateComponent.java
import lombok.RequiredArgsConstructor;
import org.springframework.http.*;
import org.springframework.stereotype.Component;
import java.util.Collections;


@Component
@RequiredArgsConstructor
public class RestTemplateComponent {

    private final RestTemplateConfig restConfig;
    // get
    public <T> ResponseEntity <T> getMethod(HttpHeaders headers, String url, Class<T> clazz){
        HttpEntity<?>  getRequestEntity = new HttpEntity<>(headers);
        ResponseEntity<T> getResponse =  restConfig
                .restTemplate()
                .exchange(url, HttpMethod.GET,getRequestEntity,clazz);
        return getResponse;
    }

    // post
    public <B> ResponseEntity<B> postMethod(HttpHeaders headers, String url, B body, Class<?> clazz){
        HttpEntity<?>  postRequestEntity = new HttpEntity<>(body,headers);
        ResponseEntity<B> postResponse = (ResponseEntity<B>) restConfig
                .restTemplate()
                .exchange(url, HttpMethod.POST, postRequestEntity, clazz);
        return postResponse;
    }

    // put
    public <B> ResponseEntity<B> putMethod(HttpHeaders headers, String url, B body, Class<?> clazz){
        HttpEntity<?>  putRequestEntity = new HttpEntity<>(body,headers);
        ResponseEntity<B> putResponse = (ResponseEntity<B>) restConfig
                .restTemplate()
                .exchange(url,HttpMethod.PUT,putRequestEntity,clazz);
        return putResponse;
    }

    // delete
    public <T> ResponseEntity<T> deleteMethod(HttpHeaders headers, String url, Class<T> clazz){
        HttpEntity<?> deleteRequestEntity = new HttpEntity<>(headers);
        ResponseEntity<T> deleteResponse =  restConfig
                .restTemplate()
                .exchange(url,HttpMethod.DELETE,deleteRequestEntity,clazz);
        return deleteResponse;
    }

    // json header 기본설정
    public HttpHeaders createBodyHeader(MediaType mediaType){
        final HttpHeaders jsonHeaders = new HttpHeaders();
        jsonHeaders.setContentType(mediaType);
        jsonHeaders.setAccept(Collections.singletonList(MediaType.APPLICATION_JSON));
        return jsonHeaders;
    }

    // query param header 기본설정
    public HttpHeaders createQueryParamHeader(){
        final HttpHeaders urlEncodedHeaders = new HttpHeaders();
        urlEncodedHeaders.setContentType(MediaType.APPLICATION_FORM_URLENCODED);
        urlEncodedHeaders.setAccept(Collections.singletonList(MediaType.APPLICATION_JSON));
        return urlEncodedHeaders;
    }
}
GET, POST, PUT, DELETE 네가지 Http Method를 exchange를 사용하여 구현하고,
기본적인 헤더설정을 위한 메서드도 추가하였다.
RequestFormat.java
public enum RequestFormat {
    QUERY_PARAM,
    BODY
}
데이터 호출 방식을 구분하기 위한 enum 이다.
CommunicationInfo.java
import lombok.*;
import org.apache.hc.core5.http.Method;
import org.springframework.http.*;
import java.util.Map;

@Getter
@Setter
@NoArgsConstructor
@AllArgsConstructor
@Builder
public class CommunicationInfo {
    private String path; // api 경로
    private String scheme; // 스키마(http / https)
    private String host; // 주소
    private String port; // 포트
    private Method method; // http method
    private MediaType mediaType; // 미디어타입
    private Object requestData; // 요청 데이터
    private Map<String,String> headers; // 추가적인 헤더
    private RequestFormat requestFormat; // 요청 데이터 형식
    private Class<?> responseClazz; // 응답 데이터 클래스 타입
}
전송할 데이터와 경로에 대해 설정하는 객체다.
2. Model
UrlDto.java
import lombok.*;

@Getter
@Setter
@NoArgsConstructor
public class UrlDto {
    private String shortUrl;

    public UrlDto(Builder builder){
        this.shortUrl = builder.url;
    }
   @Data
    public static class Builder{
       private String url;
       public UrlDto build(){
          return new UrlDto(this);
       }
   }
}
네이버 단축 url의 결과를 담을 DTO.
여기서 url 부분만 추출할 것이다.
3. util
JsonUtil.java
import com.google.gson.Gson;
import com.google.gson.GsonBuilder;
import com.google.gson.reflect.TypeToken;

import java.util.Map;

public class JsonUtil {

    // 객체 -> json 문자열
    public static final String toJson(Object obj) {
        Gson gson = new GsonBuilder()
                .serializeNulls()
                .setPrettyPrinting()
                .create();
        return gson.toJson(obj);
    }

    // Map -> json 문자열
    public static final String toJson(Map<String, Object> mapData) {
        Gson gson = new GsonBuilder()
                .setLenient()
                .create();
        return gson.toJson(mapData);
    }

    // json 문자열 -> clazz 객체
    public static final <T> T fromJson(String json, Class<T> valueType) {
        Gson gson = new GsonBuilder().
                setLenient()
                .create();
        return gson.fromJson(json, valueType);
    }

    public static final <T> T fromJson(String json, TypeToken<T> token) {
        Gson gson = new GsonBuilder()
                .setLenient()
                .create();
        return gson.fromJson(json, token.getType());
    }

    // json 문자열 -> Map
    public static final Map<String, Object> fromJson(String json) {
        Gson gson = new GsonBuilder()
                .setLenient()
                .create();
        return gson.fromJson(json, new TypeToken<Map<String, Object>>() {}.getType());
    }
}
Gson 라이브러리를 사용하여 Json 직렬화/역직렬화를 위한 메서드를 구현하고 오버로딩했다.
큰 데이터를 변환하는게 아니라면 참 편리한 라이브러리인듯.
4. Service
서버 간 통신을 위한 서비스를 구현한다.
CommunicationService.java
import com.communitcation.rest.client.CommunicationInfo;
import com.communitcation.rest.client.RequestFormat;
import com.communitcation.rest.client.RestTemplateComponent;
import com.fasterxml.jackson.databind.JsonNode;
import com.fasterxml.jackson.databind.ObjectMapper;
import jakarta.annotation.Nullable;
import lombok.RequiredArgsConstructor;
import org.apache.hc.client5.http.impl.classic.CloseableHttpClient;
import org.apache.hc.client5.http.impl.classic.HttpClientBuilder;
import org.apache.hc.core5.http.Method;
import org.springframework.http.HttpHeaders;
import org.springframework.http.MediaType;
import org.springframework.http.ResponseEntity;
import org.springframework.stereotype.Service;
import org.springframework.util.LinkedMultiValueMap;
import org.springframework.util.MultiValueMap;
import org.springframework.web.client.HttpClientErrorException;
import org.springframework.web.client.HttpServerErrorException;
import org.springframework.web.util.UriComponentsBuilder;

import java.io.IOException;
import java.util.List;
import java.util.Map;
import static com.communitcation.rest.util.JsonUtil.toJson;

@Service
@RequiredArgsConstructor
public class CommunicationService {

    private List<Method> paramList = List.of(Method.GET, Method.DELETE);
    private List<Method> bodyList = List.of(Method.POST, Method.PUT);

    private final RestTemplateComponent restClient;

    // 통신 메서드
    public <T> T communicate(CommunicationInfo communicationInfo) throws IOException {
        CloseableHttpClient httpClient = HttpClientBuilder.create().build();
        try{
            RequestFormat format = findRequestFormat(communicationInfo.getMethod(),communicationInfo.getRequestFormat());
            communicationInfo.setRequestFormat(format);
            ResponseEntity<?> responseData = getResponse(communicationInfo);
            return (T) responseData.getBody();
        }catch (HttpClientErrorException | HttpServerErrorException  e){
            e.printStackTrace();
        }
        finally {
            httpClient.close();
        }
        return null;
    }

    // 요청 형태 설정
    private RequestFormat findRequestFormat(Method method,RequestFormat format){
        if(format == null){
            if(paramList.contains(method)){
                return  RequestFormat.QUERY_PARAM;
            }
            else{
                return RequestFormat.BODY;
            }
        }
        return format;
    }

    // 헤더 생성
    private HttpHeaders createHeaders(CommunicationInfo communicationInfo){
        HttpHeaders headers;
        RequestFormat format = communicationInfo.getRequestFormat();
        Map<String,String> customHeaders = communicationInfo.getHeaders();
        if(format == RequestFormat.QUERY_PARAM){
            headers =  restClient.createQueryParamHeader();
        }
        else {
            if(communicationInfo.getMediaType() == null){
                headers = restClient.createBodyHeader(MediaType.APPLICATION_JSON);
            }
            else {
                headers = restClient.createBodyHeader(communicationInfo.getMediaType());
            }
        }
        if (customHeaders != null){
            MultiValueMap<String,String> multiValueMapHeader = new LinkedMultiValueMap<>();
            multiValueMapHeader.setAll(customHeaders);
            headers.addAll(multiValueMapHeader);
        }
        return headers;
    }

    // uri 생성
    private String createUri(CommunicationInfo communicationInfo){
        String uriString;
        RequestFormat format = communicationInfo.getRequestFormat();
        if(format == RequestFormat.QUERY_PARAM){
            uriString = UriComponentsBuilder
                    .newInstance()
                    .scheme(communicationInfo.getScheme())
                    .host(communicationInfo.getHost())
                    .port(communicationInfo.getPort())
                    .path(communicationInfo.getPath())
                    .queryParams(convertBodyToMultiValueMap(toJson(communicationInfo.getRequestData())))
                    .build()
                    .encode()
                    .toUriString();
        }
        else {
            uriString = UriComponentsBuilder
                    .newInstance()
                    .scheme(communicationInfo.getScheme())
                    .host(communicationInfo.getHost())
                    .port(communicationInfo.getPort())
                    .path(communicationInfo.getPath())
                    .build()
                    .encode()
                    .toUriString();
        }
        return uriString;
    }

    // response
    private <T> ResponseEntity<?>  getResponse(CommunicationInfo communicationInfo) {
        Method method = communicationInfo.getMethod();
        HttpHeaders headers = createHeaders(communicationInfo); // 헤더 생성
        String uri = createUri(communicationInfo); // uri 생성
        Class<?> clazz = communicationInfo.getResponseClazz();
        RequestFormat format = communicationInfo.getRequestFormat();
        Object requestData = (format == RequestFormat.QUERY_PARAM)? null : communicationInfo.getRequestData();
        ResponseEntity<?> response = byMethod(restClient,method,headers,uri,requestData,clazz);
        if (response == null) {
            throw new NullPointerException();
        }
        return response;
    }

    // 메서드 유형에 따라서 GET, POST, PUT, DELETE 호출
    private  ResponseEntity<?>  byMethod(
            RestTemplateComponent client,
            Method method,
            HttpHeaders headers,
            String uri,
            @Nullable Object body,
            Class<?> clazz
        ){
       return switch(method){
           case GET -> client.getMethod(headers,uri,clazz);
           case POST -> client.postMethod(headers,uri,body,clazz);
           case PUT -> client.putMethod(headers,uri,body,clazz);
           case DELETE -> client.deleteMethod(headers,uri,clazz);
           default -> null;
        };
    }

    // query param 생성
    public MultiValueMap<String, String> convertBodyToMultiValueMap(String body){
        MultiValueMap<String, String> multiValueMap = new LinkedMultiValueMap<>();
        try{
            ObjectMapper objectMapper = new ObjectMapper();
            JsonNode jsonNode = objectMapper.readTree(body);
            jsonNode.fields().forEachRemaining(entry -> {
                multiValueMap.add(entry.getKey(), entry.getValue().asText());
            });
        }catch(Exception e){
            e.printStackTrace();
        }
        return multiValueMap;
    }
}
ConnectionPool만큼 요청을 보낼 수 있도록 CloseableHttpClient를 사용했다.
CommunicationInfo에 필요한 정보들을 설정하여 넘기면, 해당 정보를 바탕으로 Http Method를 수행하여 응답 결과를 받아온다.
RestApiService.java
import com.communitcation.rest.client.CommunicationInfo;
import com.communitcation.rest.model.UrlDto;
import lombok.RequiredArgsConstructor;
import org.apache.hc.core5.http.Method;
import org.springframework.beans.factory.annotation.Value;
import org.springframework.stereotype.Service;
import java.io.IOException;
import java.util.Map;
import static com.communitcation.rest.util.JsonUtil.fromJson;
import static com.communitcation.rest.util.JsonUtil.toJson;
@Service
@RequiredArgsConstructor
public class RestApiService {
private final CommunicationService communicationService;
@Value("${api.naver.client-id}")
private String naverClientId;
@Value("${api.naver.client-key}")
private String naverClientKey;
// 단축 url api
public UrlDto makeShortUrlByNaverApi(String url) throws IOException {
Map<String,String> naverReqHeader = Map.of(
"X-Naver-Client-Id",naverClientId,
"X-Naver-Client-Secret",naverClientKey
);
String host = "openapi.naver.com";
String shortUrlPath = "/v1/util/shorturl";
Map<String,Object> requestMap = Map.of(
"url" , url
);
CommunicationInfo naverShortUrlApiInfo = CommunicationInfo
.builder()
.scheme("https")
.port("443")
.host(host)
.path(shortUrlPath)
.method(Method.GET)
.headers(naverReqHeader)
.requestData(requestMap)
.responseClazz(Map.class)
.build();
Map<String,Object> urlResMap = communicationService.communicate(naverShortUrlApiInfo);
String resToStr = toJson(urlResMap.get("result"));
UrlDto shortUrl = fromJson(resToStr, UrlDto.Builder.class).build();
return shortUrl;
}
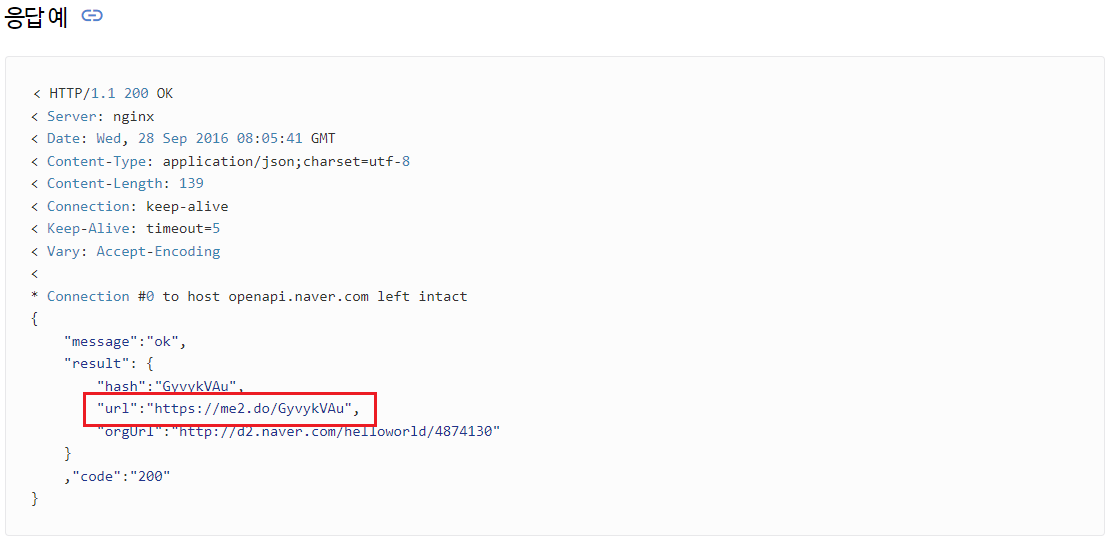
}communicate가 잘 동작하는지 확인하기 위해, 네이버 단축 url 생성 API를 연동해보자.
해당 API를 호출하기 위해선, 요청 헤더에 id 및 secret key를 설정해야 한다.
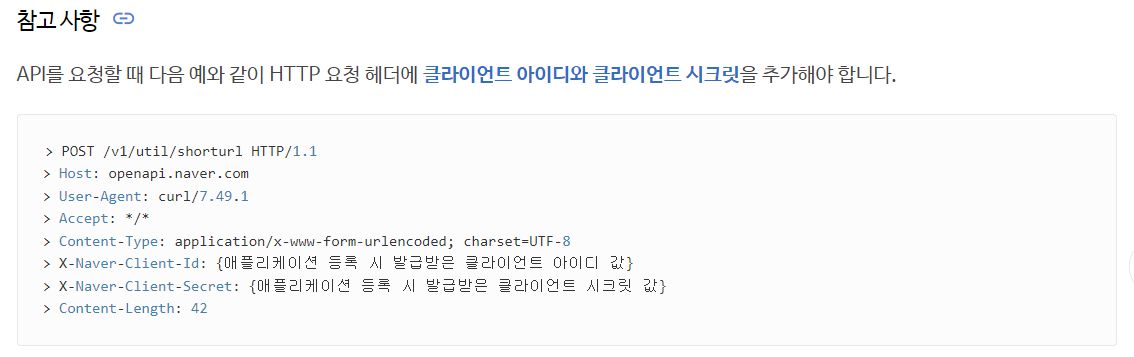
yml 파일에 등록한 값들을 가져와서 헤더에 설정해주자.
이미지는 POST 요청 예시지만, GET으로 바꿔서 전송해도 잘 동작한다.
5. controller
RestApiCallController.java
import com.communitcation.rest.model.UrlDto;
import com.communitcation.rest.service.RestApiService;
import lombok.RequiredArgsConstructor;
import org.springframework.http.ResponseEntity;
import org.springframework.web.bind.annotation.GetMapping;
import org.springframework.web.bind.annotation.RequestParam;
import org.springframework.web.bind.annotation.RestController;
import java.io.IOException;
@RestController
@RequiredArgsConstructor
public class RestApiCallController {
private final RestApiService restApiService;
@GetMapping("/naver/short-url")
public ResponseEntity<?> naverShortUrlApi(
@RequestParam("url") String url
) throws IOException {
UrlDto shortUrl = restApiService.makeShortUrlByNaverApi(url);
return ResponseEntity
.ok(shortUrl);
}
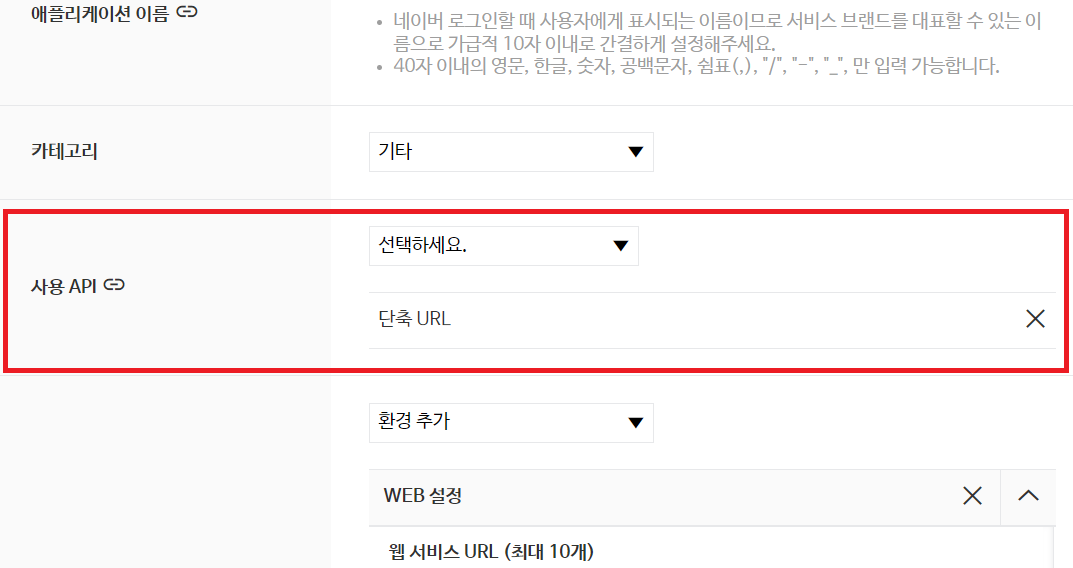
}실행 전에, Application > 내 애플리케이션 > API 설정에서
다음 이미지처럼 사용 API에 단축 URL이 등록되어 있어야 정상적으로 호출된다.
결과
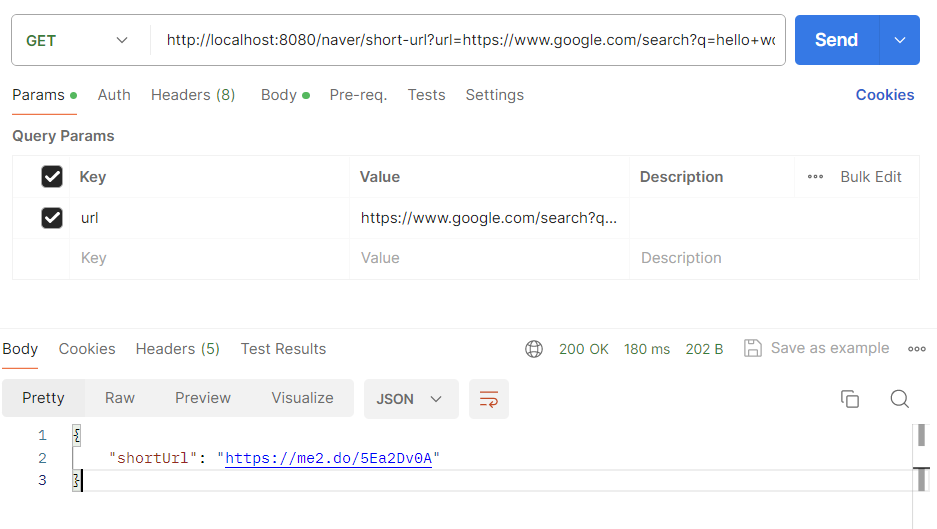
굿😜
2편에서는 Karlo 이미지 생성 AI, GPT api를 써보자.
