window.ethereum?
MetaMask가 설치되어 있고 실행중이라면 브라우저에서window.ethereum을 찍어보면MetaMask가 만들어둔ethereum객체가 생성되 있는것을 확인할 수 있습니다.
이것을 가지고Front서버에서MetaMask가 설치되어있는지 확인 할 수 있습니다.

Front에서 MetaMask로 요청 보내기

- 지난번에는
Front에서 바로Ethereum network로 다이렉트로 요청을 보냈다면 오늘은 브라우저에서MetaMask(지갑)으로JSON RPC요청을 보내면MetaMask에서Ethereum network로 요청을 보내줄것입니다.- 지난번과 같은 방식으로
Back서버에서 다이렉트로Transaction을 발생시킨다면 어찌됐던Back서버에 개인키를 보관하고 있다는 뜻이니 보안적으로 굉장히 취약합니다. 하지만,MetaMask를 사용하게 되면MetaMask에서 개인키를 각각 사용자의 로컬디렉토리에 개인키를 저장하기 때문에 비교적으로 안전하게 개인키를 보관할 수 있습니다.
초기 세팅
👉 Ganache-cli --chainId 1234
테스트할것이니 터미널에서
Ganache를 실행해주도록 하고chainId는 임의로 1213으로 설정해줍니다.

👉 Front React 설치
npx create-react-app [디렉토리명]
👉 hook 디렉토리 생성후 커스텀 훅으로 사용할 userWeb3.js 파일 생성 및 web3 라이브러리 설치
npm install web3로web3라이브러리를 설치한후import해올때는
import Web3 from 'web3/dist/web3.min.js'이런식으로Front에서 사용할 최소한의web3만import해오지 않으면 아래와 같이Error가 발생합니다.

코드 리뷰
- App.js
/* App.js */
import useWeb3 from './hook/userWeb3.js';
import { useState, useEffect } from 'react';
function App() {
const [account, web3] = useWeb3();
const [isLogin, setIsLogin] = useState(false);
const [balance, setBalance] = useState(0);
const handleSubmit = async (e) => {
e.preventDefault();
await web3.eth.sendTransaction({
from: account,
to: e.target.recived.value,
value: web3.utils.toWei(e.target.amount.value, 'ether'),
});
};
useEffect(() => {
const init = async () => {
const balance = await web3?.eth.getBalance(account);
setBalance(balance / 10 ** 18);
};
init();
if (account) setIsLogin(true);
}, [account]);
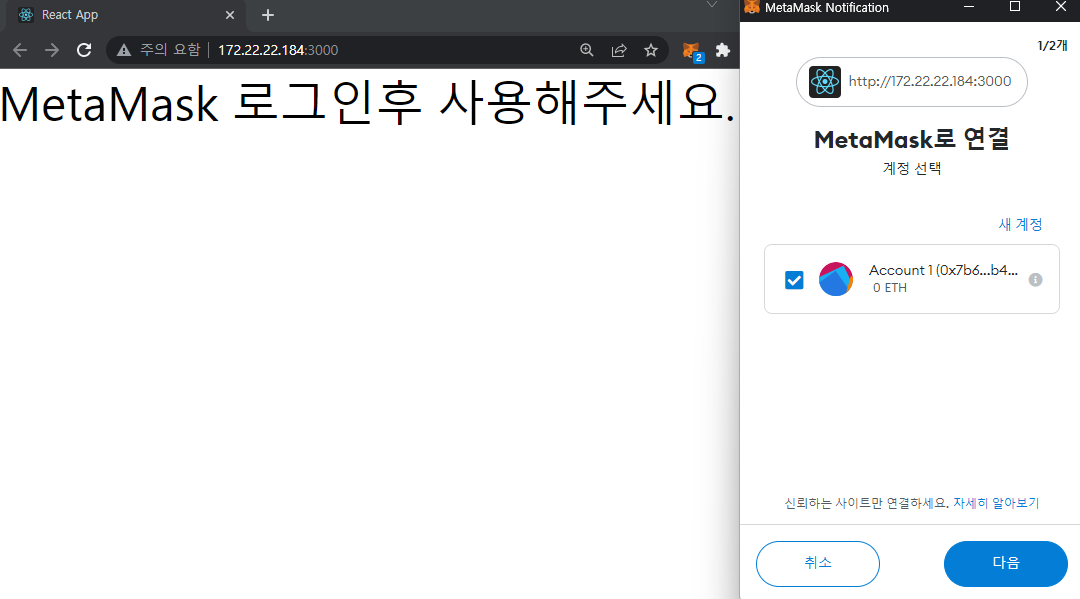
if (!isLogin) return <div>MetaMask 로그인후 사용해주세요.</div>;
return (
<div>
<span>
<h2>{account}님 환영합니다.</h2>
<div>Balance : {balance} ETH</div>
</span>
<div>
<form onSubmit={handleSubmit}>
<input type='text' id='recived' placeholder='받을계정' />
<input type='number' id='amount' placeholder='보낼 금액' />
<input type='submit' value='전송' />
</form>
</div>
</div>
);
}
export default App;- userWeb3.js ( Custom Hook )
import { useEffect, useState } from 'react';
import Web3 from 'web3';

const useWeb3 = () => {
	const [account, setAccount] = useState(null);
	const [web3, setWeb3] = useState(null);

	// MetaMask에서 생성해준 메서드로 ChainId를 가져옵니다.
	const getChainId = async () => {
		const chainId = await window.ethereum.request({
			method: 'eth_chainId',
		});

		return chainId;
	};

	// MetaMask에서 생성해준 메서드로 지갑 주소를 가져옵니다.
	// MetaMask에서 Front에 연결된 지갑이 없을경우 지갑을 연결해달라고 합니다.
	const getRequestAccounts = async () => {
		const account = await window.ethereum.request({
			method: 'eth_requestAccounts',
		});

		return account;
	};

	// 네트워크 추가 함수
	const addNetwork = async (chainId) => {
		const network = {
			chainId: chainId,
			chainName: 'suhwanGanache',
			rpcUrls: ['http://127.0.0.1:8545'],
			nativeCurrency: {
				name: 'Ethereum', // 통화 이름
				symbol: 'ETH', // 통화 기호
				decimals: 18, // 통화 소수점 자리
			},
		};

		await window.ethereum.request({
			method: 'wallet_addEthereumChain',
			params: [network],
		});
	};

	useEffect(() => {
		const init = async () => {
			try {
				const targetChainId = '0x4bd'; // 내가 설정한 Ganache ChainId
				const chainId = await getChainId(); // 사용중인 MetaMask Network의 chainId

				if (targetChainId !== chainId) {
					addNetwork(targetChainId);
				}

				const [account] = await getRequestAccounts();

				const web3 = new Web3(window.ethereum);

				setWeb3(web3);
				setAccount(account);
			} catch (e) {
				console.error(e.message);
			}
		};

		// MetaMask 설치함
		if (window.ethereum) {
			init();
		}
	}, []);

	return [account, web3];
};

export default useWeb3;
☝️ 브라우저 MetaMask 지갑 연결 확인
👉 window.ethereum을 확인하여 MetaMask가 설치되어 있는지 확인
if (window.ethereum) {
  init();
}
- 페이지 접속시 브라우저에
MetaMask가 설치되어있는지userWeb3.js Custom Hook에서window.ethereum으로 먼저 확인하고MetaMask가 있다면init함수를 실행합니다.
👉 브라우저와 연결된 지갑이 없으면 보여줄 화면
if (!isLogin) return <div>MetaMask 로그인후 사용해주세요.</div>;
MetaMask가 설치되어 있다면 지갑이 연결되어있는지 확인후 안되있을경우App.js에isLogin이false이므로MetaMask 로그인후 사용해주세요.가 표시되고MetaMask의 지갑 계정 중 연결할 계정을 선택하게 합니다.
- 지갑을 연결시켰다면
useWeb3.js의const [account] = await getRequestAccounts()로account값을 가져오고 그 값을App.js에게return해주기에App.js의account값에 지갑 주소가 들어가고account값이 변경되었으니useEffect의 내용이 실행되어init함수를 실행시켜 해당 지갑 주소의Balance를 가져온후setIsLogin을true로 변경해주게 되고 아래의 내용을return해주게 됩니다.
👉 App.js - useEffect()
useEffect(() => {
  const init = async () => {
    const balance = await web3?.eth.getBalance(account);
    setBalance(balance / 10 ** 18);
  };

  init();

  if (account) setIsLogin(true);
}, [account]);
👉 App.js - return
return (
		<div>
			<span>
				<h2>{account}님 환영합니다.</h2>
				<div>Balance : {balance} ETH</div>
			</span>
			<div>
				<form onSubmit={handleSubmit}>
					<input type='text' id='recived' placeholder='받을계정' />
					<input type='number' id='amount' placeholder='보낼 금액' />
					<input type='submit' value='전송' />
				</form>
			</div>
		</div>
	);
userWeb3.js에서 받아온account값과init함수로 구해온 해당 지갑의balance값을 가져와 화면을 리렌더링 해줍니다.
✌️MetaMask 네트워크 확인

MetaMask의 지갑 계정을 해당 페이지에 연결하면Ganache네트워크의chainId값과 현재 사용중인MetaMask의 네트워크를 가져와 해당Ganache네트워크chainId가MetaMask클라이언트에 이미 있는지 확인하고 없을경우에는 가져온Ganache네트워크의chainId로 새로운Network를 추가하도록 요청합니다.
👉 Ganache 네트워크가 MetaMask에서 현재 사용중인지 확인
const targetChainId = '0x4bd'; // 내가 설정한 Ganache ChainId
const chainId = await getChainId(); // 사용중인 MetaMask Network의 chainId

if (targetChainId !== chainId) {
  addNetwork(targetChainId);
}
👉 네트워크 추가 함수
	const addNetwork = async (chainId) => {
		const network = {
			chainId: chainId,
			chainName: 'suhwanGanache',
			rpcUrls: ['http://127.0.0.1:8545'],
			nativeCurrency: {
				name: 'Ethereum', // 통화 이름
				symbol: 'ETH', // 통화 기호
				decimals: 18, // 통화 소수점 자리
			},
		};

		await window.ethereum.request({
			method: 'wallet_addEthereumChain',
			params: [network],
		});
	};
👌 Transaction을 테스트할 임의의 지갑 생성
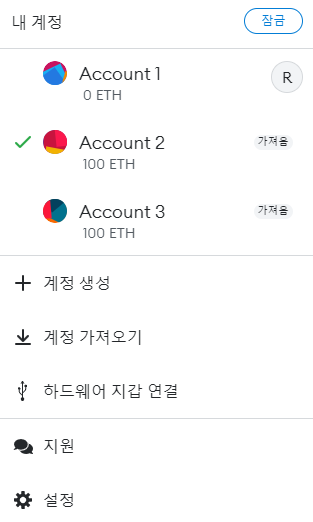
MetaMask의 지갑 계정도 연결하고 네트워크도 추가했으면Ganache의Test PrivateKey를 가지고 임의의 지갑 2개를 추가해줍니다.MetaMask에 지갑 추가하는 방법은 지난번 블로그 있습니다. 지갑을 추가하고 해당 페이지에 지갑들을 연결시켜주셔야 합니다.
🖖 Transaction 발생시키기
- 임의의 지갑들을 추가했다면
Account2번지갑에서Account3번지갑으로ETH를 송금하여Transaction을 보내봅니다.Account3번의 지갑 주소를 복사하고Account2번으로 연결하고 화면 새로고침후 지갑 주소와 보낼 금액을 입력하고 전송 버튼을 클릭합니다.

👉 전송버튼 클릭시 Transaction을 발생시킬 함수
	const handleSubmit = async (e) => {
		e.preventDefault();

		await web3.eth.sendTransaction({
			from: account,
			to: e.target.recived.value,
			value: web3.utils.toWei(e.target.amount.value, 'ether'),
		});
	};
- 지난번
Transaction을 보낼때처럼 다이렉트로 이더리움 네트워크로 보내느것이 아니라MetaMask를 거쳐서 이더리움 네트워크로 요청을 보내기 때문에from,to,value만 넣어주면 됩니다.
✋ Transaction 내용 확인

- 가스 수수료와 보내는 금액을 확인하고 아래의 확인 버튼을 클릭합니다.
- 지난번 일일이 가스
limit과 가스price와signature등등을 다 구해서sendTransaction을 했었는데MetaMask를 이용하니 정말 간단합니다.
☝️✋ 거래 확인
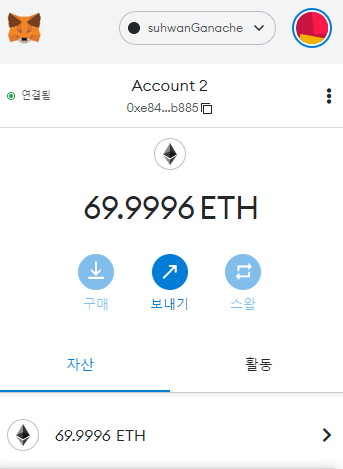
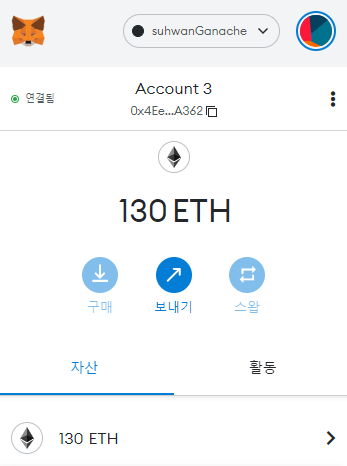
MetaMask에Account2번(발신자 지갑)을 확인해보면 보낸 금액30ETH과 일정 가스비가 같이 빠져나간것을 확인할 수 있고Account3번(수신자 지갑)은Account2번지갑이 보낸30ETH가 추가되어 있는것을 확인할 수 있습니다.