본 글은 패캠 웹개발 프로젝트 게시판 서비스의 강으를 만들어보고, 다시한번 정리하면서 쓴 글이다.
JSON API로 데이터 제공 -> Rest Repositories, Rest Repositories HAL Explorer
Restful한 API를 쉽게 만들어주는 라이브러리.
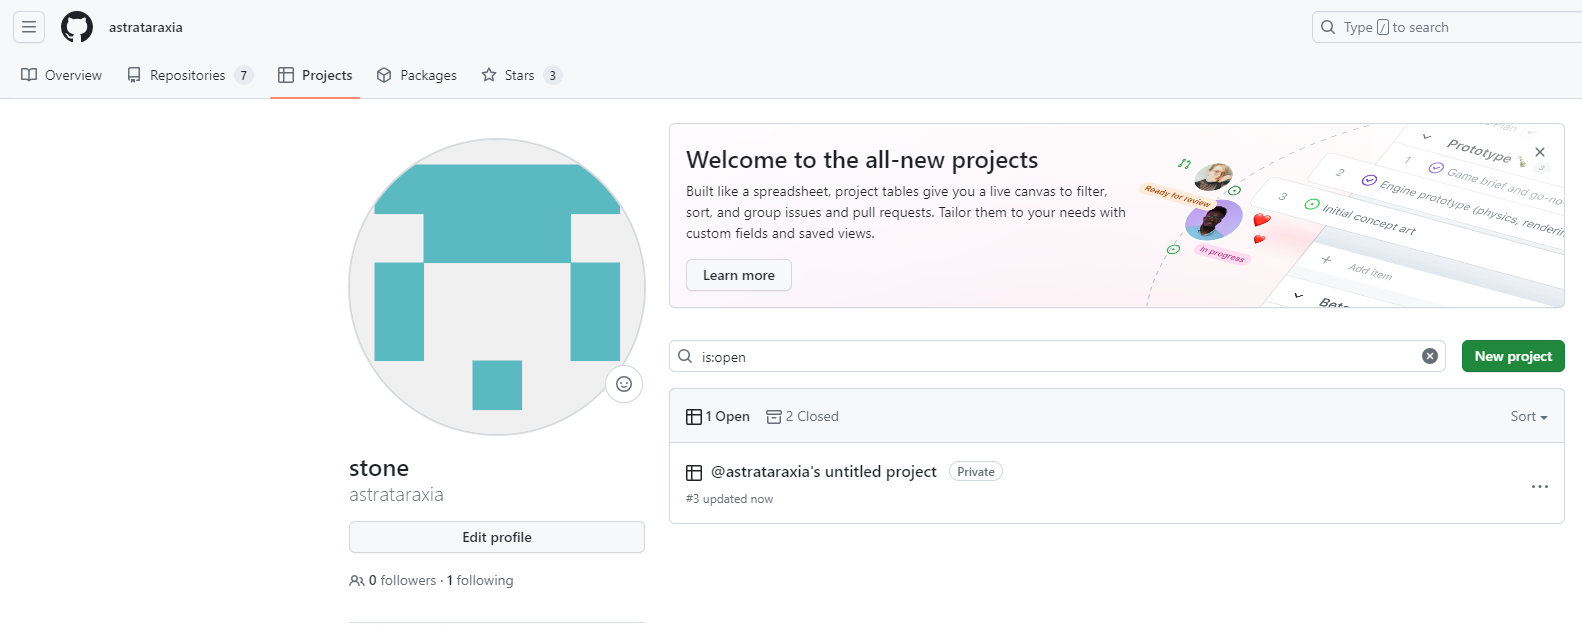
깃 헙
-
.gitignore => gitignore.io 사이트 이용하면 오래동안 만들어졌던 템플릿을 쉽게 이용 가능.
-
gitkraken => GUI git program 중에 꽤 나 좋은것..
-
issue, 마일스톤 등이 있음..
-
kanban board ( 에자일 프로세스 관련 칸반보드.. 깃헙에서 projects 에서 이런 것을 이용
할 수 있게 만들어 둠)
다양한 스타일의 탬플릿이 이미 있음. Team backlog 가 보통 괜찮은듯.
리포지토리에 종속되지 않게 만들 수 있음. (기존에는 하나의 리포지토리에 하나의 프로젝트, 하지만 이제는 프로젝트에 몇개의 리포지토리 일정이 들어가든 상관 없음)
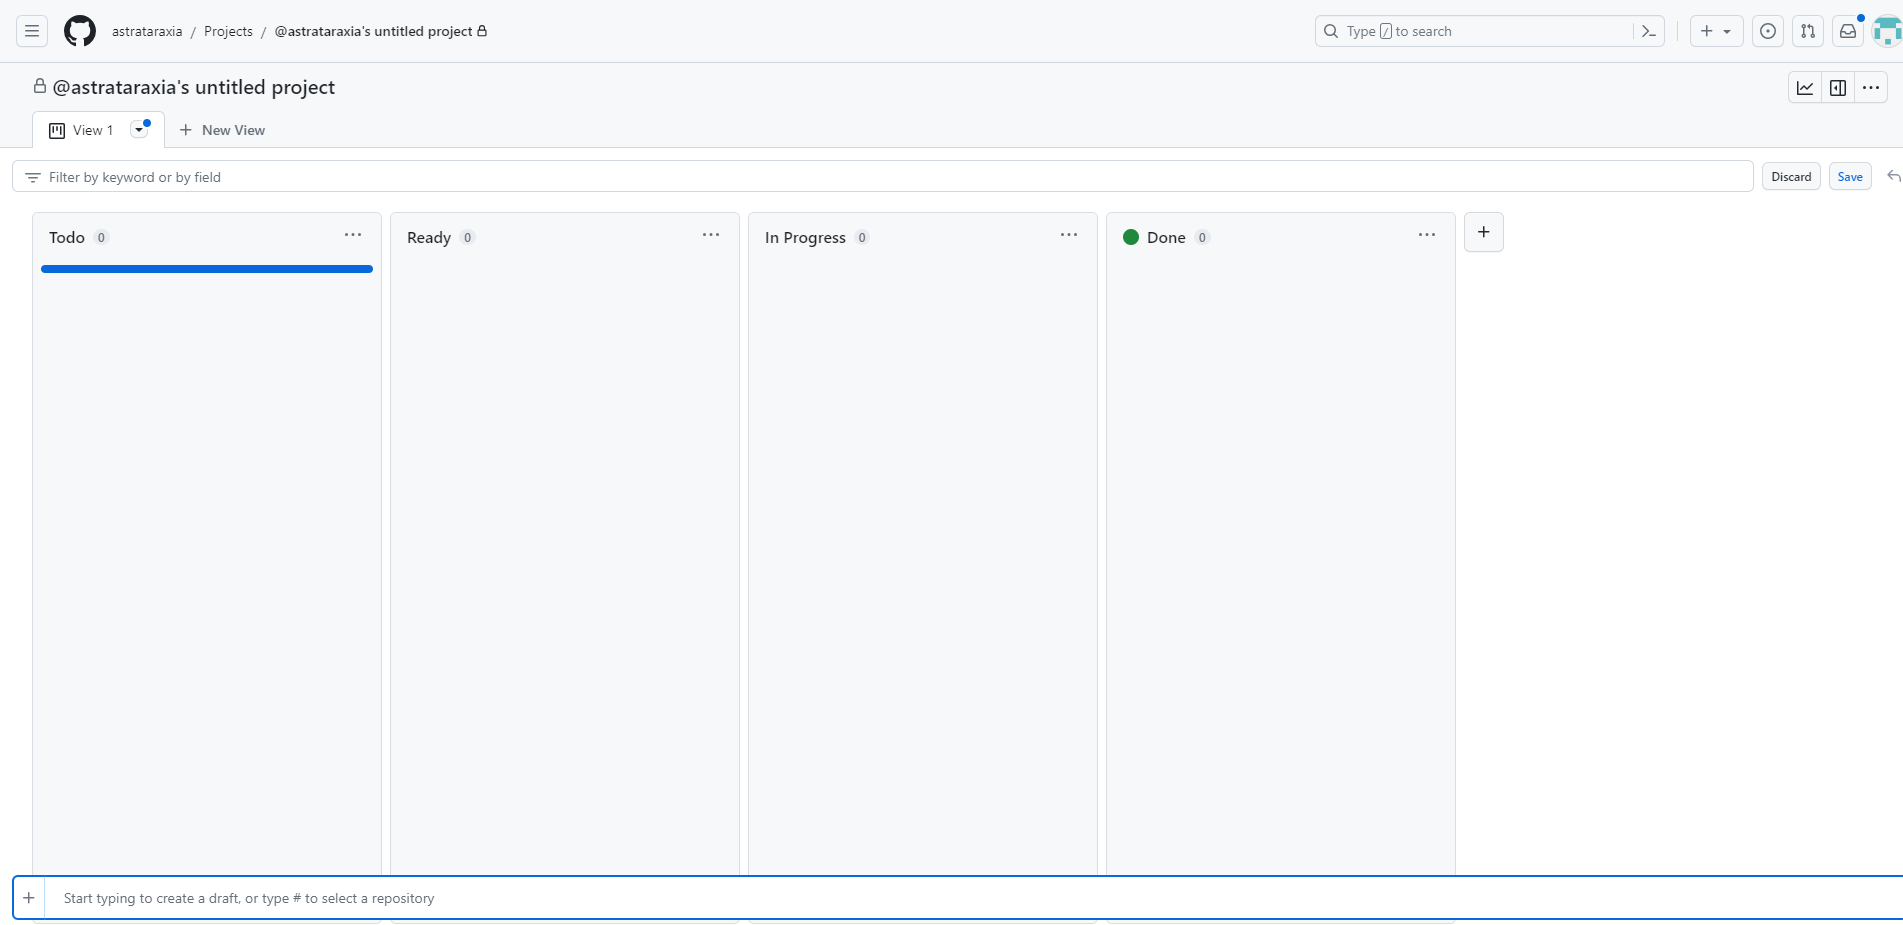
이런 식으로 프로젝트가 만들어지고, item을 넣고 리포지토리와 연동시켜서 관리 가능.
item을 만들고 아이템을 edit를 하면, convert to issue를 해서 이슈로 바꿀 수 있음.(레포지토리를 선택해서 가능)
item의 내용은 markdown문법을 이용해서 쓰기 가능.
실제 repository에 들어가면 이슈가 등록이 되어 있고 관리 가능.
아이템이 ready , in progress, Done 등으로 상황에 따라 이동되게 자동화도 가능
project settings에서 workflow를 설정 가능하다.(이미 웬만한 기능은 제공되고 있음.)
-
깃브랜치 전략 : 깃 브랜치를 운영하는 방법론
-
git flow : main, develop, feature, release, hotfix 브랜치를 설정하고 운영하는 방식
-
github flow : main, feature 브랜치 만으로 운영하는 방식
-
규모에 따라 보통 선택. 크면 git flow를 사용. 규모가 작으면 github flow 체택
git kraken을 이용하면 쉽게 깃플로우 전략의 브랜치를 만들 수 있고, 이것을 살짝 가다듬으면 깃헙 플로우 전략의 브랜치를 쉽게 구현 가능하다.
master - dummy , develop에 메인을 두고 feature로해서 사용 가능..
깃헙 프로젝트와 연동해서 github flow 전략을 쓸때, feature의 제목을 #이슈번호-제목을 사용하면 됨.
feature/#번호-제목 이런 식으로 브랜치를 그냥 만들어도 되지만, 깃플로우 전략을 깃헙 플로우로 바꿔서 쓰는 이유는, 편하게 feature를 안붙이고 만들 수 있어서...
유즈 케이스 관련
Lucidchart - 무료로는 3개밖에 안됨
diagrams.net(옛 draw.io) - github, google dirve등 다양한곳에 연동 가능
유즈케이스 말고도, erd등을 그릴때도 사용 가능
깃크라켄 터미널을 사용하면 깃 커멘드 및 깃크라켄 커멘드등의 터미널 자동완성 기능이있음.
github autolink reference
Issues and pull requests 등을 풀링크에서 short link로 치환 가능..
동일한 리포지토리안의 이슈나 풀리퀘라면 #number 로 가능. 따라서 commit 메시지에 현재 하고 있는 이슈 번호를 붙여주면 autolink 기능도 사용 잘 됨.
커밋 메시지는 그 팀에 따라 규칙을 세워 작성
커밋 메시지에는 무엇을, 왜를 적는게 좋음
feature branch는 pull request가 들어가서 머지되면 바로바로 삭제 해줘라.
setting에서 자동으로 삭제되게 할 수 도 있음.
API 설계
종류 | URI | method | 기능 | 설명
ㅡㅡㅡㅡㅡㅡㅡㅡㅡㅡㅡㅡㅡㅡㅡ
API 스펙
URI | method | 입력 데이터 구상
ㅡㅡㅡㅡㅡㅡㅡㅡㅡㅡㅡㅡㅡㅡㅡ
깃헙의 automatically close. -> pull request가 머지되면서 issue가 닫혀야 한다. 그런데 이걸 머지하고 돌아가서 닫으려면 귀찮음..(실수로 잊어버릴수도 있음)
write에 This {closed} #이슈번호 해주면 닫혀짐.
close
closes
colsed
fix
fixes
fixed
resolve
resolves
resolved
도메인 설계
DB 권한
create user 'name'@'localhost' identified by 'password';   //user 생성

select 'user' from 'mysql'.'user';  // mysql에 만들어진 유저 확인

show grants for 'name'@'localhost';  // 권한 확인

grant all on 'table'.* to 'name'@'localhost' with grant option
(grant option이 있으면 table에 대해서 다른 사람에게 권한을 줄 수 잇음, table에 대한 권한)

flush privileges;
// db에 권한을 적용하기 위해서 사용. 만약 권한을 설정 해줬는데 안되면 flush 명령을 해봐라
yml 설정중에서 기억해야될것?
spring:
  jpa:
    defer-datasource-initialization: true   //test용 db를 띄울때 초기값을 줄 수 있는 것. data.sql로 하면 됨.
    open-in-view: false
    properties:
      hibernate.format_sql: true   // sql 이쁘게 보게 해주는 포멧팅
      hibernate.default_batch_fetch_size: 100   // batch 쿼리 사이즈.

management.endpoints.web.exposure.include: "*"   // actuator 설정 다 들어나게 하기
JPA Auditing
@EnableJpaAuditing
@Configuration
public class JpaConfig {

	//createBy 를 사용할때, 자동으로 security나 이런것들을 이용할때 알아서 들어가게 하려면 필요함
    @Bean
    public AuditorAware<String> auditorAware() {
        return () -> Optional.ofNullable(SecurityContextHolder.getContext())
                .map(SecurityContext::getAuthentication)
                .filter(Authentication::isAuthenticated)
                .map(Authentication::getPrincipal)
                .map(BoardPrincipal.class::cast)
                .map(BoardPrincipal::getUsername);

     //return () -> Optional.of("kim"); 임의로 넣을때.. 위에는 시큐리티 적용.
    }


}


Auditing class

@Getter
@ToString
@EntityListeners(AuditingEntityListener.class)
@MappedSuperclass
public abstract class AuditingFields {

    @DateTimeFormat(iso = DATE_TIME)
    @CreatedDate
    @Column(nullable = false, updatable = false)
    protected LocalDateTime createdAt; // 생성일시

    @CreatedBy
    @Column(nullable = false, updatable = false, length = 100)
    protected String createdBy; // 생성자

    @DateTimeFormat(iso = DATE_TIME)
    @LastModifiedDate
    @Column(nullable = false)
    protected LocalDateTime modifiedAt; // 수정일시

    @LastModifiedBy
    @Column(nullable = false, length = 100)
    protected String modifiedBy; // 수정자
}
Entity의 Equals & Hash Code를 사용할때, 일반적인 Equals 비교 메서드가 아니라 엔티티의 특성에 맞게 바꿔주자.
primary key value 값을 이용해서 그 값만 같으면 같은 객체라는 것을 알 수 있게 만들어주자.
Equals & Hash Code
- pattern matching variable
if (animal instanceof Cat) {
    Cat cat = (Cat) animal;
    cat.meow();
} else if (animal instanceof Dog) {
    Dog dog = (Dog) animal;
    dog.woof();
}

원래는 캐스팅을 해줘야 됐다.

if (animal instanceof Cat cat) {
    cat.meow();
} else if(animal instanceof Dog dog) {
    dog.woof();
}

자바14에서 부터 pattern variable 캐스팅 없이바로 가능.
@Override
public boolean equals(Object o) {
	if (this == o) return true;
    if (!(o instanceof Article that)) return false;
    return this.getId() != null && this.getId().equals(that.getId());
}

@Override
public int hashCode() {
	return Objects.hash(this.getId());
}
services 탭에서 spring boot 넣어서 시작 가능. run 에서 볼수 있던걸 services 탭에서 보는 이유는 프로젝트가 커지거나 하면 한번에 다 볼 수 있고 여러가지 관리가 더 쉬움.
Slice Test
- junit5 부터 생성자 주입이 테스트에서도 된다.
- DataJpaTest : 모든 테스트에 Transactional을 걸어 준다.
@DisplayName("JPA 연결 테스트")
@Import(JpaRepositoryTest.TestJpaConfig.class)
@DataJpaTest
class JpaRepositoryTest {

    private final ArticleRepository articleRepository;
    private final ArticleCommentRepository articleCommentRepository;
    private final UserAccountRepository userAccountRepository;
    private final HashtagRepository hashtagRepository;

	JpaRepositoryTest(@Autowired ArticleRepository articleRepository,
                      @Autowired ArticleCommentRepository articleCommentRepository,
                      @Autowired UserAccountRepository userAccountRepository,
                      @Autowired HashtagRepository hashtagRepository) {
        this.articleRepository = articleRepository;
        this.articleCommentRepository = articleCommentRepository;
        this.userAccountRepository = userAccountRepository;
        this.hashtagRepository = hashtagRepository;
    }
MappedSuperclass 와 Embedded , 둘 다 하나의 뎁스를 더 둬서 엔티티의 반복적인 클래스를 따로 빼서 관리 가능.
MappedSuperclass는 상속으로, Embedded는 필드로 추가 가능.
간단한 API 만들기
spring data Rest Repository(api를 만들어주는것) HAL-exploer = 시각적으로 보기 편하게 만들기
spring:
  data.rest:
    base-path: /api   //기본 경로
    detection-strategy: annotated  //기본값 default ,
    //(ALL, ANNOTATED(어노테이션이 붙은것만), VISIBILITY(public repository만)
@RepositoryRestResource 를 레포지토리에 붙이기만 하면 기본적인 crud의 api를 만들어 준다.
- Spring Data Rest는 실무에서는 사용하기엔 애매하다.
- 간단한 CRUD기능을 하기엔 좋지만, 비지니스 로직을 감당하기엔 무리.
test할때 이름을 짓는데 아예 이름 자체를 given_when_then 형식으로 테스트 이름을 지어버리는 스타일도 있다. (대신 테스트 메서드 이름이 엄청 길어짐. 따라서 displayName이 필수)
Repository에 extends
QuerydslPredicateExecutor<Entity>, //엔티티 안에 있는 모든 필드에 대해 검색 기능을 추가해준다. 기본적인 검색기능제공(exactly)QuerydslBinderCustomizer<QClass>//엔티티의 QClass를 넣어주면됨. 이름에서 보듯이 커스터마이즈 할 수 있음.
QuerydslBinderCustomizer 에서 상속받을 수 있는 메서드 중에 customize가 있음. 이것을 사용하면 customizing가능..
interface에서 작업하는데, 이때 default를 이용해서 정의.
@Override
default void customize(QuerydslBindings bindings, QArticle root) {
	bindings.excludeUnlistedProperties(true);
    bindings.including(root.title, root.content, root.hashtags, root.createdAt, root.createdBy);
    bindings.bind(root.title).first(StringExpression::containsIgnoreCase);
    bindings.bind(root.content).first(StringExpression::containsIgnoreCase);
    bindings.bind(root.hashtags.any().hashtagName).first(StringExpression::containsIgnoreCase);
    bindings.bind(root.createdAt).first(DateTimeExpression::eq);
    bindings.bind(root.createdBy).first(StringExpression::containsIgnoreCase);
}
excludeUnlistedProperties(true)- 모든 필드에 대해 검색 기능이 열려있는데 포함하지 않을 것을 제외 할 수 있게 해주는 기능.including(filed)- 실제 검색이 가능하게 만들 필드를 정의bindings.bind(root.title).first(StringExpression::containsIgnoreCase);- 실제 검색조건을 정의할때(기존은 exactly), containsIgnoreCase => `like '%${v}%'bindings.bind(root.title).first(StringExpression::likeIgnoreCase);- 이 경우에는 쿼리가 like '${v}'bindings.bind(root.createdAt).first(DateTimeExpression::eq);- 시간의 경우에는 eq, after, before등이 갈 수 있음. (String eq가능). 다만 eq의 경우에는 exactly로 매칭되어야됨.
이것은 QueryDsl이 제공하는 기능이다.
Spring JPARepository를 상속받으면 Repository를 사용할 필요 없음.(이미 가지고 있음).
뷰 엔드포인트
controller단의 테스트
@WebMvcTest(테스트할 컨트롤러 클래스)
class controller

	private final MockMvc mvc;

    public ArticleControllerTest(@Autowired MockMvc mvc) {
    	this.mvc = mvc;
}-
@WebMvcTest(ArticleController.class)이런식으로 받아올 컨트롤러도 제한 가능 -
보통 andExpect(status().상태) 상태코드 검사
-
contentType 등..
-
andExpect(model().attributeExists(modelname) , 모델 테스트도 가능.
-
andExpect(view().name("articles/detail")) => mvc는 뷰 테스트도 가능
-
정상 호출 및 실패 호출 테스트가 둘 다 필요하다
-
gradle build시 테스트가 통과하지 못하면 build가 실패함. 따라서 테스트가 성공해야 빌드가 된다.(설정으로 제외할 수 있음.)
뷰를 만들때, thymleaf를 사용한다.
반복되는 부분들을 컴포넌트 형식으로 때서 구성 가능. th:replace , th:insert 등이 있음.
예전에는 fragment를 넣었어야 replace등에 작동했는데 이제는 fragment가 필요 없이 자동으로 태그나 id, class를 통해 찾을 수 있음.
th:replace="~{header :: header}" 기존
th:replace="header :: header" 생략 가능 버전
타임리프의 디커플링 기능 ...
=> 기존의 html 문서에서 th태그들을 아예 따로 때서 관리할 수 있는 기능. 순수한 HTML만을 볼 수 있고, th 태그들은 다른 쪽에서 랜더링하게되면 들어가게 된다.
(직접 사용해봤을땐, 생각보다 불편했다. xml로 작성해야 됨..;;; 다만 html이 순수하게 유지될 수 있는 점은 분명 강점이 있었다.)
타임리프 + security
타임리프 + Spring Security를 동시에 넣으면 로그인 페이지가 제공된다.
SecurityConfig // springboot 2.7 이후 큰 변화가 생김
Migrating From WebSecurityConfigurerAdapter to SecurityFilterChain
Spring Boot 2.7 upgrades to Spring Security 5.7 which has deprecated WebSecurityConfigurerAdapter. When configuring Spring Security without WebSecurityConfigurerAdapter and using Spring Boot’s sliced tests such as @WebMvcTest, you may need to make some changes to your application to make your SecurityFilterChain beans available to your tests by @Import ing your security configuration class. See the reference documentation for further details.
컴포넌트 기반 보안 구성으로 전환할 것을 권장합니다.
기존의 방법. WebSecurityConfigurerAdapter를 상속받는 방법
@Configuration
public class SecurityConfiguration extends WebSecurityConfigurerAdapter {

    @Override
    protected void configure(HttpSecurity http) throws Exception {
        http
            .authorizeHttpRequests((authz) -> authz
                .anyRequest().authenticated()
            )
            .httpBasic(withDefaults());
    }

}
2.7이후 SecurityFilterChain을 빈 등록하는 방법
@Configuration
public class SecurityConfiguration {

    @Bean
    public SecurityFilterChain filterChain(HttpSecurity http) throws Exception {
        http
            .authorizeHttpRequests((authz) -> authz
                .anyRequest().authenticated()
            )
            .httpBasic(withDefaults());
        return http.build();
    }

}- @EnableWebSecurity : spring boot 사용에서는 안넣어도 됨. autoconfig에 이미 들어가 있음.
http
.authorizeRequests().anyMatchers("/**").permitAll()
http
.authorizeHttpRequests(auth -> auth.anyRequest().permitAll())
.formLogin().and()
.build();서비스 계층 테스트. 스프링부트 슬라이스 테스트기능을 사용하지 않고 사용하기
(스프링부트에서 제공하는 간편한 슬라이스 기능 애노테이션들)
더 가볍게 테스트를 하기 위해.. (필요한 부분이 있으면 Mockito를 이용)
@ExtendWith(MockitoExtension.class)
class ArticleServiceTest {

    @InjectMocks private ArticleService sut;   //Mock을 주입하는 대상을 InjectMocks로 사용

	//나머지는 Mock
    @Mock private HashtagService hashtagService;
    @Mock private ArticleRepository articleRepository;
    @Mock private UserAccountRepository userAccountRepository;
    @Mock private HashtagRepository hashtagRepository;

}
-
given(): BDDMockito => given, when, then 패턴을 구현하는 BDD중 모키토 테스트.. -
willDoNothing()=> void 타입이라 return이 없을때 .. -
willReturn()=> 반환 타입이 있을때, 이런 타입을 리턴할거다.. -
then(): => 일어난 일.
void test

given(repository.save(any(Entity.class))).willReturn(Optional.of(entity));

service.saveArticle(ArticleDto ...);

then(repository).should().save(any(Entity.class));  // 세이브가 호출이 되었나 확인..
@ToString(callSuper = true) : 상속 뎁스의 Tostring까지 찍겠다는 말.
픽스쳐 => 테스트 내에서 계속 사용될수 있는 데이터들.. 따로 뽑아서 쓰거나, 모아서 테스트에 만들어 둠
Spring JPA Repository 네이밍 컨벤션에서,
ArticleCommant 객체 내에서 , findByArticle_Id로쓰면 Article 객체 내부의 Id를 사용하는것. (연관관계가 걸려 있어야됨)
_ (언더바)를 사용한다는것은 JPA에서 객체의 내부를 타고 들어가서 검색한다는 것을 말함.
@ManyToOne(optional = false) 주석이 있는 엔터티의 모든 인스턴스에는 연결된 엔터티에 대한 유효한 참조가 있어야 한다는 뜻. 즉 값이 존재해야 한다.
    public static ArticleDto from(Article entity) {
        return new ArticleDto(
                entity.getId(),
                UserAccountDto.from(entity.getUserAccount()),
                entity.getTitle(),
                entity.getContent(),
                entity.getHashtags().stream()
                        .map(HashtagDto::from)
                        .collect(Collectors.toUnmodifiableSet())
                ,
                entity.getCreatedAt(),
                entity.getCreatedBy(),
                entity.getModifiedAt(),
                entity.getModifiedBy()
        );
    }

    public Article toEntity(UserAccount userAccount) {
        return Article.of(
                userAccount,
                title,
                content
        );
    }
- Dto에서 엔티티 -> Dto , Dto-> entity의 매핑 코드.
- 이게 왜 좋은가? Entity는 Dto의 존재를 모름. 순수하게 남길 수 있음.
- 또한 OSIV (Open-in-view=false).. 영속성 컨텍스트의 생존 범위.. 문제 이건 OSIV를 키면 개발에 더 편리하다. 하지만, 성능에 분명 영향이 있다
컨트롤에서 조차 DTO를 모르게하고, Response, Request를 통해서만 주고받게 설계..
한 feature branch에 너무 많은 양을 커밋해야되면 중간에 branch를 만들어서, 그 새로운 브랜치에 pull request를 날려 merge 이력을 남길 수 있다. 이렇게 하면 코드 리뷰의 부담을 나눌 수 있음(중간에 한번 점검 해 갈 수 있다는 점이 좋음.)
-
findByContentContaining : spring data jpa에서 Containing이라는 키워드를 붙이면 부분 검색이 가능하다.
-
getReferenceById vs findById => getReferenceById는 레퍼런스를 주는것. findById를 사용하면 바로 select 쿼리가 나가서 참조만 하겠다는 뜻에서 getReferenceById사용 가능.
getReferenceById는 값이 없을 시 EntityNotFoundException을 던져줌
SpringBootTest(webEnviroment = SpringBootTest.webEnviroment.NONE, class = PaginationService.class)
인증
mvcMatchers 도입 (옛 antMatchers, 호환됨. 추가로 스프링 기반의 패턴매칭 가능)
@Bean
public SecurityFilterChain securityFilterChain(HttpSecurity http) throws Exception {

	return http
    		.authorizeHttpRequests(auth -> auth
            	.mvcMatchers(
                	HttpMethod.GET,
                    "/",
                    "/articles",
                    "/articles/search-hashtag"
                 ).permitAll()
                 .anyRequest().authenticated()
             )
             .formLogin().and()
             .logout()
             		.logoutSuccessUrl("/")
             		.and()
             .build();
    }

//map을 할때 Principal 클래스를 하나 만들어서 해줬다..
@Bean
public UserDetailsService userDetailsService(UserAccountService userAccountService) {
        return username -> userAccountService
                .searchUser(username)
                .map(BoardPrincipal::from)
                .orElseThrow(() -> new UsernameNotFoundException());
}


// Static file들
	CSS("/css/**"),JAVA_SCRIPT("/js/**"), IMAGES("/images/**"),
    WEB_JARS("/webjars/**"), FAVICON("/favicon.*", "/*/icon-*");
    근데 사용은 하지 않을거임. why?
    spring이 경고를 함. 이 기능을 사용하지 말고, 차라리 httpsecurity를 이용해서
    차라리 permitAll을 해라. security가 아예 보지 않아서 문제가 됨.
    httpsecurity 안에 들어가면 일단, 그래도 csrf의 관리 하에 들어가게된다.
    여러가지 시큐리티 설정들의 보호를 받을 수 있게 된다.
//@Bean
//public WebSecurityCustomizer webSecurityCustomizer() {
//	return web -> web.ignoring()
// 		.requestMatchers(PathRequest.toStaticResources().atCommonLocations());
//    }


   .requestMatchers(PathRequest.toStaticResources().atCommonLocations())
 이 부분을 그냥 http쪽에 넣기만 하면됨.


http
    		.authorizeHttpRequests(auth -> auth
            	.requestMatchers(PathRequest.toStaticResources().atCommonLocations()).permitAll()
            	.mvcMatchers(
                	HttpMethod.GET,
                    "/",
                    "/articles",
                    "/articles/search-hashtag"
                 ).permitAll()
                 .anyRequest().authenticated()
             )
             .formLogin()
             .build();
    }
Principal 클래스
public class BoardPrincipal implements UserDetails{

	String username;
	String password;
	String email;
	String nickname;
	String memo;
  	Collection<? extends GrantedAuthority> authorities;


    @Override public String getUsername() { return username; }
    @Override public String getPassword() { return password; }

    //권한에 관한 것
    @Override public Collection<? extends GrantedAuthority> getAuthorities() {
    	return authorities;
    }

    @Override public boolean isAccountNonExpired() { return true; }
    @Override public boolean isAccountNonLocked() { return true; }
    @Override public boolean isCredentialsNonExpired() { return true; }
    @Override public boolean isEnabled() { return true; }

}
- UserDetails class를 상속받아 principal을 만들면됨. 만약 구현된 클래스를 사용하고 싶다면 User 클래스를 사용해도 되지만, 그러면 여러가지 구현에 맞춰 해줘야됨.
- 밑에 많은 내용들을 그냥 true로 해주면 된다. why? 우리가 직접 구현하는게 아니라, Spring Security 를 통해 사용
return new BoardPrincipal(
	username,
    password,
    roleTypes.stream()
    	.map(RoleType::getName)
        .map(SimpleGrantedAuthority::new)
        .collect(Collectors.toUnmodifiableSet())
        ,
        email,
        nickname,
        memo,
        oAuth2Attributes
);
권한 부분에서, GrantedAuthority의 기본 구현체인 SimpleGrantedAuthroity를 많이 사용한다. (Spring에서 이미 주어진것)
스프링 시큐리티의 인증 기능을 이용할때는 PasswordEncoder를 사용해야 한다.
@Bean
public PasswordEncoder passwordEncoder() {
	return PasswordEncoderFactories.createDelegatingPasswordEncoder();
}- 기본적으로 Spring Security가 제공하는 PasswordEncoder 사용.
- 암호화 모듈
JPA Config 를 통해 사용자를 바로 알 수 있음. (Auditing에서 CreateAt의 정보를 이제 자동으로 시큐리티를 통해 넣을 수 있게 되는 방법)
@Bean
public AuditorAware<String> auditorAware() {
    // 임시로 걸어둔 사용자 자동 입력을 이제 스프링 시큐리티를 이용해 바꿔보자
	return () -> Optional.of("kim");
}

Change

@Bean
public AuditorAware<String> auditorAware() {
	return () -> Optional.ofNullable(SecurityContextHolder.getContext())
    	.map(SecurityContext::getAuthentication)
        .filter(Authentication::isAuthenticated) //인증이 되었는지 필터를 걸러줌.
        .map(Authentication::getPrincipal)
        .map(BoardPrincipal.class::cast)  // x -> (BoardPrincipal) x  캐스트도 더 똑똑하게 사용가능..
        .map(BoardPrincipal::getUsername);
}- `SecurityContextHolder - 인증 정보를 모두 가지고 있는 클래스.
TEST에서 시큐리티 적용후 유저 정보 이용할 떄
@WithMockUser => 가짜 유저 정보(제대로 인증되었다고 친)를 준다. 대신 우리가 security를 이용한 유저 정보가 오는 것은 아니라는 점을 알아둬라. 가짜 유저정보를 주는것이다. 가짜..!!
@WithUserDetails => 실제 유저 정보를 이용 할 수 있음.(당연히 데이터베이스에 유저가 있어야 함)
@WithUserDetails(value = "unoTest", setupBefore = TestExecutionEvent.TEST_EXECUTION) //테스트를 시작하기 직전
옵션에 userDetailServiceBeanName 도 적을 수 있지만, 우리는 하나만 만들었고, 그렇다면 알아서 그것만 찾기 때문에 생략하면 됨(만약 두개 이상이라면 이름을 적어 줘야됨)
인증 유저 정보 받아 올때
@AuthenticationPrincipal BoardPrincipal boardPrincipal - 파라미터로 사용하면 됨
SecurityContextHolder에서 받아오는 방법도 있지만 위의 방법이 좀 더 좋다고 한다.
깃헙 릴리즈
클라우드에 올려서 사용하기..
릴리즈를 하기 위해선 TAG 가 준비되어 있어야 한다.
gitkraken -> Create Tag || 버전을 정해야한다. 이때 버전에 대한 네이밍은 software versioning 을 검색해 보자.
만든 tag를 github에 push 한다. 그럼 깃헙에 태그가 올라가 있음.
Tag를 눌러서 들어가면, Release 가 나오는데 New Release를 통해 만들 수 있음.
Release에 적을 내용들은 실제 Project 들을 참고해 보자. 우리가 사용하는 Spring FrameWork에 들어가면 Release note가 있는데 이것을 봐도 됨.
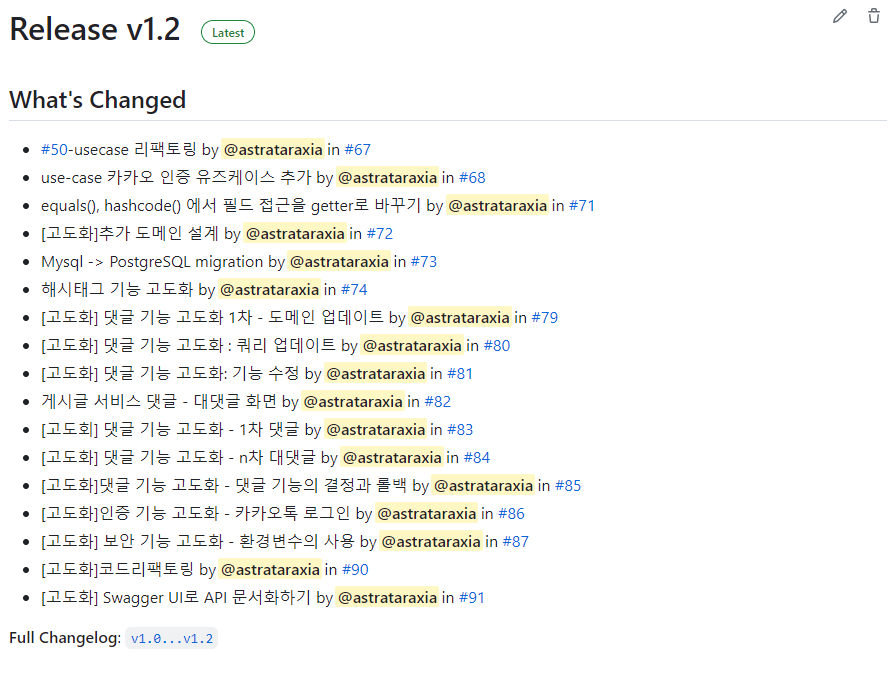
간단하게 내가 만든 릴리즈 버전
커밋 번호들을 넣으면서 Change 할 수 있음.
우리가 이제 개발을 하다가, 만약 문제가 생긴다면 안정 버전인 v1.0으로 돌아가서 다시 할 수 있다. 거기다 CompareTo를 통해 비교도 가능
깃헙 연동을 통한 자동 deploy 클라우드 배포 (헤로쿠 이용)
무중단 배포
- 헤로쿠가 유료가되었다. (무료였는데...)
create new pipe-line 을 통해 생성
Connect to GitHub 바로 가능. 여기서 우리가 배포할 레포지토리 추가한뒤 create pipe-line 하면 된다.
이 파이프라인은 헤로쿠에서 일어나는 일련의 테스트, 배포 동작들을 만들어 둔 것.
이때 STAGING과 PRODUCTION으로 나눠서 실제 배포(PRODUCTION), TEST(STAGING)을 해볼 수 있다.
우리는 바로 서비스 단계로가서, PRODUCTION 에서 create new app을 하면 된다.
region도 선택하면 됨
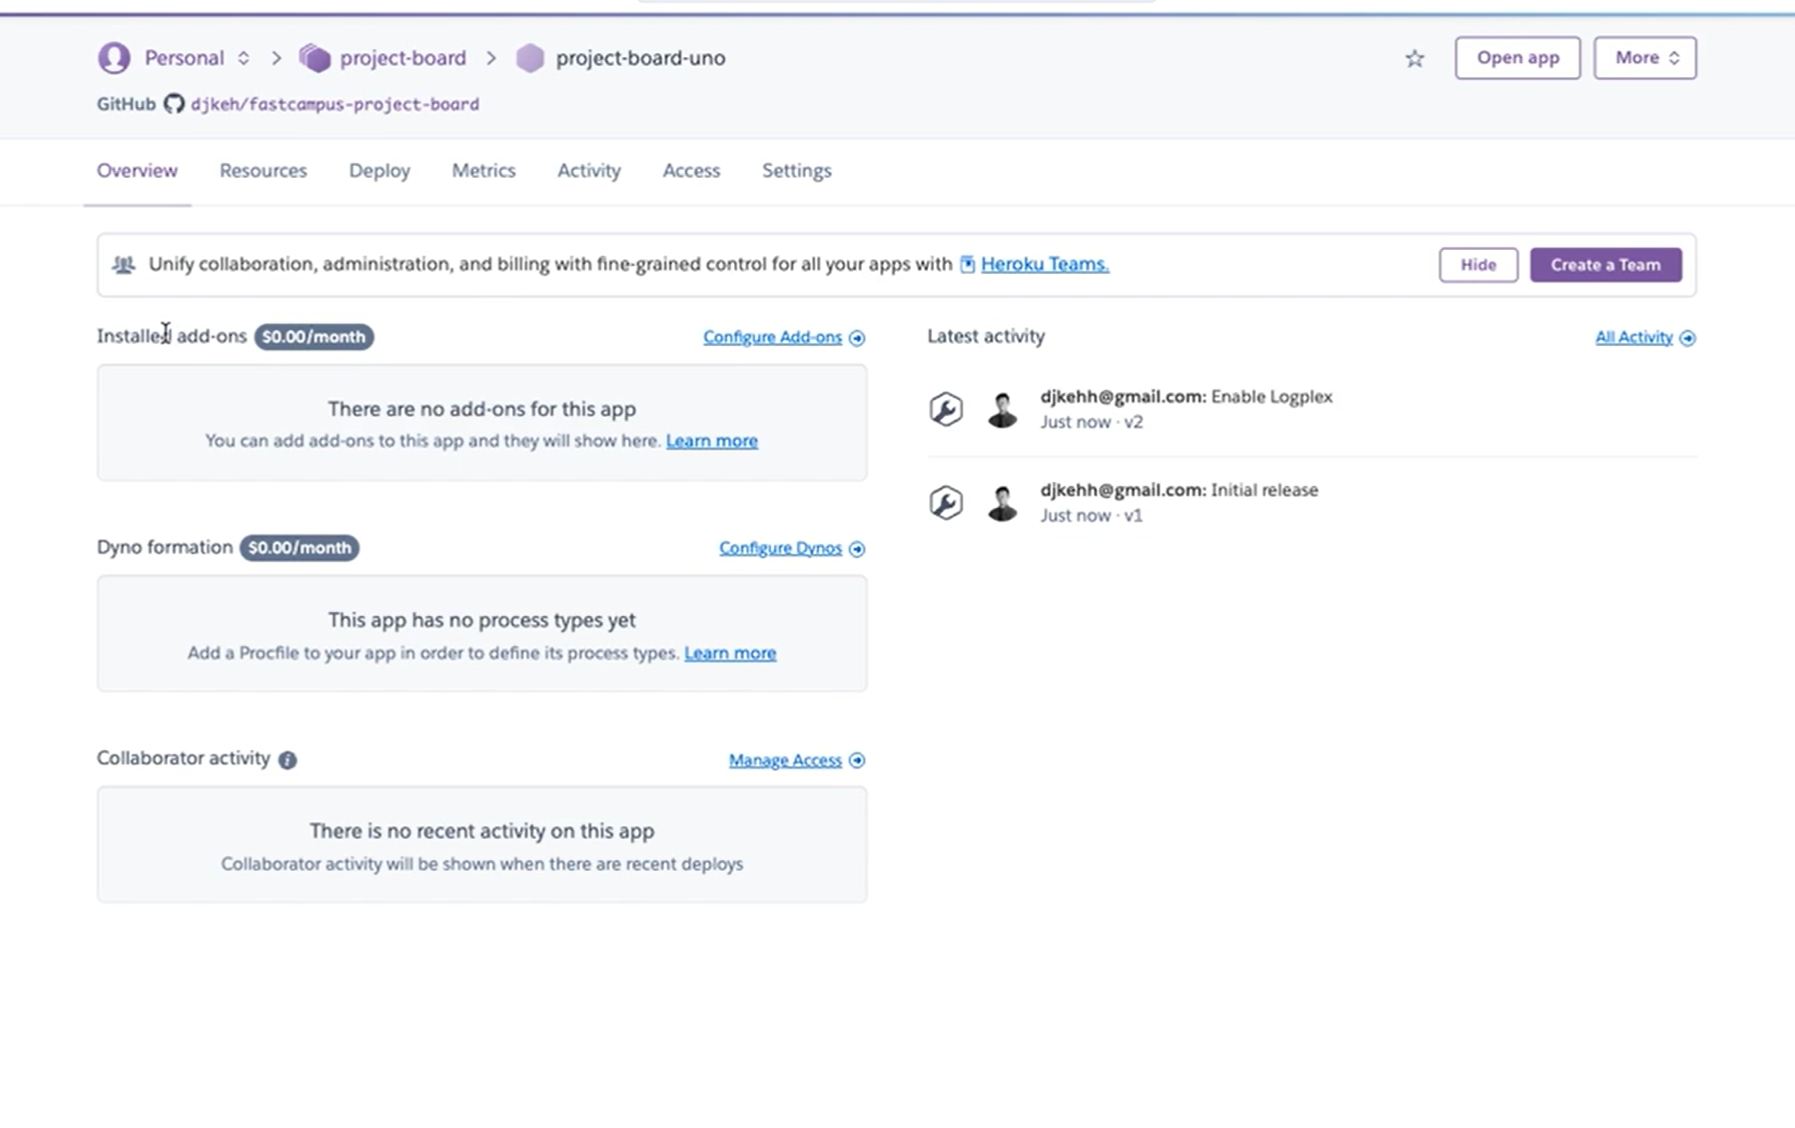
만들면 이런 화면이 나오는데,
-
Installed add-ons 은 여러가지 서드파티 솔루션들을 붙일때 사용 하는것.
-
Dyno formation : 하나의 가상 클라우드 인스턴스 개념.. (나중에 헤로쿠 배포를 하게되면 자동으로 생성될것이다)
Deploy 텝에서
-
Automatic deplys 설정 탭을 보면 브랜치 선택이 있고, able Automatic Deploys가 있는데 이를 활성화 하면 자동 배포가 됨.
-
물론, github repository 연동들을 잘 봐야됨.!!!
-
언제 이것이 반영 되나? 선택한 branch에(여기선 Main) Push가 일어났을때 반영이 된다.
Deploy가 된 뒤에는 각종 지표들을 Metrics를 통해 볼 수 있고 ,활동들도 Activity 탭을 통해 볼수 있다.
셋팅에서 여러가지 선택도 가능하다
- Config Vars 환경 변수 넣는것.
- Domain 네임도 있음.
우리는 MySQL을 쓸것이다. Add ons를 통해 바로 붙여보자.
Resources 탭을 가서 -> MySQL을 선택하자 ( 추천이 많이 뜬다) 이때 ClearDB MySQL을 선택한다.(이 사용 법만 봣음.. 다른건 잘 모르겠다)
이것을 선택하면 ClearDB에 대한 환경변수 정보들이 Settings에 이미 들어가 있을것이다.
Project에 이것을 세팅 해야된다는 뜻이다. Datasource 설정.. ( 그래야 프로젝트가 서버에 올라갔을때, MySQL을 이용)
-> 이것을 그대로 올리면 안된다. 진짜 큰일난다 이거 들키면 걍 해킹당하고 난리남..
환경변수에 key value값을 보고 key를 올리면 됨.
헤로쿠 CLI로 접속하는 방법.. => homepage에 documentation => java
그 방법에 따라서 설치하고, heroku login 을 하면됨
그 전에 잠시 돌아서 헤로쿠를 사용하기 위한 프로젝트에서의 설정을 잠깐 보겠다.
빌드 방법
프로젝트에 Procfile을 만들어놓고
// 또한 build.gradle에서 version 정보를 우리가 versioning한 네임으로 바꿔주어야 된다.
// 기본적으로 0.0.1v 으로 되있는데 우리는 v1.0으로 바꾸자
web: java $JAVA_OPTS -Dserver.port=$PORT -Dspring.profiles.active=heroku -jar build/libs/project-board-v1.0.jar./gradle clean build
System.Properties 도 만들라고 한다
java.runtime.version=17
build.gradle 에서도 설정할 것
jar {
	mainfest {
    	attributes('Main-Class': '패키지루트부터 Mainclass이름까지')
   }
}
이것을 푸쉬해줘야 헤로쿠 설정이 적용된다!!
푸쉬를 해주자
다시 heroku CLI로 돌아와서
heroku create
만들어 주자 cli 환경에서 했다면 뭐 추가하라는 설명이 있을것임..
heroku git:remote --app appName
git push heroku main
헤로쿠에 푸쉬 된다.
heroku open // 실제 헤로쿠를 띄워 볼 수 있다.
(그런데 이 작업은 별 필요가 없는듯함 why? 실제로 그냥 깃헙에 푸쉬가 되면 계속 알아서 heroku에서 하는듯.. 실제로 그때는 한번 봐야될듯. 자동으로되면 안하면되고 만약 안된다면? 위 작업을 좀 하면 될듯 )
문제가 생겼다. clearDB의 MySQL 버전이 5.6 지원.. 8버전이랑 큰차이. (실제 지금은 어떤지 모르지만 이렇게 DB지원 버전이 다를 수 있으니 잘 찾아보자)
Jaws DB로 바꿔서 진행..
잘 반영되면 다시 tag를 1.1로 만들어 헤로쿠 배포판을 태그 1.1로 만들어 올리자.
generate release notes를 하면 1.0 ~ 1.1 사이에 변경점을 쭉 잡아줌. (기존의 pull request들을 잡아서 변경 커밋점을 올려준다. 여기서 필요하면 글을 좀 수정해서 적으면 됨)
헤로쿠는 CI/CD 쪽에 있어 편리하게 자동으로 해주는 점이 있었다.