Nestjs - Chat Repository
지난 포스팅에 작성한 레디스 모듈을 Provider에 주입해 클라이언트를 이용해 보도록 하겠습니다.
config
등록하기 앞서 지난번에 작성해준 module.config.ts에서 변수의 할당이나 객체의 속성의 반복을 줄이고 간결하게 만들어 주었습니다.
export const redisModule = ClusterModule.registerAsync({
  imports: [ConfigModule],
  useFactory: async (configService: ConfigService) => {
    const logger = new Logger('RedisClusterModule');

    const redisNodes = [
      { host: 'REDIS_HOST1', port: 'REDIS_PORT1' },
      { host: 'REDIS_HOST2', port: 'REDIS_PORT2' },
      { host: 'REDIS_HOST3', port: 'REDIS_PORT3' },
    ];

    const natMaps = [
      'NAT_MAP1',
      'NAT_MAP2',
      'NAT_MAP3',
      'NAT_MAP4',
      'NAT_MAP5',
      'NAT_MAP6',
    ];

    const natMap = {};
    natMaps.forEach((map) => {
      natMap[configService.get(map)] = {
        host: configService.get(`REDIS_HOST${natMaps.indexOf(map) + 1}`),
        port: configService.get(`REDIS_PORT${natMaps.indexOf(map) + 1}`),
      };
    });

    return {
      nodes: redisNodes.map((node) => ({
        host: configService.get(node.host),
        port: configService.get(node.port),
      })),
      connectionOptions: {
        scaleReads: 'slave',
        natMap: natMap,
      },
      onClientReady: (client) => {
        ...
      }
  inject: [ConfigService],
});
redisNodes배열을 만들어준 다음 return에서 map()을 이용하여 각 요소를 순회하여 새로운 배열로 만들어주었습니다. forEach()를 이용해 생성해 준 빈 natmap객체에 값을 할당해 주었습니다.
다음은 docker-compose.yaml을 조금 수정해 주어야 합니다.
version: '3.7'
services:
  node01:
    image: 'redislabs/rejson:2.0.0'
    container_name: redis01
    restart: always
    ports:
      - 7001:7001
    volumes:
      - ./cluster/node01.conf:/etc/redis/redis.conf
    command: redis-server /etc/redis/redis.conf  --loadmodule  /usr/lib/redis/modules/rejson.so
    networks:
      redis_cluster:
        ipv4_address: 173.17.0.2

  .
  .
  .

  node06:
    image: 'redislabs/rejson:2.0.0'
    container_name: redis06
    restart: always
    ports:
      - 7006:7006
    volumes:
      - ./cluster/node06.conf:/etc/redis/redis.conf
    command: redis-server /etc/redis/redis.conf --loadmodule /usr/lib/redis/modules/rejson.so
    networks:
      redis_cluster:
        ipv4_address: 173.17.0.7

  redis_cluster:
    image: redis:7.0.4
    container_name: redis_cluster
    platform: linux/arm64/v8
    command: redis-cli --cluster create 173.17.0.2:7001 173.17.0.3:7002 173.17.0.4:7003 173.17.0.5:7004 173.17.0.6:7005 173.17.0.7:7006 --cluster-yes --cluster-replicas 1
    depends_on:
      - node01
      - node02
      - node03
      - node04
      - node05
      - node06
    networks:
      redis_cluster:
        ipv4_address: 173.17.0.8
networks:
  redis_cluster:
    driver: bridge
    ipam:
      driver: default
      config:
        - subnet: 173.17.0.0/24
변경 사항은 두가지 입니다. 첫번째는 레디스 이미지를 redislabs/rejson:2.0.0로 사용해 주었습니다. ReJSON모듈이 포함된 이미지이고 레디스에서 JSON 데이터를 저장하고 쿼리하기 위해 변경 해주었습니다.
두번째는 모듈을 로드하기 위해 command에 --loadmodule /usr/lib/redis/modules/rejson.so을 추가해 주었습니다.
173.17.0.3:7002> JSON.GET rooms:VC8W09
(error) ERR unknown command 'JSON.GET', with args beginning with: 'rooms:VC8W09'
모듈을 로드하지 않고 커맨드를 사용하면 위와 같은 오류가 발생합니다.
setup
repository
저의 경우 이제까지 NestJS에서 PostgreSQL에 데이터를 저장하고 쿼리하기 위해 TypeORM을 이용해서 작업을 해주었습니다. Redis도 역시 TypeORM을 이용할수 있지만 ioredis를 이용하는게 일반적인 방법으로 보여집니다.
// chat.repository.ts

import {
  Inject,
  Injectable,
  InternalServerErrorException,
  Logger,
} from '@nestjs/common';
import { ConfigService } from '@nestjs/config';
import { Cluster } from 'ioredis';
import { IORedisKey } from 'src/redis.module';
import { CreateRoomData } from './field/types';
import { Chat } from 'src/type';

@Injectable()
export class ChatRepository {
  private readonly ttl: string;
  private readonly logger = new Logger(ChatRepository.name);

  constructor(
    configService: ConfigService,
    @Inject(IORedisKey) private readonly redisClient: Cluster,
  ) {
    this.ttl = configService.get('CHAT_DURATION');
  }

  async createChat({ topic, roomID, userID }: CreateRoomData): Promise<Chat> {
    const initialRoom = {
      id: roomID,
      topic,
      participants: {},
      adminID: userID,
    };

    this.logger.log(
      `Creating new room: ${JSON.stringify(initialRoom, null, 2)} with TTL ${
        this.ttl
      }`,
    );

    const key = `rooms:${roomID}`;

    try {
      await this.redisClient
        .multi([
          ['call', 'JSON.SET', key, '.', JSON.stringify(initialRoom)],
          ['expire', key, this.ttl],
        ])
        .exec();
      return initialRoom;
    } catch (e) {
      this.logger.error(
        `Failed to add Room ${JSON.stringify(initialRoom)}\n${e}`,
      );
      throw new InternalServerErrorException();
    }
  }

  async getChat(roomID: string): Promise<Chat> {
    this.logger.log(`Attempting to get chat with: ${roomID}`);

    const key = `rooms:${roomID}`;

    try {
      const currentRoom = await this.redisClient.call(
        'JSON.GET',
        key,
        '.',
      ) as Chat;

      this.logger.verbose(currentRoom);

      return currentRoom;
    } catch (e) {
      this.logger.error(`Failed to get roomID ${roomID}`);
      throw e;
    }
  }
}
ChatRepository 클래스를 생성해 줍시다.
ttl은 ConfigService에서 가져온 값으로 초기화되며, 채팅 방의 유효 기간(TTL)을 설정하는 데 사용됩니다.
Logger 인스턴스를 만들어 줍니다.
ChatRepository의 생성자는 configService와 redisClient라는 두 종속성을 받습니다. configService는 CHAT_DURATION값을 검색하는 데 사용되고, redisClient는 지난 포스팅에서 설정해준 모듈에서 정의한 provide token을 이용해서 가져온 Cluster 인스턴스입니다.
CreateRoomData 객체를 매개변수로 사용하고 Promise<Chat>를 반환하는 createChat 비동기 함수를 만들어 줍니다.
CreateRoomData의 경우엔 tpyes.ts를 따로 만들어 필요한 속성들을 설정해 두었습니다
export type CreateRoomData = {
  roomID: string;
  topic: string;
  userID: string;
};
확인을 위해 initialRoom를 json로 변환해 주고 로거를 작성해줍니다. replacer는 null, space는 2로 설정해주었습니다.
roomID는 nanoid로 생성해준 6자리 대문자와 0-9까지의 숫자 조합을 이용할것입니다. 다른 데이터와의 식별을 위해 room:을 붙여 줍니다.
try문 내에 redisclient를 사용하여 multi() 명령어를 실행하도록 해줍니다. call() 명령어로 'JSON.SET' 커맨드를 호출하여 key에 생성해준 key를 넣어주고 경로를 '.'로 정해줍니다. initialRoom를 JSON으로 변환해준 값을 value에 저장합니다.
expire() 명령어를 호출하여 key에 맞는 데이터의 TTL(Time-To-Live)을 설정합니다.
.exec() 메서드는 멀티 명령어 트랜잭션을 실행하고, 각 명령어의 결과를 반환합니다.
마지막으로, initialRoom 객체가 반환시켜주도록 합니다.
Test
ChatService에서 만든 메소드를 이용해 줍시다.
import { Injectable, Logger } from '@nestjs/common';
import { createRoomID, createUserID } from 'ids';
import { CreateRoomFields, JoinRoomFields } from './field/types';
import { ChatRepository } from './chat.repository';
import { ConfigService } from '@nestjs/config';
@Injectable()
export class ChatService {
private readonly logger = new Logger(ChatService.name);
constructor(private readonly chatRepository: ChatRepository) {}
async createChatRoom(fields: CreateRoomFields) {
const roomID = createRoomID();
const userID = createUserID();
const createChatRoom = await this.chatRepository.createChat({
...fields,
roomID,
userID,
});
return {
chat: createChatRoom,
};
}
async JoinChatRoom(fields: JoinRoomFields) {
const userID = createUserID();
this.logger.debug(
`Fetching chat with ID: ${fields.roomID} for user with ID: ${userID}`,
);
const joinedChat = await this.chatRepository.getChat(fields.roomID);
return {
chat: joinedChat,
};
}
}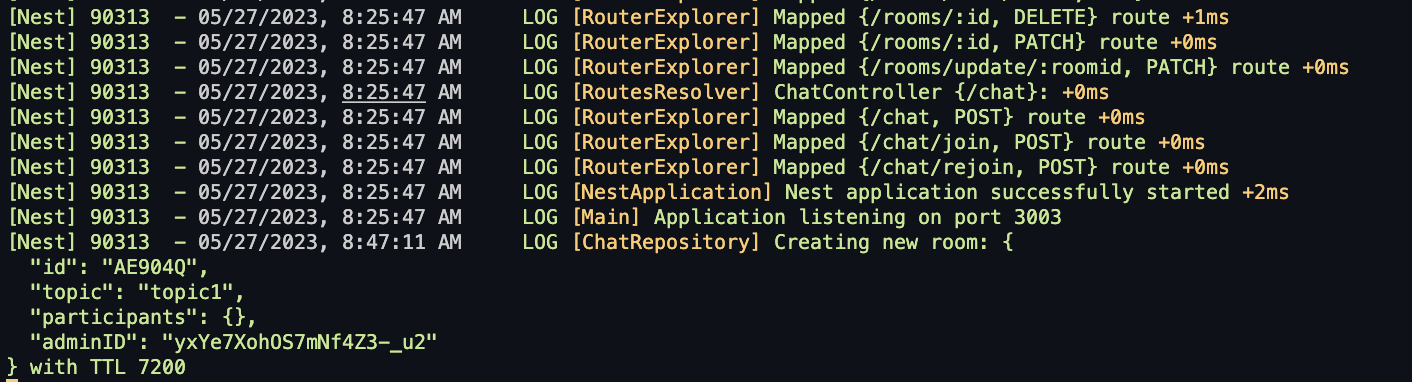 정상적으로 로거가 작동하는 모습입니다.
 레디스 클러스터에도 정상적으로 저장이 되어있는 모습입니다.
참고
Path
json.set returns unknown command
redismod-docker-compose
RedisJSON
github.com/JacobSNGoodwin/ranker-course/
Error: Type '{}' is missing the following properties from type