N : 1 관계 Create & Read (Fetch)
상품과 카테고리는 N : 1 관계다.
예를 들어, 상품 하나를 등록했을 때, 여러가지 카테고리(종류, 연식 등)를 생성하게 된다.
상품 데이터를 추가할 때, 카테고리도 새로 추가되는 것은 아니다.
이미 등록되어 있는 카테고리를 찾아서 상품에 넣어주기만 한다.
즉, 상품을 등록할 때 카테고리가 등록 될 수 있도록 만들어 보자.
10-06-typeorm-crud-one-to-one 폴더를 복사 붙여넣기 하여 사본을 만들어주고
10-07-typeorm-crud-many-to-one 폴더로 이름을 변경한다.
https://github.com/code-bootcamp/codecamp-backend-supplement-product-categories.git 에 들어가 zip파일을 다운로드 해준다.
기존 productCategories 폴더를 지우고 압축을 푼 폴더를 넣어주고
yarn install을 통해 필요한 모듈들을 설치한다.
src → apis → products → dto → create-product.input.ts 파일에 productCategoryId 를 추가한다.
// create-product.input.ts

import { Field, InputType, Int } from '@nestjs/graphql';
import { ProductSaleslocationInput } from 'src/apis/productsSaleslocations/dto/product-saleslocation.input';
import { Min } from 'class-validator';

@InputType()
export class CreateProductInput {
  @Field(() => String)
  name: string;

  @Field(() => String)
  description: string;

  @Min(0)
  @Field(() => Int)
  price: number;

  @Field(() => ProductSaleslocationInput)
  productSaleslocation: ProductSaleslocationInput;

  // 추가된 컬럼부분
  @Field(() => String)
  productCategoryId: string;
}
10-07-typeorm-crud-many-to-one → src → apis → products → products.service.ts 파일에 create 함수를 수정해준다.
// products.service.ts

async create({
    createProductInput,
  }: IProductsServiceCreate): Promise<Product> {
    // 1. 상품만 등록하는 경우
    // const result = this.productsRepository.save({
    //   ...createProductInput,

    //   // 하나하나 직접 나열하는 방식
    //   //   name: '마우스',
    //   //   description: '좋은 마우스',
    //   //   price: 3000,
    // });

    // 2. 상품과 상품거래위치를 같이 등록하는 경우
    const { productSaleslocation, productCategoryId, ...product } =
      createProductInput;

    const result = await this.productsSaleslocationService.create({
      ...productSaleslocation,
    }); // 서비스를 타고 가는 이유는...?(레파지토리에 직접 접근하면 안될까...?) => 검증을 서비스에서 진행하기 때문

    const result2 = await this.productsRepository.save({
      ...product,
      productSaleslocation: result, // result 통째로 넣기 vs id만 빼서 넣기
      productCategory: {
        id: productCategoryId,
        // 만약에, name 까지 받고싶으면 2가지 방법?
        //   1) createProductInput에서 카테고리 name도 받아오기
        //   2) productCategoryId를 사용해서 카테고리 name을 조회하기
      },
    });

    // 최종 결과 돌려주기
    return result2;
  }
구조분해할당을 통해 createProductInput 에서 productCategoryId 분리해 준 뒤,
product 테이블에 저장될 때 id가 productCategoryId 인 데이터도 저장될 수 있게 작성해준다.
조회할때 카테고리 데이터도 같이 조회하기 위해 relations 옵션에 productCategory를 추가해 준다.
// products.service.ts

findAll(): Promise<Product[]> {
    return this.productsRepository.find({
      relations: ['productSaleslocation', 'productCategory'],
    });
  }

  findOne({ productId }: IProductsServiceFindOne): Promise<Product> {
    return this.productsRepository.findOne({
      where: { id: productId },
      relations: ['productSaleslocation', 'productCategory'],
    });
  }
yarn start:dev를 통해 로컬에 서버 띄운 후, 플레이그라운드에서 카테고리를 먼저 만들어보자
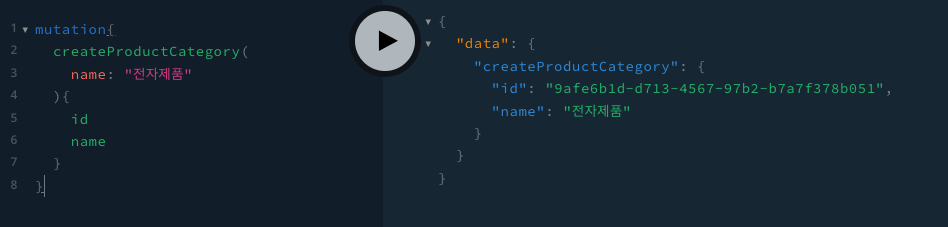
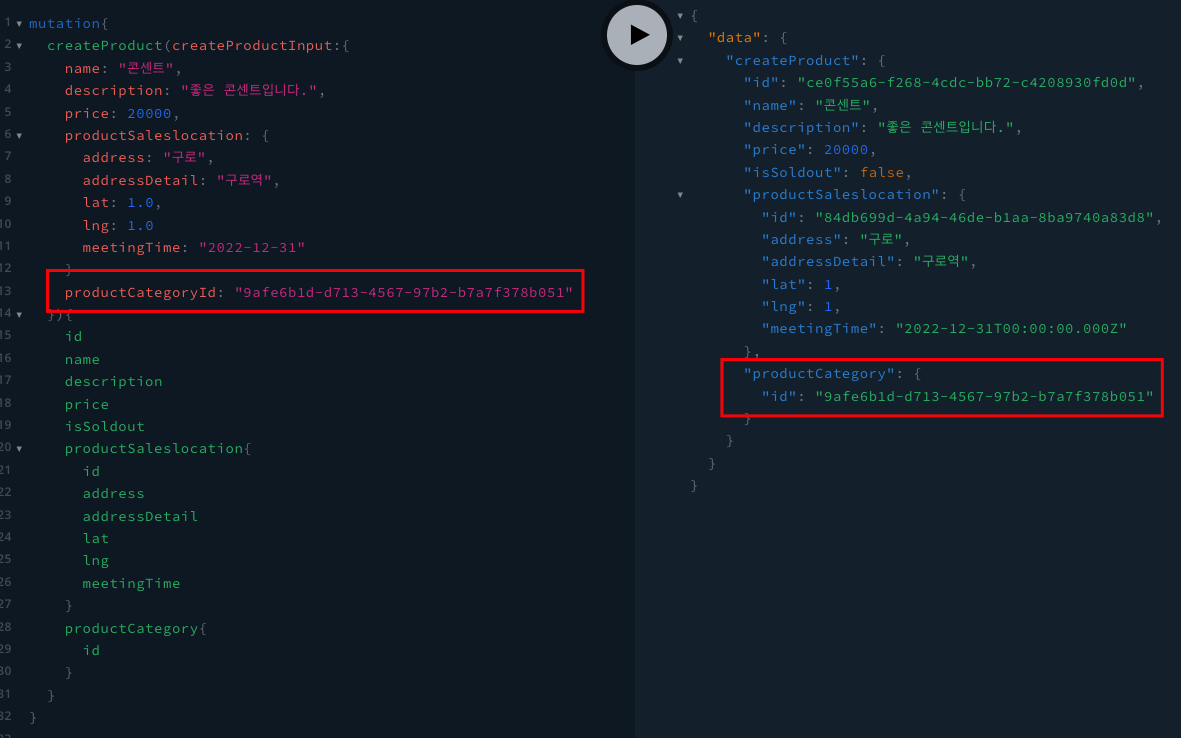
만들어진 카테고리 아이디를 가지고, 상품을 생성한다.
-
등록하고 등록된 결과를 return 받을때는 productCategory의 name을 받을 수 없다.
- 만약, name 값을 받고 싶다면 상품 데이터를 저장하기 전
findOne을 통해 productCategory 테이블 객체를 찾아서 특정 변수에 담아주고 그 변수를 상품데이터 저장 시 productCategory에 저장을 시켜줘야 가능하다. - 또는, 브라우저로 보낼때, input파일에서 Id만 보내는 것이 아니라, productCategory 전체를 객체로 보내주시면 가능하다.(ProductSaleslocation의 Fetch와 동일한 방법 사용)
- 만약, name 값을 받고 싶다면 상품 데이터를 저장하기 전
DBeaver를 통해 확인해보면 상품 데이터에 카데고리 ID까지 함께 저장되어 있는 것을 확인할 수 있다.

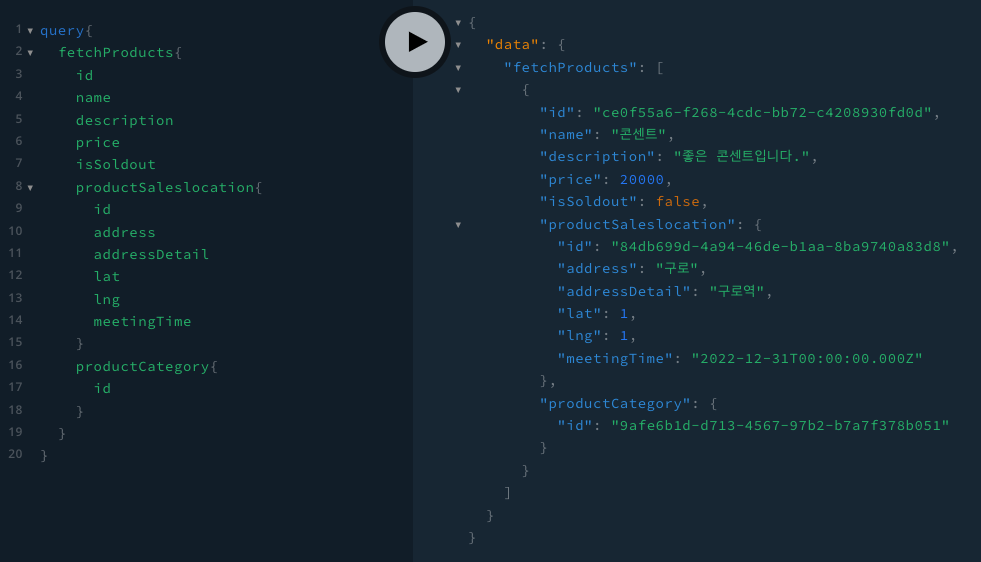
fetchProducts API를 요청하면, 카테고리도 잘 가져오는 것을 확인할 수 있다.
- 조회할 때는
relations옵션을 통해 productCategory의 id뿐 아니라, name도 가지고 올 수 있는 차이가 존재한다.
만약, fetchProducts API를 요청할 때, return nullable error가 발생하고 있다면,
현재 DB에 이전에 만들어 놓은 productCategoryID가 없는 product 데이터가 들어있기 때문이다.
따라서, 해당 데이터를 삭제하고 API를 재요청 하면된다.
