Class-Validator 실습
section10 폴더 내에 10-03-typeorm-crud 폴더를 복사해 붙여넣어주고
복사한 폴더의 이름을 10-04-typeorm-crud-validation 폴더로 변경해 진행한다.
10-04-typeorm-crud-validation → src → apis → products → dto → create-product.input.ts 파일을 아래와 같이 수정해 준다.
// create-product.input.ts

import { Field, InputType, Int } from '@nestjs/graphql';
import { Min } from 'class-validator';

@InputType()
export class CreateProductInput {
  @Field(() => String)
  name: string;

  @Field(() => String)
  description: string;

	@Min(0) // 추가
  @Field(() => Int)
  price: number;
}price: Type을int(정수)로 설정했는데, 가격에서는 음수 값이 나올수 없기때문에 최소값 설정(Min(0))을 해주었다.- 해당 설정을 위해선
class-validator,class-transformer라이브러리 설치가 필요하다.
- 해당 설정을 위해선
yarn add class-validator
yarn add class-transformer
class-validator 라이브러리를 사용하기 위해선 추가 설정이 필요하다.
10-04-typeorm-crud-validation → src → main.ts 파일에 아래와 같이 추가한다.
// main.ts

import { ValidationPipe } from '@nestjs/common';
import { NestFactory } from '@nestjs/core';
import { AppModule } from './app.module';

async function bootstrap() {
  const app = await NestFactory.create(AppModule);
  app.useGlobalPipes(new ValidationPipe()); // 추가된 부분
  await app.listen(3000);
}
bootstrap();
최종적으로 실행시켜주는 파일은 main.ts 파일 내에 존재하는 app 부분이기에,
app.useGlobalPipes를 사용해여 ValidationPipe를 연결해야한다.
Pipe는 데이터가 오고가는 흐름에 있어서 데이터 검증과 필터링을 해주는 역할이다.
따라서, price 가격에 음수 값을 넣게되면 BAD_USER_INPUT error가 발생하면서 API 요청이 이루어지지 않는다.
Product Update
이번에는 저장한 product 데이터를 수정해보자
어떤 아이디에 대해서 어떤 내용을 수정 할 것인지에 대한 updateProduct 로직을 만들어보겠다.
10-04-typeorm-crud-validation → src → apis → products→ dto 폴더 안에 update-product.input.ts 파일을 만들어준다.
// update-product.input.ts

import { InputType, Field, Int } from '@nestjs/graphql';
import { Min } from 'class-validator';

@InputType()
export class UpdateProductInput {
  @Field(() => String, { nullable: true })
  name: string;

  @Field(() => String, { nullable: true })
  description: string;

  @Min(0)
  @Field(() => Int, { nullable: true })
  price: number;
}- 모든 데이터의 수정이 일어날 수 있지만, 특정 데이터만 수정을 해야할 때도 있다.
따라서,{ nullable: true }를 사용하여 해당 값을 꼭 입력하지 않아도 API이 실행이 가능하게 만들어줄 필요가 있다.
위와 같이 input 파일을 만들어도 되지만
만약 입력값이 무수히 많다면 모든 값을 CreateProductInput과 동일하게 만들어주고
{ nullable: true }옵션까지 붙여 넣어야한다.
그리고 만일, CreateProductInput에서 특정 컬럼값을 추가하였다면, UpdateProductInput에도 특정 컬럼을 추가해 줘야 하는 불편함이 있다.
따라서, 조금 더 효율적인 방법으로 UpdateProductInput을 만들어보자
DTO를 다음과 같이 작성할 수 있는데, PartialType 을 사용하여 이전에 만들어둔 CreateProductInput을 가지고 와서 UpdateProductInput로 바꿔주는 방법이다.
이를통해 번거롭게 다시 한번 나열해서 작성하지 않을 수 있다.
// updateProduct.input.ts

import { InputType, PartialType } from '@nestjs/graphql';
import { CreateProductInput } from './create-product.input';

@InputType() // 상속을하고 이를 PartialType으로 넣어준다.
export class UpdateProductInput extends PartialType(CreateProductInput) {
  // name: string
  // description: string
  // price: number
}

// PickType(CreateProductInput, ['name', 'price']); => 고르기
// OmitType(CreateProductInput, ['description']);   => 빼기
// PartialType(CreateProductInput); => 있어도 되고 없어도 됨(nullable)extends를 사용하여 CreateProductInput을 상속받아준다.
☝ GraphQL Type
PartialType: 모든 컬럼을 선택사항으로 바꿔주는 역할을 하므로, { nullable : true } 와 같은 역할을 한다.PickType: 원하는 컬럼만을 뽑아서 사용하고 싶을 때 사용한다.
- PickType(CreateProductInput, ["name", "price"]) : CreateProductInput의 name, price 컬럼만 사용하겠다는 의미
OmitType: 원하는 컬럼만 제거하여 사용하고 싶을 때 사용한다.
- OmitType(CreateProductInput, ["description"]) : CreateProductInput의 description 컬럼을 제외한 나머지 컬럼들은 모두 사용하겠다는 의미다.
TypeScript에서도 PartialType, PickType, OmitType 을 제공하는데, 이를 Utility Types 이라고 부른다.
products.resolver.ts 파일을 아래와 같이 작성해준다.
// products.resolver.ts
@Resolver()
export class ProductsResolver {
  constructor(
    private readonly productsService: ProductsService, //
  ) {}

  // 나머지 API들은 생략

  // 상품정보를 수정하는 부분
  @Mutation(() => Product)
  async updateProduct(
    @Args('productId') productId: string,
    @Args('updateProductInput') updateProductInput: UpdateProductInput,
  ): Promise<Product> {
    return this.productsService.update({ productId, updateProductInput });
  }
}-
어떤 상품이 수정이 되었는지 리턴 받아야하기에 Product 를 리턴 타입으로 지정한다.
-
@Args를 사용해 productId 를 받아서 해당 productId 를 가진 product 를 수정할 것이다.따라서 productid는 수정 조건이 된다.
-
@Args를 사용해 updateProductInput 를 받아서 수정하고 싶은 값 들을 수정 해 줄것입니다.따라서 updateProductInput은 수정 대상이 된다.
products.service.ts 파일을 아래와 같이 작성해준다.
// products.service.ts
@Injectable()
export class ProductsService {
  constructor(
    @InjectRepository(Product)
    private readonly productsRepository: Repository<Product>,
  ) {}

  findOne({ productId }: IProductsServiceFindOne): Promise<Product> {
    return this.productsRepository.findOne({ where: { id: productId } });
  }


  // 업데이트 하는 API
  async update({
    productId,
    updateProductInput,
  }: IProductsServiceUpdate): Promise<Product> {
		// 기존 있는 내용을 재사용하여, 로직통일, 왜 this.findOne인가?
		const product = await this.findOne({ productId });
});

    // this.productsRepository.create() // DB 접속이랑 관련 없음. 등록을 위해서 빈 객체 만들기 위함
    // this.productsRepository.insert() // 결과를 객체로 못 돌려받는 등록 방법
    // this.productsRepository.update() // 결과를 객체로 못 돌려받는 수정 방법

    const result = this.productsRepository.save({
      ...product, // 수정 후 수정되지 않은 다른 결과값까지 모두 받고 싶을 때 사용
      ...updateProductInput,
    });
    return result;
  }
}-
인터페이스를 사용해서 데이터 수정에 필요한 요청값의 타입의 유효성을 검사한다.
-
this.findOne: 데이터를 수정하기 위해 DB에서 수정할 데이터를 찾아와야한다.-
this.productsRepository.findOne으로 작성해도 되지만, 해당 파일이 product 관련 파일이므로, 나 자신을 줄여서 사용할 수 있다. -
내가 수정한 컬럼에 대해서만 조회할때는 findOne을 해주지 않아도 되지만,
수정한 컬럼을 포함한 해당 상품의 다른 컬럼들을 함께 조회할 때는 findOne을 통해서 데이터를 먼저 찾아야한다.
-
즉, return 받는 값에 수정한 컬럼을 포함한 다른 컬럼들이 존재해야 한다면 findOne을 먼저 해주어야 한다는 것이다.
-
-
데이터를 수정하는 비즈니스 로직의 방법 또한 두가지가 있다.
- 하나씩 나열해서 데이터를 수정하는 방법
- 스프레드 문법을 사용해서 데이터를 수정하는 방법( ✔️ 코드 간결 )
-
this.productsRepository.save.update: 데이터를 수정할 때 사용- 사용 예시 :
update({ productId, updateProductInput }){ this.productRepository.update( { id: productId }, // 무엇에 대해서 { ...updateProductInput } // 무엇을 수정 할 것인지 ) return "수정이 완료되었습니다!" } .save: 데이터를 수정하고, 수정한 결과를 찾아오기까지 한다. 수정할 때.save를 사용하기 위해서는 먼저 데이터를 찾아와야지 사용 가능하다.- 우리는 데이터를 수정하고 무슨 데이터가 수정 되었는지 프론트에게 알려주기 위해
.save를 사용했다.
- 사용 예시 :
products-service.interface.ts 파일을 아래와 같이 작성한다.
// products-service.interface.ts

import { CreateProductInput } from '../dto/create-product.input';
import { UpdateProductInput } from '../dto/update-product.input';
import { Product } from '../entities/product.entity';

export interface IProductsServiceCreate {
  createProductInput: CreateProductInput;
}

export interface IProductsServiceFindOne {
  productId: string;
}

// 추가된 부분
export interface IProductsServiceUpdate {
  productId: Product;
  updateProductInput: UpdateProductInput;
}
수정이 제대로 이루어지는지 API를 확인해보자
http://localhost:3000/graphql 에 접속해서 플레이그라운드를 실행하고
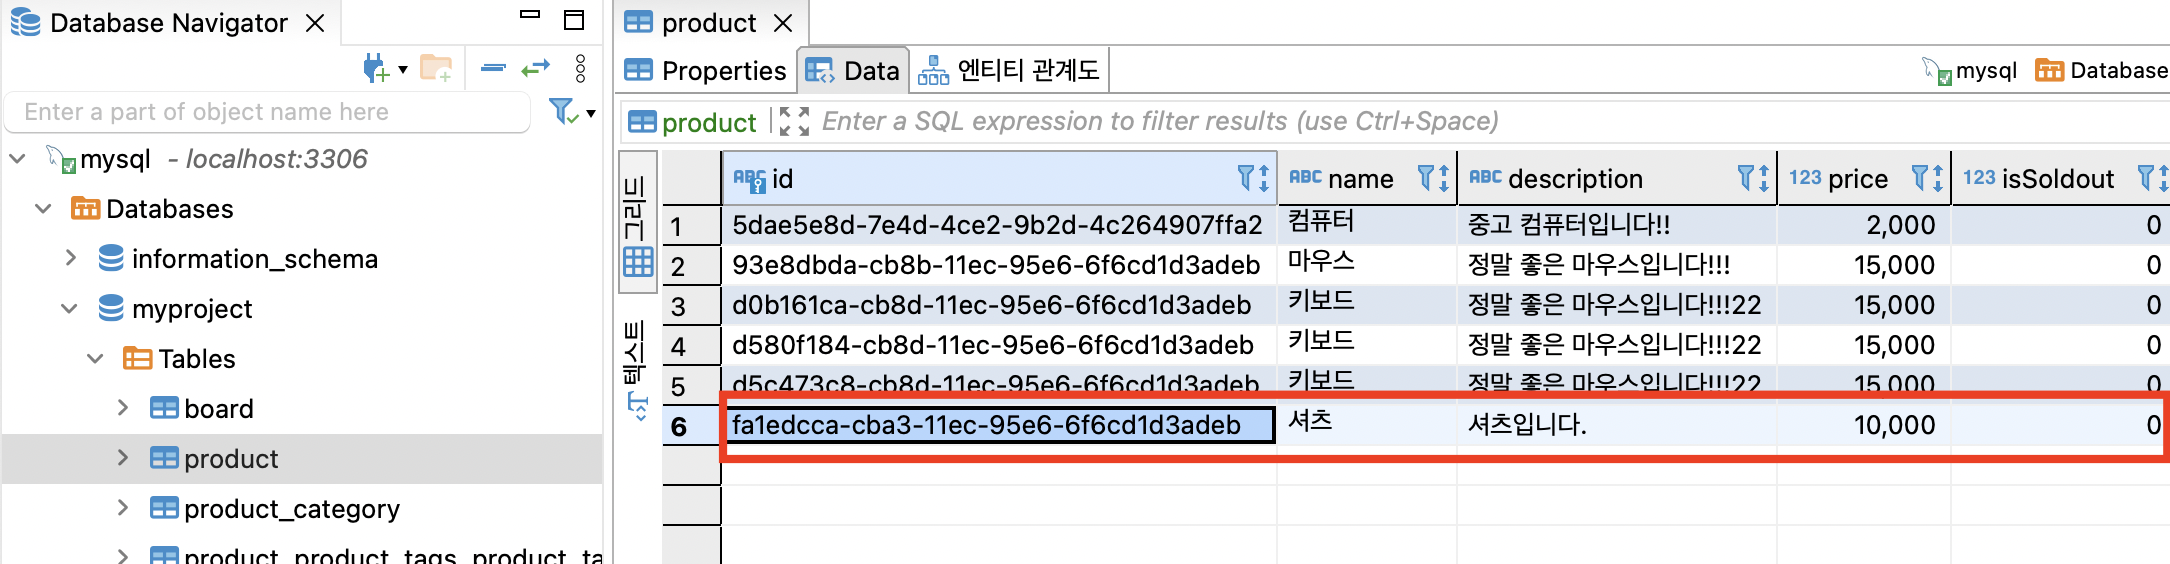
DBeaver 에서 “ 셔츠 “ 상품을 수정하기 위해 해당 id 값을 복사한다.

복사한 상품 아이디 값을 다음과 같이 붙여넣기 해서 updateProduct 를 수행한다.
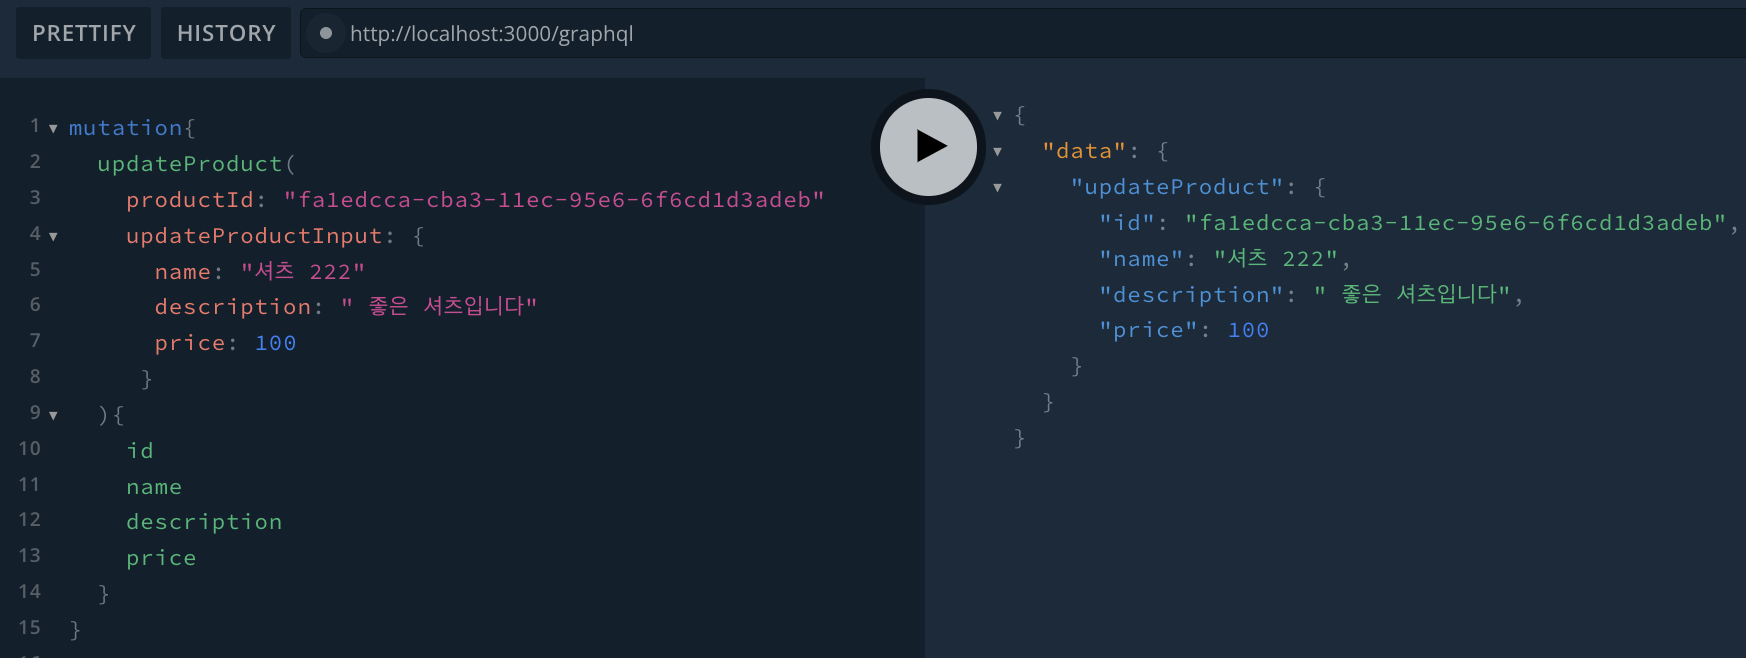
아래는 update 관련된 쿼리를 보여준다.

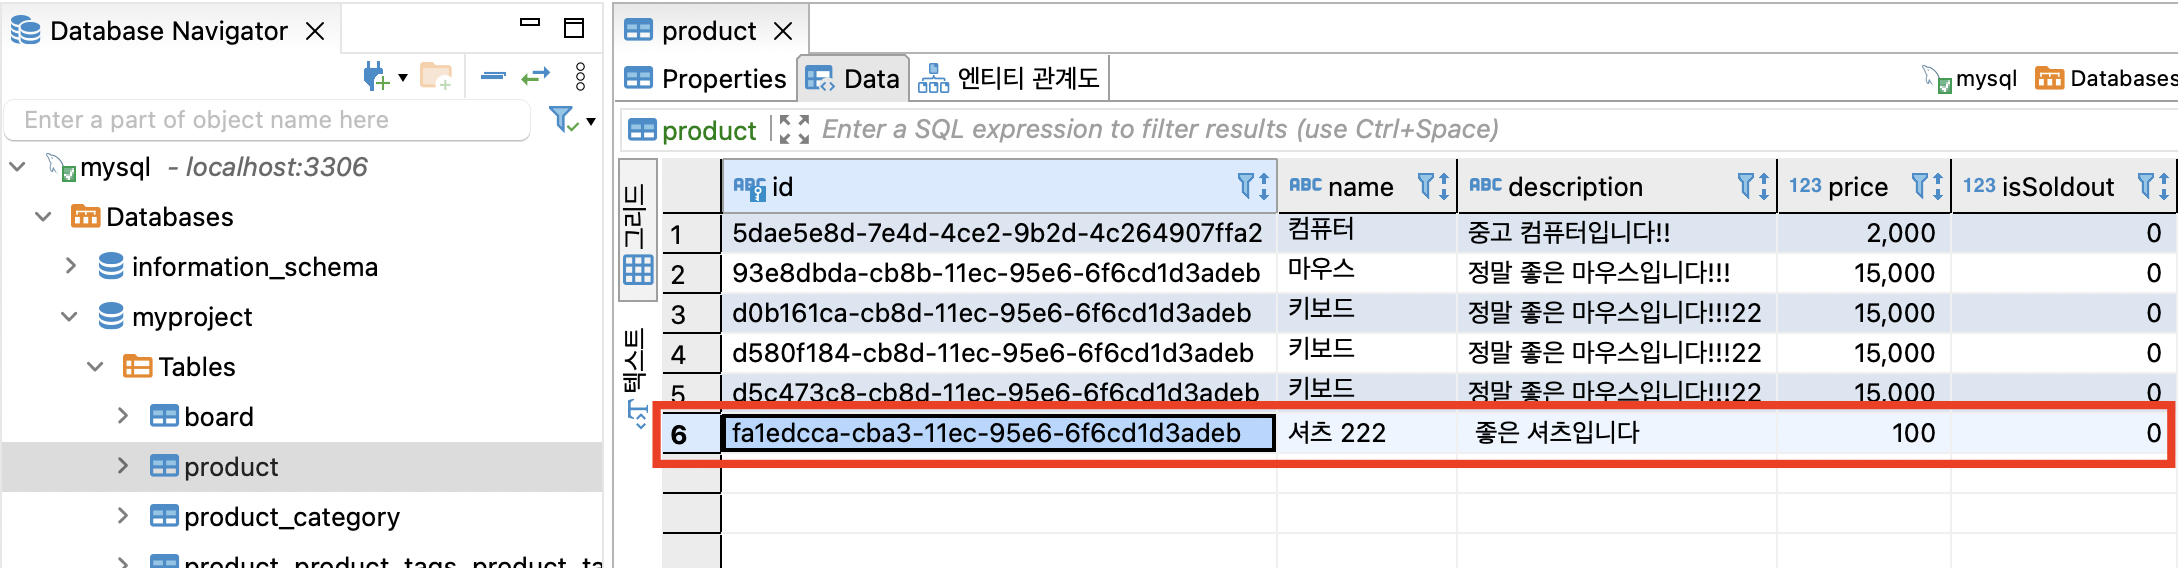
DBeaver 을 사용해서 수정된 데이터가 잘 조회된다면 성공이다.
Product Update With Error
추가적으로 상품을 수정하려고 하는데, 이미 판매 완료된 상품이면 수정이 될까?
이미 판매가 되어 없는 상품이기에 수정이 불가능할 것이다.
따라서, 먼저 상품이 판매가 되었는지 확인하는 유효성 검사를 했을 때 판매가 완료되었다면 상품 데이터를 수정할 필요가 없으므로, 이때 에러를 반환하는 방법에 대해서 알아보자
products.service.ts 파일을 아래와 같이 제일 아래 부분에서 이어서 로직을 작성한다.
// products.service.ts
@Injectable()
export class ProductsService {
  constructor(
    @InjectRepository(Product)
    private readonly productsRepository: Repository<Product>, //
  ) {}

  findAll(): Promise<Product[]> {
    return this.productsRepository.find();
  }

  findOne({ productId }: IProductsServiceFindOne): Promise<Product> {
    return this.productsRepository.findOne({ where: { id: productId } });
  }

  update({
    productId,
    updateProductInput,
  }: IProductsServiceUpdate): Promise<Product> {
	const product = await this.findOne({ productId });

    const result = this.productsRepository.save({
      ...product, // 수정 후 수정되지 않은 다른 결과값까지 모두 받고 싶을 때 사용
      ...updateProductInput,
    });
    return result;
  }

// 추가된 부분 - 판매완료를 체크하는 부분
  checkSoldout({ product }: IProductsServiceCheckSoldout): void {
    if (product.isSoldout)
      throw new UnprocessableEntityException('이미 판매 완료된 상품입니다');

    // if (product.isSoldout) {
    //   throw new HttpException(
    //     '이미 판매 완료된 상품입니다.',
    //     HttpStatus.UNPROCESSABLE_ENTITY,
    //   );
    // }
  }
}checkSoldout함수를product.service.ts에 추가했다.checkSoldout는 상품이 판매가 되었는지 확인하는 비즈니스 로직이다.- productRepository 에서 해당 product 데이터를 찾아온 뒤, 그 상품이 이미 판매가 된 상품이라면
throw new UnprocessableEntityException을 통해 에러를 만들어서 프론트로 에러메세지를 전달한다. 반환된 상태 코드를 보면서 어떤 문제인지 알 수 있습니다.- NestJS는 에러상태코드가 합쳐져 있는 에러도 제공해 주고 있기에,
UnprocessableEntityException에러를 많이 사용한다. (✔️ 코드 간결해짐)
- NestJS는 에러상태코드가 합쳐져 있는 에러도 제공해 주고 있기에,
throw new HttpException(에러메세지, 에러상태코드): 비즈니스 로직을 작성할 때 발생할 일들에 대해 예측할 수 있는 에러들, 기획에 맞지 않는 에러들이 발생하는 경우 처리할 수 없음을 나타내는 에러를 만들때 사용한다.- 422 에러상태코드 대신에, 조금 더 보기 쉽게 사용할 수 있도록 NestJS에서 제공해주는
HttpStatus.UNPROCESSABLE_ENTITY을 사용해주었다.
상태 코드
- 200 번대 : 성공 상태 코드
- 400 번대 : 프론트에서 요청을 잘못했을 때 발생하는 에러 상태 코드
- 500 번대 : 백엔드 서버에서 문제가 생겼을 때 발생하는 에러 상태코드
더 많은 내용은 링크를 참조
https://developer.mozilla.org/ko/docs/Web/HTTP/Status
products-service.interface.ts 파일을 아래와 같이 작성해준다.
// products-service.interface.ts

import { CreateProductInput } from '../dto/create-product.input';
import { UpdateProductInput } from '../dto/update-product.input';
import { Product } from '../entities/product.entity';

export interface IProductsServiceCreate {
  createProductInput: CreateProductInput;
}

export interface IProductsServiceFindOne {
  productId: string;
}

export interface IProductsServiceUpdate {
  product: Product;
  updateProductInput: UpdateProductInput;
}

// 추가된 부분
export interface IProductsServiceCheckSoldout {
  product: Product;
}
이렇게 판매가 되었는지 확인하는 함수를 추가해 주었는데, 이 함수는 상품 수정이 일어나기 전에 검증을 해주는 함수였다. 그러면 update가 일어나기 전에 검증 먼저 해줘야 한다.
검증하는 것을 product.service.ts 파일에 아래와 같이 추가해준다.
// products.service.ts
@Injectable()
export class ProductsService {
  constructor(
    @InjectRepository(Product)
    private readonly productsRepository: Repository<Product>, //
  ) {}

  update({
    productId,
    updateProductInput,
  }: IProductsServiceUpdate): Promise<Product> {
	const product = await this.findOne({ productId });

	// 추가된 부분
    // 검증은 서비스에서 해야한다!
    this.checkSoldout({ product });

    // this.productsRepository.create() // DB 접속이랑 관련 없음. 등록을 위해서 빈 껍데기 객체 만들기 위함
    // this.productsRepository.insert() // 결과를 객체로 못 돌려받는 등록 방법
    // this.productsRepository.update() // 결과를 객체로 못 돌려받는 수정 방법

    const result = this.productsRepository.save({
      ...product, // 수정 후 수정되지 않은 다른 결과값까지 모두 받고 싶을 때 사용
      ...updateProductInput,
    });
    return result;
}- checkSoldout 함수를 실행할 때
에러가 발생한다면, 함수는 중단되어 상품 수정이 일어나지 않고 끝나게 된다.
에러가 제대로 작동하는지 확인해보자
DBeaver 를 실행해서 product 테이블의 원하는 row의 isSoldout 컬럼 값을 판매완료 상태인 1로 변경한다.
- 1은 true를 의미하고 0은 false를 의미.

http://localhost:3000/graphql 에 접속해서 플레이그라운드를 실행하고
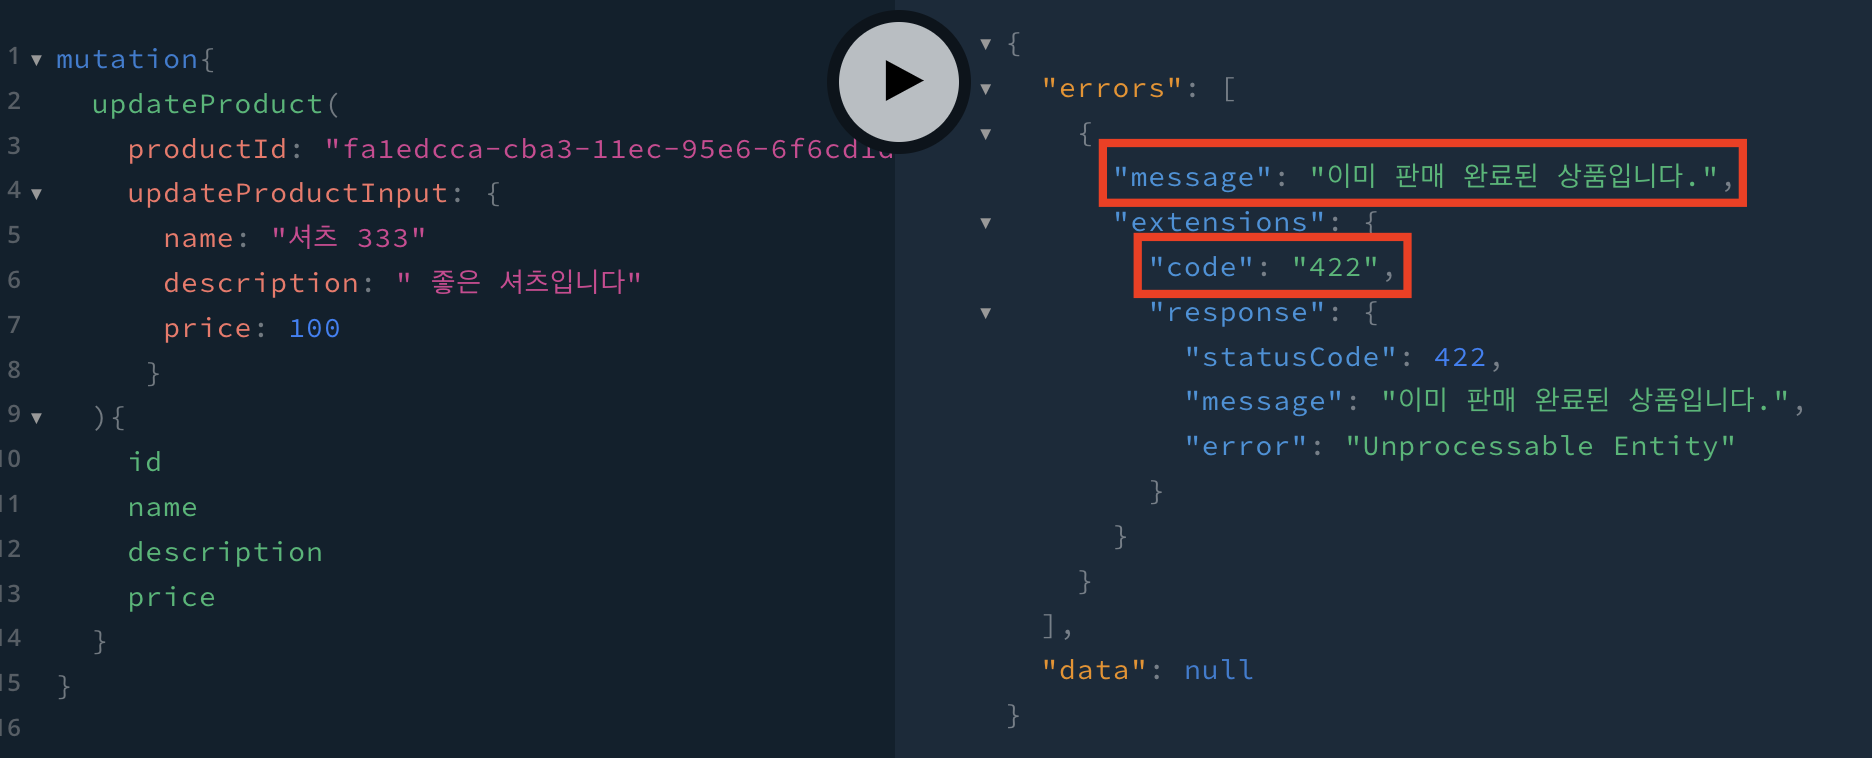
DBeaver 에서 isSoldout 칼럼이 true인 데이터의 id 값을 복사해서 해당 상품을 수정한다.
아래와 같이 에러메세지가 나타난다면 성공이다.
예외의 2가지 경우
try ~ catch
판매가 완료된 상품은 수정하지 못하게 에러를 반환하는 것과 같이 예측 가능한 에러가 있는 반면에,
예기치 못한 일에 대한 에러가 발생될 때도 있다.
예를 들어 상품을 등록 하려고 요청을 하였는데 컴퓨터 통신이 안좋아서 중간에 끊어져 버린 경우 등 많은 예상치 못한 일들이 충분히 일어날 수 있다.
그럴때는 아래와 같이 try ~ catch 문을 작성하여 어디서 어떤 에러가 발생 하였는지 확인 할 수 있다.
// product.service.ts

async create({ createProductInput }: ICreate) {
    try {
      await this.productRepository.save({
        ...createProductInput, // 스프레드연산자 사용하기

        // 하나하나 직접 나열하기
        // name: createProductInput.name,
        // description: createProductInput.description,
        // price: createProductInput.price,
      });
      console.log('안녕하세요!!')
      console.log('안녕하세요!!')
      console.log('안녕하세요!!')
    } catch(error) {
      throw error // 프론트로 에러를 반환
      console.log(error) // 백엔드에서 에러를 볼 수 있음
    }
}try문 안에서 에러가 발생시, 에러 발생 시점부터 즉시 중단되어 아래 로직들은 실행이 되지않고 바로catch문으로 넘어간다.catch문 안에서는console.log를 통해 어떤 에러가 발생했는지 확인해 볼 수 있으며,throw error를 통해 프론트로 에러를 반환 시켜 줄 수 있다.
HttpExceptionFilter
try ~ catch 문 을 모든 함수에 작성하게 되면 코드가 점점 길어지고 지저분해진다.
이럴 경우에는 NestJS 에서 제공해주는 ExceptionFilter 을 사용해야 한다.
ExceptionFilter를 사용하면 try ~ catch 문을 하나하나 작성하지 않아도
모든 에러는ExceptionFilter로 자동으로 들어오게 된다.
10-04-typeorm-crud-validation → src → commons → filter 폴더를 만들고 filter 폴더 안에 http-exception.filter.ts 파일을 만들어준다
// http-exception.filter.ts

import { Catch, ExceptionFilter, HttpException } from '@nestjs/common';

@Catch(HttpException)
export class HttpExceptionFilter implements ExceptionFilter {
  catch(exception: HttpException)  { // HttpException 타입이 정의된 부분
    const status = exception.getStatus(); // 에러발생 시, 상태코드
    const message = exception.message; // 에러 발생 시, 에러 메시지

    console.log('===========================');
    console.log('예외가 발생했어요!!');
    console.log('예외내용:', message);
    console.log('예외코드:', status);
    console.log('===========================');
  }
}@Catch(HttpException): 에러 관련된 내용이 들어가 있음을 NestJS 에게 알려주기 위한 데코레이터를 사용한 것catch: Exception 상황 발생시 비즈니스 로직에 try ~ catch 문이 없더라도 자동으로 에러가 catch 문으로 들어온다.exception: HttpException: HttpException type 으로 정의했다.
implements ExceptionFilter: class 에서 타입을 정의 해주기 위해 implements 사용했다.ExceptionFilter: 인터페이스로 catch 함수가 반드시 존재해야하는 타입, 따라서 catch 문을 작성하지 않으면 에러가 발생한다.
exception.getStatus(): 에러가 발생하면 나타나는 상태코드를 가져와 알려줍니다.exception.message: 에러가 발생시 나타나는 에러 메세지 입니다.
이렇게 작성해준 http-exception.filter.ts 파일을 main.ts 파일에 조립해야 한다.
// main.ts

import { ValidationPipe } from '@nestjs/common';
import { NestFactory } from '@nestjs/core';
import { AppModule } from './app.module';
import { HttpExceptionFilter } from './commons/filter/http-exception.filter';

async function bootstrap() {
  const app = await NestFactory.create(AppModule);
  app.useGlobalPipes(new ValidationPipe());
  app.useGlobalFilters(new HttpExceptionFilter()); // 추가된 부분
  await app.listen(3000);
}
bootstrap();- 방금까지 만든
HttpExceptionFilter의 실행을 위해main.ts파일 내 app을 사용하여 추가했다.
현재는 에러가 발생될 때 console.log 를 통해 확인하게 만들었지만, 실제 서비스 배포가 이루어지면 에러들만 따로 저장해 주는 데이터베이스를 만들어 저장되는 에러들을 보고 나중에 어떤 에러가 얼마만큼 발생했는지가 판단 가능하며 어떤 문제가 서버에 발생되어 있는지 확인할 수 있다.
