이 글에서는 다음과 같이 Jenkins와 Slack을 연동해 볼 것이다.
- Slack의
Slash Command를 이용해서 Jenkins Job을 원격으로 빌드- Slack에 Jenkins Job에 대한 메시지 게시
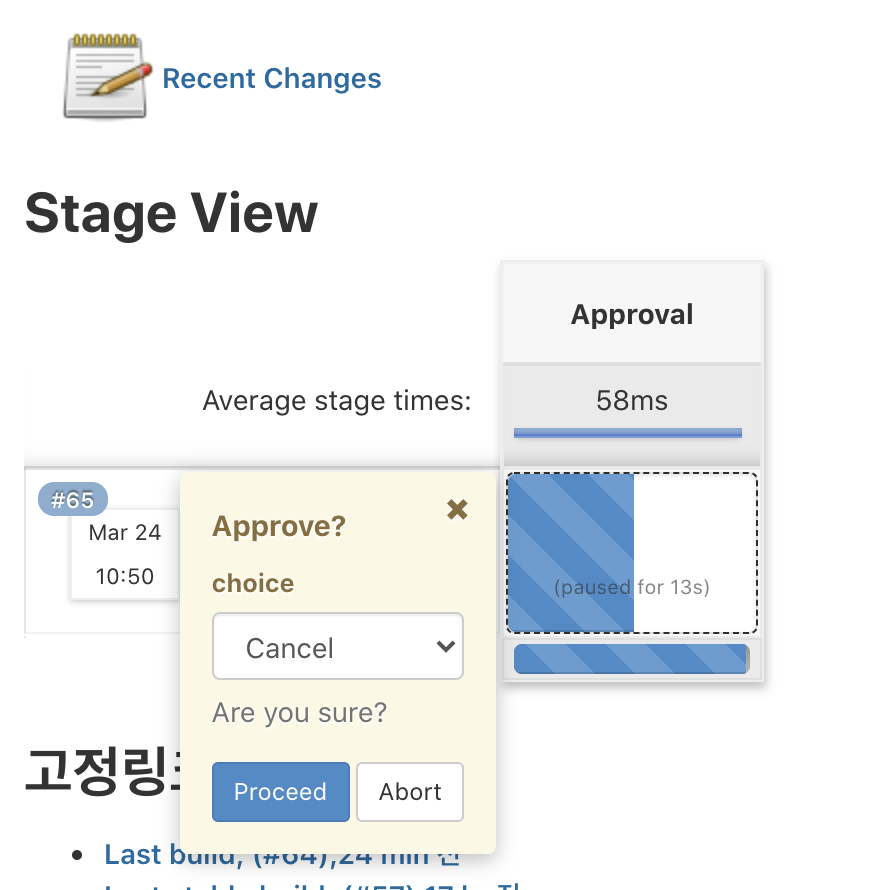
Pipeline input step을 이용해서 사용자가 값을 입력할 때까지 대기- Slack 또는 Jenkins에서 사용자가 값을 입력하면 빌드 재개
- 입력 값을 Slack에 Reply로 게시
완성한 모습을 먼저보면 다음과 같다.
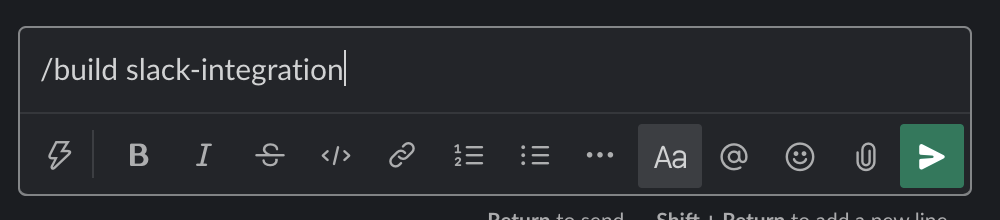
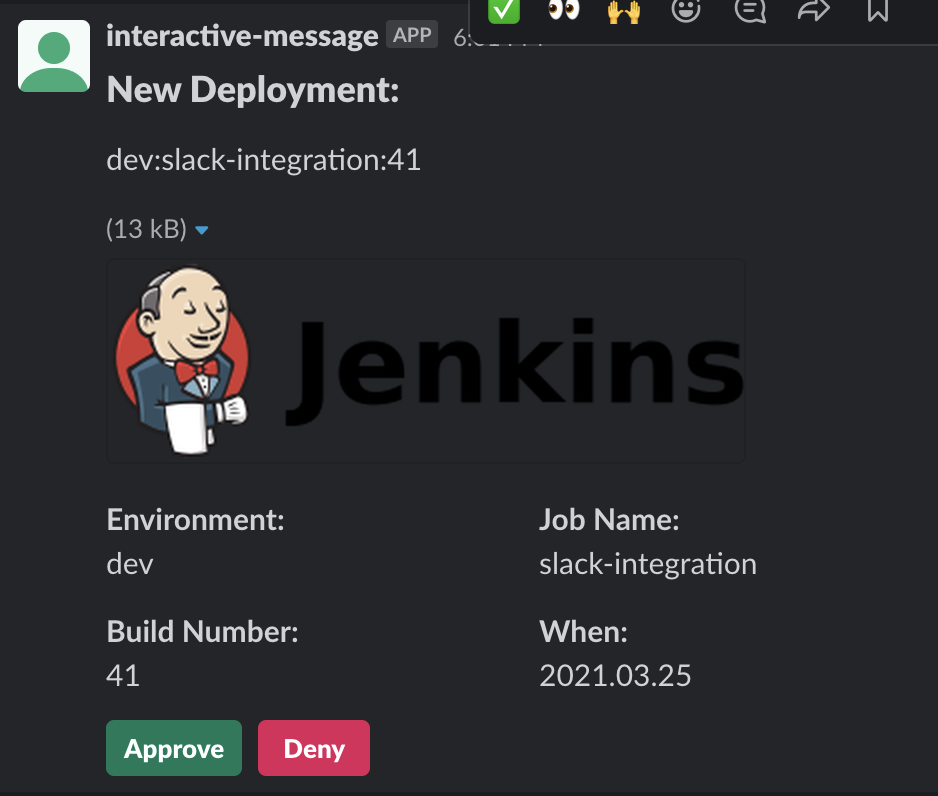
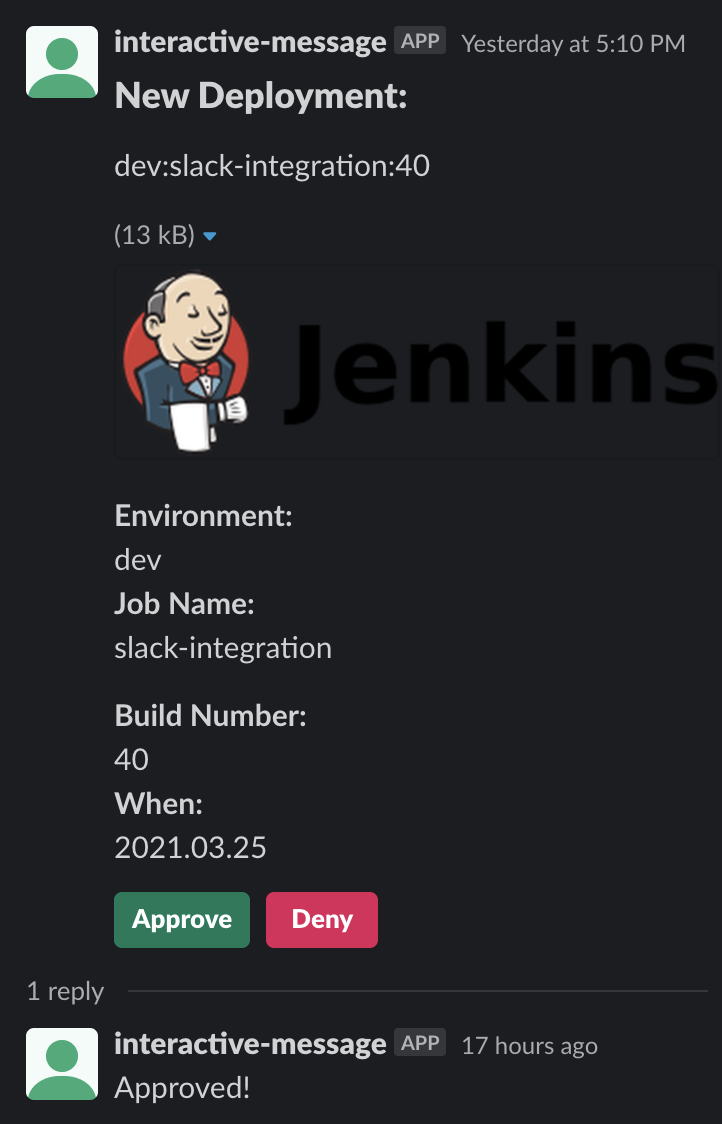
Slack에서 Slash Command를 이용해서 명령을 실행하면
Jenkins Job에 대한 정보와 Approve, Deny버튼이 함께 게시된다. 버튼을 클릭하면 reply로 사용자가 어떤 액션을 취했는지 알려주고 Jenkins Job이 다시 재개되거나 종료된다.
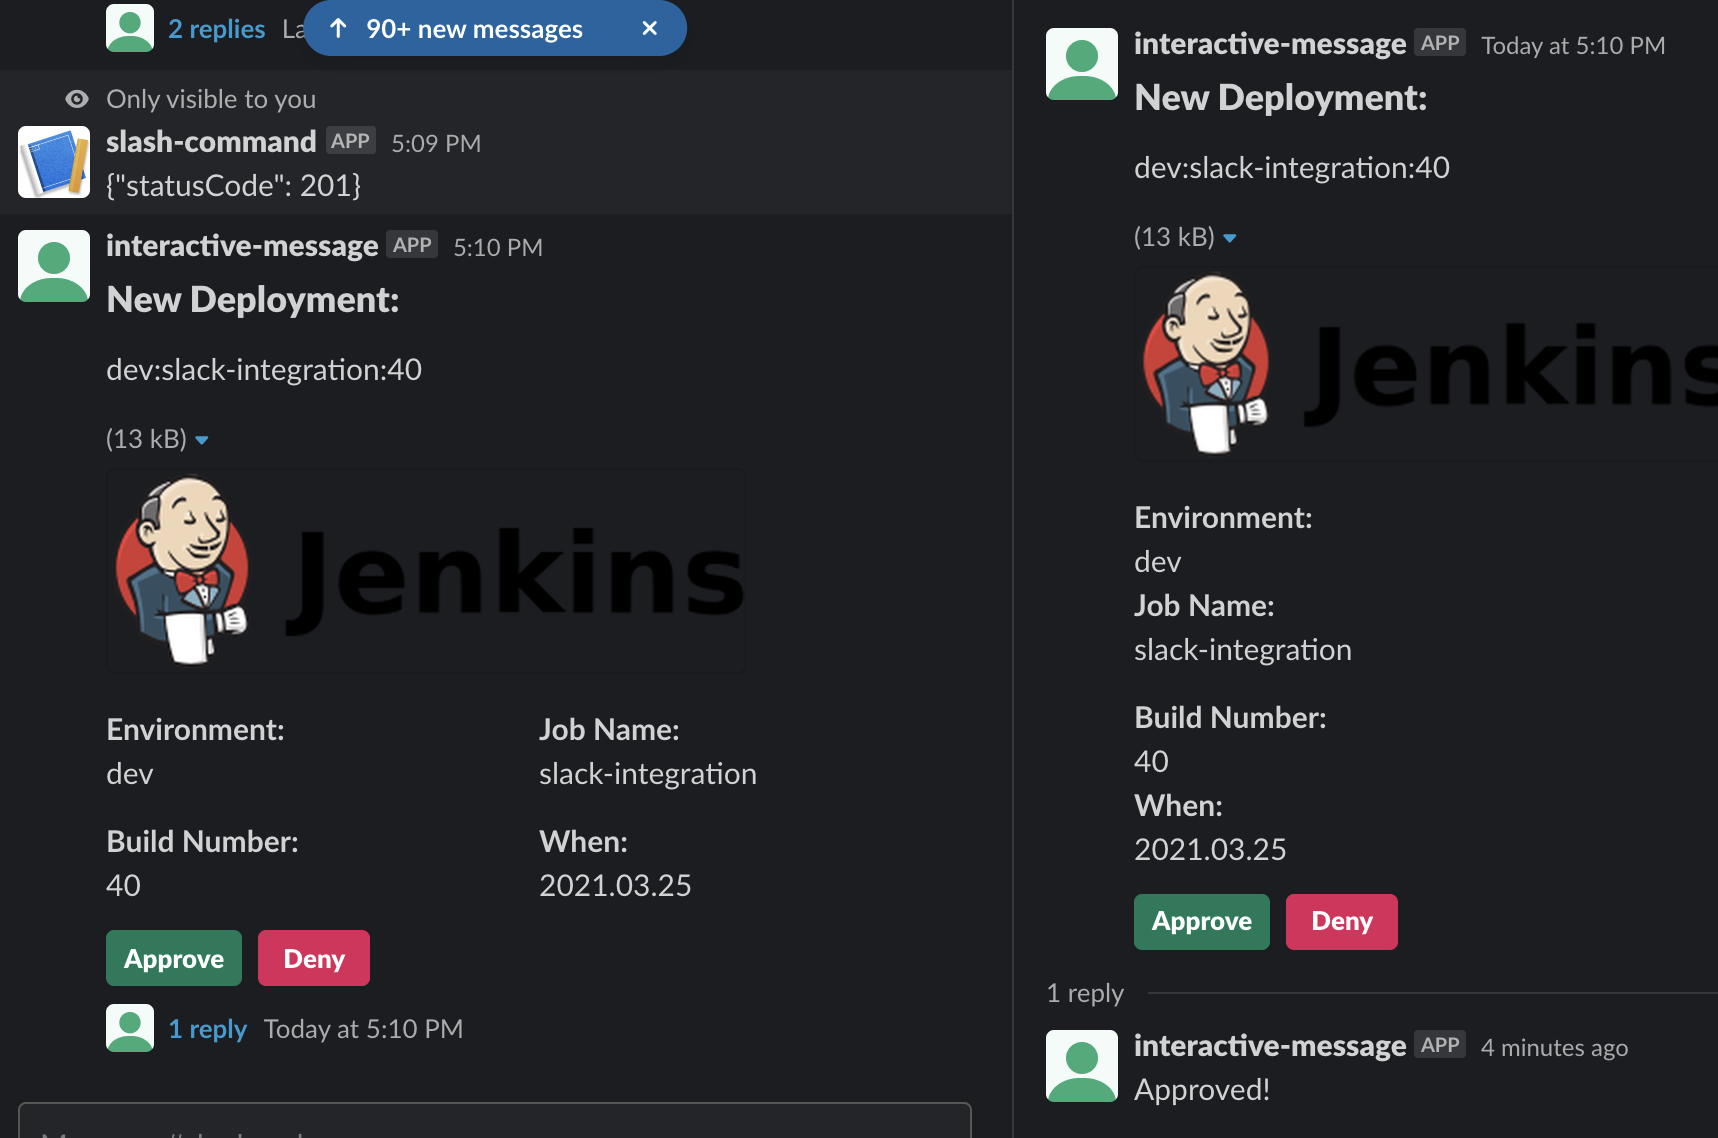
Jenkins에서 보면 아래와 같이 나온다.
이 글에서는 이전에 포스팅했던 내용을 생략하겠다.
이번 포스팅에서 모르는 부분이 있다면 아래 포스팅을 참고하기 바란다.
① Jenkins API를 이용해서 원격으로 빌드 유발
② Slack Slash Command로 Jenkins 원격 빌드 유발
③ Slack Interactive Component 게시
④ Slack Interactive Component 버튼 클릭 이벤트 처리
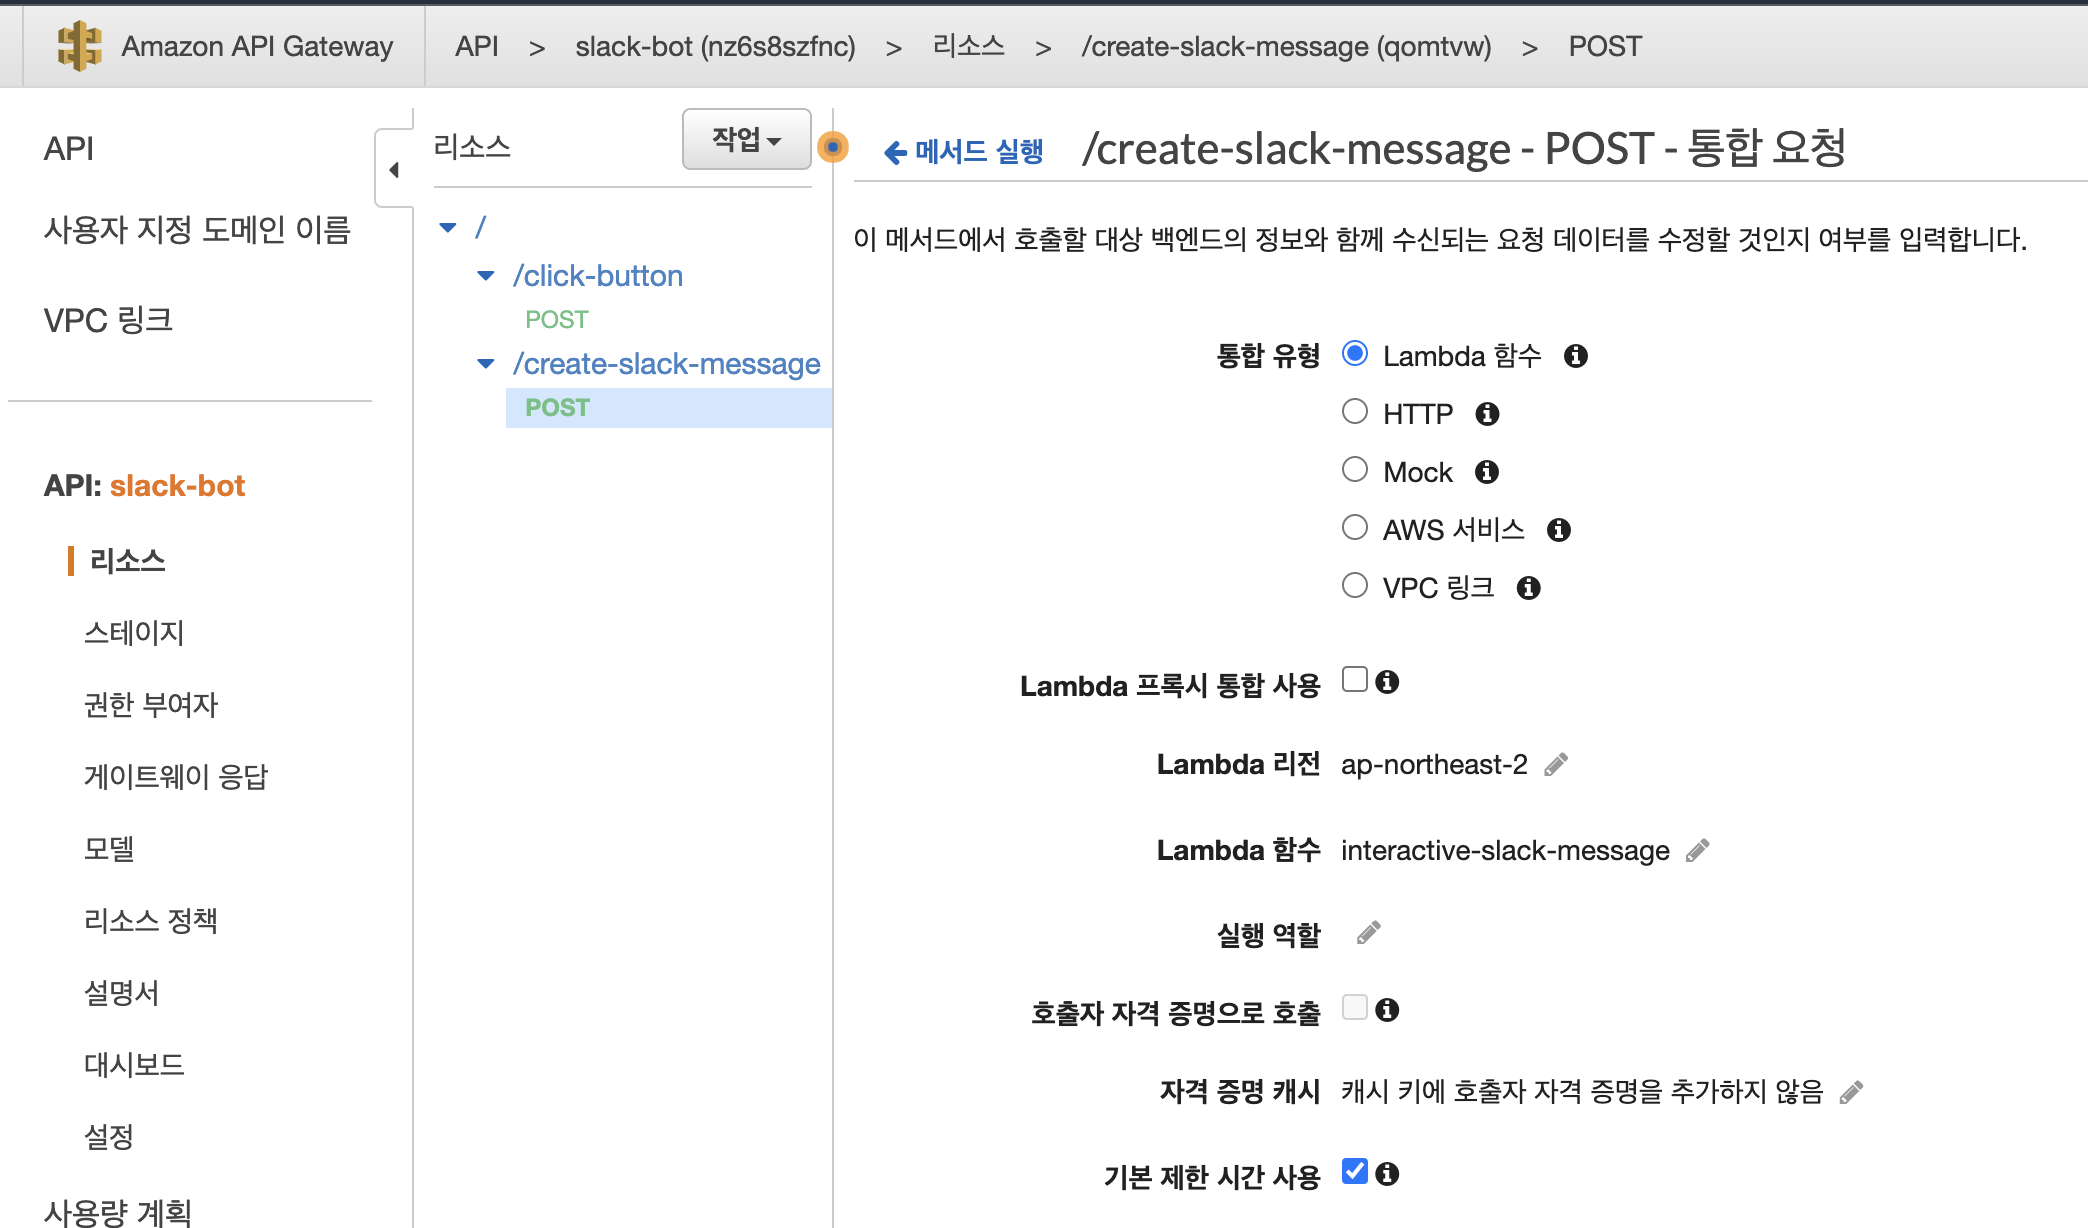
먼저 API Gateway에서 /create-slack-message 리소스를 만들어서 아래와 같이 설정한다.
Lambda 함수 interactive-slack-message의 코드는 다음과 같다.
import os
from slack_sdk import WebClient
from slack_sdk.errors import SlackApiError
import json
import datetime
import logging

# logger setting
logger = logging.getLogger()
logger.setLevel(logging.INFO)

OAUTH_TOKEN = os.environ['SLACK_OAUTH_TOKEN']
IMG_URL = os.environ['IMG_URL']


def lambda_handler(event, context):
    body = event['body-json']
    client = WebClient(token=OAUTH_TOKEN)
    now = datetime.datetime.now().strftime('%Y.%m.%d')

    try:
        # Call the chat.postMessage method using the WebClient
        result = client.chat_postMessage(
            channel=body['channel'],

            blocks= [
        		{
        			"type": "header",
        			"text": {
        				"type": "plain_text",
        				"text": "New Deployment:",
        				"emoji": True
        			}
        		},
        		{
        			"type": "section",
        			"text": {
        				"type": "plain_text",
        				"text": body['env']+':'+body['jobName']+':'+body['buildNumber'],
        				"emoji": True
        			}
        		},
        		{
        			"type": "image",
        			"image_url": IMG_URL,
        			"alt_text": "inspiration"
        		},
        		{
        			"type": "section",
        			"fields": [
        				{
        					"type": "mrkdwn",
        					"text": "*Environment:*\n"+body['env']
        				},
        				{
        					"type": "mrkdwn",
        					"text": "*Job Name:*\n"+body['jobName']
        				}
        			]
        		},
        		{
        			"type": "section",
        			"fields": [
        				{
        					"type": "mrkdwn",
        					"text": "*Build Number:*\n"+body['buildNumber']
        				},
        				{
        					"type": "mrkdwn",
        					"text": "*When:*\n"+now
        				}
        			]
        		},
        		{
        			"type": "actions",
        			"elements": [
        				{
        					"type": "button",
        					"text": {
        						"type": "plain_text",
        						"emoji": True,
        						"text": "Approve"
        					},
        					"confirm": {
        						"title": {
        							"type": "plain_text",
        							"text": "Are you sure?"
        						},
        						"text": {
        							"type": "mrkdwn",
        							"text": "Do you really want to deploy?"
        						},
        						"confirm": {
        							"type": "plain_text",
        							"text": "Deploy"
        						},
        						"deny": {
        							"type": "plain_text",
        							"text": "Stop, I've changed my mind!"
        						}
        					},
        					"style": "primary",
        					"value": "click_me_123"
        				},
        				{
        					"type": "button",
        					"text": {
        						"type": "plain_text",
        						"emoji": True,
        						"text": "Deny"
        					},
        					"style": "danger",
        					"value": "click_me_123"
        				}
        			]
        		}
        	]

        )
        logger.info(result)

    except Exception as e:
        logger.info(e)
        return {
            'status': 'Fail'
        }

    # TODO implement
    return {
        'status': 'Success',
        'ts': result['ts']
    }
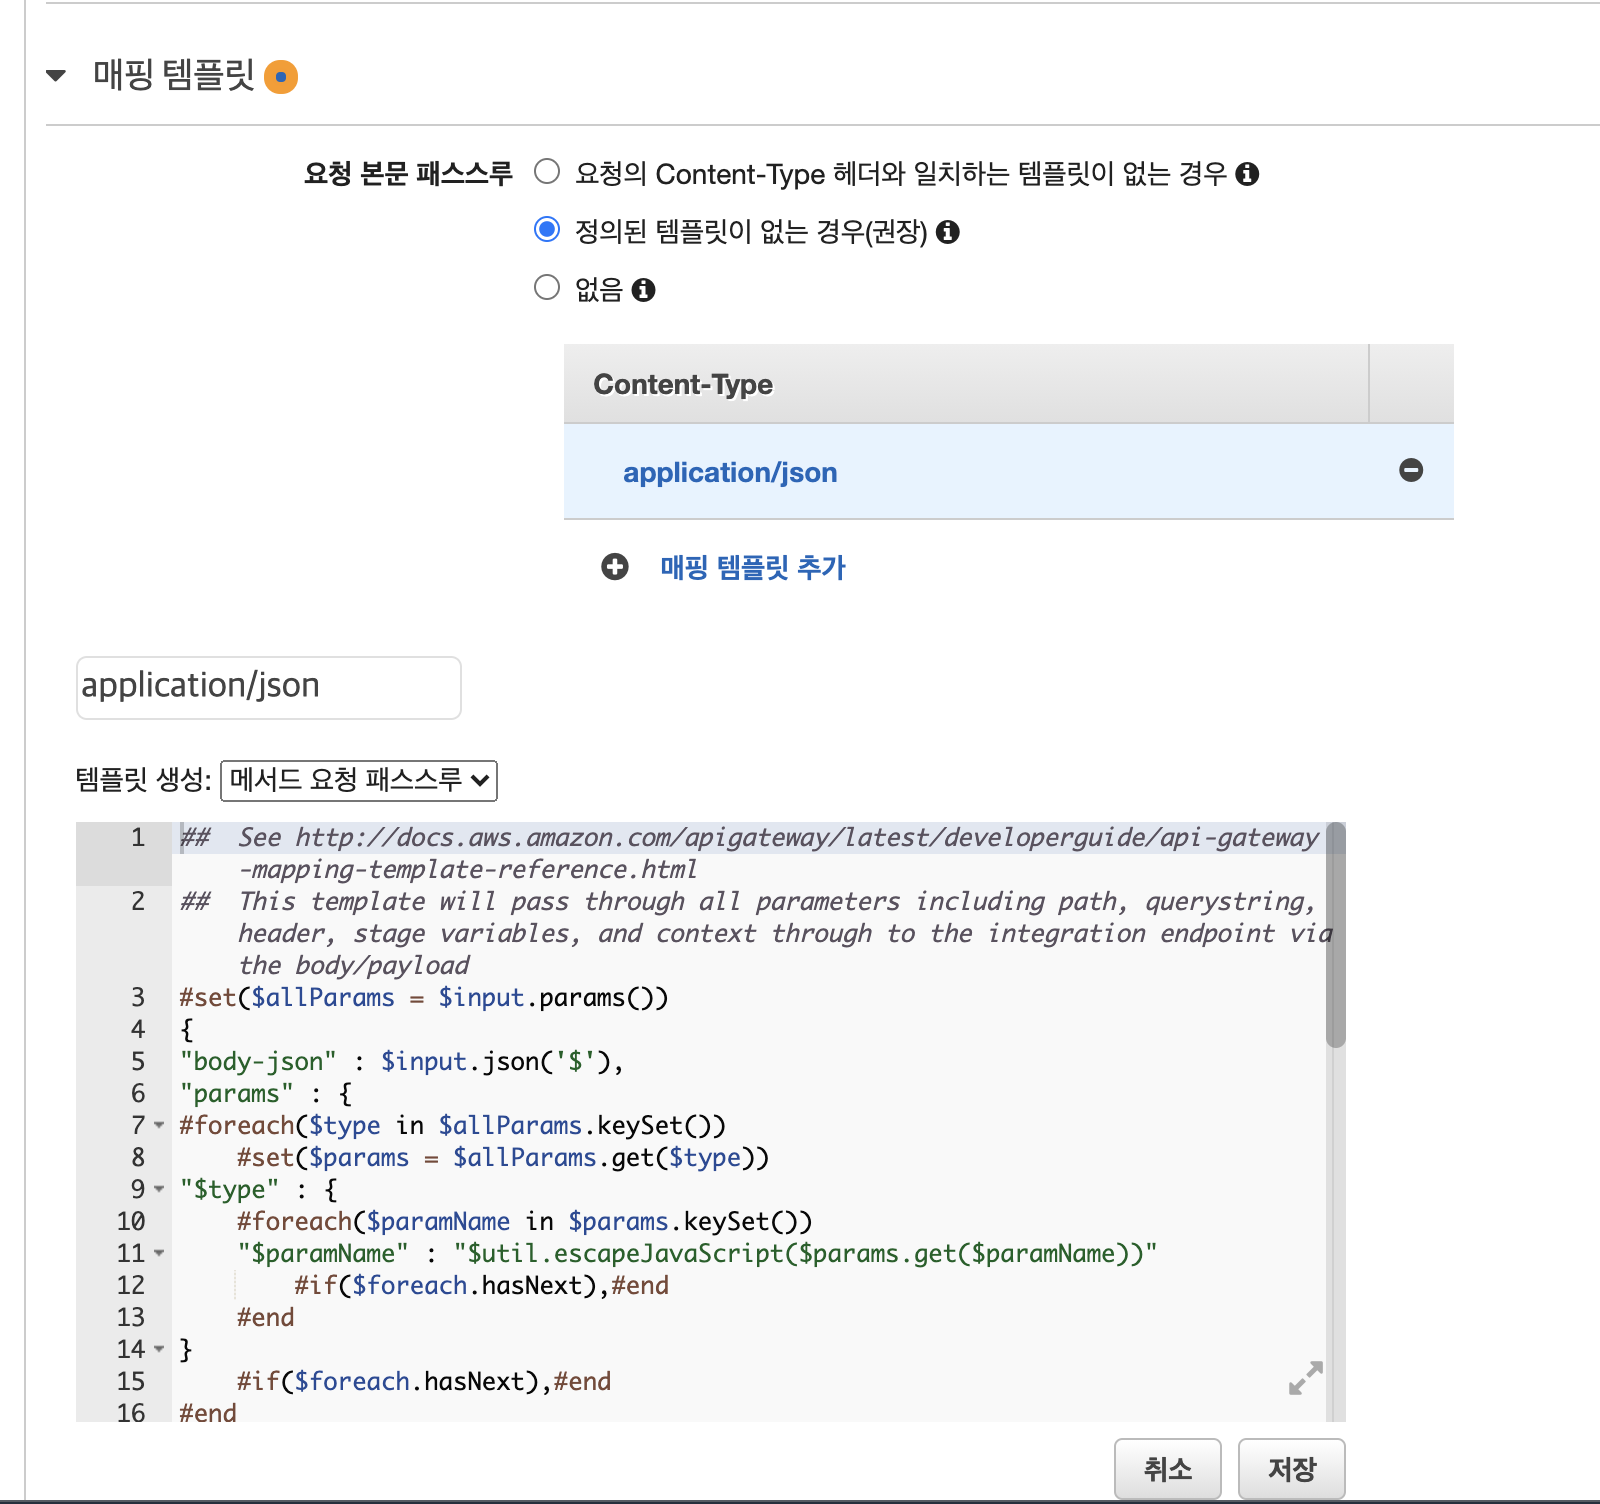
매핑 템플릿의 Content-Type은 application/json으로 해주고 메서드 요청 패스스루를 지정해준다.
저장하고 배포하면 호출 URL을 얻을 수 있다. (흐름이 이해가 안된다면 ② 또는 ④번 포스팅을 먼저 보기 바란다.)
아래는 원격으로 빌드할 Pipeline Script이다. 방금 전 얻은호출 URL을 <API Gateway 호출 URL>에 넣어준다. 나머지 변수 처리되어 있는 부분도 본인에게 맞게 추가해주면 되겠다.
pipeline {
    agent any
    stages {
        stage('Slack Approval') {
            steps {
                script {
                    try {
                        echo "========== create slack message ========="
                        def cmd = """
                            curl -d '{"env": ${env}, "buildNumber": "${BUILD_NUMBER}", "jobName": ${JOB_NAME}, "channel": ${slackChannel}}' \
                            -H "Content-Type: application/json" \
                            -X POST <API Gateway 호출 URL>/create-slack-message
                        """
                        def result = getShellCommandResult(cmd)
                        def resultJson = readJSON text: "${result}"
                        if (resultJson['status'] == 'Success') {
                            print('Created Slack Message!')
                        } else if (resultJson['status'] == 'Fail') {
                            throw new Exception('A fail was returned from the api call...')
                        } else {
                            throw new Exception('An incorrect status value was returned...')
                        }

                        echo "============= wait approval ==============="
                        try {
                        	def approval = input (
	                            id: 'wait-approval',
	                            message: 'Waiting for slack approval',
	                            submitterParameter: 'approver',
                                    parameters: [choice(choices: ['Cancel', 'Deploy'],description: 'Are you sure?',name: 'choice')]
	                        )

	                        if (approval['approver'] != "${administrator}") {
	    		            throw new Exception('You do not have permission.')
	    		        }

	    		        if (approval['choice'] == 'Deploy') {
	    		            print('choice deploy')
	   	                    currentBuild.result = 'Success'
	    		            cmd = """
	        	                curl -d '{"channel": "${slackChannel}", "text":"Approved in jenkins console", "thread_ts": "${resultJson.ts}"}' \
	                                -H "Content-type: application/json" \
	                                -H "Authorization: Bearer ${slackToken}" \
	                                -X POST https://slack.com/api/chat.postMessage
	                            """
	                            result = getShellCommandResult(cmd)
	    		        } else {
	    		            throw new Exception('Choosed cancel')
	    		        }
    		          } catch(Exception e) {
    		            	cmd = """
		    		     curl -d '{"channel": "${slackChannel}", "text":"${e}", "thread_ts": "${resultJson.ts}"}' \
		                     -H "Content-type: application/json" \
		                     -H "Authorization: Bearer ${slackToken}" \
		                     -X POST https://slack.com/api/chat.postMessage
		                 """
		                 result = getShellCommandResult(cmd)
    		          }
                    } catch(Exception e) {
                        print(e)
                        currentBuild.result = 'Fail'
                    }
                }
            }
        }
    }
}

def getShellCommandResult(cmd) {
    return sh(script: cmd, returnStdout: true).trim()
}
여기까지 완성했으면 Job을 빌드해보자.
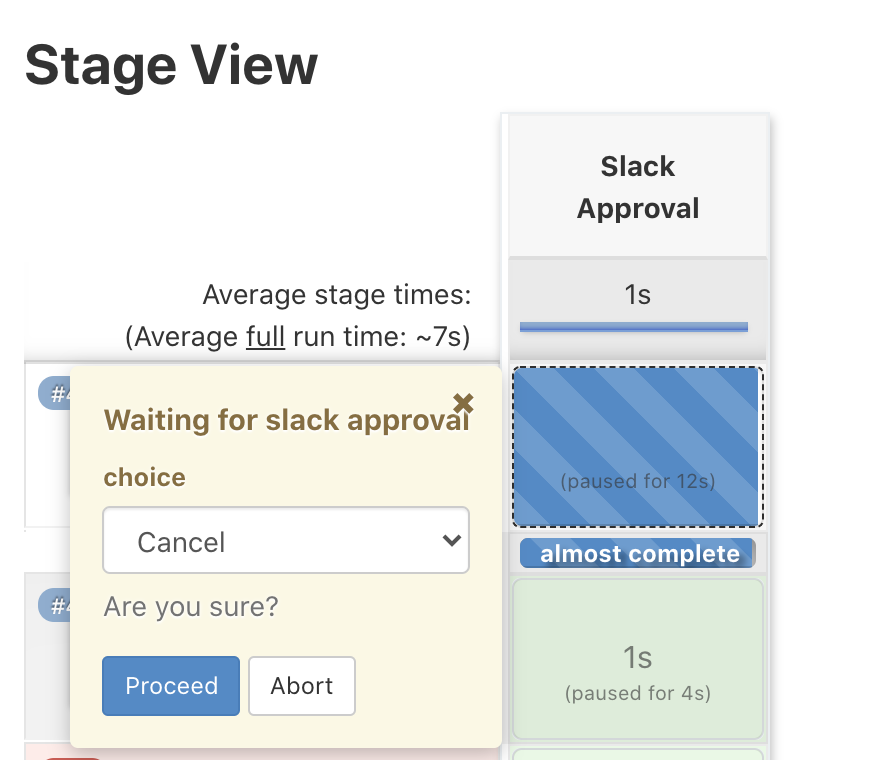
Jenkins와 Slack에 input 요청이 잘 나오는 것을 볼 수 있다.
Jenkins에서 Proceed 또는 Abort 버튼을 누르거나 Slack에서 Approve 또는 Deny 버튼을 누르면 reply도 제대로 달린다.
이제 ②번 포스팅에서 만들었던 Slash Command를 적용해주면 /build <Job_Name> 명령으로 빌드를 실행시킬 수 있다.