
📌 MyBatis
- 객체 지향 언어인 자바의 관계형 데이터베이스 프로그래밍을 보다 쉽게 도와주는 프레임워크이다.
- 자바 Object와 SQL 사이의 자동 매핑 기능을 지원한다.
- 자바에서는 관계형 데이터베이스 프로그래밍을 하기 위해 JDBC를 제공한다.
cf) JDBC
- 자바 프로그램이 데이터베이스와 연결되어 데이터를 주고 받을 수 있게 해주는 프로그래밍 인터페이스 - JDBC는 다양한 관계형 데이터베이스 프로그래밍을 위해 API를 제공한다.
MyBatis가 JDBC를 보다 편하게 사용하기 위해 개발되었다.
✔ MyBatis의 특징
- SQL을 별도의 파일로 분리해서 관리한다. (코드로부터 완전히 분리)
- 생산성 : 코드가 짧아진다.
- 유지보수성 향상 : Mapper 파일에만 SQL 코드를 입력하고 나중에 SQL 코드를 변경할 떄 이곳에서 유지보수만 하면, DAO에서는 아무런 영향을 받지 않는다. DAO에서는 Mapper 파일에서 작성된 SQL 코드를 갖다 쓰기만 하면 되기 때문이다.
- Hiberate나 JPA(Java Persistence Api)처럼 새로운 DB 프로그래밍 패러다임을 익혀야 하는 부담없이 SQL 을 그대로 이용하면서 JDBC 코드 작성의 불편함도 제거해주고, 도메인 객체나 VO 객체를 중심으로 개발이 가능하다.
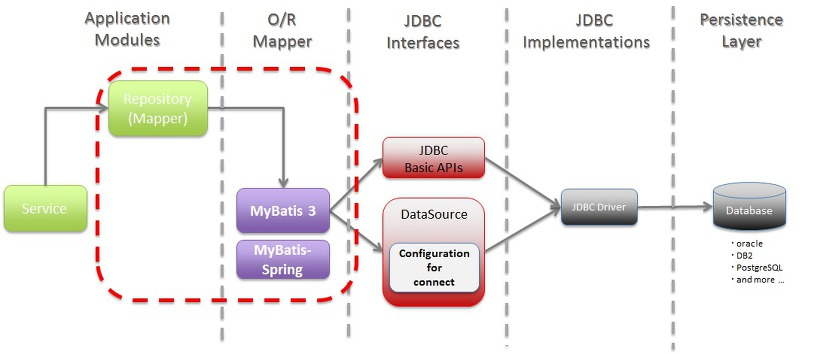
✔ MyBatis Architecture
✔ Springboot-MyBatis 설정하기
- 의존성 추가
implementation 'org.springframework.boot:spring-boot-starter-data-jdbc'
implementation 'org.mybatis.spring.boot:mybatis-spring-boot-starter:2.1.4'- 데이터베이스 연결하기 (application.yml)
spring:
  datasource:
    driver-class-name: com.mysql.jdbc.Driver
    url: jdbc:mysql://localhost:3306/mybatis?characterEncoding=UTF-8&useTimezone=true&serverTimezone=Asia/Seoul
    username: [username]
    password: [password]
mybatis: # type을 쉽게 쓰기 위해서 dto 패키지를 type-aliaes에 설정
  type-aliases-package: com.may.mybatispractice.dto
cf) 연결 테스트
@RunWith(SpringJUnit4ClassRunner.class)
@SpringBootTest
public class ConnectionTests {

    @Autowired
    private SqlSessionFactory sqlSessionFactory;

    @Test
    public void connection_test(){
        try(Connection con = sqlSessionFactory.openSession().getConnection()){
            System.out.println("커넥션 성공");
        }catch(Exception e){
            e.printStackTrace();
        }
    }
}- 프로젝트 구조
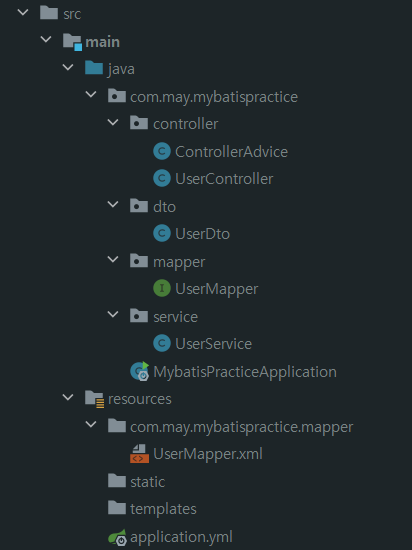 프로젝트 구조에서 볼 수 있듯이,
resources 하위에 똑같이 com.may.mybatispractice 경로를 만든다.
그 후 mapper 디렉토리를 생성해 UserMapper 인터페이스와 같은 경로에 두도록 한다.
- 데이터 접근 방식 2가지
- UserMapper.xml 대신, 어노테이션을 이용해 데이터 접근이 가능하다.
@Mapper
public interface UserMapper {

    @Select("SELECT * FROM user")
    List<UserDto> findAll();

    @Select("SELECT * FROM user where id = #{id}")
    UserDto findById(Long id);

    @Insert("INSERT INTO user (name, age) values (#{name}, #{age})")
    void save(@Param("name") String name, @Param("age") int age);
}- UserMapper.xml을 사용
위의 코드에서 어노테이션만 제거하면 된다.
@Mapper
public interface UserMapper {

    List<UserDto> findAll();

    UserDto findById(Long id);

    String nameCheck(String name);

    void save(@Param("name") String name, @Param("age") int age);
}
resources > com.may.mybatis.practice.mapper > UserMapper.xml
<?xml version="1.0" encoding="UTF-8" ?>

<!DOCTYPE mapper PUBLIC "-//mybatis.org//DTD Mapper 3.0//EN"
        "http://mybatis.org/dtd/mybatis-3-mapper.dtd">

<mapper namespace="com.may.mybatispractice.mapper.UserMapper">
    <select id="findById" resultType="UserDto">
        SELECT * FROM user WHERE id = #{id}
    </select>

    <select id="findAll" resultType="UserDto">
        SELECT * FROM user
    </select>

    <select id="nameCheck" resultType="String">
        SELECT COUNT(name) FROM user WHERE name = #{name}
    </select>

    <insert id="save">
        INSERT INTO user (name, age) values (#{name}, #{age})
    </insert>
</mapper>
application.yml에
type-aliases-package: com.may.mybatispractice.dto 작성했으므로,
resultType을 바로 UserDto로 작성할 수 있다.
✔ 테이블 자동 생성, 데이터 insert
spring:
	schema: classpath:schema.sql
추가한 후, resources > schema.sql을 생성하자.
해당 파일에 SQL 구문을 삽입하고 ctrl + enter 누르면 해당 쿼리문이 실행된다.
ex)
DROP TABLE IF EXISTS board;

create table board (
                       id BigInt not null auto_increment,
                       user_id BigInt not null,
                       title varchar(100) not null,
                       content varchar(255),
                       regdate timestamp default now(),
                       primary key(id),
                       FOREIGN KEY (user_id) REFERENCES user(id)
);
alter table user modify id int not null auto_increment;
INSERT INTO board(user_id, title, content) VALUES (1, 'title1', '');
✔ insert 후 바로 PK(auto_increment)값 가져오기
User 데이터를 insert할 때, save할 때 파라미터로 name, age를 전달했다. 이렇게 되면 PK값을 가져올 수 없게 된다.
이제 PK값을 가져오도록 해보자.
파라미터로 BoardDto를 전달한 후, PK값인 boardId를 접근자 메서드로 가져오면 된다.
BoardMapper Interface
int save(BoardDto boardDto);BoardMapper SQL
<insert id="save" useGeneratedKeys="true" keyProperty="boardId">
	INSERT INTO board (userId, title, content) values (#{userId}, #{title}, #{content})
</insert>
useGeneratedKeys="true" keyProperty="boardId"
를 Mapper에 추가해주면 자동으로 값이 들어가진다.
BoardDto
@AllArgsConstructor
@NoArgsConstructor
@Getter
@Setter
public class BoardDto {

    private Long boardId;

    private Long userId;

    private String title;

    private String content;

}
BoardService
@Transactional
public Long save(BoardDto boardDto){
	if(boardMapper.save(boardDto) == 0){
    		throw new IllegalArgumentException("데이터베이스에 저장되지 않았습니다.");
       	}
	return boardDto.getBoardId(); // 생성된 데이터의 pk값을 가져온다.
}
로그를 남기자 〰️