✨ Swagger
프로젝트에서 지정한 URL들을 HTML 화면으로 확인할 수 있게 해주는 라이브러리이다.
컨트롤러에 명시된 어노테이션을 해석하여 API 문서를 자동으로 만들어준다.
Swagger는 Java에 한정된 라이브러리는 아니고, node.js, django등에도 지원한다.
세팅을 해보장.
build.gradle
    implementation group: 'io.springfox', name: 'springfox-swagger2', version: '2.9.2'
    implementation group: 'io.springfox', name: 'springfox-swagger-ui', version: '2.9.2'
// 2.5.0 -> 2.7.0 -> 2.9.2 수정
SwaggerConfig.java
@Configuration
@EnableSwagger2 // Swagger2 버전을 활성화하겠다는 어노테이션
public class SwaggerConfig {
    @Bean
    public Docket api() {
        return new Docket(DocumentationType.SWAGGER_2)
                .select() // ApiSelectorBuilder 생성
                .apis(RequestHandlerSelectors.any()) // api 스펙이 작성되어 있는 패키지 지정 // 현재 RequestMapping으로 할당된 모든 URL 리스트를 추출
                .paths(PathSelectors.ant("/**")) // 그중 /** 인 URL들만 필터링
                .build();
    }
}- Docket : Swagger 설정의 핵심으로 문서화 객체, API에 대한 내용 및 스펙은 컨트롤러에서 작성한다.
http://localhost:8080/swagger-ui.html 로 접속하면, REST API를 볼 수 있다

동아리 면접을 보면서 알게된 툴
나는 항상 REST API 설계 노션에다 쓰고 공유했는데
요런 방법이 있었다니 매우 신기하다
만약 /api 경로 추가해서 /api/**로 설정해야겠다
글고 면접보기 전, 기술 질문을 대비해서 백엔드 면접 공부를 했는데 url에 대문자는 삼가하는 게 좋다고 하더라! loginSuccess 이런 거 다 login-success로 바꿔야겠다
ㅎㅎ
✔ 문서에 대한 정보를 추가해보자
    @Bean
    public Docket api() {
        return new Docket(DocumentationType.SWAGGER_2)
                .apiInfo(apiInfo())
                .select()
                .apis(RequestHandlerSelectors.any())
                .paths(PathSelectors.ant("/**"))
                .build();
    }
먼저 api() 메서드에 .apiInfo(apiInfo()) 추가하자
apiInfo() 메서드로 넘어가보자.
    private ApiInfo apiInfo() {
        String applicationName = "SLACK-CLONE API Documents";
        return new ApiInfoBuilder()
                .title(applicationName) // 제목 설정
                .contact(new Contact("Ayoung Moon", null, "ayong703@gmail.com")) // 연락처 and 이름 설정
                .build();
    }
화면을 보도록 하자.
 요렇게 설명이 나오게 된다 👍
✔ JWT 인증 기능 추가해보자
JWT를 적용했다면 꼭 이 기능은 있어야 편할 듯하다.
인증이 필요한 메서드마다 유효한 토큰을 넣어야 하고,,,
근데 이 기능 있으면 한 번만 인증하면 편하게 테스트 가능하다!
먼저 springfox-swagger2* version을 2.5.0 -> 2.7.0(->2.9.2)으로 바꿔야 인증 추가가 가능한 것 같다.
(2.5.0으로 계속 헤매다가 2.7.0으로 수정하고 실행하니 바로 됨,, ㅎ)
다시 api() 메서드로 돌아가 코드 추가를 하자.
    @Bean
    public Docket api() {
        return new Docket(DocumentationType.SWAGGER_2)
                .apiInfo(apiInfo())
                .select()
                .apis(RequestHandlerSelectors.any())
                .paths(PathSelectors.ant("/**"))
                .build()
                .securityContexts(Lists.newArrayList(securityContext()))
                .securitySchemes(Lists.newArrayList(apiKey()));
    }
밑에 security* 관련 코드 두 줄이 추가 됐다.
그렇다면 securityContext(), apiKey() 메서드를 살펴보자.
    private ApiKey apiKey() {
        return new ApiKey("JWT", "X-AUTH-TOKEN", "header");
    }

    // JWT 인증
    private SecurityContext securityContext() {
        return SecurityContext.builder().securityReferences(defaultAuth()).build();
    }

    List<SecurityReference> defaultAuth() {
        AuthorizationScope authorizationScope = new AuthorizationScope("global", "accessEverything");
        AuthorizationScope[] authorizationScopes = new AuthorizationScope[1];
        authorizationScopes[0] = authorizationScope;
        return Lists.newArrayList(new SecurityReference("JWT", authorizationScopes));
    }
apiKey()에서 2번째 파라미터는 헤더에 토큰값을 담을 때 키 이름을 입력하면 된다!!
(나는 X-AUTH-TOKEN으로 설정했다.)
나머지는 요 링크를 참조해서 작성했당.
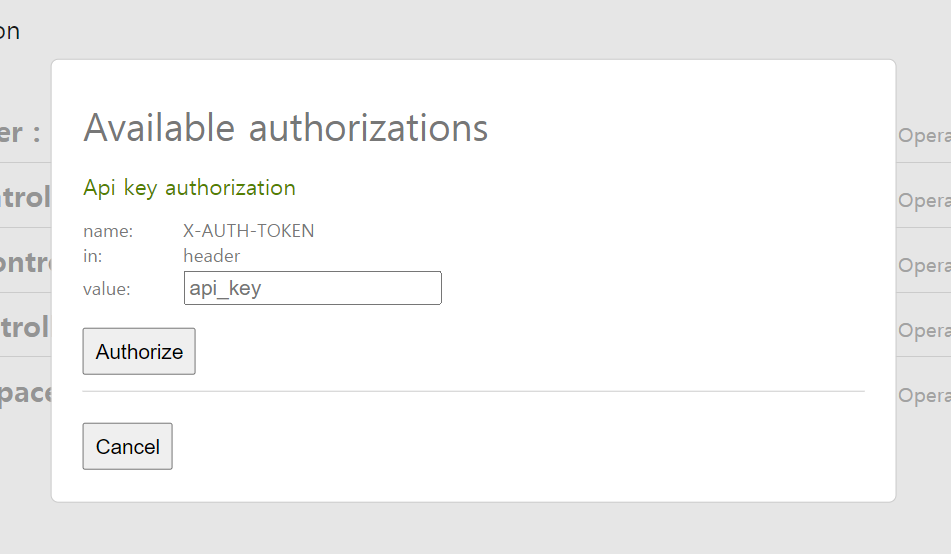
다시 실행해보면 상단에
 Authorize 버튼이 추가되었다. 클릭해보자
 이제 value에 유효한 토큰값만 집어넣으면 인증은 완료됐당. 매우 신기하다 스웩어...... 여태까지 이걸 몰랐다니 놀랍구만.
✔ Annotation 설명
@Api
해당 클래스가 Swagger 리소스라는 것을 명시
- value : 태그를 작성
- tags : 여러 개의 태그 정의 가능
@ApiOperation
한 개의 operation(API url과 method 선언)
- value : API에 대한 간략한 설명 작성
- notes : 더 자세한 설명 작성
- hidden : method 생략 가능하다(true)
@ApiParam
파라미터에 대한 정보를 명시
- value : 파라미터 정보 작성
- required : true or false
- example : 테스트를 할 때 보여줄 예시
