테스트
1) 블랙박스 테스트 : 사용자의 입장에서 동작을 검사 (많은 값을 넣어보기)
2) 개발자 테스트 : 개발자가 직접 테스트 코드를 작성
장점
- 빠르고 정확한 테스트가 가능합니다. (예상 동작 VS 실제 동작)
- 테스트 자동화가 가능합니다.
- 배포 절차 시 테스트 코드가 수행되어 동작 검증
- 리팩토링이나 기능 추가를 할 때 더욱 편리합니다.
단점
- 개발 시간이 오래 걸림
- 테스트 코드를 유지보수하는 비용
테스트 코드
-
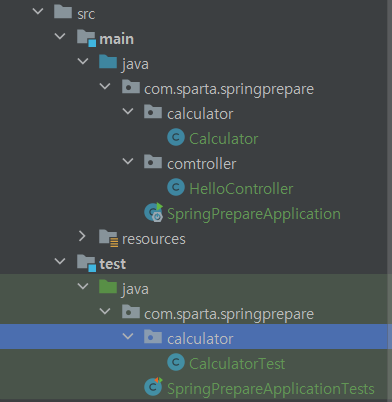
테스트 코드의 위치는 test 폴더 내에 있다
-
작성 중인 코드에서 alt + insert > test 하면 자동으로 테스트를 만들어준다
-
테스트 코드는 main메소드가 없다 >> JUnit은 따로 main 실행하지 않아도 각각의 메서드, 기능별로 테스트 코드를 작성하여 실행시킬 수 있다.
test1, test2,.. 등의 메소드를 각각 실행시키면 된다.
이전 팀 프로젝트에서 Main 완성 이전에 테스트해보기 어렵다고 했던 팀원이 있었는데, 이 방법을 이용하면 테스트할 수 있겠다!
Assertions.assertEquals(10, result);내가 예상한 값은 10이고, result (return될 값)이랑 동일할 경우 Test Passed가 된다.
Lombok
- 자바 프로젝트를 진행할 때 거의 필수적으로 필요한 메서드 / 생성자 등을 자동 생성해줌으로써 코드를 절약할 수 있도록 도와주는 라이브러리
@Getter, @Setter를 가지고 메소드를 쉽게 생성할 수 있다.
- Lombok 없이도 IntelliJ에서는 우클릭 > Generate > Getter and Setter을 통해 만들 수 있다
@AllArgsConstructor
- 모든 필드를 입력받는 생성자를 생성한다
@NoArgsConstructor
- 기본 생성자를 생성한다 (다른 생성자를 만들면 자동으로 추가되지 않기 때문에)
@RequiredArgsConstuctor
- 요구되는 필드를 포함하는 생성자를 생성 (final이 달린 필드를 가지는 생성자)
application.properties

- SpringBoot에서 자동으로 설정되고 있는 설정 값을 쉽게 수정할 수 있다
- DB 연결 시 DB 정보의 제공을 쉽게 할 수 있다
server.port = 8081등, 기본으로 설정된 포트를 바꿀 수도 있다.
- application.yml로 설정할 수도 있다.
Spring MVC
MVC 디자인 패턴

Model
- 데이터, 비즈니스 로직을 담당
- DB와 연동하여 데이터를 저장, 불러오는 등의 작업을 수행
View
- 사용자 인터페이스를 담당 (정보 출력)
- 사용자가 보는 화면, 버튼, 폼 등을 디자인하고 구현함
Controller
- Model, View 사이의 상호작용을 조정, 제어
- 사용자의 입력을 받아 Model에 전달, Model의 결과를 바탕으로 View를 업데이트
Spring MVC
- ‘DispatcherServlet이 중앙에서 HTTP 요청을 처리해주는데 이는 Front Controller 패턴으로 설계되어있다’
- Spring에서 MVC 디자인 패턴을 적용하여 HTTP 요청을 효율적으로 처리하고 있다
Servlet 참고
동적 웹 페이지를 만들 때 사용되는 자바 기반의 웹 애플리케이션 프로그래밍 기술

- 사용자가 Client(브라우저)를 통해 서버에 HTTP Request 즉, API 요청을 합니다.
- 요청을 받은 Servlet 컨테이너는 HttpServletRequest, HttpServletResponse 객체를 생성합니다.
약속된 HTTP의 규격 (어떤 브라우저에서 요청해도 구조는 동일함)을 맞추면서 쉽게 HTTP에 담긴 데이터를 사용하기 위한 객체
요청이 들어오면 답변 객체가 바로 만들어진다 - 설정된 정보를 통해 어떠한 Servlet에 대한 요청인지 찾습니다.
web.xml에서 찾는다. 우리가 찾는 것은 아님!
- 해당 Servlet에서 service 메서드를 호출한 뒤 브라우저의 요청 Method에 따라 doGet 혹은 doPost 등의 메서드를 호출합니다.
Request에 담긴 GET,PUT,POST,... 에 해당하는 메소드 호출
- 호출한 메서드들의 결과를 그대로 반환하거나 동적 페이지를 생성한 뒤 HttpServletResponse 객체에 응답을 담아 Client(브라우저)에 반환합니다.
- 응답이 완료되면 생성한 HttpServletRequest, HttpServletResponse 객체를 소멸합니다.
DispatcherServlet, Front Controller
API가 여러개 있을 때 각각에 매칭이 되는 Servlet 객체를 구현, 요청 메소드에 맞는 메소드를 호출 등등,... 이것들 다 개발자가 작성할 필요가 없도록 하는 서블릿
Front Controller 패턴 방식으로 처리하고 있다

- Client(브라우저)에서 HTTP 요청이 들어오면 DispatcherServlet 객체가 요청을 분석합니다.
- DispatcherServlet 객체는 분석한 데이터를 토대로 Handler mapping을 통해 Controller를 찾아 요청을 전달해 줍니다.
GET /api/hello → 'HelloController' 의 **hello() 함수**- Handler mapping 에는 API path 와 Controller 메서드가 매칭되어 있습니다.
@RestController public class HelloController { @GetMapping("/api/hello") // Get 방식의 ~ 경로로 들어오면 public String hello() { // 이 함수를 호출할 것이다 return "Hello World!"; } } - API path 즉, URL을 Controller에 작성하는 방법
1) @Controller 애너테이션이 달려있는 클래스를 생성
2) @GetMapping 처럼 요청한 HTTP Method 와 일치하는 애너테이션을 추가한 메서드를 구현합니다.
- URL 전달은 애너케이션의 속성값으로 함@GetMapping("/api/hello")
- 해당 메서드명은 URL을 매핑하는데 영향을 미치지 않음으로 자유롭게 정해도 상관 없습니다.
- Controller → DispathcerServlet
- 해당 Controller는 요청에 대한 처리를 완료 후 처리에 대한 결과 즉, 데이터('Model')와 'View' 정보를 전달합니다.
- DispatcherServlet → Client
- ViewResolver 통해 View에 Model을 적용하여 View를 Client에게 응답으로 전달합니다.
- 정보를 토대로 View에 적용
- 최종본 만들기
- 클라이언트에 최종본을 반환한다
이후 더 복잡한 처리를 할 때는 Controller 내에서도 게층을 분리한다 (3 Layered..)
Controller
Controller의 장점
API마다 파일을 만들 필요가 없다.
- 보통 하나의 Controller에 모든 API를 넣지는 않는다.
- 유사한 성격의 API를 하나의 Controller로 관리한다.
@Controller
public class HelloController {
    @GetMapping("/api/hello")
    public String hello() {
        return "Hello World!";
    }
}
이때 String 타입의 return은 해당 String 이름의 HTML 파일이 있는지 확인해서 HTML을 반환한다 = View name의 정보를 반환해준다.
만약 실제 문자열을 return하고 싶다면 hello()위에 @ResponseBody 를 작성해야 한다
작성한 방식과 다르게 호출할 경우
ex) Get으로 작성해두고 POST로 호출
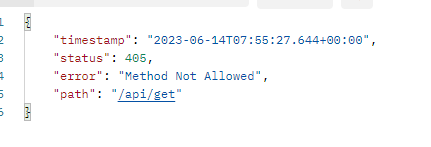
경로는 중복이 될 수 있다. 그러나 메소드까지 겹칠 수는 없다.
@GetMapping("/api/hello")
@ResponseBody
public String get() {
    return "GET Method 요청";
}

@PostMapping("/api/hello")
@ResponseBody
public String post() {
    return "POST Method 요청";
}
@RequestMapping
/api로 시작하는 요청은 RequestMapping 내의 메소드로 들어오고, 이후 경로를 찾는다.
- 중복되는 경로를 생략할 수 있다.
@Controller
@RequestMapping("/user")
public class UserController {
	@GetMapping("/login")
	public String login() { // 메서드명은 매핑에 관련 없으나 중복될 수 없다.
	    // ...
	}

  @GetMapping("/logout")
  public String logout() {
      // ...
  }

	@GetMapping("/signup")
	public String signup() {
		// ...
	}

	@PostMapping("/signup")
  public String registerUser(SignupRequestDto requestDto) {
		// ...
	}
}
정적 페이지와 동적 페이지

정적 페이지

1. 직접 접근
변경할 내용 없이 이미 완성된 페이지만을 출력할 것이기 때문에 굳이 Controller을 거칠 필요는 없다.
http://localhost:8080/hello.html
2. Controller을 거쳐서 반환
우선 html 파일을 반환하도록 한다.
@GetMapping("/static-hello")
public String hello() {
    return "hello.html";
}
thymeleaf를 추가하면 기본적으로 HTML 페이지를 templates 폴더 내에서 찾게 되어있다.
만약 다른 폴더에서 찾고 싶으면 themeleaf를 주석 처리하고, 직접 경로로 작성한다.
http://localhost:8080/폴더명-hello.html
3. Redirect
= 재호출. 직접 접근하는 경로로 다시 한 번 접근해라 (돌아서 접근하기)
- Status Code : 3xx
@GetMapping("/html/redirect")
public String htmlStatic() {
    return "redirect:/hello.html";
}
http://localhost:8080/html/redirect
redirect 내에서 hello.html을 호출하는 것이므로 실질적으로는 두 번 페이지를 읽는다
4. Template engine에 view 전달
HTML 파일 이름 전체가 아닌 .html 앞까지만 작성하면 된다
@GetMapping("/html/templates")
public String htmlTemplates() {
    return "hello";
}
http://localhost:8080/html/templates
동적 페이지
_(1).png?id=60354f85-b3b2-47a4-9e90-8f5ca06f3bb6&table=block&spaceId=83c75a39-3aba-4ba4-a792-7aefe4b07895&width=1810&userId=&cache=v2)
반환할 데이터는 Model에 담고, Model이 적용될 View Main에 작업을 전달하면, ViewResolver을 통해서 그 Model의 데이터가 View에 적용이 되고 완성된 페이지를 클라이언트에 반환한다.
private static long visitCount = 0; // 객체 생성시마다 값이 변하지 않도록 함

...

@GetMapping("/html/dynamic")
public String htmlDynamic(Model model) {
    visitCount++;
    model.addAttribute("visits", visitCount);
    return "hello-visit";
}
// 방문 한 번 할 때마다 방문 카운트를 +1 한다-
여기서 매개변수로 쓰인 Model은 springframework.ui의 것이다.
-
Model에 변동이 일어난 데이터를 넣어주기
model.addAttribute("visits", visitCount);
/templates/hello-visit.html
-
HTML 파일에서 방문 카운트 출력하는 부분은 아래로 작성되어 있다
(방문자 수: <span th:text="${visits}"></span>) -
동적 페이지 처리 과정
- Client 의 요청을 Controller에서 Model 로 처리합니다.
- DB 조회가 필요하다면 DB 작업 후 처리한 데이터를 Model에 저장합니다.
- Template engine(Thymeleaf) 에게 View, Model 전달합니다.
- View: 동적 HTML 파일
- Model: View 에 적용할 정보들
- Template engine
- View에 Model을 적용 → 동적 웹페이지 생성
- 예) 로그인 성공 시, "로그인된 사용자의 Nickname"을 페이지에 추가
- Template engine 종류: 타임리프(Thymeleaf), Groovy, FreeMarker, Jade, JSP 등
- View에 Model을 적용 → 동적 웹페이지 생성
- Client(브라우저)에게 View(동적 웹 페이지, HTML)를 전달 해줍니다.
- Client 의 요청을 Controller에서 Model 로 처리합니다.
데이터를 Client에 반환하는 방법
-
위 같은 html/css/js 파일 자체를 반환하는 방식은 요즘 선호되지 않는다.
최초 요청 때는 html을 반환해야 한다! 이때는 View를 반환해야 한다
-
프론트엔드와 백엔드가 각각 따로 발전하게 되면서, 느슨하게 결합하는 방식을 더 많이 채택하게 되었고, 최근에는 서버가 직접 뷰(html/css/js)를 반환하기 보다는 요청에 맞는 특정한 정보만 반환하는 것을 조금 더 선호한다.
-
주로 서버에서는 데이터 교환 포맷 중 아래와 같은 JSON 형태로 데이터를 반환한다.

R Studio 써서 다뤄 봤던 데이터다..! -
기본적인 html 파일 요청을 제외하고는 JSON 데이터를 요청하는 API를 통해 브라우저에서 html을 조작하여 반영하는 방식
JSON 데이터 반환하는 방법
- Java에서는 JSON을 지원하지 않는다.
String을 반환하기
    // [Response header]
    //   Content-Type: application/json
    // [Response body]
    //   {"name":"Robbie","age":95}
@GetMapping("/json/string")
@ResponseBody
public String helloStringJson() {
    return "{\"name\":\"Robbie\",\"age\":95}";
}
http://localhost:8080/response/json/string
String 외 자바 클래스를 반환하기
- 클래스 내의 변수에 자동 매칭되어 JSON 형태의 값을 반환한다.
    // [Response header]
    //   Content-Type: application/json
    // [Response body]
    //   {"name":"Robbie","age":95}

@GetMapping("/response/json/class")
@ResponseBody
public Star helloClassJson() {
    return new Star("Robbie", 95);
}
http://localhost:8080/response/json/class
Star 객체에는 String name, int age 필드가 있다.
-
스프링에서 자동으로 자바 객체를 JSON으로 변환해준다.
즉, 클라이언트에 JSON 형태를 리턴하게 된다. -
필드명이 Key, 우리가 삽입한 데이터가 Value가 된다.
@RestController
= @Controller + @ResponseBody
- @RestController를 사용하면 해당 클래스의 모든 메서드에 @ResponseBody 애너테이션이 추가되는 효과를 부여할 수 있다.
= return 값이 HTML 명이 아니라고 알려준다.
@RestController
@RequestMapping("/response/rest")

public class ResponseRestController {
    @GetMapping("/json/string")
    public String helloStringJson() {
        return "{\"name\":\"Robbie\",\"age\":95}";
    }
}
우리 강의 중에는 배우는 단계이기 때문에 html까지 반환한다.
Jackson
JSON 데이터 구조를 처리해주는 라이브러리
- Object를
JSON타입의 String으로 변환 JSON타입의 String을 Object로 변환- Spring에서는 자동으로 처리해주고 있으나,
직접 코드를 사용해서 JSON <> Object를 수행해야 할 일이 있다.
ObjectMapper클래스를 사용한다.
Object To JSON
@Test
@DisplayName("Object To JSON : get Method 필요")

void test1() throws JsonProcessingException {
    Star star = new Star("Robbie", 95);

    ObjectMapper objectMapper = new ObjectMapper(); // Jackson 라이브러리의 ObjectMapper
    String json = objectMapper.writeValueAsString(star);
    // json 형태를 읽을 수 없기 때문에 String으로 변환시켜 콘솔에 찍는다.

    System.out.println("json = " + json);
}- JSON으로 변환 시 getter을 필요로 한다 > 없으면 오류!
- @DisplayName("") : 테스트 이름을 설정한다
- objectMapper.writeValueAsString() : 매개변수로 JSON으로 변환시킬 객체 주기
JSON To Object
@Test
@DisplayName("JSON To Object : 기본 생성자 & (get OR set) Method 필요")
void test2() throws JsonProcessingException {
    String json = "{\"name\":\"Robbie\",\"age\":95}"; // JSON 타입의 String 생성

    ObjectMapper objectMapper = new ObjectMapper();
    // Jackson 라이브러리의 ObjectMapper

    Star star = objectMapper.readValue(json, Star.class);
    System.out.println("star.getName() = " + star.getName());
    // 실제로 star 객체에 값이 들어갔는지 확인하기 위해
}-
Object로 변환 시 기본 생성자, getter나 setter 중 하나가 필요하다.
-
이때 변환시킬
객체의 필드명 = json의 key값이어야 한다. -
objectMapper.readValue() : 매개변수는 (json, 어떤 객체로 만들 건지)
이때 객체 부분은클래스명.class를 사용해야 한다.
Path Variable과 Request Param
클라이언트에서 서버로 HTTP 요청을 보낼 때 데이터를 함께 보낸다. 이때 서버에서는 이 데이터를 받아서 사용해야 하는데, 데이터를 보내는 방식이 여러 가지가 있기 때문에 모든 방식에 대해 처리 방법을 학습해야 한다.
Path Variable
서버에 보내려고 하는 데이터를 URL 데이터를 경로에 추가한다
GET http://localhost:8080/hello/request/star/Robbie/age/95
// [Request sample]
@GetMapping("/star/{name}/age/{age}") // 필요한 데이터 부분에 {변수}
@ResponseBody
public String helloRequestPath(@PathVariable String name, @PathVariable int age)
// 중괄호 내의 변수 값을 넣어서 함수 실행
{
    return String.format("Hello, @PathVariable.<br> name = %s, age = %d", name, age);
    // 문자열을 리턴하여 화면에 찍는다
}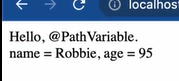
- (@PathVariable String name, @PathVariable int age)
해당 요청 메서드 파라미터에 @PathVariable 애너테이션과 함께 {name} 중괄호에 선언한 변수명과 변수타입을 선언하면 해당 경로의 데이터를 받아올 수 있다
Request Param = Query String
데이터를 보낼 때 key=value&key=value,... 형태로 보낸다
GET http://localhost:8080/hello/request/form/param?name=Robbie&age=95
// [Request sample]name=Robbie&age=95
@GetMapping("/form/param")
@ResponseBody
public String helloGetRequestParam(@RequestParam String name, @RequestParam int age) {
    return String.format("Hello, @RequestParam.<br> name = %s, age = %d", name, age);
}- @RequestParam 뒤에 key를 넣으면 value 값을 받아올 수 있다
form 태그 POST
- HTML 파일
<form method="POST" action="/hello/request/form/model">
  <div>
    이름: <input name="name" type="text">
  </div>
  <div>
    나이: <input name="age" type="text">
  </div>
  <button>전송</button>
</form>
태그 내에 form 태그를 작성
method : 전송 방식 / action : URL
POST http://localhost:8080/hello/request/form/param
- JAVA
// [Request sample]
// Header
//  Content type: application/x-www-form-urlencoded
// Body
//  name=Robbie&age=95
@PostMapping("/form/param")
@ResponseBody
public String helloPostRequestParam(@RequestParam String name, @RequestParam int age) {
    return String.format("Hello, @RequestParam.<br> name = %s, age = %d", name, age);
}- 해당 데이터를 받는 방법은 앞서 본 방법 처럼 @RequestParam 사용
@RequestParam 생략
생략해도 프로그램 실행에 무방하다
GET http://localhost:8080/hello/request/form/param?name=Robbie&age=95
// [Request sample]
@GetMapping("/form/param")
@ResponseBody
public String helloGetRequestParam(@RequestParam(required = false) String name, int age) {
    return String.format("Hello, @RequestParam.<br> name = %s, age = %d", name, age);
}
@RequestParam(required = false)- 이렇게 required 옵션을 false로 설정하면 Client에서 전달받은 값들에서 해당 값이 포함되어있지 않아도 오류가 발생하지 않습니다.
@PathVariable(required = false)도 해당 옵션이 존재합니다.- Client로 부터 값을 전달 받지 못한 해당 변수는 null로 초기화됩니다.
HTTP 데이터를 객체로 처리하는 방법
.png?id=06cefd7c-7041-4013-a10d-2864774d42c4&table=block&spaceId=83c75a39-3aba-4ba4-a792-7aefe4b07895&width=1810&userId=&cache=v2)
@ModelAttribute
@RequestParam처럼 일일히 받아오기 힘들 경우 Java 객체로 받아올 수 있어 편리하다.
key-value
form 태그 POST
POST http://localhost:8080/hello/request/form/model
// Header
//  Content type: application/x-www-form-urlencoded
// Body
//  name=Robbie&age=95
@PostMapping("/form/model")
@ResponseBody
public String helloRequestBodyForm(@ModelAttribute Star star) {
    return String.format("Hello, @ModelAttribute.<br> (name = %s, age = %d) ", star.name, star.age); //star 객체의 값을 리턴
}
HTML의 form 태그를 사용하여 POST 방식으로 HTTP 요청을 전송
Jackson 라이브러리와 유사
이때 객체의 필드명과 @ 뒤의 필드 값이 같아야 한다. 다를 경우 값이 넘어오지 않는다
Query String 방식
GET http://localhost:8080/hello/request/form/param/model?name=Robbie&age=95
@GetMapping("/form/param/model")
@ResponseBody
public String helloRequestParam(@ModelAttribute Star star) {
    return String.format("Hello, @ModelAttribute.<br> (name = %s, age = %d) ", star.name, star.age);
}
@ModelAttribuute는 생략이 가능하다.
이때 @RequestParam의 생략과는 어떻게 구분할까?
@RequestParam은 SimpleValueType 앞이고, 아닐 때는 Model이라고 판단한다
이때 Simple~은 원시 타입, Wrapper 타입, date등의 타입이다
@RequestBody
HTTP Body에 JSON 데이터를 담아 서버에 전달할 때 해당 Body 데이터를 Java의 객체로 전달 받을 수 있다.
이때 받아 올 객체에 Getter / Setter / 값을 받아올 생성자가 필요하다.
POST http://localhost:8080/hello/request/form/json
// Header
//  Content type: application/json
// Body
//  {"name":"Robbie","age":"95"}
@PostMapping("/form/json")
@ResponseBody
public String helloPostRequestJson(@RequestBody Star star) {
    return String.format("Hello, @RequestBody.<br> (name = %s, age = %d) ", star.name, star.age);
}
입력받아온 데이터를 처리하기 위한 객체 앞에 @RequestBody를 작성한다.
⚠️ 데이터를 Java의 객체로 받아올 때 주의할 점이 있습니다.
- 해당 객체의 필드에 데이터를 넣어주기 위해 set or get 메서드 또는 오버로딩된 생성자가 필요합니다.
- 예를 들어 @ModelAttribute 사용하여 데이터를 받아올 때 해당 객체에 set 메서드 혹은 오버로딩된 생성자가 없다면 받아온 데이터를 해당 객체의 필드에 담을 수 없습니다.
- 이처럼 객체로 데이터를 받아올 때 데이터가 제대로 들어오지 않는다면 우선 해당 객체의 set or get 메서드 또는 오버로딩된 생성자의 유무를 확인하시면 좋습니다.
메모장 프로젝트 (CRUD 구현)
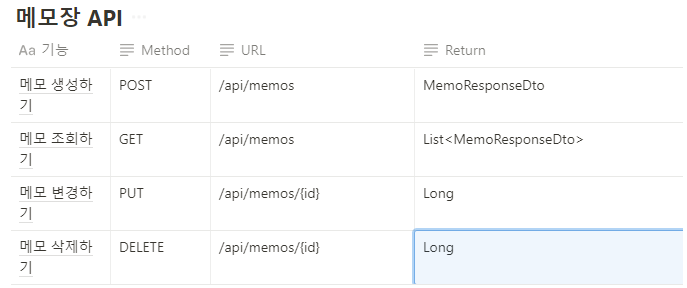
DTO(Data Transfer Object)
데이터 전송 및 이동을 위해 생성되는 객체

- 사용
- Client에서 보내오는 데이터를 객체로 처리할 때
~ 위에서 annotation 사용해서 처리했던 객체들을 DTO 객체로 처리하는 것 - 서버의 계층간의 이동 (서로 다른 class 객체로 데이터 보낼 때)
- DB와의 소통을 담당하는 Java 클래스 (Entity)를 그대로 Client에 반환하는 것이 아니라 DTO로 한번 변환한 후 반환할 때
대부분 일반 객체와 동일한 형태,
객체명 + ResponseDto / RequestDto 라는 이름의 클래스
함수들
        List<MemoResponseDto> responseList =
        memoList.values().stream().map(MemoResponseDto::new).toList();
변수.stream()
for 문을을 돌면서 변수의 값을 하나씩 추출한다
변수.map(객체)
변수의 값을 객체 Map으로 변환한다
객체::new
앞 객체의 생성자가 실행된다. 이때 매개변수는 stream()에서 리턴받은 Memo 객체이다.
~.toList()
~를 List 형태로 변환한다