서비스 디스커버리 (Service Discovery)
서비스 디스커버리란?
- 서비스 디스커버리는 MSA에서 각 서비스의 위치를 동적으로 관리하고 찾아주는 기능
- 각 서비스는
등록 서버에 자신의 위치를 등록하고, 다른 서비스는 이를 조회하여 통신 - 주요 기능으로는 서비스 등록, 서비스 조회, 헬스 체크 등이 있음
- application.properties에서 헬스 체크 주기 등을 설정할 수 있음
Eureka 개요
Eureka란?
- 넷플릭스가 개발한 서비스 디스커버리 서버로, MSA에서 각 서비스의 위치를 동적으로 관리
- 모든 서비스 인스턴스의 위치를 저장하는 중앙 저장소 역할을 하며, 서비스 인스턴스의 상태를 주기적으로 확인하여 가용성을 보장
- 여러 인스턴스를 지원하여 고가용성을 유지할 수 있음
Eureka 서버 설정
-
Eureka 서버는 서비스 레지스트리를 구성하는 중앙 서버
-
서버 설정 파일 예시:
server: port: 8761 eureka: client: register-with-eureka: false # 다른 Eureka 서버에 이 서버를 등록하지 않음 fetch-registry: false # 다른 Eureka 서버의 레지스트리를 가져오지 않음 server: enable-self-preservation: false # 자기 보호 모드 비활성화 -
해당 설정을 통해 Eureka 서버를 구성하고, 클라이언트가 등록할 수 있도록 준비
Eureka 클라이언트 설정
-
각 서비스 (app)는 Eureka 서버에 자신을 등록해야 함
-
build.gradle에서
spring-cloud-starter-netflix-eureka-client의존성을 사용하고, 애플리케이션 이름만 설정파일에 있으면 Eureka에 등록됨 -
추가 설정은 공식 문서를 참고
-
클라이언트 설정 파일 예시:
spring:
  application:
    name: my-service # 필수 지정

eureka:
  client:
    service-url:
      defaultZone: http://localhost:8761/eureka/  # Eureka 서버 URL
    register-with-eureka: true  # Eureka 서버에 등록
    fetch-registry: true  # Eureka 서버로부터 레지스트리 정보 가져오기
  instance:
    hostname: localhost  # 클라이언트 호스트 이름
    prefer-ip-address: true  # IP 주소 사용 선호
    lease-renewal-interval-in-seconds: 30  # 리스 갱신 간격
    lease-expiration-duration-in-seconds: 90  # 리스 만료 기간
서비스 등록 및 디스커버리
서비스 등록
- 각 서비스 애플리케이션은 Eureka 서버에 자신의 위치를 등록
spring-cloud-starter-netflix-eureka-client의존성을 사용하고, 애플리케이션 이름만 설정파일에 있으면 Eureka에 등록됨
서비스 디스커버리
-
클라이언트 애플리케이션은 Eureka 서버에서 필요한 서비스의 위치를 조회
~ host를 알아야 한다. -
RestTemplate을 사용하는 경우
-
클라이언트 애플리케이션은 Eureka 서버에서 필요한 서비스의 위치를 조회합니다.
-
Spring Boot 애플리케이션에서
@LoadBalanced애노테이션을 사용하여 RestTemplate에 로드 밸런싱 기능을 추가합니다.@SpringBootApplication public class MyApplication { public static void main(String[] args) { SpringApplication.run(MyApplication.class, args); } @Bean @LoadBalanced public RestTemplate restTemplate() { return new RestTemplate(); } }@RestController public class MyRestTemplateController { @Autowired private RestTemplate restTemplate; @GetMapping("/get-data-rest") public String getDataWithRestTemplate() { //my-service라는 호스트를 통해 서비스를 호출 String serviceUrl = "http://my-service/api/data"; return restTemplate.getForObject(serviceUrl, String.class); } }
-
-
FeignClient를 사용하는 경우
-
클라이언트 애플리케이션은 Eureka 서버에서 필요한 서비스의 위치를 조회합니다.
-
Spring Boot 애플리케이션에서 FeignClient를 사용하여 간편하게 서비스 호출을 수행합니다.
@SpringBootApplication
@EnableFeignClients // 선언
public class MyApplication {
    public static void main(String[] args) {
        SpringApplication.run(MyApplication.class, args);
    }
}
// name = host 주소 @FeignClient(name = "my-service") public interface MyServiceClient { @GetMapping("/api/data") String getData(); }@RestController public class MyFeignClientController { @Autowired private MyServiceClient myServiceClient; // Lombok 사용 시 아래와 동일 (bean으로 등록) // private final MyServiceClient myServiceClient; @GetMapping("/get-data-feign") public String getDataWithFeignClient() { return myServiceClient.getData(); } }
-
헬스 체크 및 장애 처리
- 헬스 체크
- Eureka 서버가 주기적으로 서비스 인스턴스의 상태를 확인하여 가용성을 유지
- 기본 헬스 체크 엔드포인트
/actuator/health를 사용
- 장애 처리
- 헬스 체크 등의 로직을 통해 장애를 확인한 후 처리하는 것- 서비스 장애 시 Eureka 서버는 해당 인스턴스를 레지스트리에서 제거하여 다른 서비스의 접근을 차단
Eureka의 고가용성 구성
클러스터 구성
- 하나의 app에 호출이 잦을 경우 부하를 낮추기 위해 같은 app을 복제해 호출을 분산
- Eureka 서버의 고가용성을 위해 여러 인스턴스를 구성할 수 있음
- 다중 인스턴스로 구성하여 고가용성을 유지하며, 각 인스턴스는 서로를 피어로 등록하여 상호 백업
하나의 인스턴스가 사용 불가해도 다른 하나가 백업 역할을 하여 유지
- 설정 파일 예시:
eureka: client: service-url: defaultZone: http://eureka-peer1:8761/eureka/,http://eureka-peer2:8761/eureka/ - Eureka 서버를 다중 인스턴스로 구성할 때 각 서버의 피어 설정을 통해 서로를 인식하고 백업할 수 있음
실습
9분 이후
💡 Eureka server 하나에 같은 기능을 하는 인스턴스 2개를 연결

Eureka server
- start.spring.io 에 접속하여 아래와 같이 Eureka Service 디펜던시를 추가하여 프로젝트 생성
원하는 폴더에 (패키지명과 동일한 것이 좋음) app 마다 프로젝트 하나씩 생성
Gradle > + || 파일 > 열기 하여 파일 세 개 모두 띄워놓기
- ServerApplication.java
import org.springframework.boot.SpringApplication; import org.springframework.boot.autoconfigure.SpringBootApplication; import org.springframework.cloud.netflix.eureka.server.EnableEurekaServer; @EnableEurekaServer // 어노테이션 추가 @SpringBootApplication public class ServerApplication { public static void main(String[] args) { SpringApplication.run(ServerApplication.class, args); } } - src/resource/application.properties
    spring.application.name=server

    server.port=19090

    # 유레카 서버에 자신을 등록할지 여부를 설정합니다.
    # true로 설정하면 유레카 클라이언트가 유레카 서버에 자신을 등록합니다.
    # 유레카 서버에서는 일반적으로 false로 설정하여, 서버가 자기 자신을 등록하지 않도록 합니다.
    eureka.client.register-with-eureka=false

    # 유레카 서버로부터 레지스트리를 가져올지 여부를 설정합니다.
    # true로 설정하면 유레카 클라이언트가 유레카 서버로부터 다른 서비스 인스턴스 목록을 가져옵니다.
    # 유레카 서버에서는 일반적으로 false로 설정하여, 레지스트리를 가져오지 않도록 합니다.
    eureka.client.fetch-registry=false

    # 유레카 서버 인스턴스의 호스트 이름을 설정합니다.
    # 유레카 서버가 자신의 호스트 이름을 다른 서비스에 알릴 때 사용합니다.
    eureka.instance.hostname=localhost

    # 유레카 클라이언트가 유레카 서버와 통신하기 위해 사용할 기본 서비스 URL을 설정합니다.
    # 클라이언트 애플리케이션이 유레카 서버에 연결하고 등록하거나 레지스트리를 가져올 때 사용할 URL을 지정합니다.
    eureka.client.service-url.defaultZone=http://localhost:19090/eureka/
service instance (Client)
-
start.spring.io 에 접속하여 아래와 같이 Eureka Discovery Client 디펜던시를 추가하여 프로젝트 생성
-
Artifact 를 first, second 로 바꿔서 GENERATE 하여 2개를 다운
-
first 프로젝트의 src/resources/application.properties
spring.application.name=first server.port=19091 #위에서 지정한 포트 # 유레카 클라이언트가 유레카 서버와 통신하기 위해 사용할 기본 서비스 URL을 설정합니다. # 유레카 서버의 포트와 호스트 이름을 정확히 지정해야 합니다. eureka.client.service-url.defaultZone=http://localhost:19090/eureka/ -
second 프로젝트의 src/resources/application.properties
spring.application.name=second

server.port=19092

# 유레카 클라이언트가 유레카 서버와 통신하기 위해 사용할 기본 서비스 URL을 설정합니다.
# 유레카 서버의 포트와 호스트 이름을 정확히 지정해야 합니다.
eureka.client.service-url.defaultZone=http://localhost:19090/eureka/
Run
-
유레카 서버 → first → second 순으로 실행
-
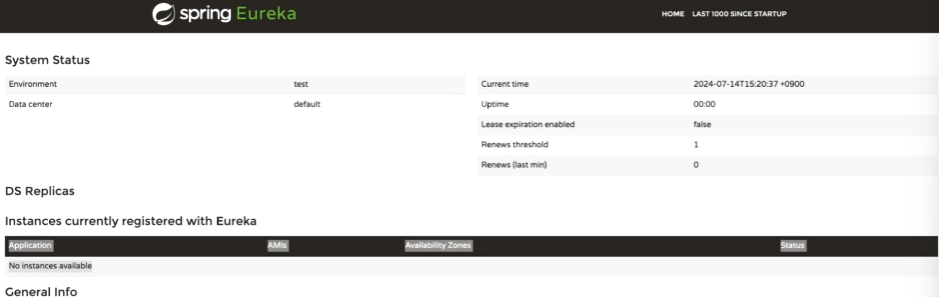
http://localhost:19090/ 으로 접속하면 두개의 인스턴스가 있는것을 확인할 수 있음
-
클라이언트 실행 전
-
클라이언트 실행 후

<하나만 실행 시>
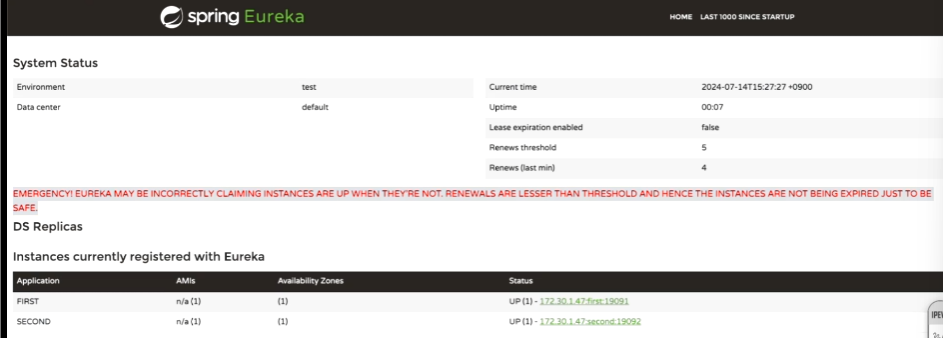
<두 개 실행 시>