Lighthouse CI 적용

새로운 기능을 추가하고 PR 전 lighthouse를 수동으로 체크하는 것이 너무 귀찮은데 자동화 할 수 없을까?
와 같은 생각으로 lighthouse CI를 적용해 보았습니다. 기존에 너무나 자세하게 작성된 카카오 기술 블로그 를 많이 보면서 활용하였습니다.
Lighthouse
Lighthouse 는 구글에서 개발한 웹사이트의 성능 측정 도구입니다.
사용 방법은 간단합니다. 먼저 개발자 도구에서 lighthouse 탭을 들어간 뒤 Analyze page load 버튼을 클릭합니다.
다음 사진은 네이버 메인 페이지의 성능 검사 결과 입니다.
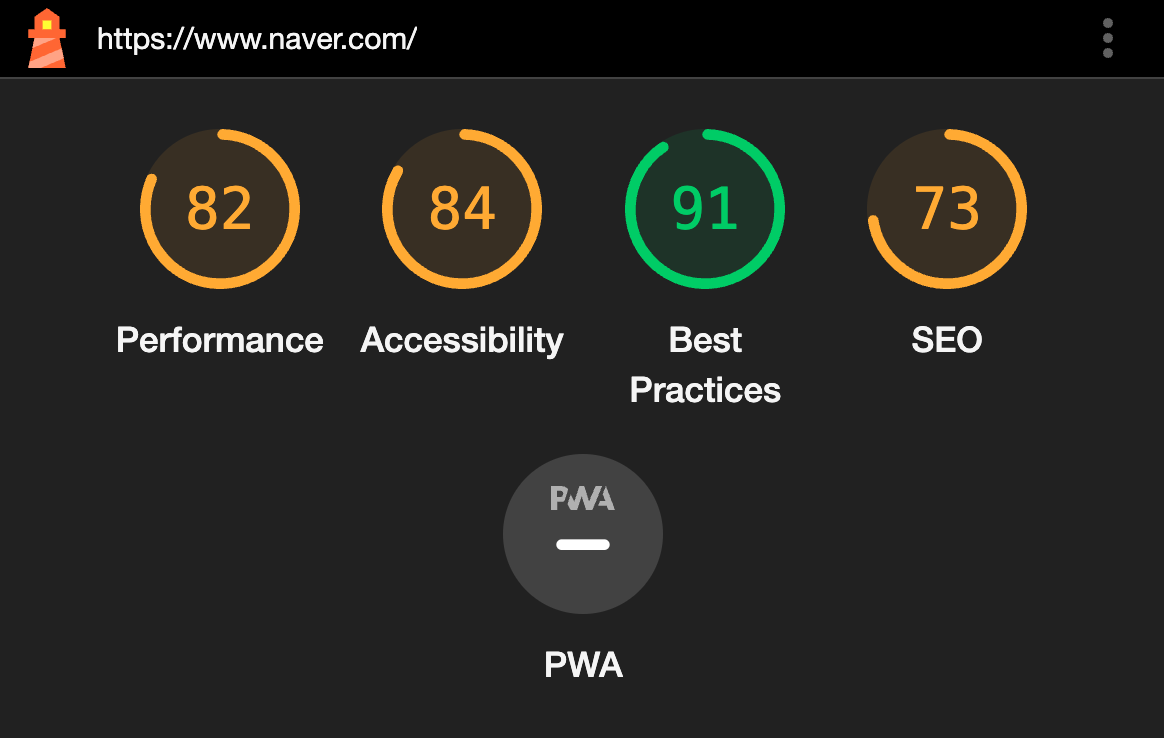
성능은 평가 지표에 따라 점수가 달라질 수 있기에 lighthouse가 무조껀 정답이라고는 할 수 없을 것입니다. 하지만 보편적으로 편리하게 많이 사용하고 있기에 lighthouse의 평가 지표를 기준으로 프로젝트 성능 개선을 시도해보는 것 또한 좋을 것 같습니다.
Lighthouse CI
lighthouse CI github 를 보면 어떠한 방식으로 무엇을 설정할 것 인지 자세하게 설명이 되어있습니다. 저는 먼저 설정 파일을 작성해보겠습니다.
.lighthouserc.js
module.exports = {
  ci: {
    collect: {
      startServerCommand: 'npm run start',
      startServerReadyPattern: 'ready on',
      url: ['http://localhost:3000'],
      numberOfRuns: 3,
      settings: {
        preset: 'desktop',
      },
    },
    upload: {
      target: 'filesystem',
      outputDir: './lhci_reports',
      reportFilenamePattern: '%%PATHNAME%%-%%DATETIME%%-report.%%EXTENSION%%',
    },
    assert: {
      assertions: {
        'categories:performance': ['warn', { minScore: 0.9 }],

        'categories:performance': ['error', { minScore: 0.8 }],
        'categories:accessibility': ['error', { minScore: 0.9 }],
        'categories:best-practices': ['error', { minScore: 0.9 }],
        'categories:seo': ['error', { minScore: 0.9 }],
      },
    },
  },
};
먼저 collect의 경우 어떠한 환경에서 실행되는지 설정값 입니다. 여기서 numberOfRuns의 의미는 lighthouse를 몇번 실행할 것인가? 로 저는 3번 실행 하여 점수를 확인하는 것이 좋다고 판단했습니다.
upload의 경우 실행 결과 파일을 어디에 저장할 지 설정하는 부분 입니다.
assert의 경우 warn의 기준 점수, error의 기준 점수에 대해서 설정을 하고 이 값보다 낮은 경우 결과값은 fail을 보여줍니다.
물론 100점이먼 너무 좋겠지만 현실적인 부분을 고려하여 perfomance는 90점 이하는 경고 80점 이하는 에러를 발생 시켰습니다.
lighthouse.yml
그 다음 github에서 trigger을 시키기 위해 root파일에서 .github/workflows 폴더를 생성하고 lighthouse.yml 파일을 생성하였습니다.
name: Run lighthouse CI When Push
on: [push]
jobs:
lhci:
name: Lighthouse CI
runs-on: ubuntu-latest
env:
working-directory: ./client
steps:
- uses: actions/checkout@v2
- name: Use Node.js
uses: actions/setup-node@v1
with:
node-version: '16'
- name: Install packages
run: yarn install && yarn global add @lhci/cli@0.8.x
working-directory: ${{ env.working-directory }}
- name: Build
run: yarn build
working-directory: ${{ env.working-directory }}
- name: Run Lighthouse CI
run: lhci autorun
env:
LHCI_GITHUB_APP_TOKEN: ${{ secrets.LHCI_GITHUB_APP_TOKEN }}
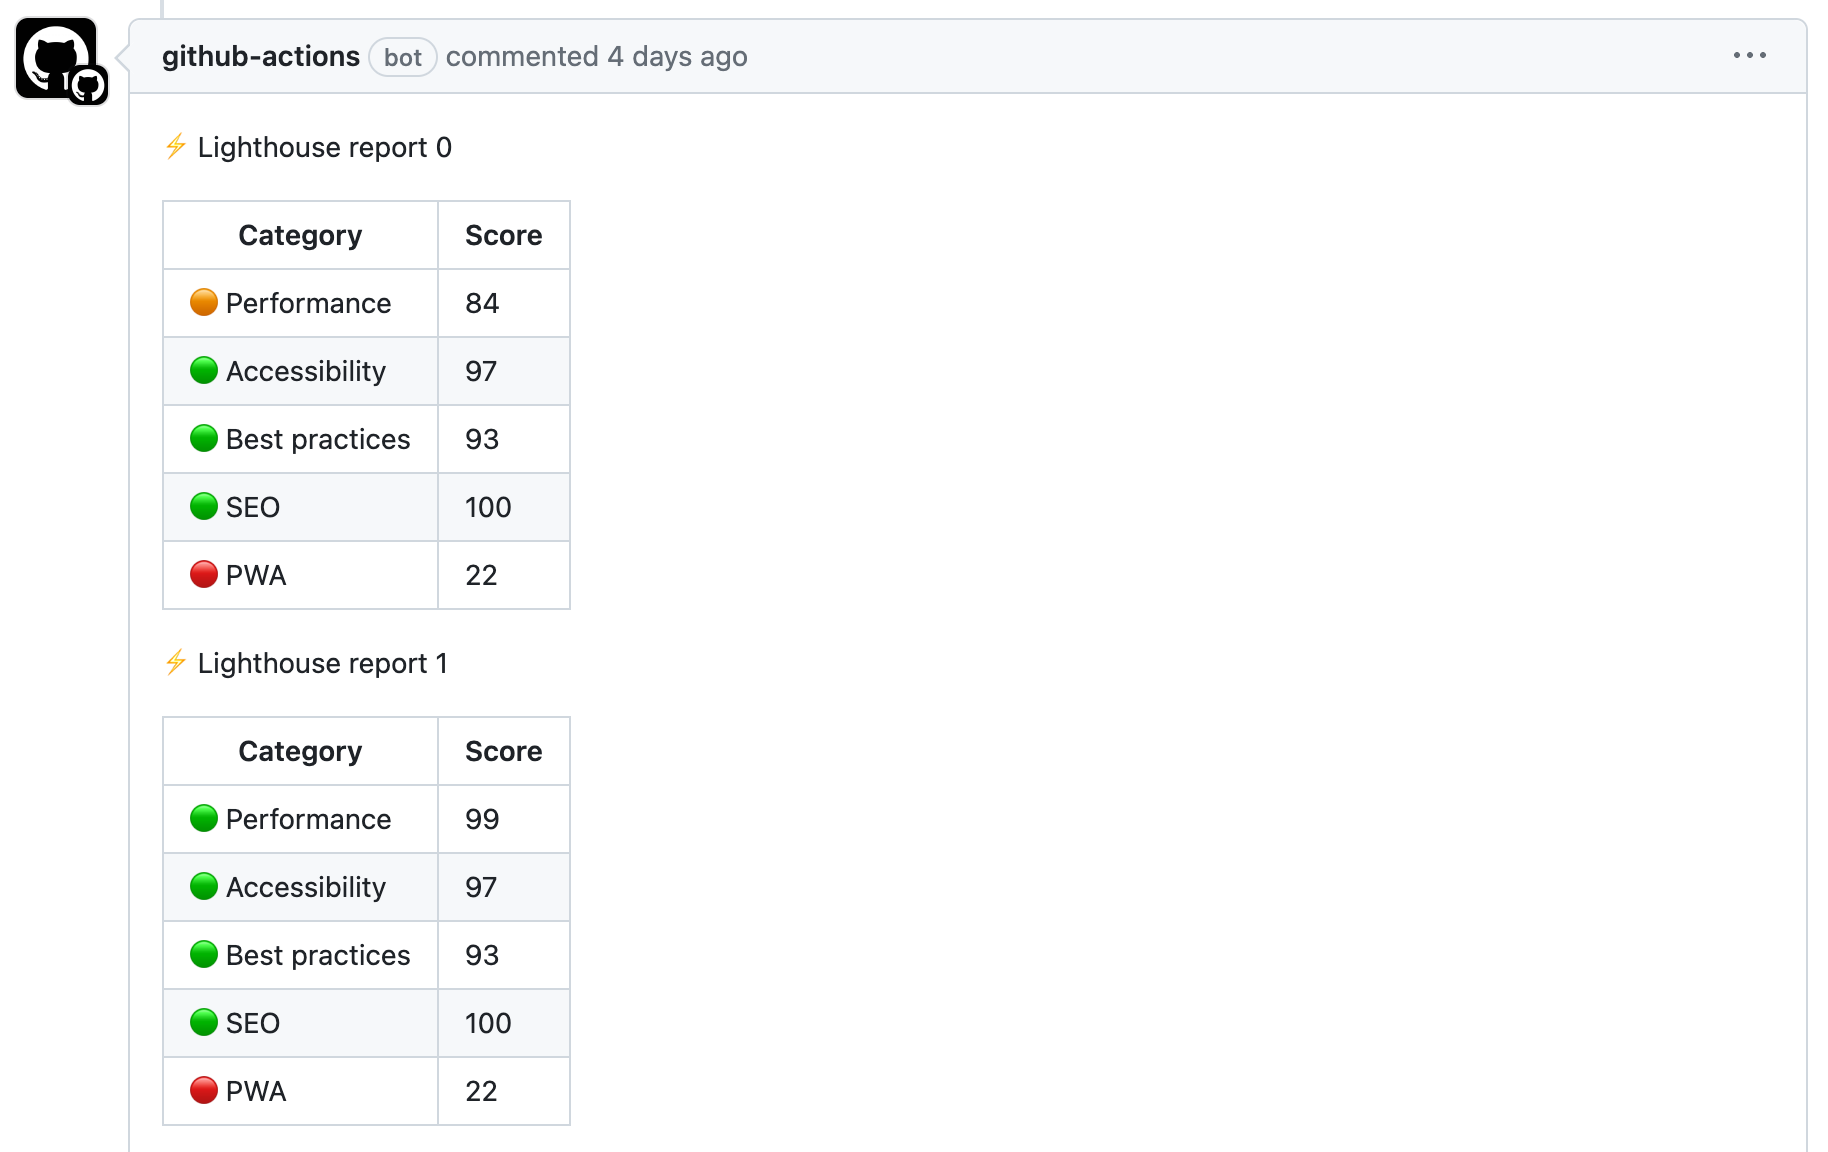
working-directory: ${{ env.working-directory }}그 뒤 origin으로 Push를 하게 성공시 다음과 같은 lhci/url 창에 점수가 뜨게 됩니다.

하지만 이 브랜치가 merge가 되고 나면 해당 점수를 다시 확인할 수 없다는 불편함을 겪었습니다. 그래서 githuh bot이 comment를 달아놓으면 merge 후에도 확인할 수 있어 좋을것 같다고 판단하고 위의 yml에 추가적으로 구현을 하였습니다.
      - name: Format lighthouse score
        id: format_lighthouse_score
        uses: actions/github-script@v3
        with:
          github-token: ${{secrets.GITHUB_TOKEN}}
          script: |

            const fs = require('fs');
            const results = JSON.parse(fs.readFileSync("${{ env.working-directory }}/lhci_reports/manifest.json"));
            let comments = "";

            results.forEach((result,index) => {
              const { summary } = result;

              const formatResult = (res) => Math.round(res * 100);

              Object.keys(summary).forEach(
                (key) => (summary[key] = formatResult(summary[key]))
              );

              const score = (res) => (res >= 90 ? "🟢" : res >= 70 ? "🟠" : "🔴");

              const comment = [
                `⚡️ Lighthouse report ${index}`,
                `| Category | Score |`,
                `| --- | --- |`,
                `| ${score(summary.performance)} Performance | ${summary.performance} |`,
                `| ${score(summary.accessibility)} Accessibility | ${summary.accessibility} |`,
                `| ${score(summary['best-practices'])} Best practices | ${summary['best-practices']} |`,
                `| ${score(summary.seo)} SEO | ${summary.seo} |`,
                `| ${score(summary.pwa)} PWA | ${summary.pwa} |`,
                `\n`,
              ].join("\n");

              comments += comment + "\n";
            });

            core.setOutput('comments', comments)

      - name: comment PR
        uses: unsplash/comment-on-pr@v1.3.0
        env:
          GITHUB_TOKEN: ${{ secrets.GITHUB_TOKEN }}
        with:
          msg: ${{ steps.format_lighthouse_score.outputs.comments}}
카카오 블로그에서는 FCB, LCP등 좀 더 상세한 정보도 활용하였지만 이 프로젝트에서는 불필요하다고 생각이 되어서 핵심적인 Perfomance, Accessibility, Best practices, SEO, PWA 5가지만 테스팅 하였습니다.
여기서 처음 알았던 사실은 secrets.GITHUB_TOKEN 토큰값은 개발자가 직접 작성하는 것이 아닌 기본적으로 github에 설정되어 있다는 것 입니다.
결과
이후 PR을 날려보면 다음과 같이 git-bot이 lighthouse 성능 지표에 대해 코멘트를 달아 주었습니다.
lighthouse CI를 통해서 좀 더 효율적으로 프로젝트를 테스팅 할 수 있었습니다. 이와 같은 테스팅 자동화로 좀 더 유저에게 최적화된 사이트를 제공하는 것이 중요하다고 생각합니다.