세션 기반 인증 vs 토큰(쿠키) 기반 인증 은 개발자 면접에서 자주 나오는 질문 중의 하나!
JWT, Refresh, Access Token에 대해서 설명은 개발자 면접에서 자주 나오는 질문 중의 하나!
1. 정의
-
JWT (Json Web Token)
-
인증에 필요한 정보들을 암호화시킨 토큰 (JWT는 토큰의 한 종류)
-
Json 포맷을 이용하여 사용자에 대한 속성을 저장하는 Claim 기반의 Web Token
-
쿠키 저장소에 담긴 ‘저장된 쿠키’
참고: 암호화된 토큰을 볼 수 있는 사이트
2. JWT 방식을 사용하지 않을 경우
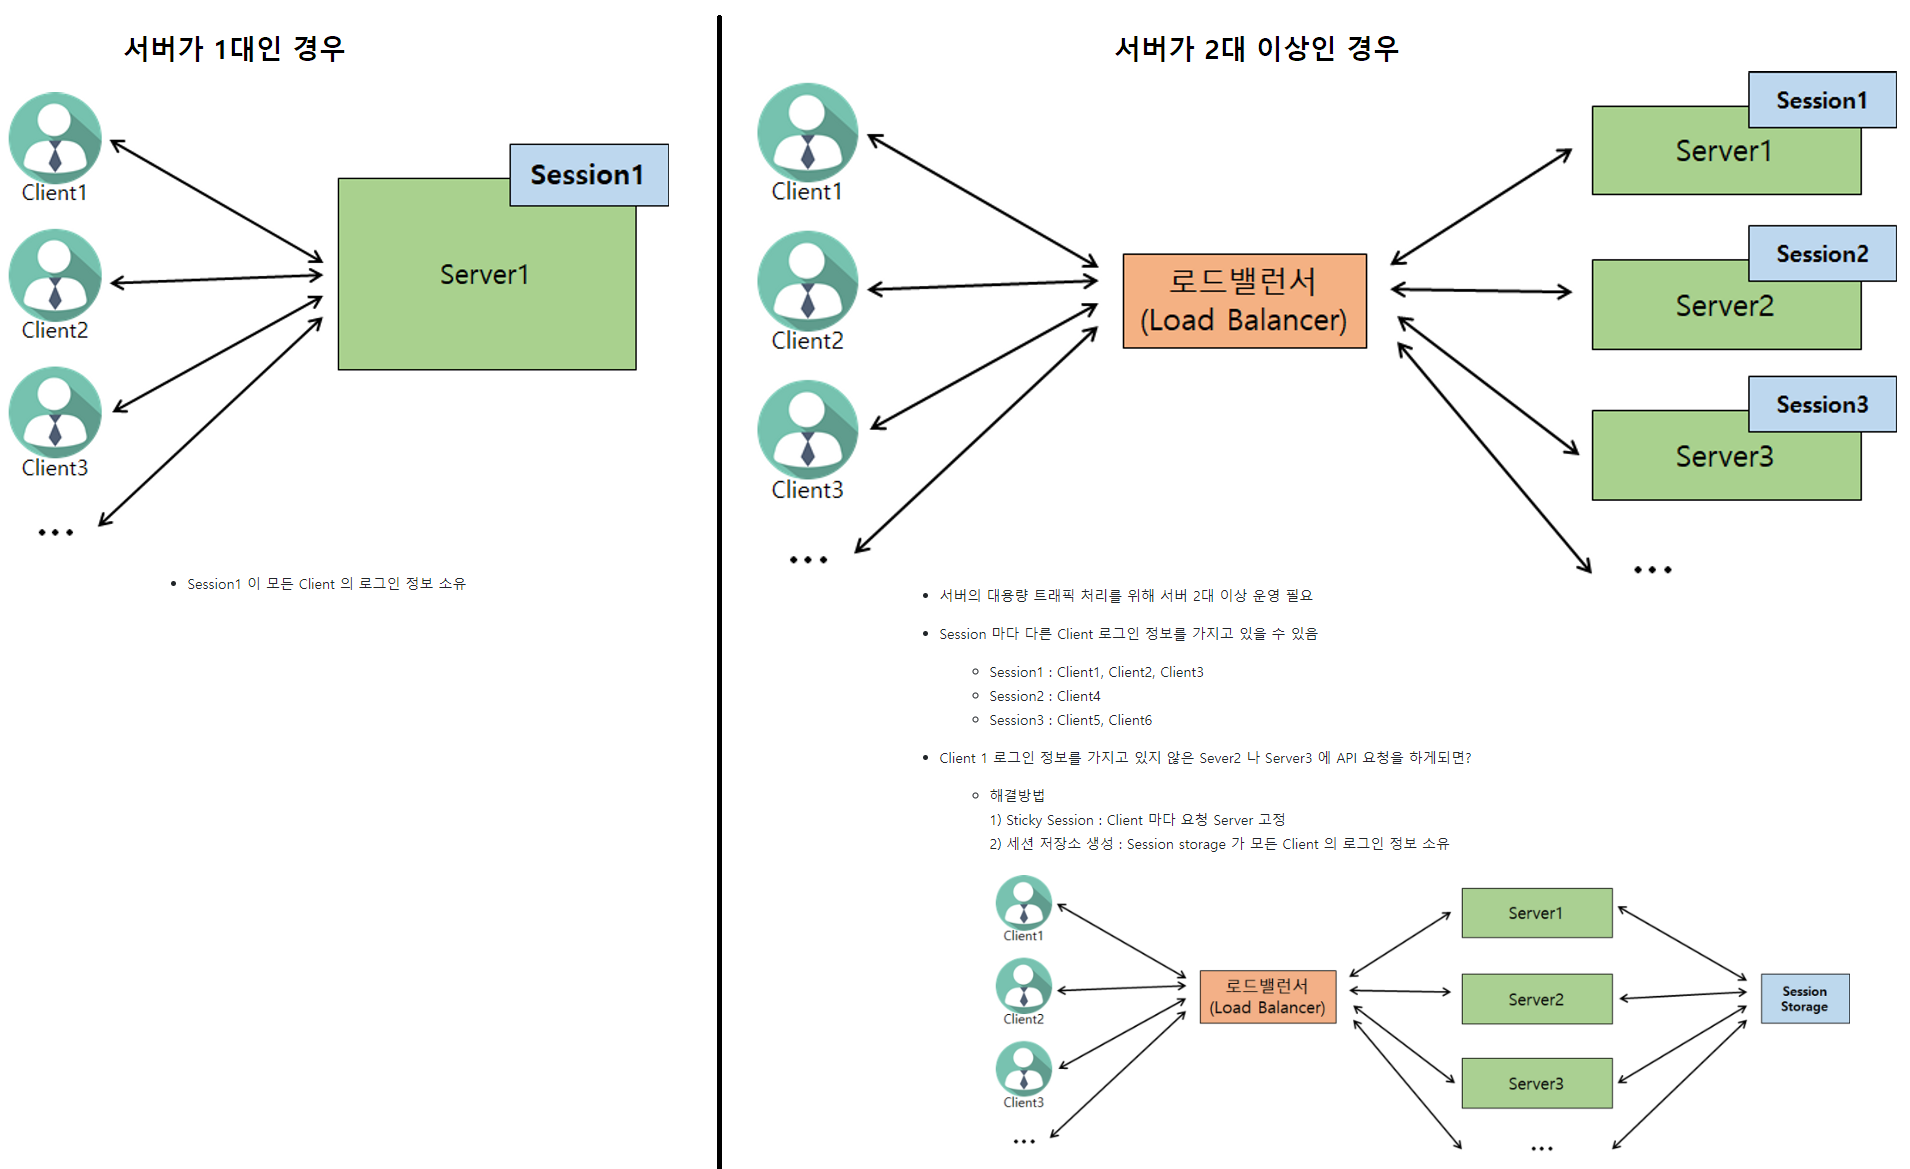
3. JWT 를 사용할 경우
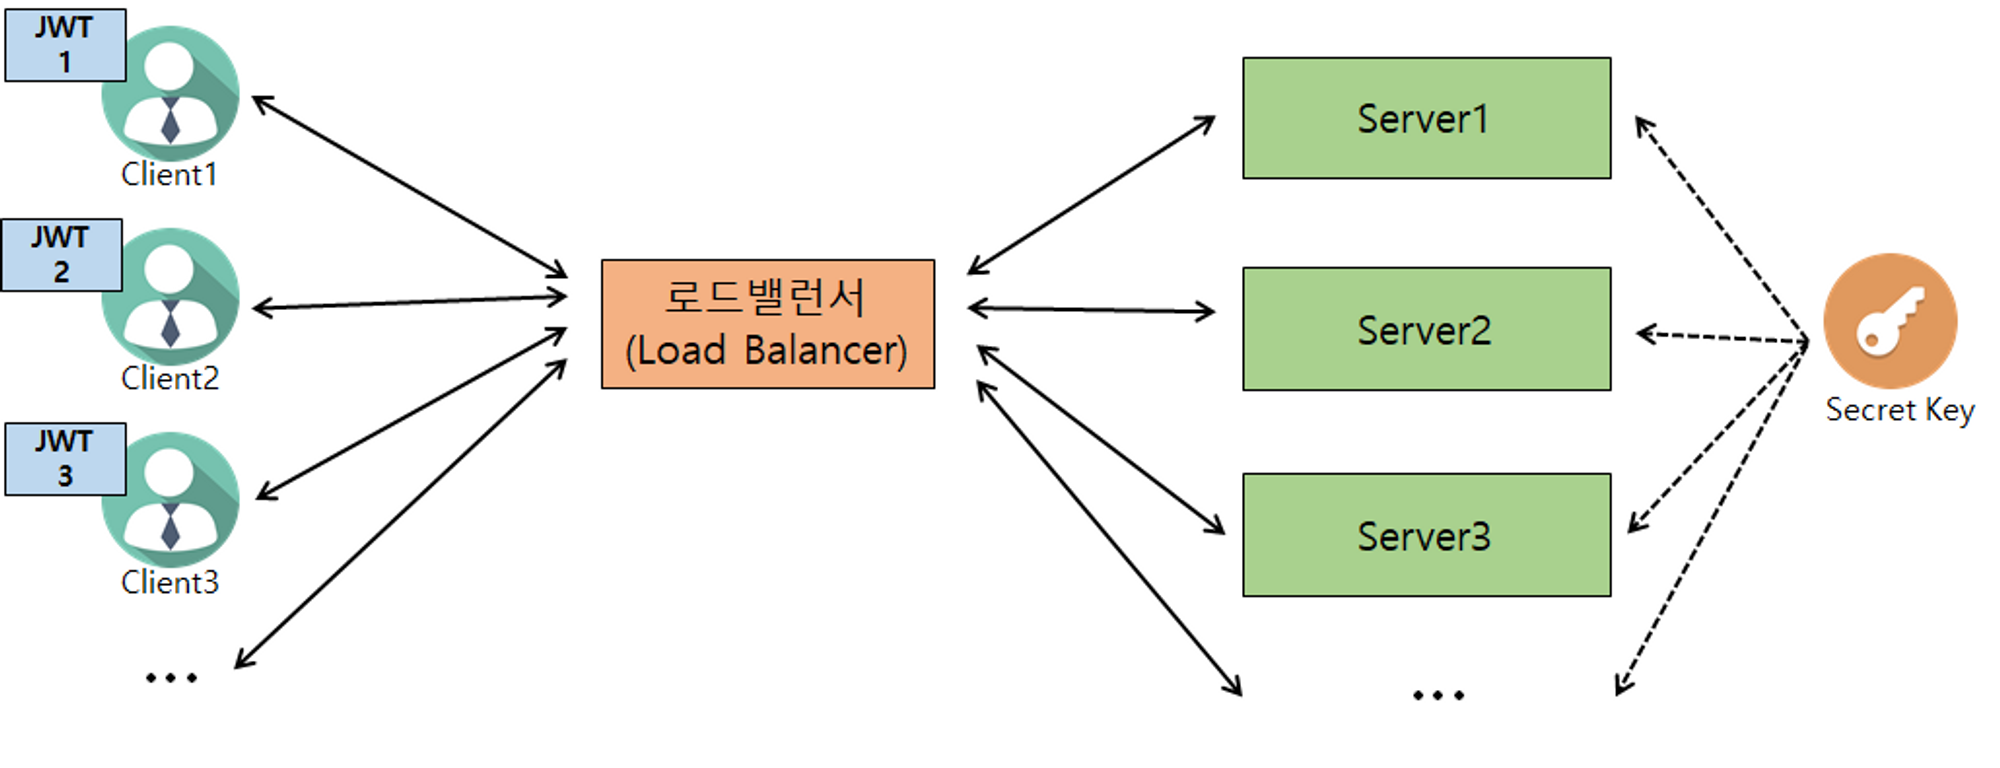
로그인 정보를 Server 에 저장하지 않고, Client 에 로그인정보를 JWT 로 암호화하여 저장 → JWT 통해 인증/인가
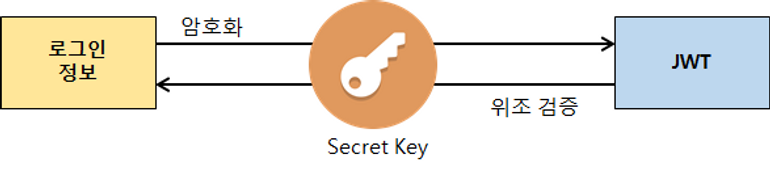
- 모든 서버에서 동일한 Secret Key 소유
- Secret Key 통한 암호화/위조 검증(복호화 시)
4. 동작순서
(여기에서 'JWT 토큰 = Access Token' 을 지칭한다)
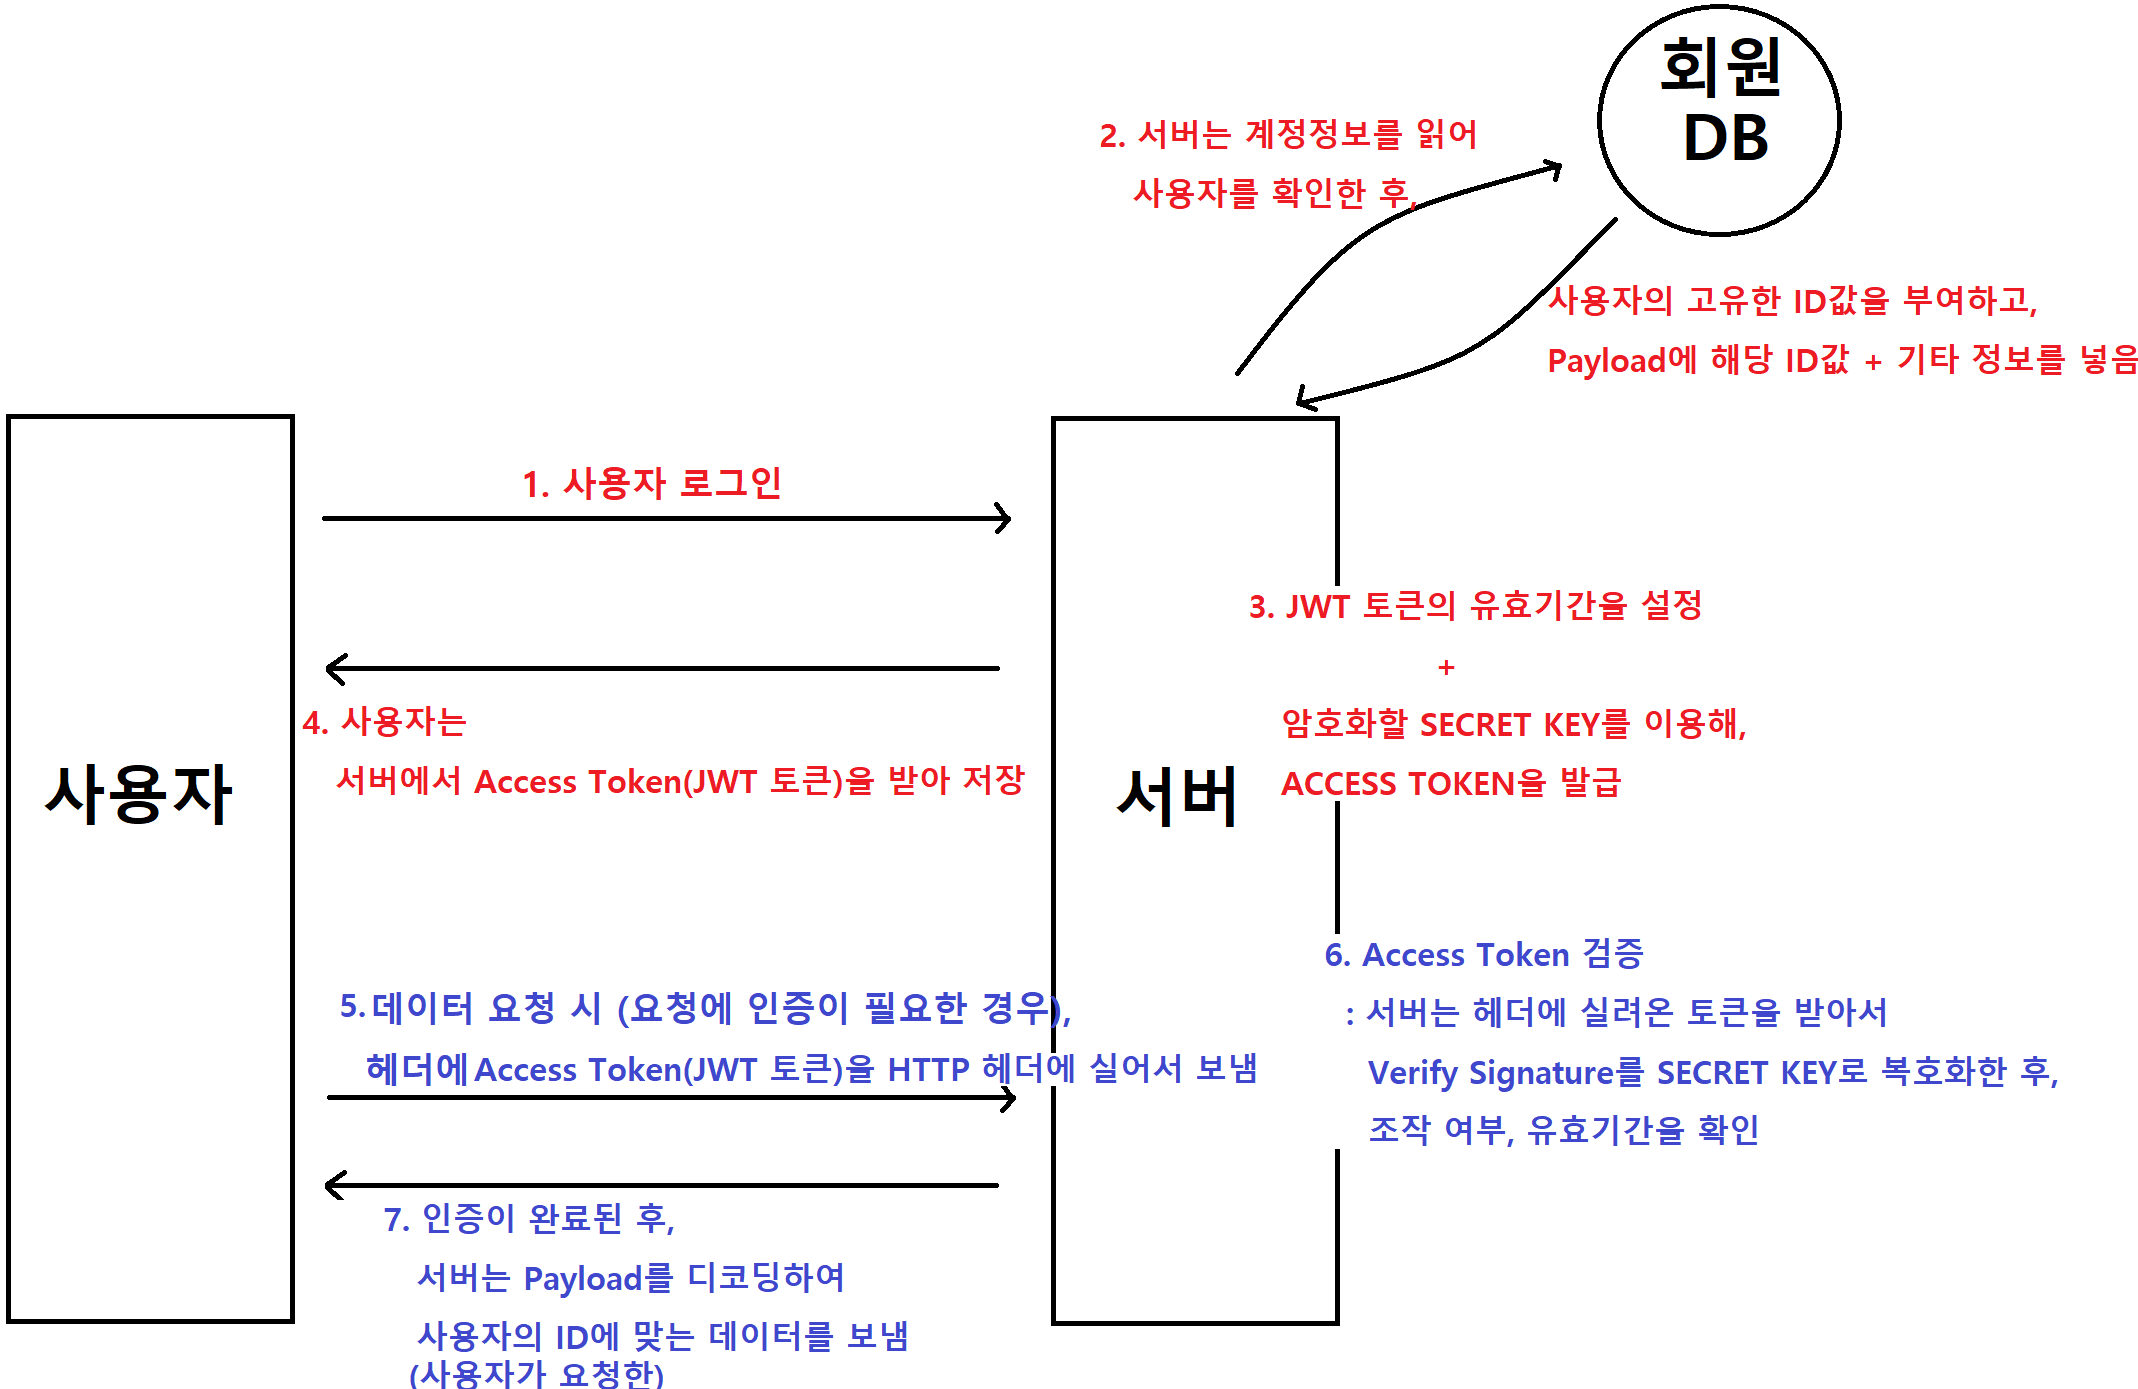
stateless 한 방식
1 ~ 3
Client 가 username, password 로 로그인 성공 시, "로그인 정보" → JWT 로 암호화 (Secret Key 사용)
4
JWT 를 Client 응답에 전달(JWT 전달방법은 개발자가 정함) --> Authorization: BEARER <JWT 넣기>
(쿠키를 생성할 때의 코드와 동일 (참고: 서버 인증 - Session / Cookie 방식))
Cookie cookie = new Cookie(AUTHORIZATION_HEADER, token); // Name-Value
cookie.setPath("/");

// Response 객체에 Cookie 추가
res.addCookie(cookie);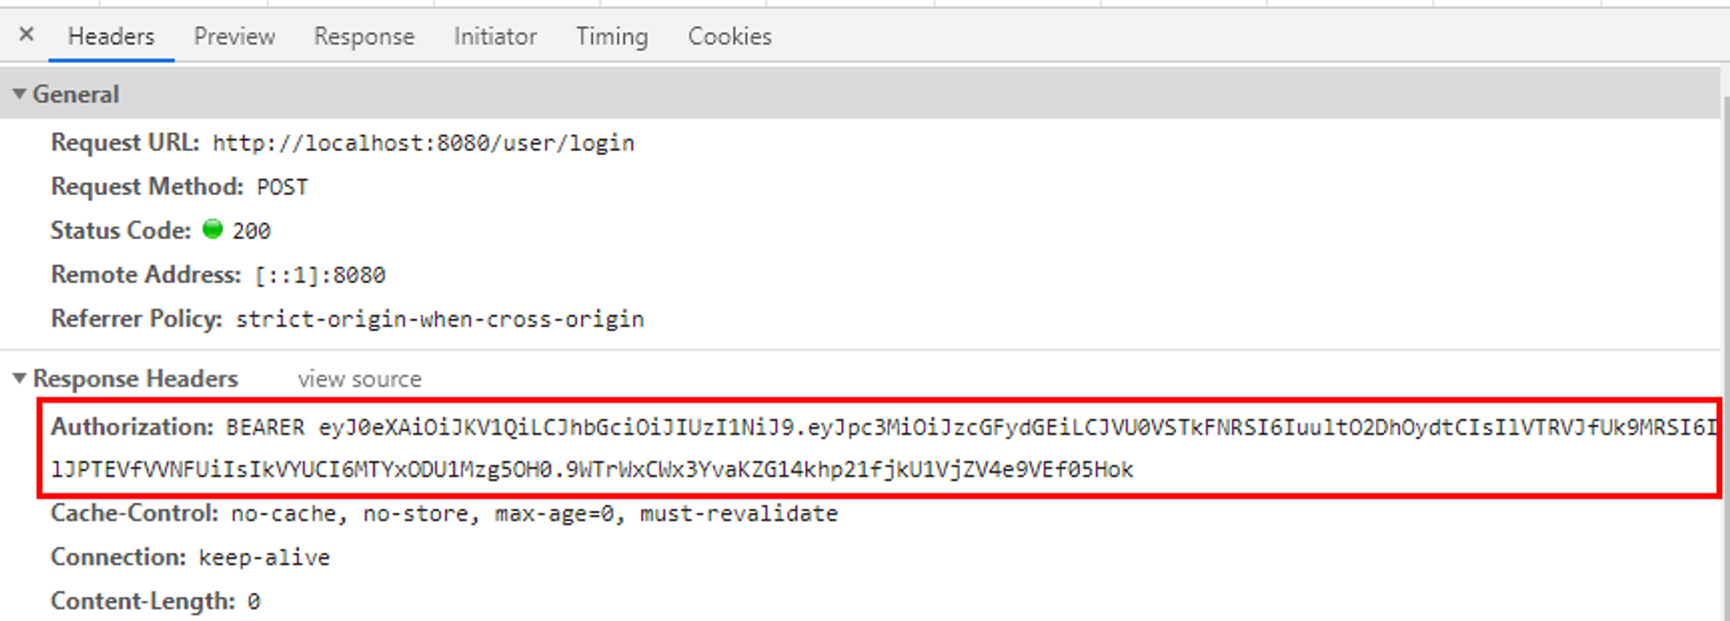
Client 에서 JWT 저장 (쿠키, Local storage 등. 쿠키 저장소를 多 사용)
5 ~ 7
Client 에서 JWT 통해 인증할 때는 아래의 쿠키를 찾는 코드를 이용한다.
// HttpServletRequest 에서 Cookie Value : JWT 가져오기
public String getTokenFromRequest(HttpServletRequest req) {
    Cookie[] cookies = req.getCookies();
    if(cookies != null) {
        for (Cookie cookie : cookies) {
            if (cookie.getName().equals(AUTHORIZATION_HEADER)) {
                try {
                    return URLDecoder.decode(cookie.getValue(), "UTF-8"); // Encode 되어 넘어간 Value 다시 Decode
                } catch (UnsupportedEncodingException e) {
                    return null;
                }
            }
        }
    }
    return null;
}-
JWT 를 API 요청 시마다 Header 에 포함
Content-Type: application/json
Authorization: Bearer <JWT> -
Server 에서는
-
Client 가 전달한 JWT 위조 여부 검증 (Secret Key 사용)
-
JWT 유효기간이 지나지 않았는지 검증
-
검증 성공시, JWT 안에 있는 사용자 정보를 가져와서 확인
ex) GET /api/products : JWT 보낸 사용자의 관심상품 목록 조회
-
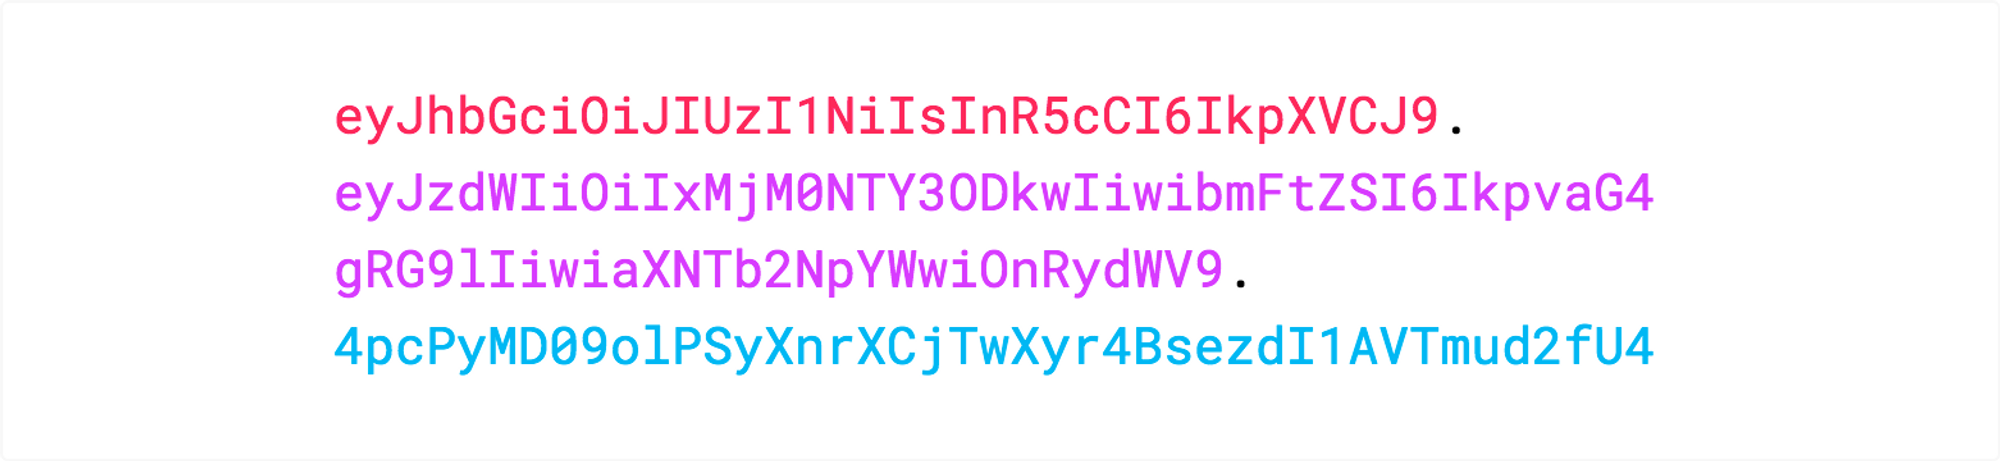
5. 토큰을 만들기 위해 필요한 것
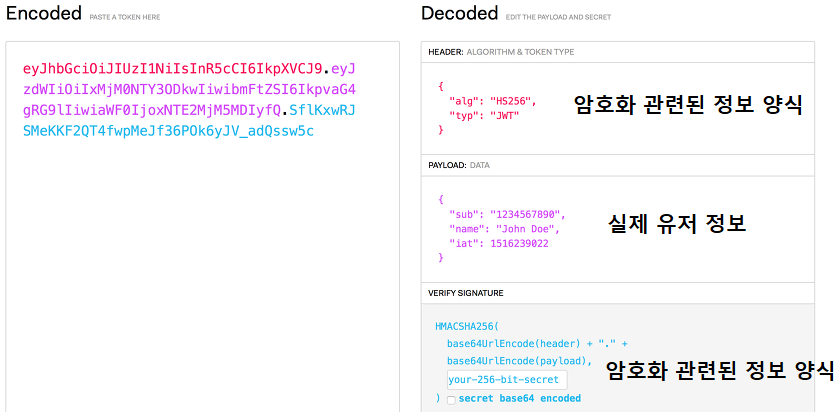
’ . ’을 사용하여 세 부분으로 나뉘어져 있다.
-
Header
- Header, Payload, Verify Signature 정보를 암호화할 방식(alg), 타입(type) 등...
- 인코딩될 뿐(16진수로 변경), 따로 암호화 X --> JWT 토큰에서 누구나 디코딩하여 확인 가능 (즉, 유저의 개인 정보(비밀번호)가 들어가면 쉽게 노출될 수 있다) -
Payload
- 서버에서 보낼 데이터 (ex. 유저의 고유 ID값, 유효기간 등...)
- 인코딩될 뿐(16진수로 변경), 따로 암호화 X --> JWT 토큰에서 누구나 디코딩하여 확인 가능 (즉, 유저의 개인 정보(비밀번호)가 들어가면 쉽게 노출될 수 있다) -
Verify Signature
- Base64 방식으로 인코딩한 Header + payload + SECRET KEY를 더한 후 서명된다.
- SECRET KEY를 모르면, 디코딩(복호화) X
6. 사용법
1) JWT
(1) build.gradle
JWT를 Spring 에서 사용하기 위해서는 아래의 코드를 추가할 필요가 있다.
build.gradle > dependencies
compileOnly group: 'io.jsonwebtoken', name: 'jjwt-api', version: '0.11.5'
runtimeOnly group: 'io.jsonwebtoken', name: 'jjwt-impl', version: '0.11.5'
runtimeOnly group: 'io.jsonwebtoken', name: 'jjwt-jackson', version: '0.11.5'
(2) application.properties
아래 코드 추가
jwt.secret.key=7Iqk7YyM66W07YOA7L2U65Sp7YG065+9U3ByaW5n6rCV7J2Y7Yqc7YSw7LWc7JuQ67mI7J6F64uI64ukLg==
-
코드 단이 아닌, application.properties 에 추가해서 사용하는 방법
- application.properties 에서 가져와서 사용하는데, 더 안전할 수 있다.
-
Base64 로 인코딩 해두었다.
- 사용 시에는 다시 Base64 로 디코드하면 된다
(3) JwtUtil 클래스 생성
import com.sparta.springauth.entity.UserRoleEnum;
import io.jsonwebtoken.*;
import io.jsonwebtoken.security.Keys;
import jakarta.annotation.PostConstruct;
import jakarta.servlet.http.Cookie;
import jakarta.servlet.http.HttpServletResponse;
import org.slf4j.Logger;
import org.slf4j.LoggerFactory;
import org.springframework.beans.factory.annotation.Value;
import org.springframework.stereotype.Component;
import org.springframework.util.StringUtils;

import java.io.UnsupportedEncodingException;
import java.net.URLEncoder;
import java.security.Key;
import java.util.Base64;
import java.util.Date;

// 쿠키를 직접 만드는 방법
@Component
public class JwtUtil {

    /* 1. JWT 데이터 준비하기 */
    public static final String AUTHORIZATION_HEADER = "Authorization";      // Header KEY 값
    public static final String AUTHORIZATION_KEY = "auth";      // 사용자 권한 값의 KEY
    public static final String BEARER_PREFIX = "Bearer ";       // Token 식별자 (다른 값과 구별을 위해 공백을 덧붙인다)
    private final long TOKEN_TIME = 60 * 60 * 1000L;        // 토큰 만료시간 : 60분 (60 * 1000L는 1분. 60 * 60 * 1000L는 1시간)

    @Value("${jwt.secret.key}") // Base64 Encode 한 SecretKey (application.properties 에 추가해둔 값)
    private String secretKey;       // 그 값을 가져와서 secretKey 변수에 넣는다
    private Key key;        // Secret key 를 담을 변수
    private final SignatureAlgorithm signatureAlgorithm = SignatureAlgorithm.HS256;     // 사용할 알고리즘 선택

    // 로그 설정 (기록을 위해)
    public static final Logger logger = LoggerFactory.getLogger("JWT 관련 로그");

    @PostConstruct      // 한 번만 받으면 값을 사용할 때마다, 매번 요청을 새로 호출하는 것을 방지
    public void init() {
        byte[] bytes = Base64.getDecoder().decode(secretKey);       // Base64 를 디코딩
        key = Keys.hmacShaKeyFor(bytes);
    }

    /* 2. JWT 토큰 생성 */
    public String createToken(String username, UserRoleEnum role) {
        Date date = new Date();

        // Token 식별자 + 암호화
        return BEARER_PREFIX +
                Jwts.builder()
                        .setSubject(username)               // 사용자 식별자값(ID). 여기에선 username 을 넣음
                        .claim(AUTHORIZATION_KEY, role)     // 사용자 권한 (key, value)
                        .setExpiration(new Date(date.getTime() + TOKEN_TIME))   // 만료 시간 : 현재시간 date.getTime() + 위에서 지정한 토큰 만료시간(60분)
                        .setIssuedAt(date)                  // 발급일
                        .signWith(key, signatureAlgorithm)  // 암호화 알고리즘 (Secret key, 사용할 알고리즘 종류)
                        .compact();
    }

    /* 3. 생성된 JWT 를 쿠키에 저장 */
    public void addJwtToCookie(String token, HttpServletResponse res) {
        try {
            token = URLEncoder.encode(token, "utf-8").replaceAll("\\+", "%20"); // Cookie Value 에는 공백이 불가능해서 encoding 진행

            Cookie cookie = new Cookie(AUTHORIZATION_HEADER, token); // Name-Value
            cookie.setPath("/");

            // Response 객체에 Cookie 추가
            res.addCookie(cookie);
        } catch (UnsupportedEncodingException e) {
            logger.error(e.getMessage());
        }
    }

    /* 4. 쿠키에 들어온 JWT 토큰을 Substring */
        // Token 을 식별하기 위해 토큰 앞에는 "Bearer " 가 붙는데, 검증 과정에 이것이 붙어있으면 안 되기 때문에 Substring 으로 이 부분을 잘라낸다.
    public String substringToken(String tokenValue) {
        if (StringUtils.hasText(tokenValue) && tokenValue.startsWith(BEARER_PREFIX)) {      // StringUtils.hasText() : 공백 or NULL 인지 확인. tokenValue.startsWith(BEARER_PREFIX) : 토큰이 Bearer 로 시작하는지 확인
            return tokenValue.substring(7);
        }
        logger.error("Not Found Token");
        throw new NullPointerException("Not Found Token");
    }

    /* 5. JWT 토큰 검증 */
        // 토큰의 만료, 위/변조 를 검증
    public boolean validateToken(String token) {
        try {
            Jwts.parserBuilder().setSigningKey(key).build().parseClaimsJws(token);
            return true;
        } catch (SecurityException | MalformedJwtException | SignatureException e) {
            logger.error("Invalid JWT signature, 유효하지 않는 JWT 서명 입니다.");
        } catch (ExpiredJwtException e) {
            logger.error("Expired JWT token, 만료된 JWT token 입니다.");
        } catch (UnsupportedJwtException e) {
            logger.error("Unsupported JWT token, 지원되지 않는 JWT 토큰 입니다.");
        } catch (IllegalArgumentException e) {
            logger.error("JWT claims is empty, 잘못된 JWT 토큰 입니다.");
        }
        return false;
    }

    /* 6. JWT 토큰에서 사용자 정보 가져오기 */
    public Claims getUserInfoFromToken(String token) {
        return Jwts.parserBuilder().setSigningKey(key).build().parseClaimsJws(token).getBody();     // body 에 있는 claims 를 가져온다
    }
}-
Util 클래스
-
특정 매개 변수(파라미터)에 대한 작업을 수행하는 메서드들이 존재하는 클래스
- 즉,
다른 객체에 의존하지 않고하나의 모듈로서 동작하는 클래스
- 즉,
-
JwtUtil 클래스는 JWT 관련 기능들을 가진다
- JWT 생성
- 생성된 JWT를 Cookie에 저장
- Cookie에 들어있던 JWT 토큰을 Substring
- JWT 검증
- JWT에서 사용자 정보 가져오기
-
(4) UserRoleEnum 클래스
// 유저의 권한을 관리하는 클래스
public enum UserRoleEnum {
    USER(Authority.USER),       // 사용자 권한 (일반 사용자)
    ADMIN(Authority.ADMIN);     // 관리자 권한

    private final String authority;

    // 생성자
    UserRoleEnum(String authority) {        // 생성자의 매개변수를 위의 사용자 권한, 관리자 권한으로 넣는다
        this.authority = authority;
    }

    public String getAuthority() {
        return this.authority;
    }

    // 생성자의 매개변수 값을 관리하는 내부 클래스
    public static class Authority {
        public static final String USER = "ROLE_USER";
        public static final String ADMIN = "ROLE_ADMIN";
    }
}
(5) AuthController 클래스
@RestController
@RequestMapping("/api")
public class AuthController {

    public static final String AUTHORIZATION_HEADER = "Authorization";
    private final JwtUtil jwtUtil;

    public AuthController(JwtUtil jwtUtil) {
        this.jwtUtil = jwtUtil;
    }

    // 쿠키 생성
    @GetMapping("/create-cookie")
    public String createCookie(HttpServletResponse res) {
        addCookie("Robbie Auth", res);      // 쿠키가 공백을 포함하고 있다

        return "createCookie";
    }

    // 쿠키 가져오기
    @GetMapping("/get-cookie")
    public String getCookie(@CookieValue(AUTHORIZATION_HEADER) String value) {      // @CookieValue(쿠키 이름) 으로 가져오기 -> 변수 value 에 쿠기 값이 들어간다
        System.out.println("value = " + value);

        return "getCookie : " + value;
    }

    // 세션 생성
    @GetMapping("/create-session")
    public String createSession(HttpServletRequest req) {
        // 세션이 존재할 경우 세션 반환,
        // 없을 경우 새로운 세션을 생성한 후 반환
        HttpSession session = req.getSession(true);

        // 세션에 저장될 정보 Name - Value 를 추가합니다.
        session.setAttribute(AUTHORIZATION_HEADER, "Robbie Auth");

        return "createSession";
    }

    // 세션 가져오기
    @GetMapping("/get-session")
    public String getSession(HttpServletRequest req) {
        // 세션이 존재할 경우 세션 반환,
        // 없을 경우 null 반환
        HttpSession session = req.getSession(false);

        String value = (String) session.getAttribute(AUTHORIZATION_HEADER); // 가져온 세션에 저장된 Value 를 Name 을 사용하여 가져옵니다.
        System.out.println("value = " + value);

        return "getSession : " + value;
    }

    @GetMapping("/create-jwt")
    public String createJwt(HttpServletResponse res) {
        // Jwt 생성
        String token = jwtUtil.createToken("Robbie", UserRoleEnum.USER);

        // Jwt 쿠키 저장
        jwtUtil.addJwtToCookie(token, res);

        return "createJwt : " + token;
    }

    @GetMapping("/get-jwt")
    public String getJwt(@CookieValue(JwtUtil.AUTHORIZATION_HEADER) String tokenValue) {
        // JWT 토큰 substring
        String token = jwtUtil.substringToken(tokenValue);

        // 토큰 검증
        if(!jwtUtil.validateToken(token)){
            throw new IllegalArgumentException("Token Error");
        }

        // 토큰에서 사용자 정보 가져오기
        Claims info = jwtUtil.getUserInfoFromToken(token);
        // 사용자 username
        String username = info.getSubject();
        System.out.println("username = " + username);
        // 사용자 권한
        String authority = (String) info.get(JwtUtil.AUTHORIZATION_KEY);
        System.out.println("authority = " + authority);

        return "getJwt : " + username + ", " + authority;
    }

    public static void addCookie(String cookieValue, HttpServletResponse res) {
        try {
            cookieValue = URLEncoder.encode(cookieValue, "utf-8").replaceAll("\\+", "%20"); // Cookie Value 에는 공백이 불가능해서, 해당 코드로 encoding 진행

            Cookie cookie = new Cookie(AUTHORIZATION_HEADER, cookieValue); // (Name, Value)
            cookie.setPath("/");
            cookie.setMaxAge(30 * 60);

            // Response 객체에 만든 Cookie 를 추가
            res.addCookie(cookie);
        } catch (UnsupportedEncodingException e) {
            throw new RuntimeException(e.getMessage());
        }
    }
}
2) 회원가입 및 로그인
참고: 서버 인증 - JWT 로 회원가입 및 로그인 구현
7. 장단점
장점
-
발급 후 검증만 하면 되므로, 추가 저장소 필요 X
→ stateless한 서버를 만들기에 용이
→ 이는 서버를 확장/유지/보수하는데 유리 -
Facebook 로그인, Google 로그인 등... 모두 토큰을 기반으로 인증
- 토큰 기반의 다른 인증 시스템에 접근 가능함 = "확장성이 뛰어나다."
- 클라이언트가 저장하는 방식이기 때문에, 이런 세션 불일치 문제로부터 자유롭다(세션 기반 인증에서의 수평 확장으로 생기는 문제인).
따라서, HTTP의 무상태(Stateless)를 그대로 활용할 수 있어서, 높은 확장성을 가질 수 있다.
-
사용자의 인증을 토큰을 통해서 관리하므로, 서버의 scale-out 에서도 인증이 자유롭다.
-
동시 접속자 多 때, 서버측 부하 ↓
→ When? 클라이언트, 서버가 다른 도메인을 사용할 때 (예시: 카카오 OAuth2 로그인 시, JWT Token 사용)
단점
-
이미 발급된 JWT에 대해서는 악의적으로 이용될 가능성
1) JWT는 한 번 발급되면, 유효기간 완료될 때까지(expire)는 계속 사용 가능하므로, 유효기간 지나기 전까지 이용될 가능성 있음
2) 이미 생성된 JWT 를 일부만 만료시킬 방법 X
3) Secret key 유출 시, JWT 조작 가능
4) 해결책 : 기존의 Access Token 의 유효기간을 짧게 + Refresh Token 을 새로 발급
(Session/Cookie 방식의 경우, 해당 세션을 지워버리기) -
Payload는 함호화되지 않으므로, 유저의 중요 정보를 넣을 수 X
→ 따라서, Payload에 들어가는 정보는 제한적일 수 밖에.
(Session/Cookie 방식의 경우, 유저의 정보는 모두 서버의 세션 저장소에 안전하게 보관) -
(Session/Cookie 방식에 비해) JWT 의 길이가 길다
→ 따라서, 인증이 필요한 곳이 多수록, 서버의 자원낭비 多 -
JWT 에 담는 내용이 커질수록, 네트워크 비용 ↑ (클라이언트 → 서버)
8. Session/Cookie 방식 VS 토큰 기반 인증 방식(JWT)
-
유저의 정보
-
Session/Cookie 방식
- 세션 저장소에 유저의 정보를 넣음
- 검증을 위해 정보를 저장해둬야 함
-
JWT 방식
- Token에 유저의 정보를 넣음
- 저장 없이, 검증 → 더 효율적
클라이언트 측에서는 HTTP 헤더에 세션ID나 토큰을 실어서 보내준다는 점에서는 동일하나,
서버 측에서는 별도의 저장소(세션 저장소)를 이용하느냐, 인증을 위해 암호화를 하느냐 의 차이가 발생 -
-
데이터의 양
-
Session/Cookie 방식 : 세션 아이디만 전달
-
JWT 방식 : Token 안에 아이디 + 유저의 정보도 넣음 → 데이터 양 多
-
-
안전성
-
Session/Cookie 방식 : 서버에서 사용자의 데이터를 관리 → 안전성 高
-
JWT 방식 : Token 안에 사용자의 데이터가 담겨있음
-
3) 예시 : 로그인 성공 시 Response Header에 토큰 보내기
로그인, 회원가입 페이지
1.
@Controller
@RequiredArgsConstructor
@RequestMapping("/api/user")
public class UserController {

    private final UserService userService;

    @GetMapping("/signup")
    public ModelAndView signupPage() {
        return new ModelAndView("signup");  //url 로 /signup 이 들어오면, signup 페이지를 반환
    }

    @GetMapping("/login")
    public ModelAndView loginPage() {
        return new ModelAndView("login");
    }

    // 회원가입 구현
    @PostMapping("/signup")
    public String signup(SignupRequestDto signupRequestDto) {
        userService.signup(signupRequestDto);
        return "redirect:/api/user/login";
    }

    // 로그인 구현
    @ResponseBody
    @PostMapping("/login")
    public String login(@RequestBody LoginRequestDto loginRequestDto, HttpServletResponse response) {
        userService.login(loginRequestDto, response);
        return "success";
    }
}
로그인 구현 中 HttpServletResponse response
HttpRequest 에서 Header 가 넘어와 받아오는 것처럼,
Client 쪽으로 반환할 때는 response 객체를 반환하고, 반환 할 response 객체의 Header 쪽에 우리가 만든 Token 을 넣기위해
@Service
@RequiredArgsConstructor
public class UserService {

//회원가입 구현
    //의존성 주입(DI) --> jwtUtil.class 에서 @Component 로 빈을 등록했기때문에 가능
    private final UserRepository userRepository;
    private final JwtUtil jwtUtil;
    private static final String ADMIN_TOKEN = "AAABnvxRVklrnYxKZ0aHgTBcXukeZygoC";   //검증을 위한 Token

	// SignupRequestDto 에서 가져온 username, password, email 을 확인
    @Transactional
    public void signup(SignupRequestDto signupRequestDto) {
        String username = signupRequestDto.getUsername();
        String password = signupRequestDto.getPassword();
        String email = signupRequestDto.getEmail();

        // 회원 중복 확인
          // 실제 유저가 있는지 없는지 username으로 확인
        Optional<User> found = userRepository.findByUsername(username);
        // 중복된 유저가 존재한다면, 예외 처리 메시지 보내기
        if (found.isPresent()) {
            throw new IllegalArgumentException("중복된 사용자가 존재합니다.");
        }

        // 사용자 ROLE(권한) 확인
        UserRoleEnum role = UserRoleEnum.USER;
        // admin 이 true 라면 (= admin 으로 로그인 시도하려고 하면),
        if (signupRequestDto.isAdmin()) {
            // 들어온 Token 값과 위의 검증을 위한 Token 값(위쪽에 AAABnvxRVklrnYxKZ0aHgTBcXukeZygoC)이 일치하는지 확인
            if (!signupRequestDto.getAdminToken().equals(ADMIN_TOKEN)) {
                // 일치하지 않으면, 예외 처리 메시지 보내기
                throw new IllegalArgumentException("관리자 암호가 틀려 등록이 불가능합니다.");
            }
            // 일치하면, user 를 admin 타입으로 바꾼다
            role = UserRoleEnum.ADMIN;
        }

        // 가져온 username, password, email, role(UserRoleEnum)를 넣어서 저장(save)
        User user = new User(username, password, email, role);
        userRepository.save(user);
    }

//로그인 구현
	// 로그인이 되면, username, password 가 넘어온다
    @Transactional(readOnly = true)
    public void login(LoginRequestDto loginRequestDto, HttpServletResponse response) {
        String username = loginRequestDto.getUsername();
        String password = loginRequestDto.getPassword();

        // 사용자 확인
          //username 을 통해 확인해서,  있다면 User 객체에 담긴다
        User user = userRepository.findByUsername(username).orElseThrow(
                // 없다면, 예외 처리 메시지 보내기
                () -> new IllegalArgumentException("등록된 사용자가 없습니다.")
        );
        // 비밀번호 확인
          // User 객체에 들어있던 Password 와 가지고 온 Password(String password = loginRequestDto.getPassword() 에 있는) 가 일치하는지 확인
        // 일치하지 않는다면, 예외 처리 메시지 보내기
        if(!user.getPassword().equals(password)){
            throw  new IllegalArgumentException("비밀번호가 일치하지 않습니다.");
        }

        //response 에 addHeader() 를 사용해서 Header 쪽에 값을 넣는데
            //AUTHORIZATION_HEADER: KEY 값
            //createToken(user.getUsername(), user.getRole()): Username(이름), Role(권한)을 넣어서 토큰을 만든다
                //위의 User 객체에서 유저 정보를 가져왔기 떄문에 사용 가능한 것
        response.addHeader(JwtUtil.AUTHORIZATION_HEADER, jwtUtil.createToken(user.getUsername(), user.getRole()));
    }
}
4) 예시 : JWT 를 사용하여 관심상품 조회
-
Entity
1)@Getter @NoArgsConstructor @Entity(name = "users") //USER가 예약어로 등록돼서 USER는 이제 사용 못함 public class User { @Id @GeneratedValue(strategy = GenerationType.IDENTITY) private Long id; // nullable: null 허용 여부 // unique: 중복 허용 여부 (false 일때 중복 허용) @Column(nullable = false, unique = true) private String username; @Column(nullable = false) private String password; @Column(nullable = false, unique = true) private String email; @Column(nullable = false) @Enumerated(value = EnumType.STRING) private UserRoleEnum role; //생성자를 통해, 초기화 public User(String username, String password, String email, UserRoleEnum role) { this.username = username; this.password = password; this.email = email; this.role = role; } }2)
@Getter @Setter @Entity // DB 테이블 역할 @NoArgsConstructor public class Product extends Timestamped{ @Id @GeneratedValue(strategy = GenerationType.IDENTITY) // ID가 자동으로 생성 및 증가합니다. private Long id; @Column(nullable = false) private String title; @Column(nullable = false) private String image; @Column(nullable = false) private String link; @Column(nullable = false) private int lprice; //itemDto 의 lprice 값을 가져온 것을 기존의 lprice 쪽으로 update @Column(nullable = false) private int myprice; @Column(nullable = false) private Long userId; //userId 를 넣는다 (관심상품 조회를 위해서 user 와 product 의 연관관계를 짓기위해) public Product(ProductRequestDto requestDto, Long userId) { this.title = requestDto.getTitle(); this.image = requestDto.getImage(); this.link = requestDto.getLink(); this.lprice = requestDto.getLprice(); this.myprice = 0; this.userId = userId; //생성자를 통해서 userId 도 같이 넣는다 (관심상품 조회를 위해서 user 와 product 의 연관관계를 짓기위해) } public void update(ProductMypriceRequestDto requestDto) { this.myprice = requestDto.getMyprice(); } public void updateByItemDto(ItemDto itemDto) { //itemDto 의 lprice 값을 가져와서, this.lprice = itemDto.getLprice(); } } -
Controller
@RestController @RequestMapping("/api") @RequiredArgsConstructor //의존성 주입 public class ProductController { //HTTP request 를 받아서, Service 쪽으로 넘겨주고, 가져온 데이터들을 requestDto 파라미터로 보냄 private final ProductService productService; //관심상품 추가 할 때 토큰 보내기 // 관심 상품 등록하기 @PostMapping("/products") public ProductResponseDto createProduct(@RequestBody ProductRequestDto requestDto, HttpServletRequest request) { return productService.createProduct(requestDto, request); } //관심상품 조회 할 때 토큰 보내기 // 관심 상품 조회하기 @GetMapping("/products") public List<ProductResponseDto> getProducts(HttpServletRequest request) { //request 안에 들어있는 Header 안의 Token 값을 가져온다 return productService.getProducts(request); } //관심상품 최저가 추가 할 때 토큰 보내기 // 관심 상품 최저가 등록하기 @PutMapping("/products/{id}") public Long updateProduct(@PathVariable Long id, @RequestBody ProductMypriceRequestDto requestDto, HttpServletRequest request) { // 응답 보내기 (업데이트된 상품 id) //request: 토큰을 가져와야하므로 넣었음 return productService.updateProduct(id, requestDto, request); } } -
Service
@Service @RequiredArgsConstructor public class ProductService { private final ProductRepository productRepository; private final UserRepository userRepository; //의존성 주입 private final JwtUtil jwtUtil; //의존성 주입 //관심상품 추가 할 때 토큰 보내기 //등록하기 @Transactional public ProductResponseDto createProduct(ProductRequestDto requestDto, HttpServletRequest request) { // Request 에서 Token 가져오기 String token = jwtUtil.resolveToken(request); //JWT 안에 있는 정보를 담는 Claims 객체 Claims claims; // 토큰이 있는 경우에만 관심상품 추가 가능 if (token != null) { //validateToken()를 사용해서, 들어온 토큰이 위조/변조, 만료가 되지 않았는지 검증 if (jwtUtil.validateToken(token)) { //true 라면, 토큰에서 사용자 정보 가져오기 claims = jwtUtil.getUserInfoFromToken(token); //false 라면, } else { //해당 메시지 반환 throw new IllegalArgumentException("Token Error"); } // 토큰에서 가져온 사용자 정보를 사용하여 DB 조회 //claims.getSubject(): 우리가 넣어두었던 username 가져오기 //findByUsername()를 사용해서, UserRepository 에서 user 정보를 가져오기 User user = userRepository.findByUsername(claims.getSubject()).orElseThrow( () -> new IllegalArgumentException("사용자가 존재하지 않습니다.") ); // 요청받은 DTO 로 DB에 저장할 객체 만들기 Product product = productRepository.saveAndFlush(new Product(requestDto, user.getId())); //(관심상품 조회를 위해서 user 와 product 의 연관관계를 짓기위해) return new ProductResponseDto(product); //토큰이 null 이라면(Client 에게서 Token 이 넘어오지 않은 경우), } else { //null 을 반환 return null; } } //관심상품 조회 할 때 토큰 보내기 //조회하기 (Token 을 통해 검증한 다음, 검증된 사람만 조회 가능) @Transactional(readOnly = true) public List<ProductResponseDto> getProducts(HttpServletRequest request) { // Request 에서 Token 가져오기 String token = jwtUtil.resolveToken(request); //의존성 주입 필요 Claims claims; // 토큰이 있는 경우에만 관심상품 조회 가능 if (token != null) { // Token 검증 if (jwtUtil.validateToken(token)) { // 토큰에서 사용자 정보 가져오기 claims = jwtUtil.getUserInfoFromToken(token); } else { throw new IllegalArgumentException("Token Error"); } // 토큰에서 가져온 사용자 정보를 사용하여 DB 조회 User user = userRepository.findByUsername(claims.getSubject()).orElseThrow( () -> new IllegalArgumentException("사용자가 존재하지 않습니다.") ); //사용자 권한 가져와서, //ADMIN 이면 전체 조회 //USER 면 본인이 추가한 부분만 조회 //user: 위의 User 객체에서 가져온 것 //userRoleEnum: 가져온 권한을 담는 곳 UserRoleEnum userRoleEnum = user.getRole(); System.out.println("role = " + userRoleEnum); //반환 할 List 를 만들어둔다 List<ProductResponseDto> list = new ArrayList<>(); List<Product> productList; //사용자 권한이 USER 일 경우 if (userRoleEnum == UserRoleEnum.USER) { //UserId 가 동일한 product 를 가져와서 productList 에 담는다 productList = productRepository.findAllByUserId(user.getId()); //사용자 권한이 ADMIN 일 경우 } else { //상관없이 모든걸 다 가져온다(findAll()) productList = productRepository.findAll(); } //if 문으로 가져온 productList 를 for 문을 돌린다 for (Product product : productList) { //product 를 다시 ProductResponseDto 로 변환 //다시 ProductResponseDto 로 변환? DAO로 데이터를 저장시키기 위해서, 이 DTO를 Entity로 변환해주는 작업이 필요 (dto 가 이해할 수 있는 언어로 변환하는 것??) list.add(new ProductResponseDto(product)); } //반환 return list; } else { return null; } } //관심상품 최저가 추가 할 때 토큰 보내기 @Transactional //Long id: product 의 id --> update 하기 위해서는 먼저 어떤 product 인지 확인하고, 그 product 의 myprice 를 update public Long updateProduct(Long id, ProductMypriceRequestDto requestDto, HttpServletRequest request) { // Request 에서 Token 가져오기 String token = jwtUtil.resolveToken(request); Claims claims; // 토큰이 있는 경우에만 관심상품 최저가 업데이트 가능 if (token != null) { // Token 검증 if (jwtUtil.validateToken(token)) { // 토큰에서 사용자 정보 가져오기 claims = jwtUtil.getUserInfoFromToken(token); } else { throw new IllegalArgumentException("Token Error"); } // 토큰에서 가져온 사용자 정보를 사용하여 DB 조회 User user = userRepository.findByUsername(claims.getSubject()).orElseThrow( () -> new IllegalArgumentException("사용자가 존재하지 않습니다.") ); //product 안에 userid 가 추가돼서, productid(id) 와 userid(user.getId()) 둘 다 필요 //내가 가지고 온 productid 이면서, 그 product 가 동일한 userid 를 가지고 있는지까지 확인 //즉, 현재 로그인한 user 가 선택한 product 가 맞는지 확인 Product product = productRepository.findByIdAndUserId(id, user.getId()).orElseThrow( () -> new NullPointerException("해당 상품은 존재하지 않습니다.") ); //동일하다면, update() 메서드 사용 product.update(requestDto); //product 의 id 반환 return product.getId(); } else { return null; } } @Transactional //설정해둔 myprice 값 보다 수정된 lprice 값이 작다면, '최저가' 표시가 뜨도록 js 에서 설정되어 있음 public void updateBySearch (Long id, ItemDto itemDto){ //가지고 온 id 로 product 가 있는지 없는지 확인부터 한다 Product product = productRepository.findById(id).orElseThrow( () -> new NullPointerException("해당 상품은 존재하지 않습니다.") ); //그리고 itemDto 를 넣어서 update 를 실시 product.updateByItemDto(itemDto); } } -
Repository
1)public interface ProductRepository extends JpaRepository<Product, Long> { //UserId 를 통해, userId 가 동일한 Product 를 가져온다 (관심상품 조회를 위해서 user 와 product 의 연관관계를 짓기위해) List<Product> findAllByUserId(Long userId); //Product 의 id 와 userId 가 일치하는 Product 를 가져온다 (관심상품 조회를 위해서 user 와 product 의 연관관계를 짓기위해) Optional<Product> findByIdAndUserId(Long id, Long userId); }
5) 예시 : 인증/인가
++ ③ 예시(UserController, UserService)
++ ④ 예시(User)
-
RequestDto
1)@Setter @Getter public class SignupRequestDto { private String username; private String password; private String email; private boolean admin = false; //admin 인지 아닌지 확인 private String adminToken = ""; }2)
@Setter @Getter public class LoginRequestDto { private String username; private String password; } -
Enum
public enum UserRoleEnum {
    USER,  // 사용자 권한
    ADMIN  // 관리자 권한
}
-
관리자 회원 가입 인가 방법
-
로그인 할 때는 ADMIN 표시를 하고,
회원가입 할 때는 미리 서버쪽에서 가지고 있는 키 값을 클라이언트쪽에서 등록해야 ADMIN 사용자로 등록 가능 -
'관리자 가입 토큰' 입력 필요 --> AAABnvxRVklrnYxKZ0aHgTBcXukeZygoC
-
but, 실제로 '관리자' 권한을 이렇게 엉성하게 부여해 주는 경우는 드물다.(해커가 해당 암호를 갈취하게 되면, 관리자 권한을 너무 쉽게 획득하니까)
-
보통 현업에서는
방법 1 : '관리자' 권한을 부여할 수 있는 관리자 페이지 구현
방법 2 : 승인자에 의한 결재 과정 구현 → 관리자 권한 부여
-
- Repository
// 회원가입 구현
public interface UserRepository extends JpaRepository<User, Long> {
    // 회원 중복 확인
    Optional<User> findByUsername(String username);
}