0. 등장 배경
각 요청 URL마다 별개의 Servlet 을 만들면,
새로운 요청이 생길 때마다 새로운 HttpServlet 을 상속한 클래스를 정의해야되고, web.xml에 매핑 내용을 추가해야된다.
→ 이 과정에서 많은 코드 중복이 발생할 수 있음
1. 전체적인 순서
Spring Web Application 동작원리
= Spring Web MVC 동작원리
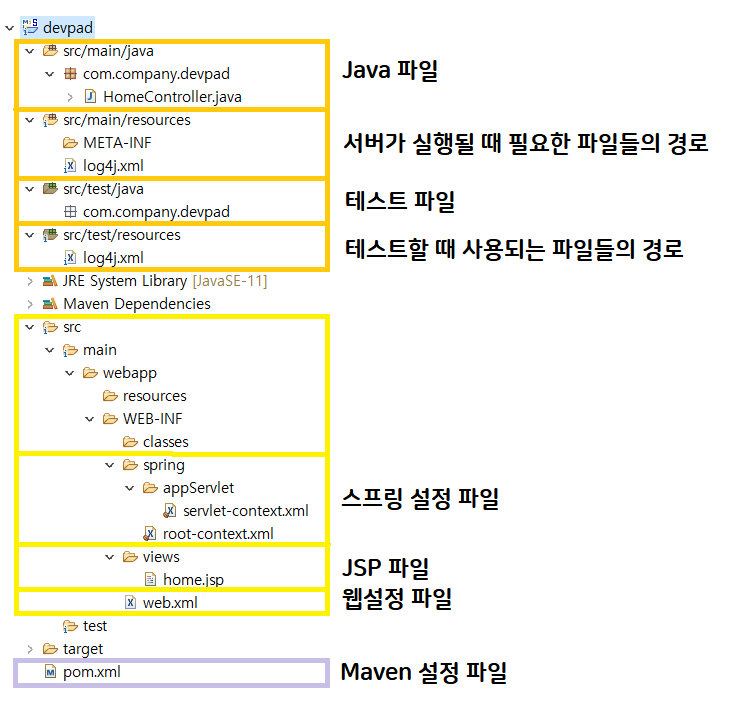
1) Spring MVC 프로젝트의 기본 구조
2) Spring 실행
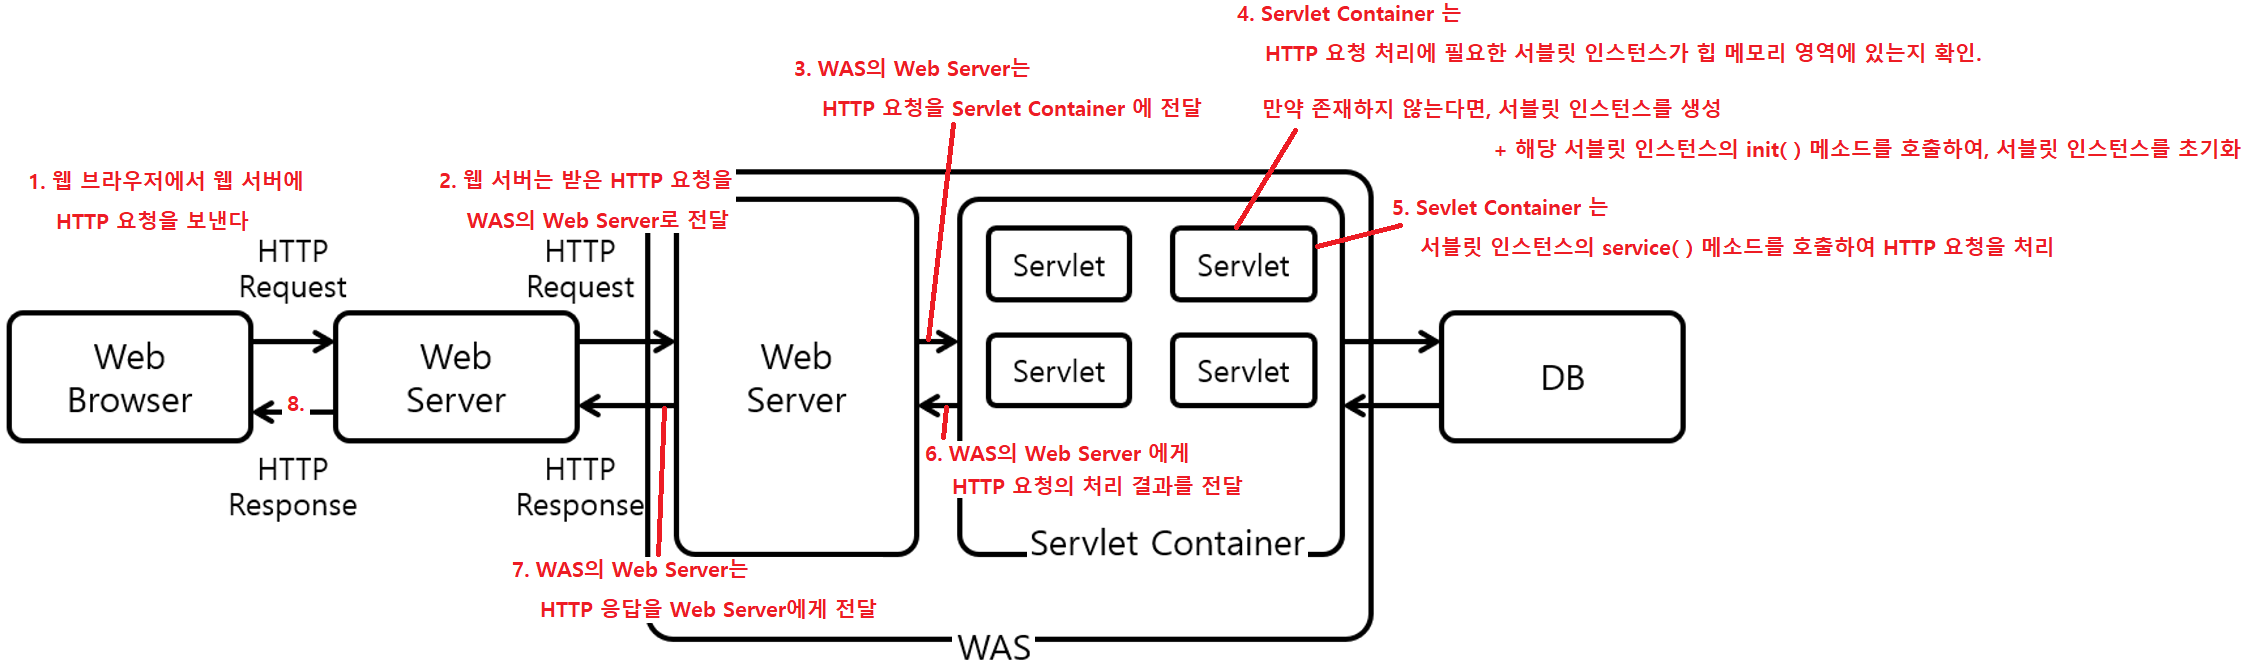
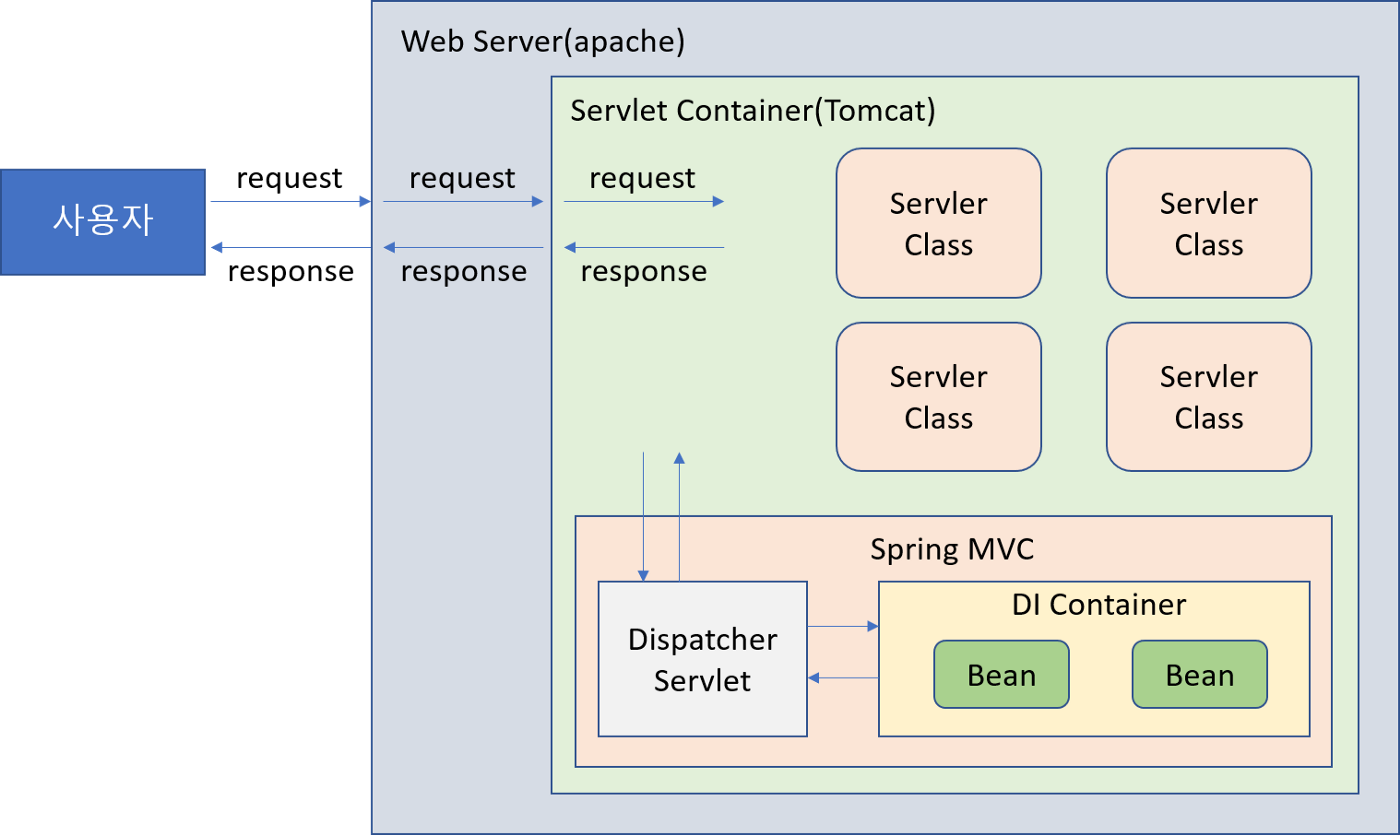
-
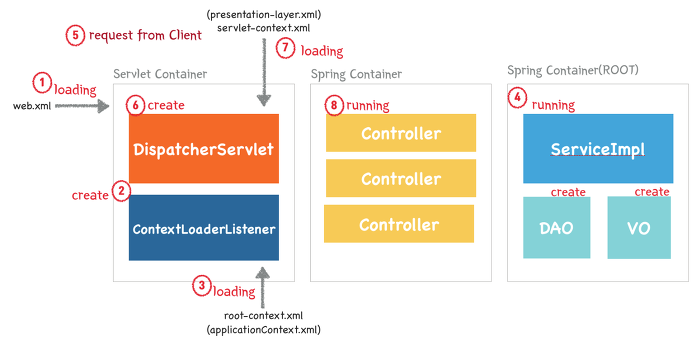
Web Application 이 실행되면, Tomcat(WAS) 에 의해 web.xml 이 로딩된다.
-
서블릿 컨테이너가 파일을 읽어서 구동될 때, web.xml 에 등록되어 있는 ContextLoaderListener (Java Class) 가 자동 생성된다.
-
ContextLoaderListener 클래스는 root-context.xml 을 로딩한다.
→ ContextLoaderListener 객체는 applicationContext.xml 파일을 로딩하여 스프링 컨테이너를 구동하는데, 이를 Root Container 라고 함
(root-context.xml = applicationContext.xml 라고 간주하면 된다.) -
root-context.xml 에 등록되어 있는 Spring Container 가 구동된다.
1) 이때, 개발자가 작성한 비즈니스 로직(Service)에 대한 부분과 DB 로직(DAO), VO 객체들이 생성된다.
2) root-context.xml : 주로 view 지원을 제외한 공통 bean을 설정한다. (단, web과 관련된 bean들은 등록해주지 않음)
→ 예시 : spring properties 파일을 로컬과 서버용으로 구분지을 때, 여기서 property value를 설정해줌 (databaseDataSource, repository 설정을 주로함) -
클라이언트로부터 웹 어플리케이션 요청이 옴
-
요청에 따라, DispatcherServlet (Servlet) 이 생성됨
1) DispatcherServlet 객체는 servelt-context.xml 파일을 로딩하여 두번째 스프링 컨테이너를 구동한다.
→ 이 두 번째 스프링 컨테이너가 Controller 객체를 메모리에 생성한다.
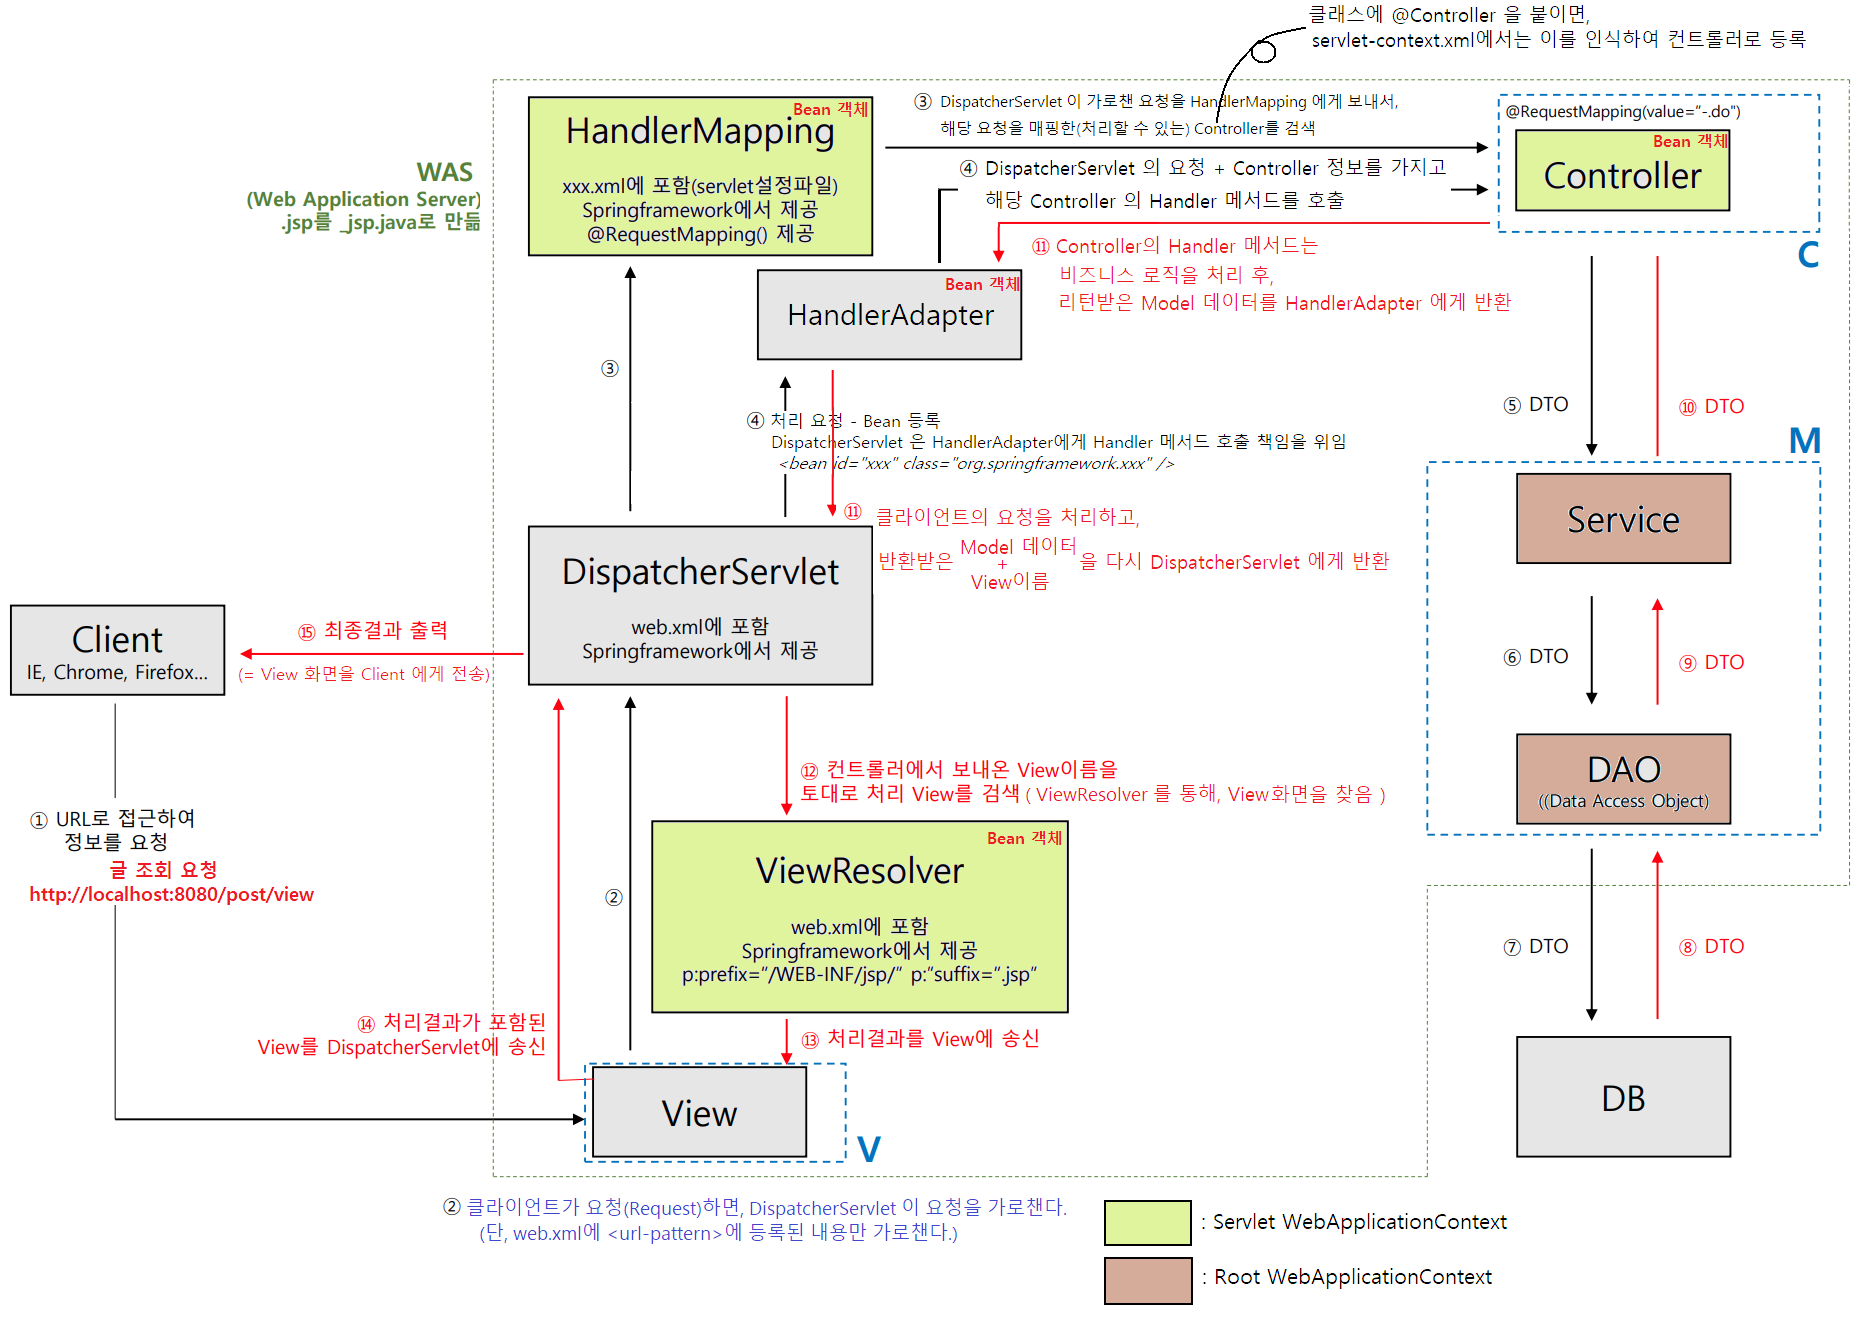
2) 여기서 DispatcherServlet 는 FrontController 의 역할을 수행한다.
= 클라이언트로부터 요청 온 메시지를 분석하여 알맞은 PageController 에게 전달하고, 응답을 받아서 요청에 따른 응답을 어떻게 할지 결정
= 앞에서 모든 요청을 받아서, 적절한 Controller(각각의 Application Controller)에게 위임(deletgate)해주는 방식
(Servlet 을 하나씩 연결하는 방법과는 다르다.)
(실질적인 작업은 PageController 에서 이루어짐 → 이러한 클래스들을 HandlerMapping, ViewResolver 클래스라고 함)
(이 때문에, 해당 모델을 "Front Controller Pattern" 이라고도 함) -
DispatcherServlet 이 servlet-context.xml 을 로딩한다.
-
두번째 Spring Container 가 구동되며, 응답에 맞는 PageController 들이 동작한다.
→ 이때, DAO, VO, Service 클래스들과 협업하여 작업을 처리
(DAO, VO, Service 클래스들 : 첫번째 Spring Container 가 구동되면서 생성된 것들)
3) 구동
(Spring FrameWork 의 MVC 모델 2)
참고: MVC 패턴 - 모델 1 과 모델 2 비교
-
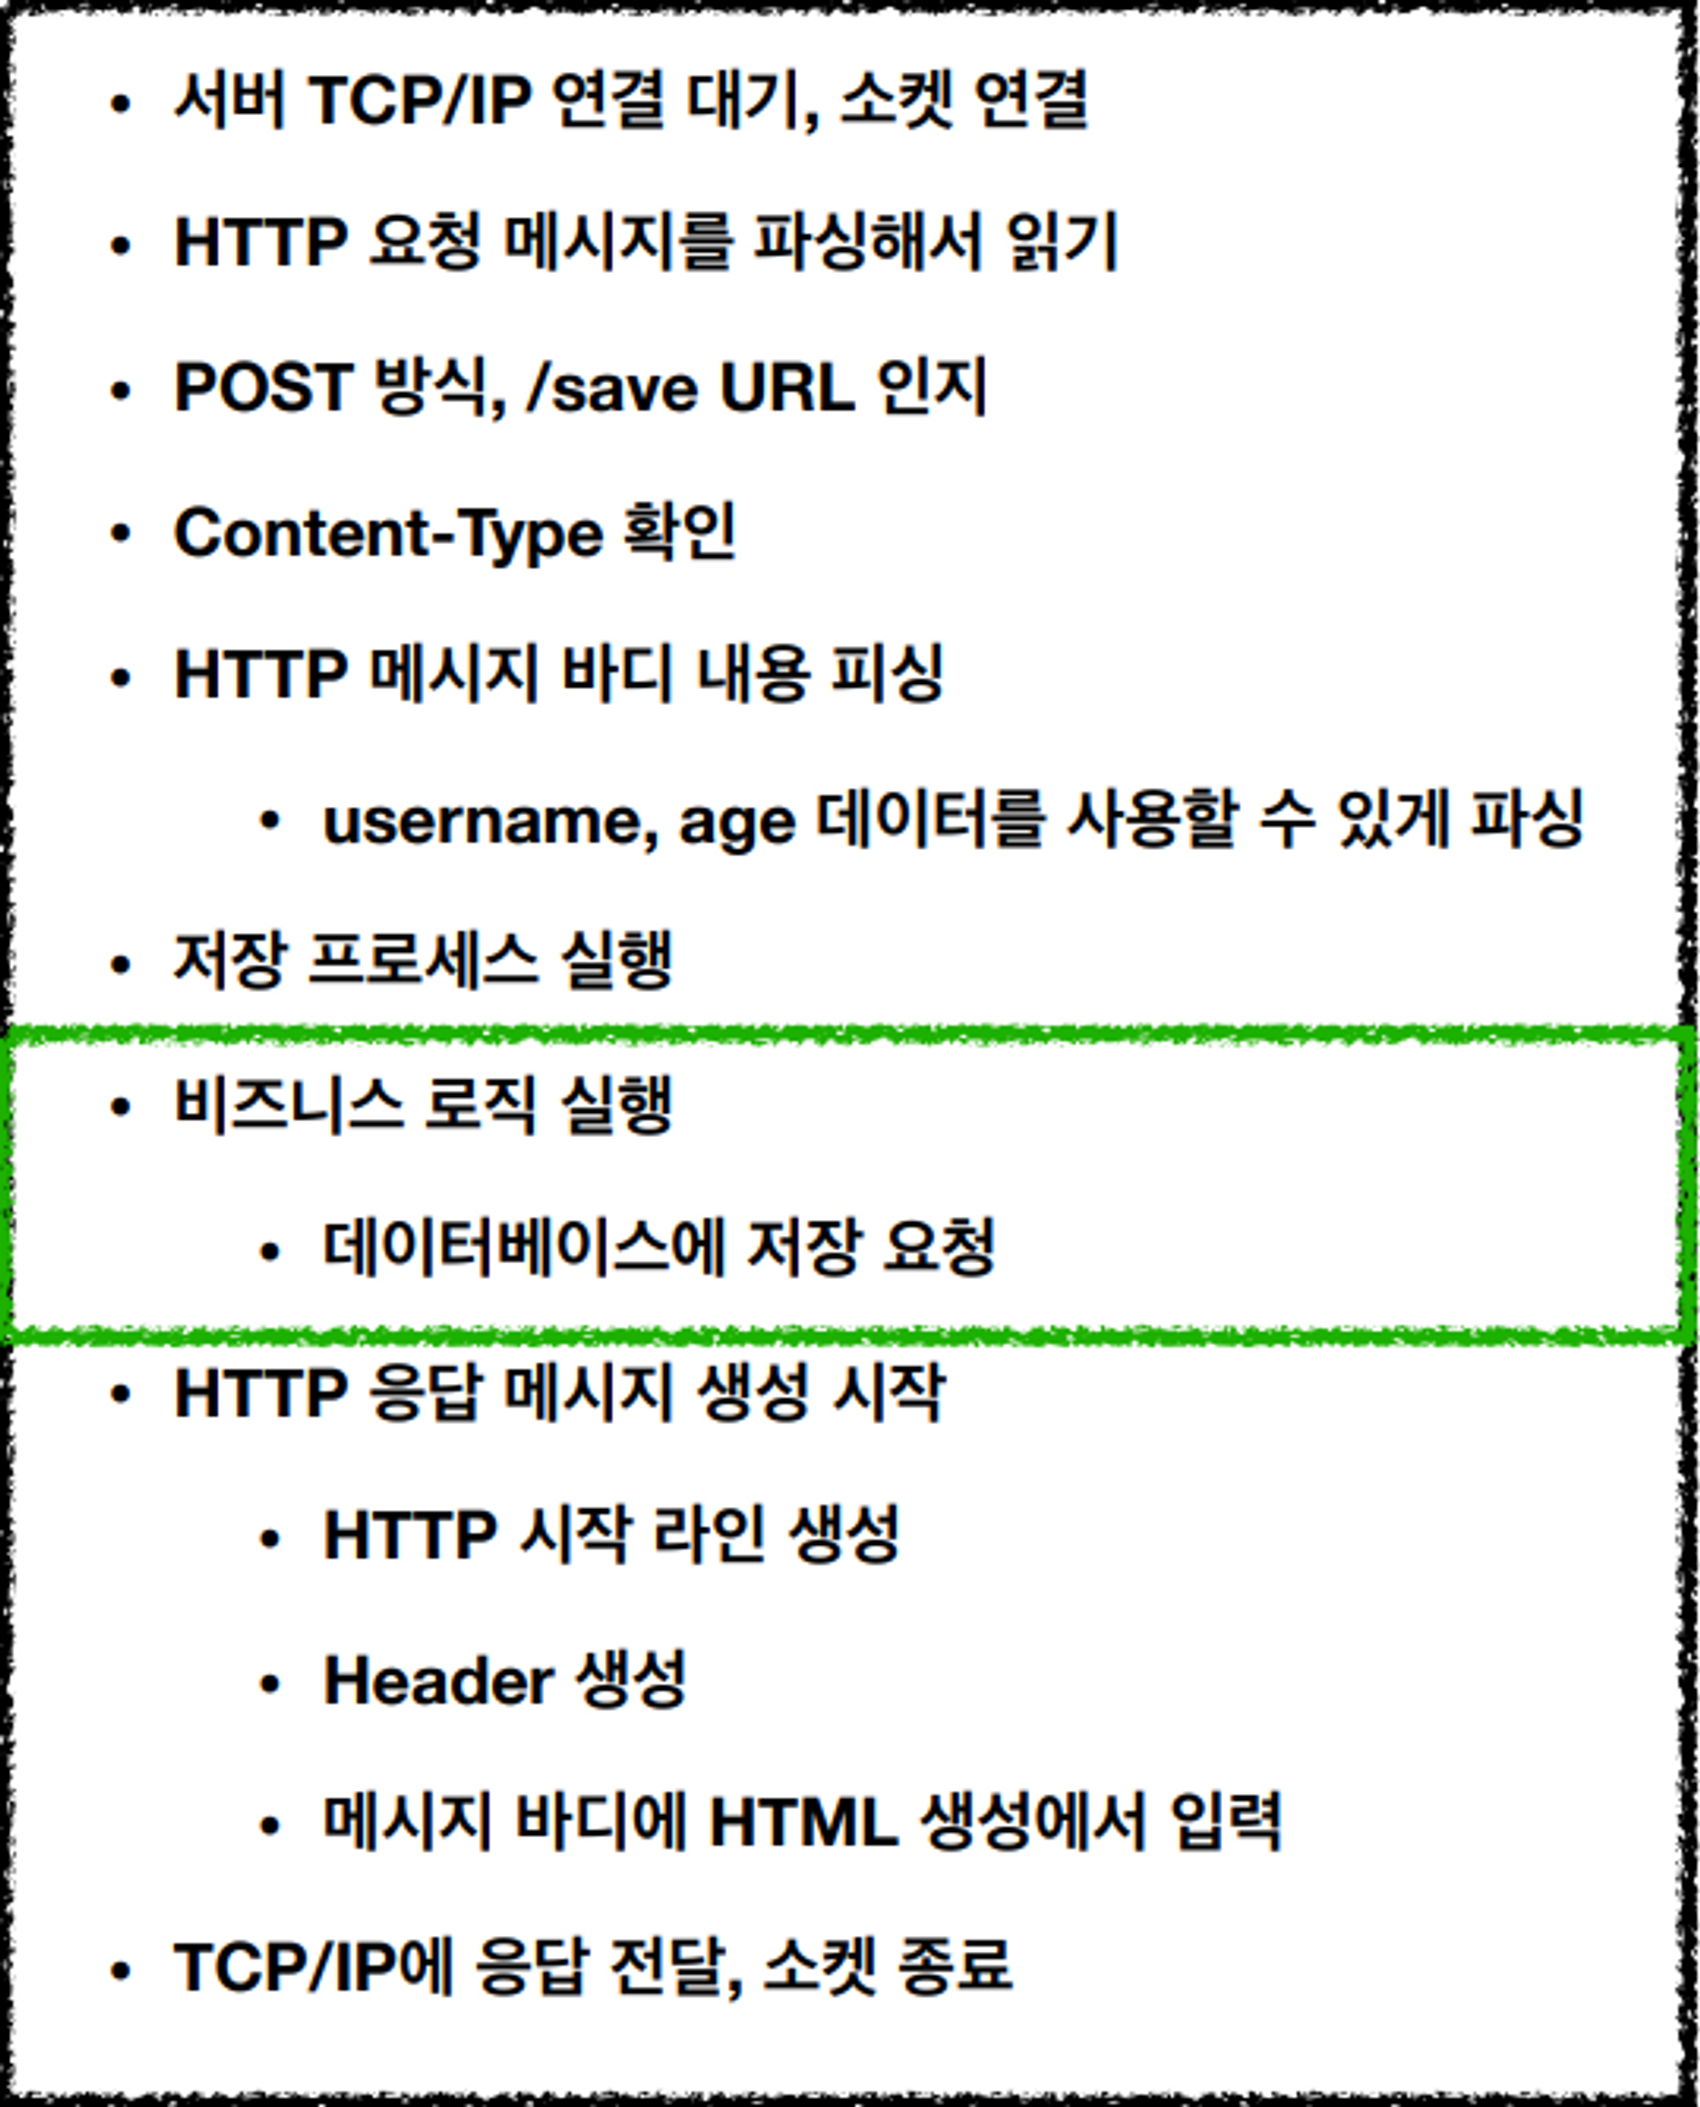
실제 로직 처리 :
Controller→Service→DAO→DB→>DAO→Service→Controller -
11번. 출력할 뷰와 뷰에 전달할 객체를 담고 있는 Model 객체를 리턴
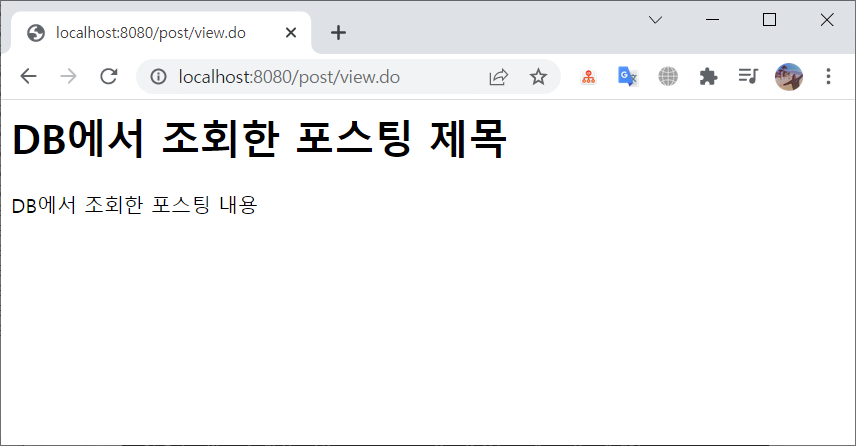
@Controller public class HomeController { @RequestMapping(value = "/post/view") public String view() { // DB에서 포스팅 정보를 가져왔다는 가정한다. String title = "DB에서 조회한 포스팅 제목"; String content = "DB에서 조회한 포스팅 내용"; model.addAttribute("title", title); model.addAttribute("content", content); // view이름 (여기 예시에서는 home) return "home"; } } -
14번. view 화면 (home.jsp) 의 모습
<%@ taglib uri="http://java.sun.com/jsp/jstl/core" prefix="c"%> <%@ page language="java" contentType="text/html; charset=utf-8" pageEncoding="utf-8"%> <html> <body> <h1>${title}</h1> <P>${content}</P> </body> </html> -
15번. 14번까지 진행되면, 클라이언트가 조회 요청할 때 DB 에서 가져온 결과값이 출력된다.
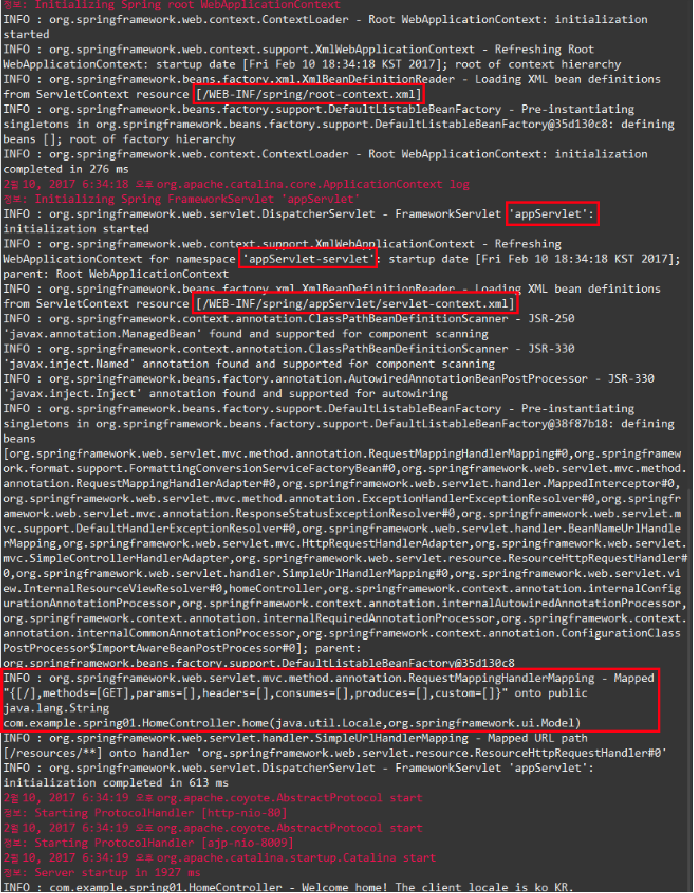
4) 콘솔 화면
2. 구성
1) Servlet
(1) 정의
-
Java EE의 표준 중 하나
-
javax.servlet Package를 기반으로 Server에서 동작하는 Class들을 의미
-
클라이언트 요청을 처리하고, 그 결과를 다시 클라이언트에게 전송하는 Servlet 클래스의 구현 규칙을 지킨 자바 프로그램
→ Servlet 프로그램을 개발할 때, 반드시 구현해야 하는 메서드를 선언하고 있는 인터페이스
→ 이 표준을 구현해야만, Servlet Container 가 해당 Servlet 을 실행 할 수 있다. -
이전의 웹 프로그램들은 클라이언트의 요청에 대한 응답으로 만들어진 페이지를 넘겨 주었으나,
현재는 동적인 페이지를 가공하기 위해서 웹 서버가 다른 곳에 도움을 요청한 후 가공된 페이지를 넘겨주게 된다.
→ 이때 Servlet 을 사용하게 되면, 웹 페이지를 동적으로 생성하여 클라이언트에게 반환 가능 -
Servlet Container에 의해 관리, 실행된다.
HTTP Server + Servlet Container 가 웹 서버 역할에 필요한 대부분을 구현해두었고,
개발자는 Servlet을 만들어 HTTP 요청을 받아 처리하는 부분을 구현하는 것 -
html 을 사용해서 요청에 응답
-
HTML 변경시, Servlet 을 재컴파일 해야한다
-
Java thread 를 통해 동작한다
-
MVC 패턴 中 Controller로 이용된다
-
HTTP 프로토콜 서비스를 지원하는 javax.servlet.http.HttpServlet 클래스를 상속받는다.(UDP보다 속도가 느림)
-
Servlet 이 생성될 때, ServletContainer 에 이미 만들어지지 않았다면 새로 만든다.
Servlet 을 이미 만든 적이 있다면, 이를 재사용
→ 따라서, Servlet 은 재사용이 가능한 형태로 stateless + immutable 하게 구현해야 한다.
→ 상태가 없는 객체(stateless)를 공유하므로, 별도의 동기화 과정 필요 X
→ 컨트롤러가 여러 개의 요청을 받아도 문제 발생 X
(2) 종류
어디서 관리하느냐에 따라 구별된다.
@WebServlet
- Tomcat이 관리
Spring @Bean
-
Spring이 관리
-
POJO와 설정(Configuration Metadata)을 Spring이 제공하는 Container(DI Container, 또는 IoC Container)에 주입시키면,
Bean으로 등록되고 사용이 가능하다.
→ 결국, Spring 을 쓴다는 것은 Spring으로 Servlet을 다루겠다는 뜻
→ Spring MVC 또한, Servlet Container 가 관리하는 Servlet 이다.
→ 그래서 "Servlet 없이 Spring MVC 만 있으면 된다." = "비지니스 로직을 Spring 을 통해 처리하겠다." "Servlet이 필요없다."
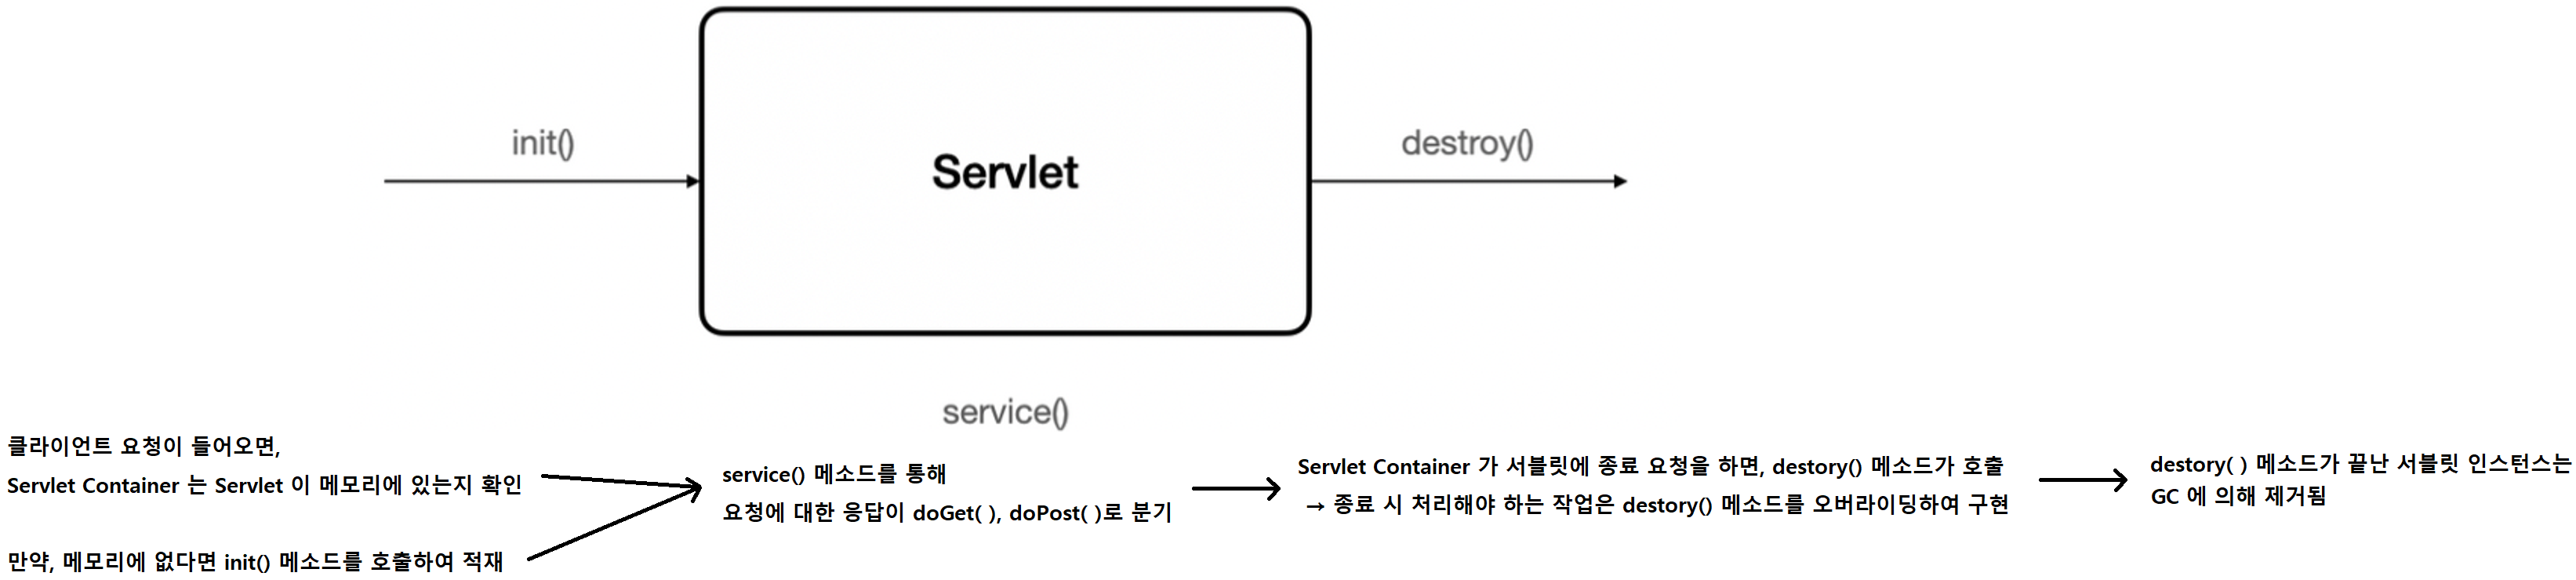
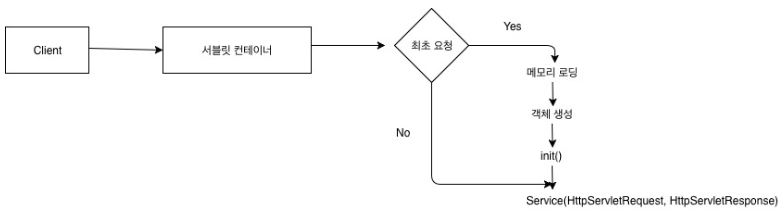
(3) 생명 주기 (Life Cycle)
-
Servlet 생명 주기는 Servlet Container 에 의해 관리된다.
→ 따라서, 개발자가 직접 서블릿을 생성하고 파괴할 필요 X -
Servlet은 아래 3개의 method 를 반드시 정의해야 한다.
init( )- 서블릿 인스턴스가 생성되고 초기화될 로직을 담는 메서드 = "초기화"
→ Parameter 로 javax.servlet.ServletConfig Interface 기반의 Instance 가 넘어온다.
(Instance : 일반적으로 실행 중인 임의의 프로세스, 해당 클래스의 구조로 컴퓨터 저장공간에서 할당되어 현재 생성된 Object) - 기본적으로 아무 처리도 하지 않는다.
- 서버가 켜질 때, 한 번만 실행
→ 서블릿의 쓰레드에서 공통적으로 사용해야 하는 것이 있다면, 오버라이딩하여 구현
service( )- HTTP request의 유형을 해석하여, service 메소드를 통해 대한 응답이 doGet, doPost로 분기되고 적절한 메서드를 호출한다.
→ 이 때 HttpServletRequest, HttpServletResponse에 의해 request와 response객체가 제공된다.
(HttpServletRequest, HttpServletResponse : 클라이언트의 요청으로 서블릿 컨테이너가 가장 먼저 처리하는 과정으로 생성된 것들) - 모든 유저들의 요청들을 받는다.
- init() 와 달리, 몇 번이고 계속 호출되는 메소드이다.
destroy( )- 더 이상 해당 서블릿의 서비스를 사용하지 않을 때 호출
→ 즉, 서블릿 컨테이너가 서블릿에 종료 요청 - 기본적으로 아무 처리도 하지 않는다.
- 서버가 꺼질 때, 한 번만 실행
→ 종료 시 처리해야하는 작업들은 destroy() 메소드를 오버라이딩하여 구현
- 서블릿 인스턴스가 생성되고 초기화될 로직을 담는 메서드 = "초기화"
(4) 동작 방식
①
- 서블릿의 실행 순서는~~ 개발자가 아닌~~ Servlet Container 가 관리
→ 즉, 서블릿에 의해 사용자가 정의한 서블릿 객체가 생성/호출된다.
→ 이렇게개발자가 아닌프로그램에 의해 객체들이 관리되는 것을IoC(Inversion of Control)라고 한다.
② Servlet들의 상속
-
상속 구조
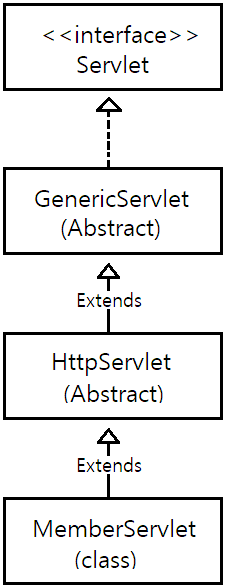
MemberServlet (개발자가 정의한 것)이 구현한 service 를 Servlet Conatiner 가 실행할 것이다.
(만약service가 아닌method 방식으로 처리하고 싶다면, 해당 HTTP Method 방식을 구현하면 된다.) -
HttpServlet 의 구현체 내부
public abstract class HttpServlet extends GenericServlet
            implements java.io.Sericalizable {
    private static final String METHOD_DELETE = "DELETE";
    private static final String METHOD_HEAD = "HEAD";
    private static final String METHOD_GET = "GET";
    private static final String METHOD_OPTIONS = "OPTIONS";
    private static final String METHOD_POST = "POST";
    private static final String METHOD_PUT = "PUT";
    private static final String METHOD_TRACE = "TRACE";

    private static final String HEADER_IFMODSINCE = "If-Modified-Since";
    private static final String HEADER_LASTMOD = "Last-Modified";

    private static final String LSTRING_FILE = "javax.servlet.http.LocalStrings";
    private static ResourceBundle lStrings = ResourceBundle.getBundle(LSTRING_FILE);

    public HttpServlet() {
    }

    protected void doGet(HttpServletRequest req, HttpServletResponse resp)
            throws ServletException, IOException {
        String protocol = req.getProtocol();
        String msg = lStrings.getString("http.method_get_not_supported");
        if (protocol.endsWith("1.1")) {
            resp.sendError(HttpServletResponse.SC_METHOD_NOT_ALLOWED, msg);
        } else {
            resp.sendError(HttpServletResponse.SC_BAD_REQUEST, msg);
        }
    }

    protected long getLastModified(HttpServletRequest req) {
        return -1;
    }

    protected void doHead(HttpServletRequest req, HttpServletResponse resp)
            throws ServletException, IOException {
        NoBodyResponse response = new NoBodyResponse(resp);

        doGet(req, response);
        response.setContentLength();
    }

    protected void doPost(HttpServletRequest req, HttpServletResponse resp)
            throws ServletException, IOException {
        String protocol = req.getProtocol();
        String msg = lStrings.getString("http.method_post_not_supported");
        if (protocol.endsWith("1.1")) {
            resp.sendError(HttpServletResponse.SC_METHOD_NOT_ALLOWED, msg);
        } else {
            resp.sendError(HttpServletResponse.SC_BAD_REQUEST, msg);
        }
    }

    protected void doPut(HttpServletRequest req, HttpServletResponse resp)
            throws ServletException, IOException {
        String protocol = req.getProtocol();
        String msg = lStrings.getString("http.method_put_not_supported");
        if (protocol.endsWith("1.1")) {
            resp.sendError(HttpServletResponse.SC_METHOD_NOT_ALLOWED, msg);
        } else {
            resp.sendError(HttpServletResponse.SC_BAD_REQUEST, msg);
        }
    }

    protected void doDelete(HttpServletRequest req,
            HttpServletResponse resp)
            throws ServletException, IOException {
        String protocol = req.getProtocol();
        String msg = lStrings.getString("http.method_delete_not_supported");
        if (protocol.endsWith("1.1")) {
            resp.sendError(HttpServletResponse.SC_METHOD_NOT_ALLOWED, msg);
        } else {
            resp.sendError(HttpServletResponse.SC_BAD_REQUEST, msg);
        }
    }

    private Method[] getAllDeclaredMethods(Class c) {
        if (c.getName().equals("javax.servlet.http.HttpServlet"))
            return null;

        int j = 0;
        Method[] parentMethods = getAllDeclaredMethods(c.getSuperclass());
        Method[] thisMethods = c.getDeclaredMethods();

        if (parentMethods != null) {
            Method[] allMethods =
                    new Method[parentMethods.length + thisMethods.length];
            for (int i = 0; i < parentMethods.length; i++) {
                allMethods[i] = parentMethods[i];
                j = i;
            }
            j++;
            for (int i = j; i < thisMethods.length + j; i++) {
                allMethods[i] = thisMethods[i - j];
            }
            return allMethods;
        }
        return thisMethods;
    }

    protected void doOptions(HttpServletRequest req, HttpServletResponse resp)
            throws ServletException, IOException {
        Method[] methods = getAllDeclaredMethods(this.getClass());

        boolean ALLOW_GET = false;
        boolean ALLOW_HEAD = false;
        boolean ALLOW_POST = false;
        boolean ALLOW_PUT = false;
        boolean ALLOW_DELETE = false;
        boolean ALLOW_TRACE = true;
        boolean ALLOW_OPTIONS = true;

        for (int i = 0; i < methods.length; i++) {
            Method m = methods[i];

            if (m.getName().equals("doGet")) {
                ALLOW_GET = true;
                ALLOW_HEAD = true;
            }
            if (m.getName().equals("doPost"))
                ALLOW_POST = true;
            if (m.getName().equals("doPut"))
                ALLOW_PUT = true;
            if (m.getName().equals("doDelete"))
                ALLOW_DELETE = true;
        }

        String allow = null;
        if (ALLOW_GET)
            if (allow == null) allow = METHOD_GET;
        if (ALLOW_HEAD)
            if (allow == null)
                allow = METHOD_HEAD;
            else
                allow += ", " + METHOD_HEAD;
        if (ALLOW_POST)
            if (allow == null)
                allow = METHOD_POST;
            else
                allow += ", " + METHOD_POST;
        if (ALLOW_PUT)
            if (allow == null)
                allow = METHOD_PUT;
            else
                allow += ", " + METHOD_PUT;
        if (ALLOW_DELETE)
            if (allow == null)
                allow = METHOD_DELETE;
            else
                allow += ", " + METHOD_DELETE;
        if (ALLOW_TRACE)
            if (allow == null)
                allow = METHOD_TRACE;
            else
                allow += ", " + METHOD_TRACE;
        if (ALLOW_OPTIONS)
            if (allow == null)
                allow = METHOD_OPTIONS;
            else
                allow += ", " + METHOD_OPTIONS;

        resp.setHeader("Allow", allow);
    }

    protected void doTrace(HttpServletRequest req, HttpServletResponse resp)
            throws ServletException, IOException {

        int responseLength;

        String CRLF = "\r\n";
        String responseString = "TRACE " + req.getRequestURI() +
                " " + req.getProtocol();

        Enumeration reqHeaderEnum = req.getHeaderNames();

        while (reqHeaderEnum.hasMoreElements()) {
            String headerName = (String) reqHeaderEnum.nextElement();
            responseString += CRLF + headerName + ": " +
                    req.getHeader(headerName);
        }

        responseString += CRLF;

        responseLength = responseString.length();

        resp.setContentType("message/http");
        resp.setContentLength(responseLength);
        ServletOutputStream out = resp.getOutputStream();
        out.print(responseString);
        out.close();
        return;
    }

    protected void service(HttpServletRequest req, HttpServletResponse resp)
            throws ServletException, IOException {
        String method = req.getMethod();

        if (method.equals(METHOD_GET)) {
            long lastModified = getLastModified(req);
            if (lastModified == -1) {
                // servlet doesn't support if-modified-since, no reason
                // to go through further expensive logic
                doGet(req, resp);
            } else {
                long ifModifiedSince = req.getDateHeader(HEADER_IFMODSINCE);
                if (ifModifiedSince < (lastModified / 1000 * 1000)) {
                    // If the servlet mod time is later, call doGet()
                    // Round down to the nearest second for a proper compare
                    // A ifModifiedSince of -1 will always be less
                    maybeSetLastModified(resp, lastModified);
                    doGet(req, resp);
                } else {
                    resp.setStatus(HttpServletResponse.SC_NOT_MODIFIED);
                }
            }

        } else if (method.equals(METHOD_HEAD)) {
            long lastModified = getLastModified(req);
            maybeSetLastModified(resp, lastModified);
            doHead(req, resp);

        } else if (method.equals(METHOD_POST)) {
            doPost(req, resp);

        } else if (method.equals(METHOD_PUT)) {
            doPut(req, resp);

        } else if (method.equals(METHOD_DELETE)) {
            doDelete(req, resp);

        } else if (method.equals(METHOD_OPTIONS)) {
            doOptions(req, resp);

        } else if (method.equals(METHOD_TRACE)) {
            doTrace(req, resp);

        } else {
            //
            // Note that this means NO servlet supports whatever
            // method was requested, anywhere on this server.
            //

            String errMsg = lStrings.getString("http.method_not_implemented");
            Object[] errArgs = new Object[1];
            errArgs[0] = method;
            errMsg = MessageFormat.format(errMsg, errArgs);

            resp.sendError(HttpServletResponse.SC_NOT_IMPLEMENTED, errMsg);
        }
    }

    private void maybeSetLastModified(HttpServletResponse resp, long lastModified) {
        if (resp.containsHeader(HEADER_LASTMOD))
            return;
        if (lastModified >= 0)
            resp.setDateHeader(HEADER_LASTMOD, lastModified);
    }

    public void service(ServletRequest req, ServletResponse res)
            throws ServletException, IOException {
        HttpServletRequest request;
        HttpServletResponse response;

        try {
            request = (HttpServletRequest) req;
            response = (HttpServletResponse) res;
        } catch (ClassCastException e) {
            throw new ServletException("non-HTTP request or response");
        }
        service(request, response);
    }
}
Servlet
(설명은 2. 구성 > 1) Servlet 부분을 참고)GenericServlet- Servlet 인터페이스를 상속하여, 클라이언트-서버 환경에서 서버단의 어플리케이션으로써 필요한 기능을 구현한 추상클래스
- service() 메서드를 제외한 모든 메서드를 재정의하여 적절한 기능으로 구현
- GenericServlet 클래스를 상속하면, 어플리케이션의 프로토콜에 따라 메서드 재정의 구문을 적용해야 한다.
- Servlet 인터페이스, ServletConfig 인터페이스를 구현 (두 인터페이스가 서블릿 API 를 구현하여 제공한다.)
HttpServlet- 일반적으로 "Servlet" 이라하면, 거의 대부분 HttpServlet 을 상속받은 Servlet 을 의미한다.
- GenericServlet 을 상속받았으며, GenericServlet 의 유일한 추상 메서드인 service 를 HTTP 프로토콜 요청 메서드에 적합하게 재구현
→ 이 상속에서 doPost 와 doGet 메소드가 나온다. - 이미 DELETE, GET, HEAD, OPTIONS, POST, PUT, TRACE를 처리하는 메소드가 모두 정의되어 있다.
-
web.xml 또는 @WebServlet 어노테이션
개발자는 HttpServlet 을 상속받고, HTTP Method 에 맞게 Servlet 을 구현해서 기능 구현할 수 있다.
→ 그런데 HTTPServlet 을 상속/구현한 클래스들이 많을텐데, 어떻게 요청된 URL에 따라 일일이 각각의 Servlet 으로 보내줄 수 있을까.
→ web.xml 또는 @WebServlet 어노테이션 이용하기주의!
URL 마다 모두 매핑해서 사용해야한다면, 유지보수↓ 확장성↓ ...
→ 이를 보완하여 등장한 것이MVC 패턴 -
MVC 패턴
- Model(비즈니스로직), View(화면), Controller(최초 Request를 받는 곳) 로 나누고 개발을 하는 것
- DispatcherServlet 을 FrontController 의 역할로써 활용한다.
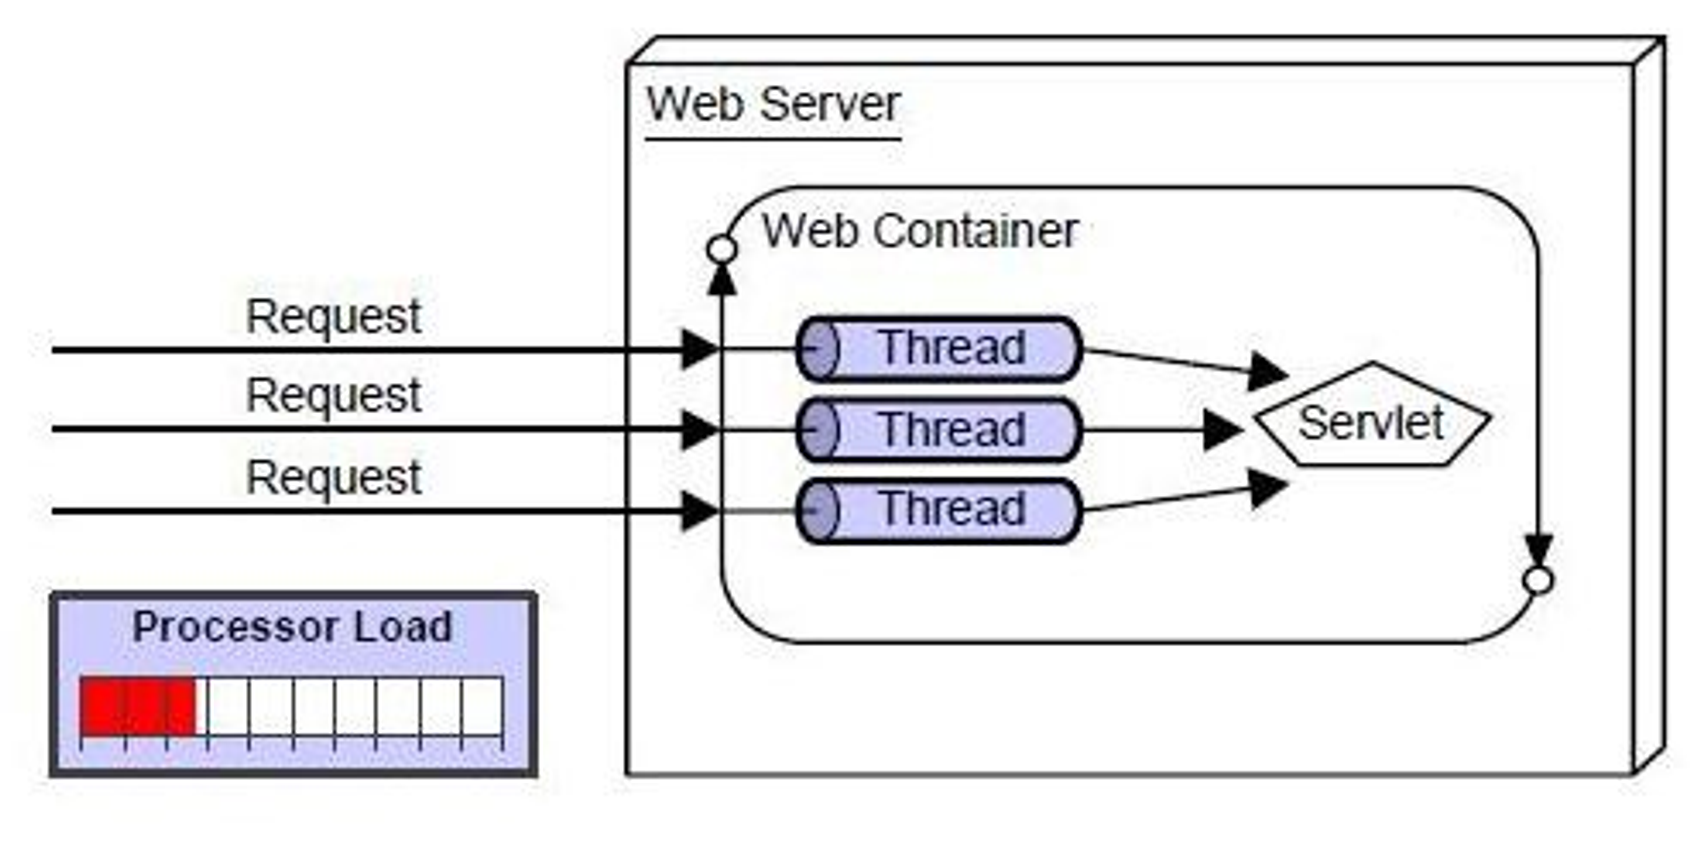
③ thread (쓰레드)
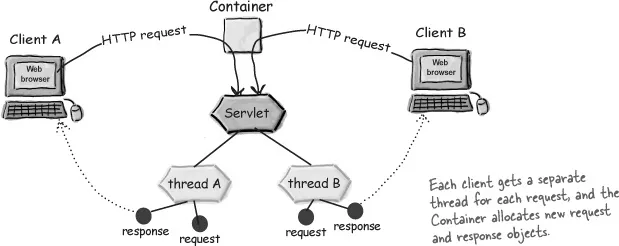
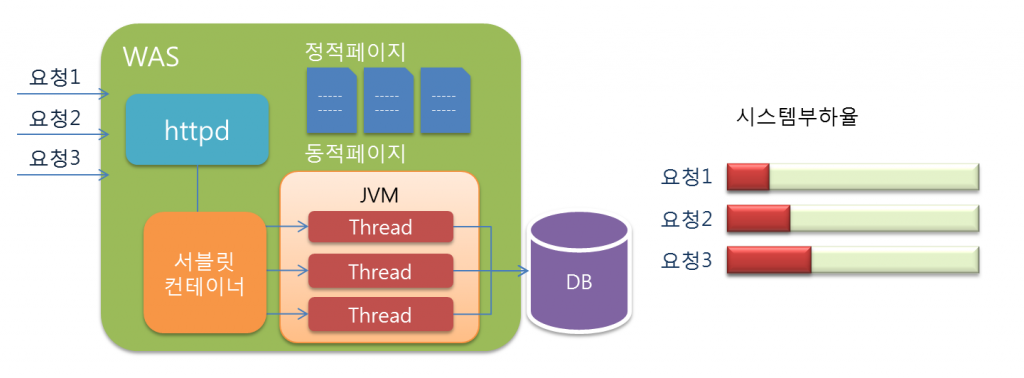
-
하나의 클라이언트에 하나의 쓰레드가 부여되는 것 (X) → Thread-per-connection
요청 당 하나의 쓰레드가 부여되는 것 (O) → 즉, Thread-per-request
→ Container 는
누가 요청을 보냈는지에 대해서는 무관심.
→ 새로운 요청은 새로운 쓰레드를 만들어낸다. -
Thread-per-request 를 Thread-per-connection에 우선해서 쓰는 이유 : Scalability 에 유리하기 때문
문제 상황
Java 쓰레드는 비용이 비싸다(1Mb 메모리 segment 가 하나씩 붙음).
connection 하나당 하나의 쓰레드에 붙이면, 쓰레드는 요청이 계속 오기까지 idle 상태로 대기를 타야할 것이다.
→ 궁극적으로 framework 가 더이상 쓰레드를 만들 수 없어서 새로운 connection 을 만들지 못하게 된다.
→ 따라서, 연결되는 동안 스레드가 유지되어야 한다.해결법
thread-per-request 를 사용하면,
request 가 진행될 때만 쓰레드가 개입을 하므로, 수만명이 서비스를 사용하더라도 현재 사용중인 요청에만 쓰레드를 투입시키면 되므로 경제적이다.(단, 클라이언트의 지속적인 요청이 필요한 상황에서는 HTTP Keep-alives 를 사용하여, Connection 별로 쓰레드를 지속적으로 유지 가능)
(5) 사용법
-
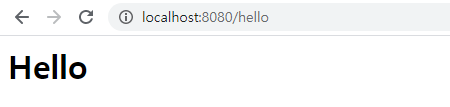
Servlet Application 만들기
// @WebServlet("/hello") → 이렇게 표현도 가능
@WebServlet(name = "helloServlet", urlPatterns = "/hello")	// Servlet Mapping 자동 설정 → urlPatterns("/hello") 의 URL이 호출되면, 서블릿 코드가 실행된다.
public class HelloServlet extends HttpServlet {

    // HttpServletRequest를 통해, HTTP 요청(request) 정보를 사용 가능
    // HttpServletResponse를 통해, HTTP 응답(response) 정보를 사용 가능
    @Override
    protected void service(HttpServletRequest request, HttpServletResponse response)
        throws ServletException, IOException {

        // 애플리케이션 로직
    }
}

/* ??
  public class HelloServlet extends HttpServlet {
    @Override
    protected void doGet(HttpServletRequest req, HttpServletResponse resp) throws IOException {
        System.out.println("Do Get");
        resp.getWriter().println("<html>");
        resp.getWriter().println("<header>");
        resp.getWriter().println("</header>");
        resp.getWriter().println("<body>");
        resp.getWriter().println("<h1>Hello</h1>");
        resp.getWriter().println("</body>");
        resp.getWriter().println("</html>");
    }

    @Override
    public void destroy() {
        System.out.println("Servlet Destroy");
    }

    @Override
    public void init() {
        System.out.println("Servlet Init");
    }
}
*/
Servlet 은 HttpServlet 클래스를 상속한 클래스
→ Servlet 은 HttpServlet 을 상속받아서 정의한다. -
web.xml 에 servlet 등록 + servlet 을 원하는 url 과 mapping 하기
<web-app> <display-name>Web Application</display-name> <!--Servlet Class 정의--> <servlet> <servlet-name>hello</servlet-name> <!-- 시스템 에서 사용할 서블릿의 이름 --> <servlet-class>me.doflamingo.HelloServlet</servlet-class> <!-- 서블릿의 패키지명 포함 클래스명 --> </servlet> <!-- Servlet Mapping 설정 --> <servlet-mapping> <servlet-name>hello</servlet-name> <!-- 위에서 선언한 서블릿 이름 --> <url-pattern>/hello</url-pattern> <!-- 대응할 URL --> </servlet-mapping> </web-app> -
확인해보기
1) Servlet Application 실행
2) Servlet Container(WAS) 실행 시 Servlet이 초기화되고, Servlet Container가 내려갈 시 Servlet이 제거된다.
3) /hello라는 url이 불러졌을 때 "hello"가 브라우저에 나오게 된다.
(6) 장단점
장점
-
Java를 기반으로 하므로, Java API를 모두 사용 O
-
운영체제나 하드웨어에 영향을 받지 않으므로, 한 번 개발된 애플리케이션은 다양한 서버 환경에서도 실행 O
-
웹 어플리케이션에서 효율적인 자료 공유 방법을 제공
-
다양한 오픈소스 라이브러리와 개발도구를 활용 O
단점
-
HTML 응답을 위해서는 출력문으로 문자열 결합을 사용해야 함
-
HTML 을 Servelt 에서 포함할 경우, 화면 수정 어려움
-
HTML form 데이터 처리 불편함
-
기본적으로 단일 요청과 응답을 처리하는 구조로, 다양한 경로의 URL 접근을 하나의 클래스에서 처리하기 어려움
(예시 : Rest API 구현 등...)
2) root-context.xml (applicationContext.xml)
(1) 정의
-
이 파일은 최초에는 텅 비어있다.
-
다른 모든 웹 구성요소에 표시되는 공유 리소스를 정의
→ view 와 관련되지 않은 객체를 정의 (예시 : Service, Repository(DAO), DB등 비즈니스 로직과 관련된 설정을 해주는 곳)
(2) 사용법
Spring 환경 설정 파일
<?xml version="1.0" encoding="UTF-8"?>
<beans xmlns="http://www.springframework.org/schema/beans"
	xmlns:xsi="http://www.w3.org/2001/XMLSchema-instance"
	xsi:schemaLocation="http://www.springframework.org/schema/beans https://www.springframework.org/schema/beans/spring-beans.xsd">

	<!-- Root Context: defines shared resources visible to all other web components -->

</beans>
2) web.xml
(1) 정의
-
Spring 프로젝트가 시작되면, 가장 먼저 web.xml 을 읽어들이게 된다.
→ 위에서부터 차례대로 태그를 해석하기 시작 -
WAS(tomcat 같은)는 Servlet 생성, mapping(어떤 Servlet이 어떤 요청을 담당할 것인지), 제어 기능(어떤 요청이 인증과정을 거칠 것인지)을 지원
→ 이 경우 WAS 에게 Servlet에 대한 정보를 줘야하고, 이때 쓰이는 파일이 web.xml 이다.
→ web.xml 가 배포 서술자(Deployment Descriptor)의 역할을 담당
(배포 서술 : Servlet 클래스를 등록하는 것) -
모든 서블릿 컨테이너에 대한 기본적인 설정과 정보를 가지고 있음
-
들어온 모든 요청을 DispatcherServlet 으로 가도록 한다.
(2) 사용법
웹 프로젝트의 배치 기술서 (deploy descriptor, 웹 프로젝트의 환경 설정 파일)
<web-app xmlns="http://xmlns.jcp.org/xml/ns/javaee"
         xmlns:xsi="http://www.w3.org/2001/XMLSchema-instance"
         xsi:schemaLocation="http://xmlns.jcp.org/xml/ns/javaee
         http://xmlns.jcp.org/xml/ns/javaee/web-app_3_1.xsd"
         version="3.1">

  	<!--Root Sprong Contanier 정의-->
	<context-param>
      <param-name>contextConfigLocation</param-name>
      <param-value>/WEB-INF/spring/root-context.xml</param-value>	<!--root-context.xml(spring 환경설정 파일)을 가장 먼저 참조한다-->
    </context-param>

    <!--Spring Container 생성-->
  	<listener>
      	<listener-class>org.springframework.web.context.ContextLoaderListener</listener-class>
    </listener>

  	<!--Processess application 요청(request)-->
    <servlet>
        <servlet-name>appServlet</servlet-name>
        <servlet-class>org.springframework.web.servlet.DispatcherServlet</servlet-class>
        <init-param>
            <param-name>contextConfigLocation</param-name>
            <param-value>/WEB-INF/spring/appServlet/servlet-context.xml</param-value>	<!--/WEB-INF/spring/appServlet/servlet-context.xml을 참조한다 → xml 파일 안에 정의된 객체들을 로딩-->
        </init-param>
    	<load-on-startup>1</load-on-startup>	<!--가장 첫번째 순위-->
    </servlet>

  	<!--DispatcherServlet 이 모든 요청을 가로챌 수 있도록 등록-->
    <servlet-mapping>
        <servlet-name>appServlet</servlet-name>
        <url-pattern>/</url-pattern>	<!--* .do 처럼 특정 url 로 변경하여 사용도 가능-->
    </servlet-mapping>

    <filter>
        <filter-name>encodingFilter</filter-name>
        <filter-class>org.springframework.web.filter.CharacterEncodingFilter</filter-class>
        <init-param>
             <param-name>encoding</param-name>
             <param-value>utf-8</param-value>
        </init-param>
    </filter>

    <filter-mapping>
        <filter-name>encodingFilter</filter-name>
        <url-pattern>/*</url-pattern>
    </filter-mapping>

</web-app>
크게 4부분으로 나눌 수 있다.
<context-param> : 모든 서블릿 및 필터가 공유하는 루트 스프링 컨테이너 정의
<listener> : 모든 서블릿 및 필터가 공유하는 스프링 컨테이너를 작성
<servlet> : DispatcherServlet 을 구현하기 위해 어떤 클래스를 이용해야 할지와 초기 파라미터 정보를 포함
<servlet-name>: 서블렛명을 지정하면 해당 이름을 가지고 다른 설정 파일에서 해당 서블릿 정보를 참조<servlet-class>: 어떤 클래스를 가지고 DispatcherServlet을 구현할 것인지를 명시<init-param>: 초기화 파라미터에 대한 정보. servlet에 대한 설정 정보가 여기에 들어간다. 만약 초기화 파라미터에 대한 정보를 기술하지 않을 경우 스프링이 자동적으로 스프링 컨테이너를 생성<load-on-startup>: 서블릿이 로딩될 때 로딩 순서를 결정하는 값. 톰캣이 구동되고 서블릿이 로딩되기 전 해당 서블릿에 요청이 들어오면 서블릿이 구동되기 전까지 기다려야 한다. 이 중 우선순위가 높은 서블릿부터 구동할 때 쓰이는 값이다.
<servlet-mapping> : servlet에서 지정한 패턴으로 클라이언트 요청이 들어오면 해당 url을 가진 servlet에게 이 요청을 토스하는 정보를 기술
3) Servlet Container
(1) 정의
-
구현되어 있는 Servlet 클래스의 규칙에 맞게, Servlet 객체를 생성/초기화/호출/종료하는 생명 주기(Life Cycle)를 관리
-
클라이언트의 요청을 받고 응답할 수 있도록, 웹 서버와 소켓으로 통신
-
Servlet Instance 를 생성/관리
-
ServletContainer 는 WebApplication 에 하나씩 붙고,
Tomcat도 자바 프로그램이기 때문에, JVM이 하나씩 붙는다.
→ 즉, 1 WAS : 1 JVM (one WAS per one JVM) 인 것
(2) Tomcat (Apache Tomcat)
① Apache 와 Tomcat 의 정의
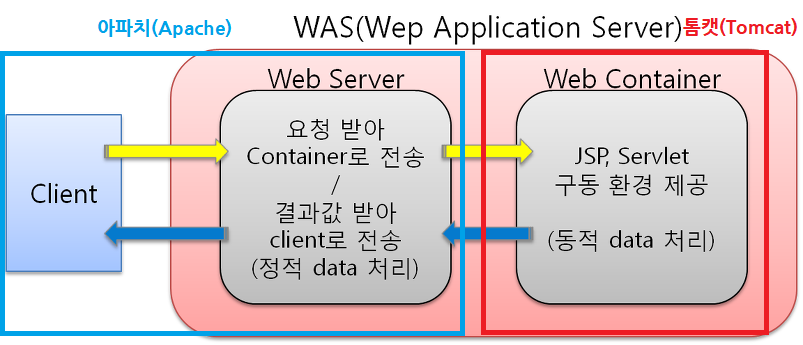
Apache
-
"WebServer" 이다.
→ 즉, Web Browser 로부터 HTTP 요청을 받아서 정적인 컨텐츠를 전달 + 간단한 홈페이지 등 정적으로 보여주는 목적인 경우 주로 사용 (80 포트)
(정적 파일 : html, javascript, css, image 물리적인 파일 등의 즉시 응답 가능한 컨텐츠) -
오픈소스 라이선스에 따라 배포되어, 마음대로 사용 가능
-
아파치 : 아파치 소프트웨어 단체
-
멀티 프로세스 방식
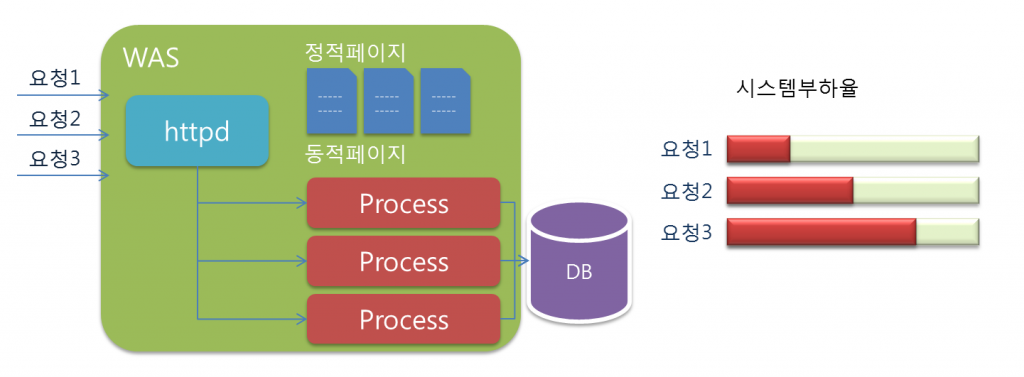
- 클라이언트의 요청을 받아 웹 애플리케이션을 직접 실행하는 구조
- 각각의 요청에 대해 프로세스를 생성하고 응답한 뒤 종료
- 각각의 요청이 多 들어올 경우, 프로세스를 계속 생성하므로 시스템 부하↑ + 안정적인 서비스X
(프로세스를 create하는 작업은 필요이상의 부담을 주게 된다)
-
멀티 프로세스 + 멀티 쓰레드 방식을 함께 사용 가능
-
항상 idle한 수의 프로세스 및 쓰레드를 생성해두므로, 요청이 들어왔을 때 새로운 프로세스나 쓰레드가 생성되는 것을 기다릴 필요 X
→ 평소에는 요청 하나가 쓰레드 하나에 대응을 하다가, 사용자의 접속이 증가하면 Apache MPM 방식에 따라 프로세스를 fork 하거나 쓰레드를 할당
Tomcat
-
"WebServer + Web Container(Servlet Container)" 이다. (8080 포트)
→ 대표적인 Servlet Container
→ 동적인 결과가 필요할 때 사용 (jsp 등...) -
웹 어플리케이션(WAS) 中 하나
-
"Servlet Engine" 이라고도 함
→ Tomcat Server 가 요청을 받으면, Tomcat Engine 이 요청에 맞는 Context 를 찾아서,
해당 Context 가 본인의 web.xml 을 바탕으로 전달받은 요청을 Servlet 에 전달하여 처리되도록 한다. -
Servlet 을 관리
= "클라이언트가 어떤 요청(Request)을 했을 때, 어떤 Servlet 을 실행할 것인지 제어해준다."
(2. web.xml 에서 언급한 "Servlet 생성, mapping(어떤 Servlet이 어떤 요청을 담당할 것인지), 제어 기능(어떤 요청이 인증과정을 거칠 것인지)을 지원")
(주의! Tomcat 이 Servlet을 관리해주는 주체이므로,아무 클래스가 아니라Servlet(HttpServlet 클래스를 상속한 클래스)이어야 한다.) -
멀티 쓰레드 방식
-
최초 요청 시 웹 애플리케이션을 실행 후 종료하지 않은 상태에서 같은 요청이 여러 번 오는 경우, 실행되고 있는 웹 애플리케이션의 스레드를 생성해 요청을 처리
→ 멀티 프로세스 방식보다, 시스템 부하 ↓ + 안정적인 서비스 O -
Acceptor Thread (쓰레드 풀을 관리) 1개 + 여러 개의 Thread (Acceptor Thread 를 관리) 를 동시에 띄워둔다.
-
클라이언트로부터 요청이 들어옴
→ 클라이언트의 요청을 받으면,웹 애플리케이션을 거치지 않고웹 컨테이너로 요청이 전달되고, 웹 컨테이너가 요청을 처리할 스레드를 생성 -
Acceptor Thread 가 available worker thread 와 connection 을 맺어준다.
-
worker thread 는 응답을 받아, Tomcat engine 에 요청을 보내서 처리하고,
request header 와 associated virtual host and contexts 에 따른 적합한 응답을 보내달라고 한다. -
client와의 socket 통신이 열리면, Tomcat 은 다시 worker thread 를 활성화한다.
-
-
-
필요에 따라, 하나의 Apache 는 여러 개의 Tomcat Instances 를 가질 수 있다. (Tomcat 하나 = Single Servlet)
-
Tomcat Instance : 각각 Instance 마다 Acceptor Thread 한 개가 있고, Dedicated Thread Pool 을 보유
(하나의 Instance = 여러 Thread 가 공유하는 ServletContainer) -
Tomcat 은 기본적으로 one thread per request 를 주장하므로, 하나의 HTTP Request 가 들어올 때 하나의 Thread 를 배정
Request가 종료되면 Thread Pool에 돌려주어 해당 Thread를 재사용할 수 있도록 한다.참고: 웹 서버 (Web Server)
참고: 운영체제 (OS) - 3) 멀티 스레드 (Multi Thread)
Apache MPM (Multiple Request Processing Module, 다중 처리 모듈)
- 정의
: Apache HTTP 서버에서 html 요청을 하는 브라우저가 서버에서 어떤 process 나 Thread 로 어떻게 처리할것인가에 대한 기술적인 방식
- Apache Httpd 컴파일 시, 별도 옵션을 주지 않을 경우 설정되는 기본 MPM (OS 종류에 따라)
(이들은 컴파일 시 결정되고, 변경을 하려면 재컴파일이 필요)
- 윈도우즈 : mpm_winnt
- 유닉스/리눅스 : prefork
- BeOS : beos
- Netware : mpm_netware
- OS/2 : mpmt_os2
- Apache MPM 中 가장 대표적인 Prefork, worker 비교
- Prefork (프로세스기반)
- 요청 : 프로세스 = 1 : 1
- 실행중인 프로세스를 복제하여 실행 (메모리 영역까지 같이 복제)
- 응답프로세스를 미디 띄우놓고, 클라이언트 요청에 응답하는 방식
- 장점 : 구조가 간단함, 구현이 쉬움
- 단점 : 대량의 메모리 필요, 상대적으로 느림 (일반적으로 single CPU 또는 Daul CPU에서 성능이 좋다고 함)
- worker (쓰레드기반)
- 요청 : 프로세스 : = n : 1
- 요청을 thread 단위로 처리 (최대 64개의 thread 처리 가능)
- 한개의 프로세스내의 여러개의 쓰레드가 클라이언트의 요청을 처리하는 방식
- 3개 이상의 멀티CPU 에서 성능이 좋다고 함
- 통신량에 많은 서버에 적합
- 장점 : 메모리 적게 사용, 설정에 따라 약간 빠를 수 있음
참고: [쉬운설명] Apache MPM - Multiple Request Processing Module
② Apache 와 Tomcat 의 분리
Apache 는 WebServer
Tomcat 은 WebServer + Web Container(Servlet Container)
이에 따르면,
Tomcat 만 사용하면 될텐데 Apache 와 Tomcat 이 따로 분리된 이유는?
Apache 의 장점 측면
Apache 를 분리해서 사용함으로써,
정적인 요청(단순 html, 이미지 등...)을 웹서버에서 바로 Response 할 수 있으므로 부하 ↓
→ 즉, '빠르고 + 안정적 + 효율적인 자원 활용' 이 가능
Tomcat 의 장점 측면
많은 트래픽이 발생할 경우(동적인 데이터를 처리하는 서버, DB 연결, 데이터 조작 등... 의 처리),
여러 WAS 로 로드벨런싱에 유리하다.
③ Apache 와 Tomcat 의 활용
잘못된 활용
많은 개발자들이 애플리케이션 서버로 Tomcat 을 사용하는 경우,
스태틱 파일(css, js, html, 이미지 등... 정적 파일)은 Tomcat 앞에 Apache 웹 서버(Httped)를 두어서 처리하게 하는 것이 좋다고 생각한다.
즉, 외부 요청은 일단 Apache Httpd 가 받고, Tomcat 내에서 처리할 자바 애플리케이션만 Tomcat 으로 다시 전달해서 처리한 후
그 외의 리소스는 Apache Httpd 가 직접 처리하게 만들어야 성능이 좋다는 것이다.
스태틱 파일 처리에서 자바로 만든 서버인 Tomcat 이 Apache Httpd 만 못하다는 것이 그 이유이다.
올바른 활용
(톰캣 5.5 부터 Httpd 의 native 모듈을 사용해서, 스태틱 파일을 처리하는 기능을 제공)
-
Apache 와 Tomcat 을 분리 (Tomcat 만 사용)
1) Httpd 와 Tomcat 이 같은 모듈을 사용한다고 간주할 수 있으므로, 성능적인 차이가 없다.
(실제 성능 테스트에서도 'Tomcat에서 아파치 Native 모듈을 사용' = '순수하게 아파치 Httpd 만 사용')따라서,
단지 스태틱 파일 처리의 성능만을 위해서라면, 굳이 Tomcat 앞에 Apache Httpd 를 두는 것은 불필요.
→ 오히려, 메모리 부담↑ + 관리 부담↑ + 불필요한 부하2) 보안 강화
SSL에 대한 암호화, 복호화 처리에 웹 서버를 사용 가능3) 하나의 서버에서 여러 웹 어플리케이션 서비스(PHP, JAVA 애플리케이션)을 함께 사용할 수 있다.
-
Apache 와 Tomcat 모두 사용
Httpd 의 다른 기능 or 모듈을 사용 할 필요가 있다면, 그때는 Httpd 를 앞에 두고 사용해도 좋다.예를 들어, 다음과 같은 경우에는 Httpd 를 앞에 두고 Tomcat을 연결해서 사용하면 될 것이다.
1) 하나의 서버에서 PHP 애플리케이션과 자바 애플리케이션을 함께 사용하는 경우
2) Httpd 서버를 간단한 로드밸런싱을 위해서 사용해야 하는 경우라면
(3) 동작 방식
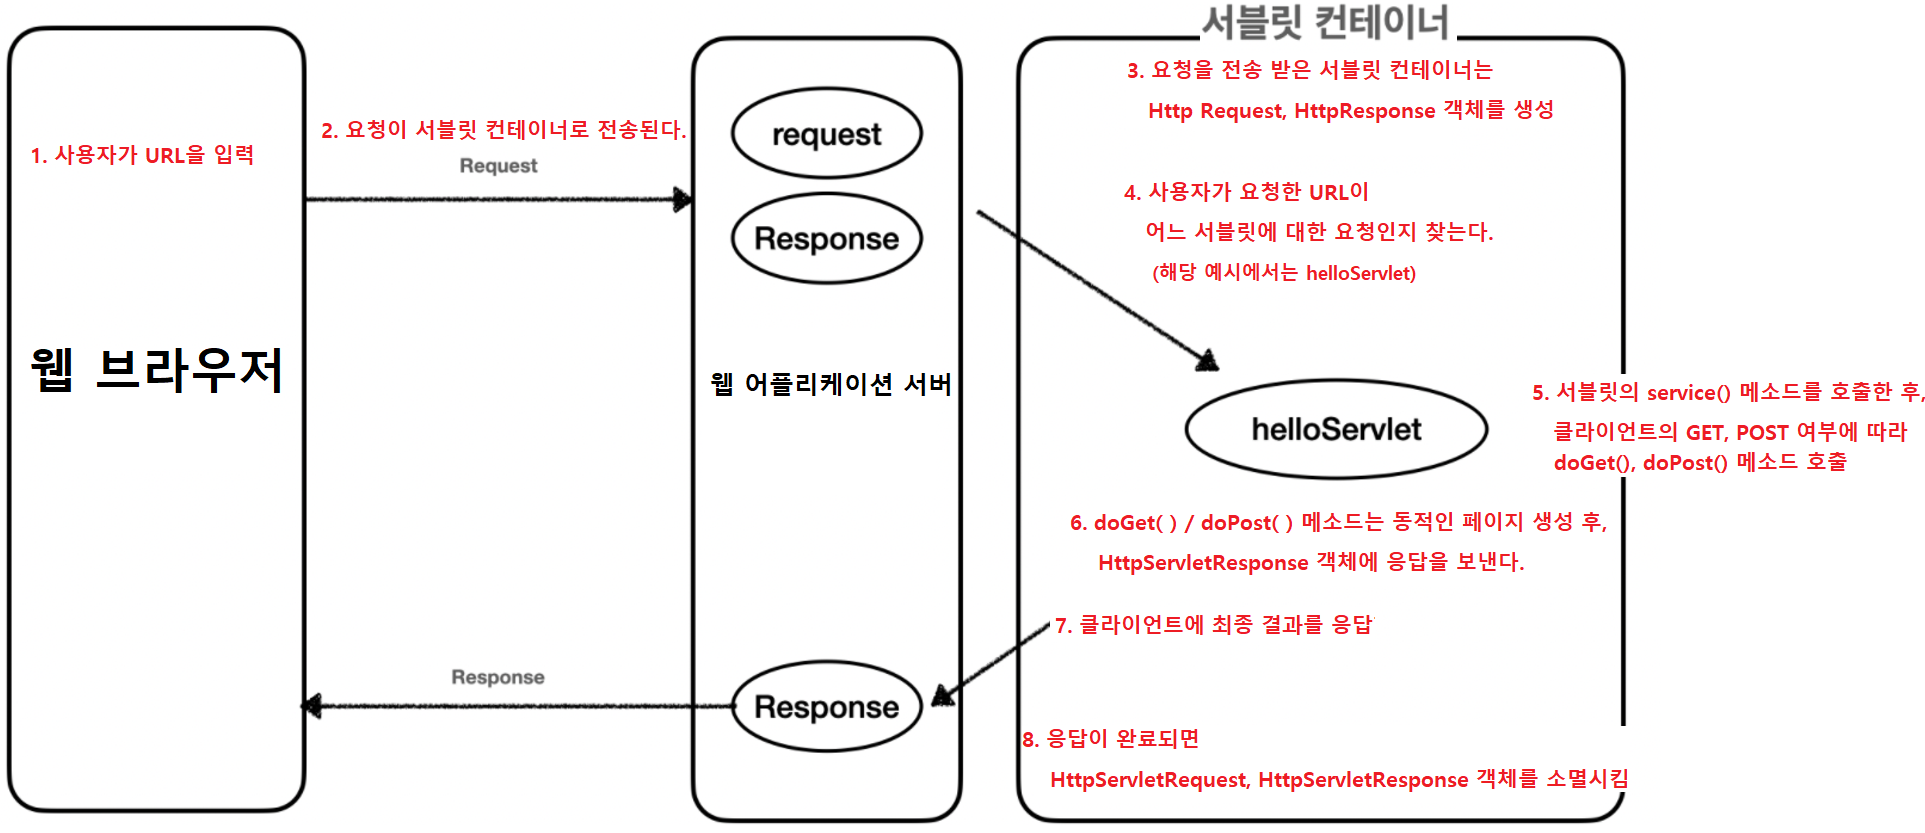
위의 4, 5번 순서를 도식화하면
(4) 장점
① 통신 지원
Servlet Container 사용 안 할 경우
해당 유저의 이름 값을 FORM 을 통해 입력받는다고 가정할 때, 아래의 작업들이 필요하게 된다.
FORM 인증을 하면 HTTP 메시지가 전송되는데,
그것을 읽어 들이기 위해 여러 가지 과정을 거쳐야 하고
응답하기 위해서도 또 번거로운 과정들을 거쳐야 한다.
Servlet Container 사용 할 경우
Servlet Container는 개발자가 비즈니스 로직에 집중할 수 있도록(서블릿과 웹 서버가 쉽게 통신할 수 있도록),
해당 과정을 모두 자동으로 해준다.
개발자는 단순히 HTTP 요청 메시지로 생성된 request를 읽어서 비즈니스 로직을 수행하고, response를 반환하기만 하면 된다.
② Servlet 의 생명 주기를 관리
서블릿 클래스를 로딩해 인스턴스화
서블릿의 초기화 메소드를 호출
요청이 들어오면 적절한 서블릿 메소드를 호출
서블릿의 사용이 끝난 시점에는 가비지 컬렉션을 진행해 제거
이 과정들을 Servlet Container 가 담당한다.
③ 멀티 스레딩 관리
요청이 올 때마다 새로운 자바 스레드를 하나 생성하여 다중 처리하고,
실행이 끝나면 자동 종료된다.
주의!
요청이 올 때마다 해당 서블릿의 스레드를 생성하는 것이지, 서블릿 인스턴스 자체를 새로 생성하는 것이 아니다.
멀티 스레딩
- 서블릿 인스턴스는 싱글톤으로 생성되며, Thread-Safe 하지 않기 때문에
Servlet 은 무상태 or 읽기 전용 상태, 동기화 처리된 구조로 설계되어야 한다.
- Servlet Container는 사용자 요청이 올 때마다 무한정 스레드를 생성하지는 않는다.
내부에 스레드 풀이 있으므로, 전체 스레드 수를 조절한다.
참고: 운영체제 (OS) - 3) 멀티 스레드 (Multi Thread)
④ 선언적 보안 관리
배포 서술자라는 xml 문서를 활용하여 보안 관련 설정을 관리하므로,
개발자가 보안 설정을 바꾸더라도 자바 코드에 영향 X
⑤ JSP 지원
JSP 코드를 Java 코드로 변환해준다.
4) Spring Container
(1) 정의
-
Bean들의 생명주기를 관리
-
어플리케이션을 구성하는 Bean들을 관리하기 위해 IoC 를 사용
-
Spring Framework 의 핵심부에 위치
Bean
- Spring Container 는 종속 객체 주입을 이용하여, Application 을 구성하는 Component들을 관리
→ 이때 Spring Container 에서 생성되는 객체가 "Bean"
→ Bean Container 는 의존성 주입을 통해 Bean 객체를 사용할 수 있도록 해준다.
- Spring 에서 Bean 은 보통 Singleton 으로 존재
참고: 디자인 패턴 - (2) 생성 패턴 - 5) 싱글톤 (Singleton)
- Application 의 핵심을 이루는 객체
- 대부분 Container 에 공급하는 XML 파일(설정 메타 데이터)에 의해 생성된다.
→ Container 는 이 메타 데이터를 통해, Bean 생성/Bean Life Cycle/Bean Dependency(종속성) 등... 을 알 수 있다.
ApplicationContext.getBean() 으로 얻어질 수 있는 객체는 Bean 이다.
→ 즉, Spring 에서의 Bean 은 ApplicationContext 가 알고있는 객체(ApplicationContext 가 만들어서 그 안에 담고있는 객체)를 의미
(2) 종류
이 두 개의 Container 로 의존성 주입된 Bean들을 제어/관리 가능하다.
BeanFactory
ApplicationContext : BeanFactory 를 상속함
(3) 동작 방식

(4) Spring Container 와 Servlet Container 의 차이
Spring Container
- Servlet을 관리 + Spring Bean 객체를 생성/관리해주는 컨테이너
- DispatcherServlet : Servlet이긴 하나, Servlet Container가 보내는 요청을 맨 앞단에서 처리하는 Front Controller 역할을 할 뿐
Spring Containe 안에 포함되어 있다.
Servlet Container
- Servlet을 관리해주는 컨테이너
(5) Servlet WebApplicationContext 와 Root WebApplicationContext
Spring Container 로는 Servlet WebApplicationContext 와 Root WebApplicationContext 가 있다.
→ 이 둘은 계층 구조를 갖는다.
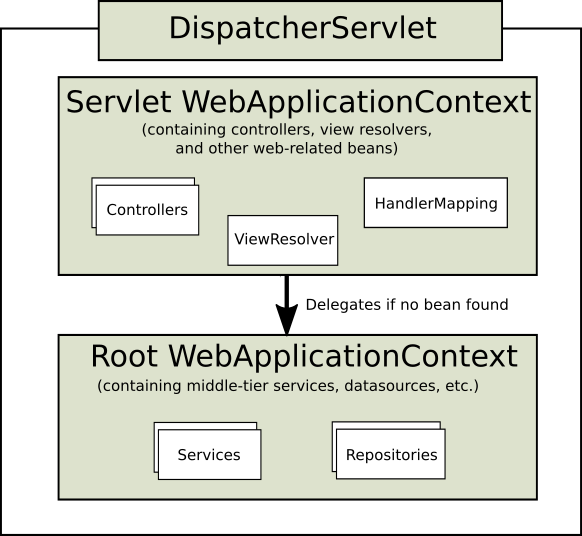
Servlet WebApplicationContext
- DispatcherServlet 은 Servlet WebApplicationContext 를 만든다.
- Servlet 만 가지고 있다.
Root WebApplicationContext
- 여러개의 DispatcherServlet 을 등록하면, 공유하는 Bean 을 관리하기 위해 따로 존재
- 모든 Servlet 이 공유한다.
- Servlet WebApplicationContext 의 부모는 Root WebApplicationContext
→ 그래서 Servlet WebApplicationContext 가 관리하지 않는 Bean 은 Root WebApplicationContext 로 위임하기도 한다.
5) DispatcherServlet
(1) 정의
-
dispatch = '급파하다', '신속히 보내다', '특파하다'
dispatcher = '항공기 운항 관리자(관제사)', '배차 담당자' -
Servlet Container(tomcat 같은)로부터 들어오는 요청을 관제하는 컨트롤러
-
Spring MVC 에서 요청을 받는 부분
-
DispatcherServlet 은 Servlet WebApplicationContext 를 만든다.
-
Spring 이 제공하는 Servlet 구현체
(2) 사용법
-
Java configuration
public class MyWebApplicationInitializer implements WebApplicationInitializer {

    @Override
    public void onStartup(ServletContext servletContext) {

        // Load Spring web application configuration
        AnnotationConfigWebApplicationContext context = new AnnotationConfigWebApplicationContext();
        context.register(AppConfig.class);

        // Create and register the DispatcherServlet
        DispatcherServlet servlet = new DispatcherServlet(context);
        ServletRegistration.Dynamic registration = servletContext.addServlet("app", servlet);
        registration.setLoadOnStartup(1);
        registration.addMapping("/app/*");
    }
}
java 설정은 직접 작성으로 이뤄진다.
Spring 에서는 @Configuration 을 이용해서, 해당 클래스의 인스턴스를 이용해서 설정 파일을 대신한다. -
web.xml
<web-app>

    <listener>
        <listener-class>org.springframework.web.context.ContextLoaderListener</listener-class>
    </listener>

    <context-param>
        <param-name>contextConfigLocation</param-name>
        <param-value>/WEB-INF/app-context.xml</param-value>
    </context-param>

    <servlet>
        <servlet-name>app</servlet-name>
        <servlet-class>org.springframework.web.servlet.DispatcherServlet</servlet-class>
        <init-param>
            <param-name>contextConfigLocation</param-name>
            <param-value></param-value>
        </init-param>
        <load-on-startup>1</load-on-startup>
    </servlet>

    <servlet-mapping>
        <servlet-name>app</servlet-name>
        <url-pattern>/app/*</url-pattern>
    </servlet-mapping>

</web-app>
DispatcherServlet 은 Spring security 동작 과정과 같이 자주 나오는 질문
6) Servlet Filter
(1) 정의
-
Servlet 실행 전/후(Servlet으로 들어오는 요청 or 나가는 응답 전/후), 어떤 작업을 하고자할 때 사용
-
Servlet Container 에 등록해서 사용
-
Filter는 chaining 되어 여러개의 Filter를 거칠 수 있다.
참고: Spring Security (1) -
javax.servlet.Filter 인터페이스의 구현체
(2) Interceptor 와 Servlet Filter
이 둘은 실행 시점(handler전/후)에 차이가 있다.
Interceptor : Spring Container 에 등록
Servlet Filter : Servlet Container 에 등록
(3) 사용법
Servlet Filter 를 등록하는 방법
- filter 클래스를 만들기
(여기서는 filter1과 filter2를 만들어서, 두 개의 filter 를 chaining 했음)
public class MyFilter1 implements Filter {
    @Override
    public void init(FilterConfig filterConfig) throws ServletException {
        System.out.println("Filter1 Init");
    }

    @Override
    public void doFilter(ServletRequest servletRequest, ServletResponse servletResponse, FilterChain filterChain) throws IOException, ServletException {
        System.out.println("Do Filter1");
        filterChain.doFilter(servletRequest,servletResponse);
    }

    @Override
    public void destroy() {
        System.out.println("Filter1 Destroy");
    }
}

public class MyFilter2 implements Filter {
    @Override
    public void init(FilterConfig filterConfig) throws ServletException {
        System.out.println("Filter2 Init");
    }

    @Override
    public void doFilter(ServletRequest servletRequest, ServletResponse servletResponse, FilterChain filterChain) throws IOException, ServletException {
        System.out.println("Do Filter2");
        filterChain.doFilter(servletRequest,servletResponse);
    }

    @Override
    public void destroy() {
        System.out.println("Filter2 Destroy");
    }
}- web.xml 에 filter 를 등록 + filter-mapping 하기
<filter>
    <filter-name>filter1</filter-name>
    <filter-class>me.doflamingo.MyFilter1</filter-class>
  </filter>
  <filter>
    <filter-name>filter2</filter-name>
    <filter-class>me.doflamingo.MyFilter2</filter-class>
  </filter>
  <filter-mapping>
    <filter-name>filter1</filter-name>
    <servlet-name>hello</servlet-name>
  </filter-mapping>
  <filter-mapping>
    <filter-name>filter2</filter-name>
    <servlet-name>hello</servlet-name>
</filter-mapping>-
확인해보기
1) Servlet Container 가 시작하면서 Servlet Listener 로 등록해놓은 Servlet Context 가 먼저 초기화되고, filter 가 초기화

2) mapping 해놓은 Servlet hello 로 요청이 들어오면, filter 가 chaining 되어 Servlet 으로 들어오기 전에 지나치게 된다.
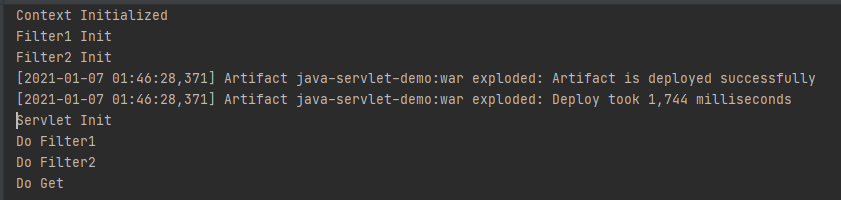
3) Servlet Container 가 내려가면, filter 가 제거된다.
7) Servlet Context
(1) 정의
-
Servlet 단위로 생성되는 Context
-
Servlet Container(tomcat 같은)에 DispatcherServlet 과 같은 servlet 을 등록하면,
해당 servlet 이 갖는 하나의 작은 Container 역할을 하는 객체 -
Spring 을 이용하는 경우, Spring Container(Application Context)를 부모 Context로 사용
-
Servlet Context 와 Application Context에 같은 id로 된 Bean이 있으면, Servlet Context에 있는 Bean을 우선 사용
→ Bean 을 찾는 순서가 Servlet 에서 ServletContext 를 확인한 후, 부모인 Application Context 를 확인하기 때문 -
Servlet 별로 Servlet Context 가 존재하는데,
여기에 attribute 를 저장해서 Servlet 에서 이용 가능
(2) servlet-context.xml
<?xml version="1.0" encoding="UTF-8"?>
<beans:beans xmlns="http://www.springframework.org/schema/mvc"
	xmlns:xsi="http://www.w3.org/2001/XMLSchema-instance"
	xmlns:beans="http://www.springframework.org/schema/beans"
	xmlns:context="http://www.springframework.org/schema/context"
	xsi:schemaLocation="http://www.springframework.org/schema/mvc https://www.springframework.org/schema/mvc/spring-mvc.xsd
		http://www.springframework.org/schema/beans https://www.springframework.org/schema/beans/spring-beans.xsd
		http://www.springframework.org/schema/context https://www.springframework.org/schema/context/spring-context.xsd">

	<!-- DispatcherServlet Context: defines this servlet's request-processing infrastructure -->

	<!-- Enables the Spring MVC @Controller programming model -->

	<annotation-driven />	<!--어노테이션을 사용할 수 있도록 설정. @Controller 어노테이션을 감지하여 해당 클래스를 Controller로 등록할 수 있도록 해주는 태그-->

	<!--<resources> : 정적인 html문서 같은 웹 리소스들의 정보를 기술하는 태그-->
	<!-- Handles HTTP GET requests for /resources/** by efficiently serving up static resources in the ${webappRoot}/resources directory -->
	<resources mapping="/resources/**" location="/resources/" />

	<!--Controller가 Model를 리턴하고 DispatcherServlet이 jsp 파일을 찾을 때 쓰이는 정보를 기술하는 태그. "home"이라는 문자열을 반환하면 /WEB-INF/views/ 경로에서 접미사가 .jsp인 해당 파일을 찾는다. /WEB-INF/views/home.jsp-->
	<beans:bean class="org.springframework.web.servlet.view.InternalResourceViewResolver">	<!---viewResolver (view 해석기)->
		<!--prefix(접두사)와 suffix(접미사) 덕분에, 우리가 일일이 전체경로와 .jsp 를 붙이지 않아도 된다.-->
		<beans:property name="prefix" value="/WEB-INF/views/" />	<!--prefix(접두어, 디렉토리) 설정 : 파일명만 작성 가능하게 세팅-->
		<beans:property name="suffix" value=".jsp" />	<!--suffix(접미어, 확장자) 설정 : 파일명만 작성 가능하게 세팅-->
	</beans:bean>

  	<!--<context:component-scan> : Java 파일의 @Component로 등록된 Bean 객체를 찾도록 해주는 태그 → Spring 에서 사용하는 bean 을 일일이 xml에 선언하지 않고도, 필요한 것을 어노테이션을 자동으로 인식하게 하는 역할 -->
	<context:component-scan base-package="com.company.devpad" />

</beans:beans>
(3) 동작 방식
① Application Context
-
"Root Context"
-
"Spring 에 의해 생성되는 Bean 에 대한 Spring IoC Container"
→ Servlet 에서 ServletContext 를 통해 IoC Container 를 꺼내서 사용 가능 -
여러 Servlet 에서 공통으로 사용할 Bean을 등록하는 Context
-
BeanFactory를 상속받는 Context
-
@Transactional 으로 트랜잭션 이용 시, Application Context 에 있는 Service 에서만 트랜잭션이 정상 작동
-
ContextLoaderListener 가 Application Context 를 만들고, Servlet Context 생명주기에 맞춰 등록/삭제
② WebApplicationInitializer
public interface WebApplicationInitializer{
       void onStartup(ServletContext servletContext) throws ServletException;
      //onStartup()메소드의 파라미터인 ServletContext는 Servlet Container를 가리킵니다.
}-
Servlet Context 를 프로그래밍적으로 설정하기 위한 인터페이스
(web.xml 을 대체하기 위함) -
Spring 에 ServletContainerInitializer 를 구현한 클래스(SpringServletContainerInitializer)가 있고,
그 클래스가 WebApplicationInitializer 인터페이스를 구현한 클래스를 찾아 초기화 작업을 위임하도록 구현돼있음
(설정 방식마다 차이가 있음)
8) Servlet Listener
(1) 정의
-
웹 어플리케이션에서 발생하는 주요 이벤트를 감지하고, 각 이벤트에 특별한 작업이 필요한 경우에 사용
-
Servlet Context 에 attribute 를 저장해서 Servlet에서 이용하는데,
이 관리를 Servlet Listener 가 맡는다. -
Application 이 시작되면, Servlet Listener는 사전에 지정된 역할을 수행하며 Servlet을 생성/제거
(2) 사용법
-
ServletLisntenr 클래스를 생성
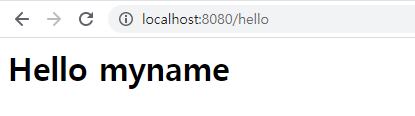
public class MyListener implements ServletContextListener { @Override public void contextInitialized(ServletContextEvent sce) { System.out.println("Context Initialized"); sce.getServletContext().setAttribute("name", "myname"); } @Override public void contextDestroyed(ServletContextEvent sce) { System.out.println("Context Destroyed"); } } -
web.xml 에 ServletLisntenr 클래스를 Listener 로 등록
<web-app> <display-name>Web Application</display-name> <listener> <listener-class>me.doflamingo.MyListener</listener-class> </listener> <servlet> <servlet-name>hello</servlet-name> <servlet-class>me.doflamingo.HelloServlet</servlet-class> </servlet> <servlet-mapping> <servlet-name>hello</servlet-name> <url-pattern>/hello</url-pattern> </servlet-mapping> </web-app> -
확인해보기
1) 위에서 저장해준 attribute 를 확인하기 위해, servlet 에서 attribute 를 가져다 쓰는 코드를 추가public class HelloServlet extends HttpServlet { @Override protected void doGet(HttpServletRequest req, HttpServletResponse resp) throws IOException { System.out.println("Do Get"); resp.getWriter().println("<html>"); resp.getWriter().println("<header>"); resp.getWriter().println("</header>"); resp.getWriter().println("<body>"); resp.getWriter().println("<h1>Hello "+getServletContext().getAttribute("name")+"</h1>"); // 추가 resp.getWriter().println("</body>"); resp.getWriter().println("</html>"); } @Override public void destroy() { System.out.println("Servlet Destroy"); } @Override public void init() { System.out.println("Servlet Init"); } }2)
(3) ContextLoaderListener
Spring Framework 에서 제공하는 ContextLoaderListener 를 Servlet Listener 로 등록하면,
Servlet 에서도 Spring 에서 만든 Bean 을 사용 가능
① 정의
-
Servlet Container(tomcat 같은)에 Root Web Application Context 를 생성(등록)
→ ContextLoaderListener 는 Application Context 를 만들어준다 -
Application Context 에 대한 실제 초기화 작업을 수행
Servlet 을 사용하는 시점에 서블릿 컨텍스트에 ApplicationContext 등록,
Servlet 이 종료되는 시점에 ApplicationContext 삭제 -
이 Listener만 등록하면, 자동으로 디폴트 루트 어플리케이션 컨텍스트를 생성해줌
디폴트 설정
XmlWebApplicationContext
XML 설정파일 위치 : /WEB-INF/applicationContext.xml -
Listener 를 등록하기 위해 ServletContextListener 인터페이스를 구현한 Listener를 사용하는데,
그 구현체가 ContextLoaderListener 이다.
(Listener : Servlet Container의 시작/종료 시에 발생하는 이벤트를 처리)
→ 즉, ServletContextListener 인터페이스를 구현한다. -
Servlet 의 생명주기를 관리
② 사용법
등록하는 방법은 Listener로 ContextLoaderListener를 등록해주고 context-param으로 Application Context로 사용할 클래스를 등록해주고, 사용한 config 클래스를 등록해준다.
-
Config 로 사용할 클래스 만들기
@ComponentScan // 어노테이션이 붙어있는 클래스가 있는 경로와 하위 패키지 밑에 @Component 가 달려있는 걸 Bean 으로 등록해준다. public class AppConfig { } -
등록할 Bean 을 하나 만들기 (여기서는 Service 하나를 만들었음)
@Service public class HelloService { public String getName() { return "My Service"; } } -
web.xml 에 contextLoaderListener 와 context-param 을 등록
1) context-param 으로 Application Context 로 사용할 클래스를 등록
→ Application Context 로 AnnotationConfigWebApplicationContext 클래스를 사용했다.<web-app> <display-name>Web Application</display-name> <context-param> <param-name>contextClass</param-name> <param-value>org.springframework.web.context.support.AnnotationConfigWebApplicationContext</param-value> </context-param> <context-param> <param-name>contextConfigLocation</param-name> <param-value>me.doflamingo.AppConfig</param-value> </context-param> <filter> <filter-name>filter1</filter-name> <filter-class>me.doflamingo.MyFilter1</filter-class> </filter> <filter> <filter-name>filter2</filter-name> <filter-class>me.doflamingo.MyFilter2</filter-class> </filter> <filter-mapping> <filter-name>filter1</filter-name> <servlet-name>hello</servlet-name> </filter-mapping> <filter-mapping> <filter-name>filter2</filter-name> <servlet-name>hello</servlet-name> </filter-mapping> <listener> <listener-class>org.springframework.web.context.ContextLoaderListener</listener-class> </listener> <servlet> <servlet-name>hello</servlet-name> <servlet-class>me.doflamingo.HelloServlet</servlet-class> </servlet> <servlet-mapping> <servlet-name>hello</servlet-name> <url-pattern>/hello</url-pattern> </servlet-mapping> </web-app> -
AnnotationConfigWebApplicationContext 클래스는
@Configuration 과 @Component 가 붙어있는 클래스를 IOC 컨테이너에 Bean으로 등록해준다. -
ApplicationContext 의 Configuration 을 할 클래스를 등록해준다.
-
확인해보기
1)
@Override
// Sevlet 의 doGet 메소드에서 빈이 잘 주입되었는지 확인 가능
protected void doGet(HttpServletRequest req, HttpServletResponse resp) throws IOException {
System.out.println("Do Get");
WebApplicationContext webApplicationContext = (WebApplicationContext) getServletContext().getAttribute(WebApplicationContext.ROOT_WEB_APPLICATION_CONTEXT_ATTRIBUTE);
HelloService helloService = webApplicationContext.getBean(HelloService.class);
resp.getWriter().println("<html>");
resp.getWriter().println("<header>");
resp.getWriter().println("</header>");
resp.getWriter().println("<body>");
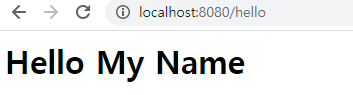
resp.getWriter().println("<h1>Hello "+helloService.getName()+"</h1>");
resp.getWriter().println("</body>");
resp.getWriter().println("</html>");
}Sevlet Context 에서 ROOT_WEB_APPLICATION_CONTEXT_ATTRIBUTE 라는 key값으로 IOC Container(Application Context)가 저장되어 있고,
IOC Container 에서 HelloService 빈을 불러서 사용하면 Hello My Name 이라는 결과를 확인할 수 있다.
즉, 빈이 잘 주입되었음을 알 수 있다.
2)
(4) RequestContextListener
-
현재 스레드에 요청(Request)을 노출하는 Servlet Listener
-
RequestContextListener 를 등록하면,
LocaleContextHolder, RequestContextHolder를 통해서 HttpServletRequest 에 접근할 수 있게 함
9) AnnotationConfigWepApplicationContext
-
Component 클래스를 입력값으로 받는 WebApplicationContext 인터페이스의 구현체
(Component 클래스 : @Configuration, @Component, @Inject annotation 을 사용하는 클래스를 포함) -
패키지 경로를 스캔하여, 컴포넌트를 Context 에 등록
-
AnnotationConfigWebApplicationContext 인스턴스
: Spring 에서 DispatcherServlet 이나 ContextLoaderListener 에 주입되는 경우에 多 사용
(web.xml 을 대체하여, WebApplicationInitializer 를 이용한 자바 코드 기반 설정 할 때) -
(XmlWebApplicationContext 와 달리) 디폴트로 ConfigurationLocation 을 지정 X
→ 따라서,
ContextLoader 에 대한 context-param= 'contextConfigLocation' 또는
Servlet 에 대한 init-param = 'contextConfigLocation' 을 반드시 설정해야 함
Spring Security
참고: [Spring] Servlet, Servlet Container, Spring MVC 정리
참고: Servlet에 대한 개념없이 스프링을 했네요? (급하게 알아보는 스프링 기반 기술 Servlet, Servlet Context, Application Context, ...)
참고: JSP 04. 배포서술자(Deployment Descriptor)와 web.xml 파일
참고: Servlet과 Spring MVC
참고: [Spring] Servlet 정리하고 넘어가자!
참고: [Spring] Servlet이란?
참고: Servlet과 Spring
참고: Servlet이란 + Spring MVC 연동
참고: [Servlet] 서블릿 컨테이너와 스프링 컨테이너
참고: 요청처리 내부구조
참고: 웹어플리케이션 동작원리
참고: [Spring] | Spring Web MVC 동작원리 정리
참고: [Web] 3. Servlet 생성하는 방법, HelloServlet, 누적합 계산 ①, ②
참고: 백엔드 자바 웹 프로그래밍
참고: Spring Framework (스프링프레임워크) 기본 동작 순서 및 구조
참고: Spring Framework 실행순서
[Spring] Spring Container의 구동 원리와 설정 파일에 대한 설명
참고: [스프링] Spring MVC 동작 방식과 구성요소
참고: Springboot with JPA - 데어 프로그래밍 유튜브 (10강_서블릿 객체의 생명주기를 알려줘요!)
참고: [Servlet] 서블릿 컨테이너와 스프링 컨테이너
참고: 아파치, 톰캣의 차이
참고: Apache와 Tomcat의 차이?
참고: Apache? Tomcat?? 둘이 무슨 차이지?
참고: [JSP & Servlet 배경지식] 3. Servlet – concept
참고: ServletContainer와 SpringContainer는 무엇이 다른가?
참고: Spring에서 사용자 요청 처리 흐름 + Tomcat과 DispatcherServlet 시점
참고: Spring - home.jsp 구동과정, web.xml, servelt-context.xml
참고: Spring MVC 동작원리 / 구성요소
참고: Spring MVC, 동작 원리
참고: Spring MVC 프로젝트의 기본 구조와 실행 순서