이노캠에서 요구하는 것은 JWT 토큰을 이용하는데, Spring Security 로 이를 인증/인가 하는 것이었다.
그러나, Spring Security 는 세션-쿠키 방식을 사용한다. (참고: 서버 인증 - Session / Cookie 방식)
이 포스트에서는 기본적으로 세션-쿠키 방식을 사용하는 Spring Security 에 대해 다룰 것이다.
1. 정의
-
Spring Security 란
Spring 기반의 애플리케이션의 보안(인증과 권한, 인가 등)을 담당하는 스프링 하위 프레임워크 -
보안과 관련된 체계적으로 많은 옵션을 제공해주기 때문에, 개발자 입장에서는 일일이 보안 관련 로직을 작성하지 않아도 된다.
2. 기본적인 원리
Spring Security 의 기본 절차는 다음과 같다.
이때, Principal 를 아이디로 Credential을 비밀번호로 사용하여 인증과 인가를 진행한다.
-
인증 (Authentication)
-
인증 성공 후
-
인가 (Authorization)
3. 동작 과정
아키텍쳐를 중심으로 동작 과정을 설명할 것이다.
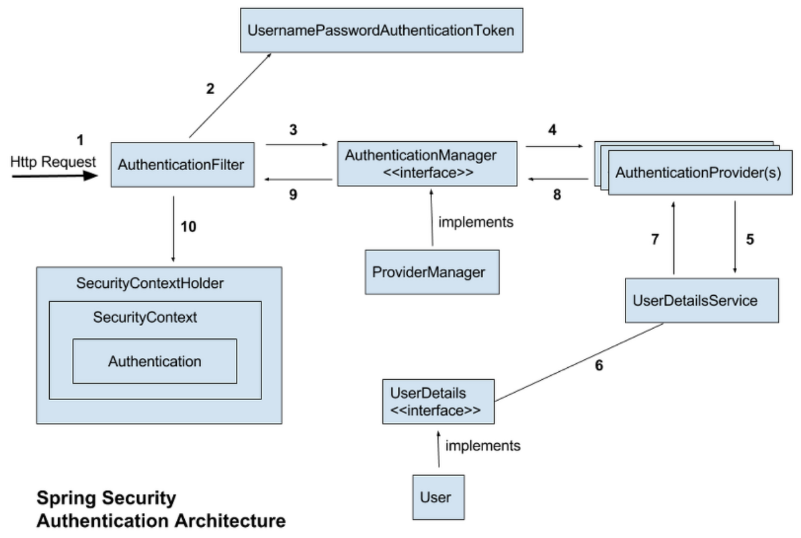
1 ~ 2
순서 1
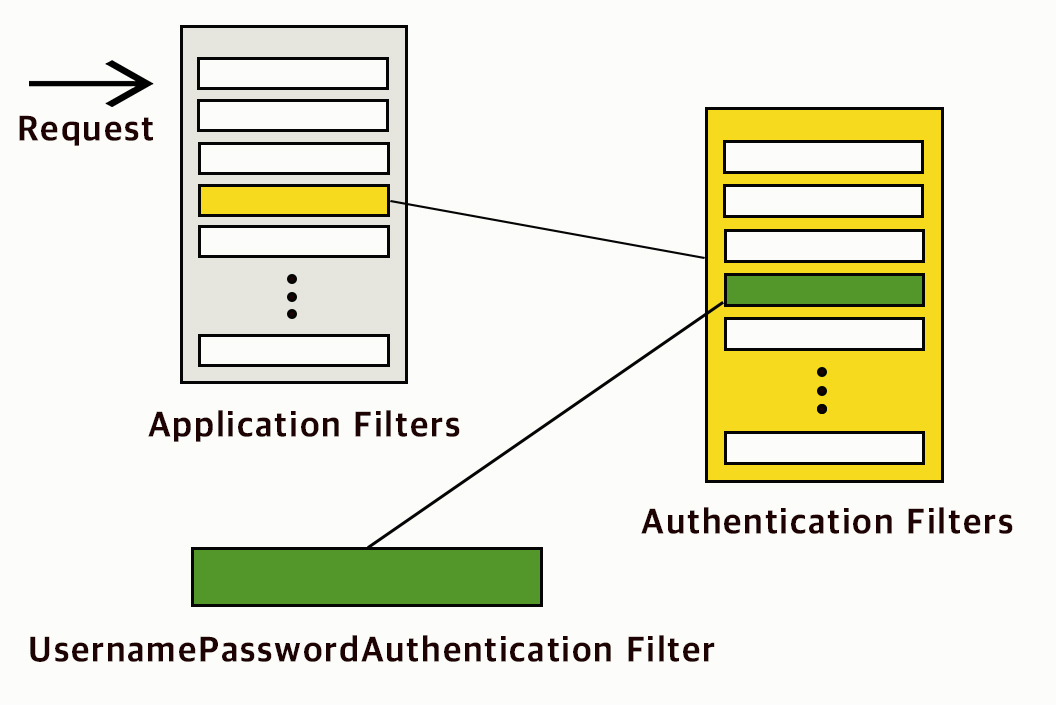
- Client(브라우저)로부터 Request 가 오면, 인증/인가 목적으로 일련의 필터를 거치게 된다.
순서 2
- 가장 먼저 Application Filters 라는 필터 뭉치에 도달 (기본적인 ID, PASSWORD 기반의 인증이라고 가정해보자)
순서 3
- Application Filters 라는 필터들 中 Authentication Filters 라는 필터 뭉치에 다시 도달
순서 4
- UsernamePasswordAuthenticationFilter 에 도착하게 된다.
- username, password 를 사용하여, form 기반 인증을 처리하는 필터다
- UsernamePasswordAuthenticationFilter 가 ID, PASSWORD 기반의 인증 요청을 가로채는 것이다.
순서 5
-
UsernamePasswoardAuthenticationFilter 클래스에서 attempAuthentication(request, response) 메서드가 동작
- 이 메서드는 request 로부터 username, password 를 가지고 와서,
사용자 자격 증명을 기반으로 한 UsernamePasswordAuthenticationToken(Authentication)을 생성
단,
id, password가 아닌OAuth2.0 나 JWT를 이용한 인증을 할 경우
해당 필터가 아닌 다른 필터를 거치게 된다.
(예시: OAuth2ClientAuthenticationProcessingFilter) - 이 메서드는 request 로부터 username, password 를 가지고 와서,
3 ~ 4
순서 1
public interface Authentication extends Principal, Serializable {
    // 현재 사용자의 권한 목록을 가져옴
    Collection<? extends GrantedAuthority> getAuthorities();

    // credentials(주로 비밀번호)을 가져옴
    Object getCredentials();

    Object getDetails();

    // Principal 객체를 가져옴.
    Object getPrincipal();

    // 인증 여부를 가져옴
    boolean isAuthenticated();

    // 인증 여부를 설정함
    void setAuthenticated(boolean isAuthenticated) throws IllegalArgumentException;
}-
Authentication 인터페이스
-
생성된 UsernamePasswordAuthenticationToken(Authentication 객체) 을 가지고,
AuthenticationManager (실질적으로는 구현체인 ProviderManager)에게 인증을 진행하도록 위임- 단, Spring Security 가 생성, 등록하고 관리하는 스프링 빈이기 때문에 직접 구현할 필요는 X
순서 2
public interface AuthenticationProvider {

	// 인증 전의 Authenticaion 객체를 받아서 인증된 Authentication 객체를 반환
	Authentication authenticate(Authentication authentication) throws AuthenticationException;

	boolean supports(Class<?> authentication);
}-
순서 1 에서 언급한 것 처럼, AuthenticationProvider 인터페이스에서는 authenticate() 메서드를 통해 인증 과정을 진행
-
boolean supports(Class< ? >) 메서드
- AuthenticationProvider 가 앞에서 필터를 통해 보내준 UsernamePasswordAuthenticationToken(Authentication 객체) 를 인증 처리 할 수 있는 클래스인지를 확인
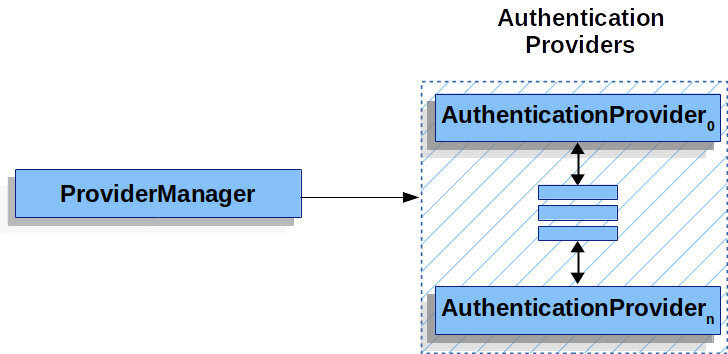
순서 3
ublic class ProviderManager implements AuthenticationManager, MessageSourceAware, InitializingBean {
    public List<AuthenticationProvider> getProviders() {
		return providers;
	}

    public Authentication authenticate(Authentication authentication) throws AuthenticationException {
		Class<? extends Authentication> toTest = authentication.getClass();
		AuthenticationException lastException = null;
		Authentication result = null;
		boolean debug = logger.isDebugEnabled();

        // for문으로 모든 provider를 순회하여 처리하고 result가 나올 때까지 반복한다. (위의 그림 부분)
		for (AuthenticationProvider provider : getProviders()) {
            ....
			try {
				result = provider.authenticate(authentication);		// for문을 통해, 모든 provider 를 조회하면서 authenticate 처리를 한다

				if (result != null) {
					copyDetails(authentication, result);
					break;
				}
			}
			catch (AccountStatusException e) {
				prepareException(e, authentication);
				throw e;
			}
            ....
		}

		throw lastException;
	}
}- ProviderManager
- AuthenticationManager 의 구현체
- AuthenticationManager를 implements 헀다
- 실제 인증 과정에 대한 로직을 가지고 있는 AuthenticaionProvider를 List로 가지고 있다
- Spring 에서 인증을 담당하는 클래스
- 단,
실제로 직접 인증 과정을 진행하는 게 아닌,
멤버 변수로 가지고 있는 AuthenticationProvider(s) 에게 인증을 위임하고
그 중에서 인증 처리가 가능한 AuthenticationProvider 객체가 인증 과정을 거쳐서 인증에 성공하면,
요청에 대해 ProviderManager가 '인증이 되었다고 알려주는' 방식- AuthenticationManager 인터페이스의 authenticate() 메서드의 리턴 값인
UsernamePasswordAuthenticationToken(Authentication 객체) 안에 인증 값을 넣어주는 것으로 인증이 되었다고 알려준다
- AuthenticationManager 인터페이스의 authenticate() 메서드의 리턴 값인
- 단,
- AuthenticationManager 의 구현체
순서 4
@RequiredArgsConstructor
public class CustomAuthenticationProvider implements AuthenticationProvider {

    private final CustomUserDetailsService customUserDetailsService;
    private final PasswordEncoder passwordEncoder;

    @Override
    public Authentication authenticate(Authentication authentication) throws AuthenticationException {		// authenticate 메서드
        String username = authentication.getName();
        String password = authentication.getCredentials().toString();

        UserDetails loadedUser = customUserDetailsService.loadUserByUsername(username);

        UsernamePasswordAuthenticationToken result = new UsernamePasswordAuthenticationToken(loadedUser, null, loadedUser.getAuthorities());
        result.setDetails(authentication.getDetails());
        return result;
    }

    @Override
    public boolean supports(Class<?> authentication) {		// supports 메서드
        return UsernamePasswordAuthenticationToken.class.isAssignableFrom(authentication);
    }
}- CustomAuthenticationProvider
- AuthenticationProvider 가 인터페이스이기 때문에, 이를 구현할 클래스가 필요하다.
- AuthenticationProvider 를 implements 하므로, authenticate(), supports() 메서드를 구현하게 된다.
- 이 클래스에서 실질적인 인증이 진행된다.
- AuthenticationProvider 가 인터페이스이기 때문에, 이를 구현할 클래스가 필요하다.
순서 5
@RequiredArgsConstructor
@Configuration
@EnableWebSecurity
public class SecurityConfig extends WebSecurityConfigurerAdapter {
    private final CustomAuthenticationProvider authProvider;

    @Override
    protected void configure(AuthenticationManagerBuilder auth) throws Exception {
        auth.authenticationProvider(authProvider);		// authenticationProvider 추가해주기
    }
}- SecurityConfig 클래스
- Security 설정을 위한 클래스
- 이 클래스에서 인증 로직이 구현된 CustomAuthenticationProvider 를 ProviderManager 가 알 수 있도록 ProviderManager 에 등록해 줄 수 있다.
- authenticationProvider 를 추가해주면 된다
순서 6
public class UsernamePasswordAuthenticationToken extends AbstractAuthenticationToken {

	private static final long serialVersionUID = SpringSecurityCoreVersion.SERIAL_VERSION_UID;
	private final Object principal;
	private Object credentials;

	// 인증 전의 객체를 생성하는 생성자
	public UsernamePasswordAuthenticationToken(Object principal, Object credentials) {
		super(null);
		this.principal = principal;
		this.credentials = credentials;
		setAuthenticated(false);
	}

	// 인증이 완료된 객체를 생성하는 생성자
	public UsernamePasswordAuthenticationToken(Object principal, Object credentials,
			Collection<? extends GrantedAuthority> authorities) {
		super(authorities);
		this.principal = principal;
		this.credentials = credentials;
		super.setAuthenticated(true);
	}
}- UsernamePasswordAuthenticationToken 클래스
- 인증 전/후 의 객체를 생성해준다.
(여기선 순서 4 로 넣었지만, 인증 전/후로 해당 클래스가 사용된다)
- 인증 전/후 의 객체를 생성해준다.
순서 7
public interface AuthenticationManager {
	Authentication authenticate(Authentication authentication) throws AuthenticationException;
}-
실질적으로는 AuthenticationManager 에 등록된 AuthenticationProvider 에 의해 인증 처리가 이루어진다.
-
인증 완료되면, 인증된 UsernamePasswordAuthenticationToken(Authentication 객체)를 돌려준다.
- 이는 AuthenticationManager 인터페이스에서 authenticate() 메서드로 구현한다.
- isAuthenticated(boolean) 값(인증이 완료된 값)을 true로 바꿔준다. (isAuthenticated=true 객체를 생성)
UsernamePasswordAuthenticationToken 이 AbstractAuthenticationToken 을 extends 하고,
AbstractAuthenticationToken 은 Authentication 을 implements 하는 구조로 설계되어 있다.따라서, UsernamePasswordAuthenticationToken 은 Authentication 인터페이스의 구현체다.
( UsernamePasswordAuthenticationToken < AbstractAuthenticationToken < Authentication )
5
public interface UserDetailsService {
    UserDetails loadUserByUsername(String var1) throws UsernameNotFoundException;
}- UserDetailsService 인터페이스
- UserDetails 객체를 반환하는 단 하나의 메소드를 가지고 있다
- 일반적으로 이를 구현한 클래스의 내부에 UserRepository를 주입받아 DB와 연결하여 처리
6
public interface UserDetails extends Serializable {

    Collection<? extends GrantedAuthority> getAuthorities();

    String getPassword();

    String getUsername();

    boolean isAccountNonExpired();

    boolean isAccountNonLocked();

    boolean isCredentialsNonExpired();

    boolean isEnabled();

}-
인증에 성공하여 생성된 UserDetails 객체
-
이 객체는 UsernamePasswordAuthenticationToken (Authentication객체를 구현한)을 생성하기 위해 사용된다.
-
정보를 반환하는 메소드를 가지고 있다
-
-
GrantedAuthority
- 현재 사용자(principal)가 가지고 있는 권한
- UserDetailsService 에 의해 불러올 수 있다
- 특정 자원에 대한 권한이 있는지를 검사하여 접근 허용 여부를 결정
10
Authentication authentication = SecutiryContextHolder.getContext().getAuthentication();-
다음과 같은 방법으로 SecurityContext 에 저장된 인증 객체를 전역적으로 사용할 수 있게 된다.
-
SecutiryContextHolder
- SecurityContext 객체를 저장하고 감싸고 있는 wrapper 클래스
- 최종적으로 인증 정보가 저장되는 곳 (세션 저장소)
- 세션 - 쿠키 방식으로 저장
- 응용 프로그램의 현재 보안 콘텍스트에 대한 세부 정보가 저장됨 (보안 주체의 세부 정보 등...)
-
SecutiryContext
-
isAuthenticated=true 객체가 저정된다
-
Authentication 을 보관하는 역할
- SecurityContext 를 통해 Authentication 객체를 꺼내올 수 있다
- 모든 접근 주체는 Authentication 을 생성하며, 이것은 최종적으로 SecurityContext 에 보관 및 사용된다
-
ThreadLocal 에 저장되어있으므로, 아무 곳에서나 참조가 가능하도록 설계되어 있다
-
4. CustomAuthenticationProvider 등록하기
@Configuration
@EnableWebSecurity
public class SecurityConfig extends WebSecurityConfigurerAdapter {

    @Bean
    public AuthenticationManager getAuthenticationManager() throws Exception {
        return super.authenticationManagerBean();
    }

    @Bean
    public CustomAuthenticationProvider customAuthenticationProvider() throws Exception {
        return new CustomAuthenticationProvider();
    }

    @Override
    protected void configure(AuthenticationManagerBuilder auth) throws Exception {
        auth.authenticationProvider(customAuthenticationProvider());
    }
}-
ProviderManager에 우리가 직접 구현한 CustomAuthenticationProvider 를 등록하는 방법은
WebSecurityConfigurerAdapter 를 상속해 만든 SecurityConfig에서 할 수 있다.- WebSecurityConfigurerAdapter의 상위 클래스에서는 AuthenticationManager를 가지고 있기 때문에
우리가 직접 만든 CustomAuthenticationProvider를 등록할 수 있다.
- WebSecurityConfigurerAdapter의 상위 클래스에서는 AuthenticationManager를 가지고 있기 때문에
5. 패스워드 암호화
@Override
protected void configure(AuthenticationManagerBuilder auth) throws Exception {
	// TODO Auto-generated method stub
	auth.userDetailsService(userDetailsService).passwordEncoder(passwordEncoder());
}

@Bean
public PasswordEncoder passwordEncoder(){
	return new BCryptPasswordEncoder();
}- AuthenticationManagerBuilder.userDetailsService().passwordEncoder() 를 통해,
패스워드 암호화에 사용될 PasswordEncoder 구현체를 지정할 수 있다.
참고: Spring Security 시큐리티 동작 원리 이해하기 - 1
참고: Spring Security 시큐리티 동작 원리 이해하기 - 2
참고: [SpringBoot] Spring Security란?
참고: [SpringBoot] Spring Security 처리 과정 및 구현 예제
참고: Spring security 동작 원리 (인증,인가)