멀티 스레드
Thread
자바 메모리 구조
- Thread를 구현해보기 앞서, 먼저 자바의 메모리 구조에 대한 이해가 필요하다.
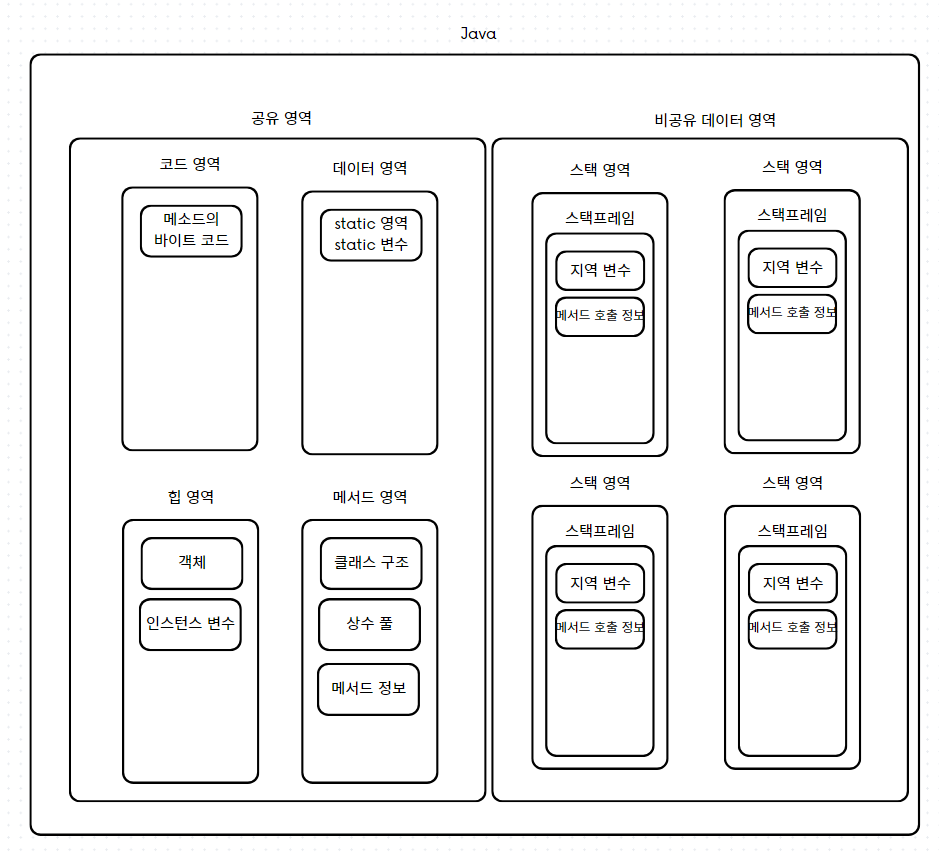
- Java 내부에는 크게 두가지 영역으로 나눌 수 있다. 공유와 비 공유 영역
- 해당 글은 메모리 구조에 대한 설명글은 아니므로, 해당 Thread에서만 할당 되는 지역 변수, 메서드 호출 정보, 중간 연산 결과 등이 비 공유 데이터 라고만 인식 하고 있으면 된다.
생성 방법
Thread 클래스 상속
다음과 같이 Thread class를 상속받아, run() 메서드를 Override 시켜준다.
public class MyThread extends Thread{
    @Override
    public void run() {
        System.out.println(Thread.currentThread().getName() + ": run()");
    }
}
사용할 곳에서 생성을 하고, start() 메서드를 통해, Thread를 시작한다.
public class MyThreadMain {
    public static void main(String[] args) throws InterruptedException {
        MyThread thread = new MyThread();
        thread.start();
    }
}
무조건 Start() 메서드로 Thread를 실행하고, run() 메서드로는 실행 하지 않도록 한다
- run() 메서드를 실행하면, Override 된
System.out.println코드를 main Thread에서 실행하고 끝
-
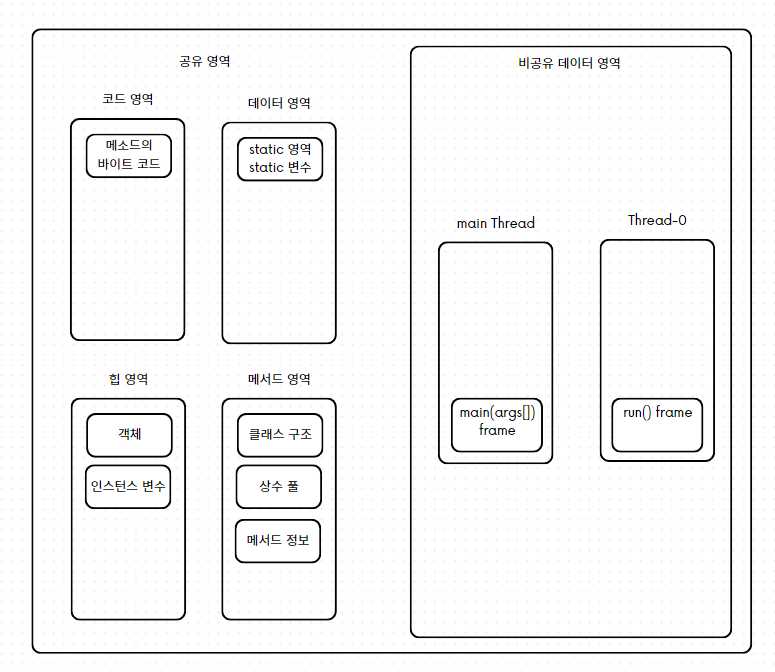
위의 코드를 실행하면 다음과 같은 스택 영역이 생성된다.
-
해당 코드의 핵심 포인트는,
main thread가run()메서드를 실행 한 것이 아니라,Thread-0스레드가run()메서드를 실행 한 것이다. -
main thread는 단지,start()메서드를 통해서Thread-0스레드에게 실행 지시를 내린 것 뿐이다. -
해당
main Thread와Thread-0는 이제부터 병렬적으로 일을 처리한다. 즉 머리가 두개로 나눠진 것이다.
Runnable 인터페이스 구현
Thread 상속과 다르게 Runnable 인터페이스는 Implements 해서 구현한다.
public class MyRunnable implements Runnable{

    @Override
    public void run() {
        System.out.println(Thread.currentThread().getName() + ": run()");
    }
}
Runnable을 구현한 class를 Thread에 생성자 주입하여 사용한다
public class MyRunnableMain {

    public static void main(String[] args) {
        MyRunnable runnable = new MyRunnable();
        Thread thread = new Thread(runnable);
        thread.start();
    }

}
Runnable은@FunctionalInterface작성되어있어,익명함수or 람다 식으로 활용 가능하다.
public class MyRunnableMain {

    public static void main(String[] args) {
        Thread thread = new Thread(new Runnable() {
            @Override
            public void run() {
                log("run() start");
            }
        });
        thread.start();
    }
}
public class MyRunnableMain {
public static void main(String[] args) {
Thread thread = new Thread(() -> {
log("run() start");
log("test");
});
thread.start();
}
}Thread 상속 vs Runnable 구현
Thread 상속
- 장점
- 간단한 구현
- 단점
- 상속 제한
- 자바는 단일 상속만을 허용 하므로, Thread 외에 다른 class를 상속하여 사용할 수 없다.
- 유연성 부족
- 상속 제한
Runnable 구현
- 장점
- 상속의 자유로움
- 코드의 분리
- 스레드와 실행 코드가 분리되어있어 코드의 가독성 부분을 챙길 수 있다.
- 단점
- 코드의 복잡성 증가

현재 블로그 이전 중입니다. https://blog.baekgwa.site/