📌 커넥션 획득 방식 변경
🚨 문제
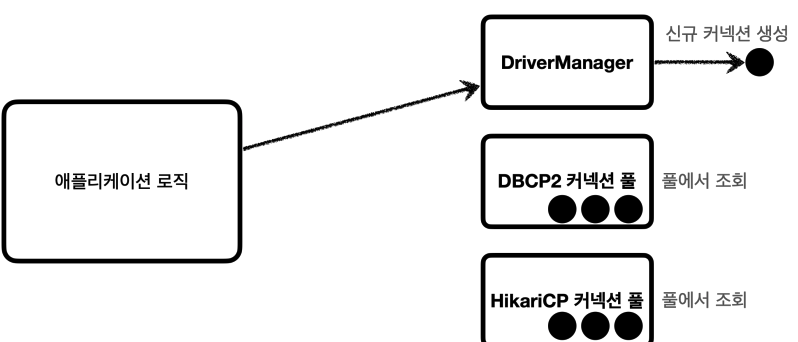
DB 커넥션을 획득하는 방법은 DriverManager HikariCP DBCP2 등 다양한 방법이 존재하는데, 이 때 다른 방식으로 변경하면 애플리케이션 코드를 변경해야 하는 문제가 있다.
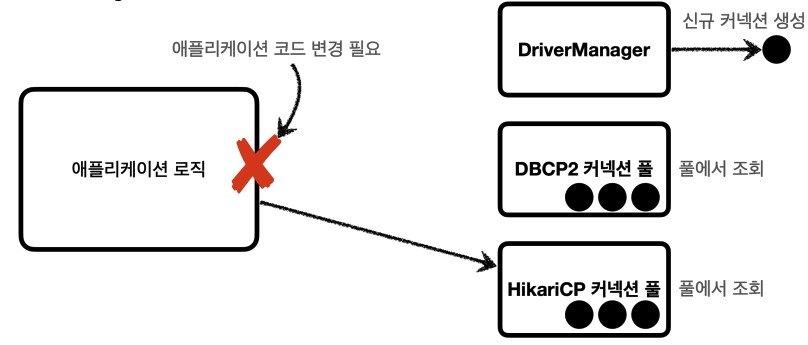
애플리케이션 로직에서 DriverManager 를 통해 커넥션을 획득하다가 HikariCP 같은 커넥션 풀을 사용하도록 변경하면 해당하는 애플리케이션 코드 변경이 필요
👍 해결 방법
이러한 문제를 해결하기 위해 커넥션을 획득하는 방식을 추상화하였고, 그것이 바로 DataSource 이다.
DataSource
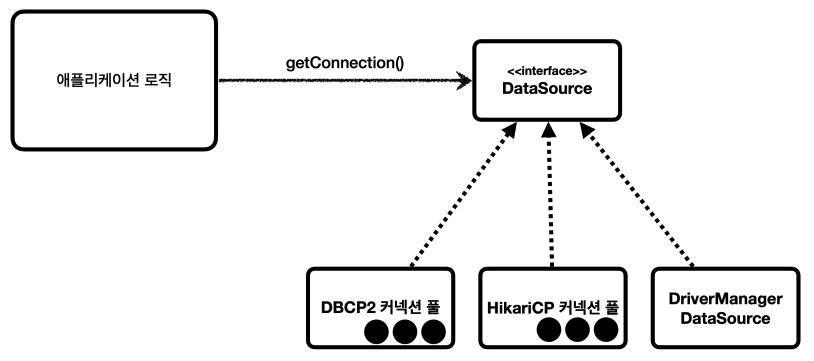
Java에서는 이런한 문제를 해결하기 위해 커넥션 획득 방법을 추상화 하는 DataSource 인터페이스를 제공한다.(핵심 기능은 커넥션 조회)
// DataSource의 핵심 기능
public interface DataSource {
	Connection getConnection() throws SQLException;
}
✅ 정리
- 대부분의 커넥션 풀은
DataSource인터페이스를 구현해두어, 커넥션 풀 구현 기술을 변경하고 싶으면 해당 구현체로 변경하면 됨(DataSource인터페이스만 의존하도록 애플리케이션 코드 작성) DriverManager는DataSource인터페이스를 사용하지 않기 때문에DriverManager->DataSource 기반 커넥션 풀로 변경하면 코드를 변경해야 하는 문제를 해결하고자 스프링은DriverManagerDataSource라는DataSource를 구현한 클래스를 제공
📌 DataSource - DriverManager
기존 DriverManager 를 통한 커넥션 획득 방법이다.
@Test
void driverManager() throws SQLException {
    Connection con1 = DriverManager.getConnection(URL, USERNAME, PASSWORD);
    Connection con2 = DriverManager.getConnection(URL, USERNAME, PASSWORD);
    log.info("connection={}, class={}", con1, con1.getClass());
    log.info("connection={}, class={}", con2, con2.getClass());
}

// 실행 결과
connection=conn0: url=jdbc:h2:tcp://localhost/~/test user=SA, class=class org.h2.jdbc.JdbcConnection
connection=conn1: url=jdbc:h2:tcp://localhost/~/test user=SA, class=class org.h2.jdbc.JdbcConnection
이번에는 DataSource 가 적용된 DriverManager 인 DriverManagerDataSource 를 통한 획득 방법이다.
@Test
void dataSourceDriverManager() throws SQLException {
    // DriverManagerDataSource - 항상 새로운 커넥션 획득
    DriverManagerDataSource dataSource = new DriverManagerDataSource(URL, USERNAME, PASSWORD);
    useDataSource(dataSource);
}

private void useDataSource(DataSource dataSource) throws SQLException {
    Connection con1 = dataSource.getConnection();
    Connection con2 = dataSource.getConnection();
    log.info("connection={}, class={}", con1, con1.getClass());
    log.info("connection={}, class={}", con2, con2.getClass());
}

// 실행 결과
Creating new JDBC DriverManager Connection to [jdbc:h2:tcp://localhost/~/test]
Creating new JDBC DriverManager Connection to [jdbc:h2:tcp://localhost/~/test]
connection=conn0: url=jdbc:h2:tcp://localhost/~/test user=SA, class=class org.h2.jdbc.JdbcConnection
connection=conn1: url=jdbc:h2:tcp://localhost/~/test user=SA, class=class org.h2.jdbc.JdbcConnection
✅ 설정과 사용 분리
DriverManager 는 커넥션을 획득할 때 마다 URL USERNAME PASSWORD 같은 속성을 계속 전달하는 반면에 DataSoure 방식은 처음 객첵를 생성할 때만 속성을 전달하고 이후 커넥션을 획득할 때는 dataSource.getConnection() 만 호출하면 된다. 이를 통해 설정하는 시점과 사용하는 시점을 분리하였다.
✅ 정리
- 관련 속성을
DataSource가 만들어지는 시점에 미리 설정하면 사용하는 곳에서는getConnection()만 호출하면 되므로, 속성들에 의존하지 않아도 됨 - repository에서는
DataSource만 의존하고 관련 속성을 몰라도 됨 - 객체를 설정하는 부분과 사용하는 부분을 명확하게 분리
📌 DataSource - HikariCP
다음 코드는 DataSource 에서 HikariDP 커넥션 풀을 사용하는 코드이다.
@Test
void dataSourceConnectionPool() throws SQLException, InterruptedException {
    HikariDataSource dataSource = new HikariDataSource();
    dataSource.setJdbcUrl(URL);
    dataSource.setUsername(USERNAME);
    dataSource.setPassword(PASSWORD);
    dataSource.setMaximumPoolSize(10);
    dataSource.setPoolName("MyPool");

    useDataSource(dataSource);
    Thread.sleep(1000); // 커넥션 풀에서 커넥션 생성되는 시간 대기

    // 커넥션 풀 초기화
    MyPool - configuration:
    connectionTimeout...............30000
    maximumPoolSize.................10
    password........................<masked>
    poolName........................"MyPool"
    username........................"sa"
    MyPool - Starting...

    // 커넥션 풀 전용 스레드가 커넥션 풀에 커넥션 10개를 채움
    MyPool - Added connection conn1: url=jdbc:h2:tcp://localhost/~/test user=SA
    MyPool - Connection not added, stats (total=2, active=2, idle=0, waiting=0)
    MyPool - Pool stats (total=2, active=2, idle=0, waiting=0)
    MyPool - Added connection conn2: url=jdbc:h2:tcp://localhost/~/test user=SA
    MyPool - After adding stats (total=3, active=2, idle=1, waiting=0)
    .
    .
    MyPool - After adding stats (total=8, active=2, idle=6, waiting=0)
    MyPool - Added connection conn8: url=jdbc:h2:tcp://localhost/~/test user=SA
    MyPool - After adding stats (total=9, active=2, idle=7, waiting=0)
    MyPool - Added connection conn9: url=jdbc:h2:tcp://localhost/~/test user=SA
    MyPool - After adding stats (total=10, active=2, idle=8, waiting=0)
    MyPool - Connection not added, stats (total=10, active=2, idle=8, waiting=0)
    MyPool - Connection not added, stats (total=10, active=2, idle=8, waiting=0)
}HikariDataSource는DataSource인터페이스를 구현- 커넥션 풀 최대 사이즈를 10, 풀 이름은
MyPool로 지정 - 커넥션 풀에서 커넥션을 생성하는 작업은 애플리케이션 실행 속도에 영향을 주지 않기 위해 별도의 스레드에서 동작하여 테스트가 먼저 종료되기 때문에
Thread.sleep을 사용해 대기 시간을 주어 커넥션 생성 로그 확인
⚠️ 만약 최대 커넥션을 초과하는 요청이 발생하면?
11개의 커넥션을 요청하는 코드이다.
private void useDataSource(DataSource dataSource) throws SQLException {
    Connection con1 = dataSource.getConnection();
    Connection con2 = dataSource.getConnection();
    Connection con3 = dataSource.getConnection();
    Connection con4 = dataSource.getConnection();
    Connection con5 = dataSource.getConnection();
    Connection con6 = dataSource.getConnection();
    Connection con7 = dataSource.getConnection();
    Connection con8 = dataSource.getConnection();
    Connection con9 = dataSource.getConnection();
    Connection con10 = dataSource.getConnection();
    Connection con11 = dataSource.getConnection();
    log.info("connection={}, class={}", con1, con1.getClass());
    log.info("connection={}, class={}", con2, con2.getClass());

    // 실행 결과
    MyPool - Pool stats (total=10, active=10, idle=0, waiting=1)
    MyPool - Fill pool skipped, pool has sufficient level or currently being filled.
    MyPool - Timeout failure stats (total=10, active=10, idle=0, waiting=0)
}
위에서 dataSource.setMaximumPoolSize(10) 을 통해 최개 커넥션 개수를 10개로 제한하였다. 그래서 11번째 커넥션을 요청하는 코드는 waiting 상태로 커넥션을 대기하게 되고, 위 코드에서는 커넥션 풀에 커넥션을 반납하지 않으므로 connectionTimeout: 30000(설정을 하지 않으면 기본값) 30초 이후에 오류거 발생한다.
java.sql.SQLTransientConnectionException:
MyPool - Connection is not available, request timed out after 30008ms (total=10, active=10, idle=0, waiting=0)
👍 사용자 경험을 위한 설정
사용자가 30초 동안 기다리는 것은 있을 수 없는 일이다. connectionTimeout 시간을 길게 가져가면 애플리케이션 전체 기능이 기다리는데 큰 리소스를 소모할 것이다. 사용자 경험을 위해서 connectionTimeout 을 짧게 가져가는 것이 좋은 선택지 같다.
