📌JDBC 연결
public abstract class ConnectionConst {
    public static final String URL = "jdbc:h2:tcp://localhost/~/jdbc";
    public static final String USERNAME = "sa";
    public static final String PASSWORD = "";
}
먼저 데이터베이스 접속에 필요한 정보를 편하게 사용하기 위해 상수로 만들어준다. 이후 JDBC를 사용하여 데이터베이스에 연결하는 코드를 작성한다.
@Slf4j
public class DBConnectionUtil {
    public static Connection getConnection() {
        try{
            Connection connection = DriverManager.getConnection(URL, USERNAME, PASSWORD);
            log.info("get connection={}, class={}", connection, connection.getClass());
            return connection;
        }catch (SQLException e) {
            throw new IllegalStateException(e);
        }
    }
}
JDBC가 제공하는 DriverManager.getConnection(...) 을 사용하면 된다. 이렇게 하면 라이브러리에 있는 데이터베이스 드라이버를 찾아서 해당 드라이버가 제공하는 커넥션을 반환해준다.
테스트 코드를 작성하여 기능이 동작하는지 실행해본다.
@Slf4j
class DBConnectionUtilTest {

    @Test
    void connection() {
        Connection connection = DBConnectionUtil.getConnection();
        assertThat(connection).isNotNull();

        //실행결과
        get connection=conn0: url=jdbc:h2:tcp://localhost/~/jdbc user=SA, class=class org.h2.jdbc.JdbcConnection
    }
}
class=class org.h2.jdbc.JdbcConnection 이 H2 데이터베이스 드라이버가 제공하는 H2 전용 커넥션이다. 해당 커넥션은 JDBC 표준 커넥션 인터페이스인 java.sql.Connection 인터페이스를 구현하고 있다.(JDBC는 인터페이스이기 때문에 구현을 해줘야 하는데 그 구현체가 각 데이터베이스의 드라이버이다)
📌DriverManager 연결 이해
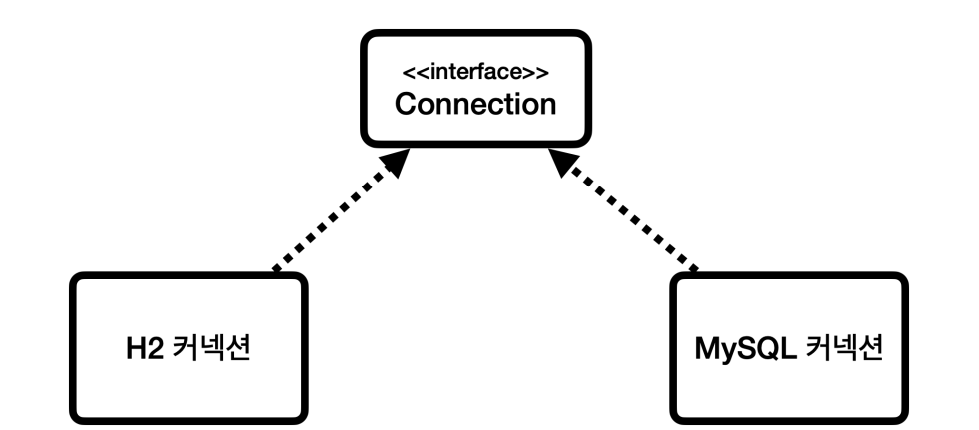
- JDBC는
java.sql.Connection표준 커넥션 인터페이스를 정의한다.- H2 데이터베이스 드라이버는 JDBC Connection 인터페이스를 구현한
org.h2.jdbc.JdbcConnection구현체를 제공한다.
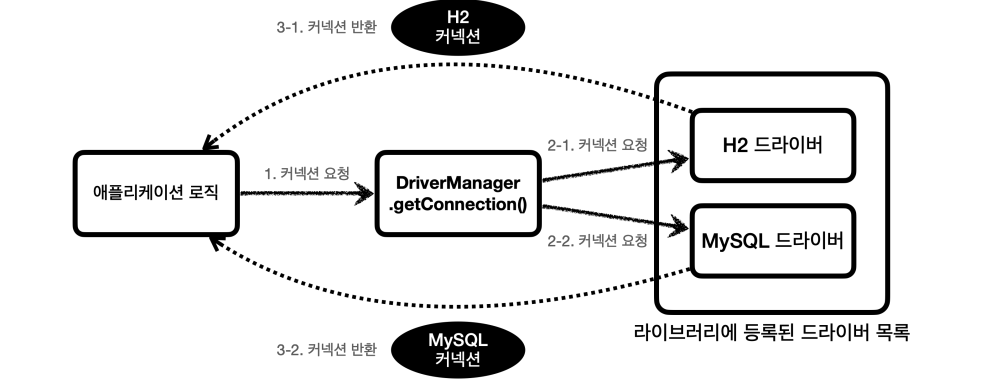
DriverManager가 커넥션을 요청하는 흐름이다. DriverManager는 라이브러리에 등록된 데이터베이스 드라이버들을 관리하고 커넥션을 획득하는 기능을 제공해준다. 순서는 다음과 같다.
- 커넥션이 필요하면
DriverManager.getConnection()을 호출한다.- DriverManager에 등록된 드라이버들에게 순서대로 정보를 넘겨서 커넥션을 획득할 수 있는지 확인한다. ex) DB URL, 이름, 비밀번호
- 드라이버는 URL 정보를 확인하여 본인이 처리할 수 있는 요청인지 확인하고 처리가능하면 데이터베이스에 연결하여 커넥션을 획득하고 해당 커넥션을 반환한다. 등록된 드라이버가 여러개라 맞지 않는 드라이버에게 요청이 가면 처리 불가능하다는 결과를 반환하고 다음 드라이버에게 순서가 넘어간다.
📌DriverManager가 DB에 맞는 커넥션을 얻는 과정
위 실습을 따라하는 과정에서 의문점이 하나 생겼다. DriverManager는 어떤 과정으로 사용자가 연결하려는 데이터베이스에 맞는 커넥션을 얻어오는지 궁금해졌다. 그래서 해당 메서드를 하나씩 파고 들어가봤다.
아래의 코드들은 DriverManager 클래스의 코드이다.
    @CallerSensitive
    public static Connection getConnection(String url,
        String user, String password) throws SQLException {
        java.util.Properties info = new java.util.Properties();

        if (user != null) {
            info.put("user", user);
        }
        if (password != null) {
            info.put("password", password);
        }

        return (getConnection(url, info, Reflection.getCallerClass()));
    }
Connection connection = DriverManager.getConnection(URL, USERNAME, PASSWORD)을 통해서 호출하는 메서드이다. info에 사용자 정보를 담아준다. 이후 getConnection(url, info, Reflection.getCallerClass())로 이동해보자.
@CallerSensitiveAdapter
    private static Connection getConnection(
        String url, java.util.Properties info, Class<?> caller) throws SQLException {
        /*
         * When callerCl is null, we should check the application's
         * (which is invoking this class indirectly)
         * classloader, so that the JDBC driver class outside rt.jar
         * can be loaded from here.
         */
        ClassLoader callerCL = caller != null ? caller.getClassLoader() : null;
        if (callerCL == null || callerCL == ClassLoader.getPlatformClassLoader()) {
            callerCL = Thread.currentThread().getContextClassLoader();
        }

        if (url == null) {
            throw new SQLException("The url cannot be null", "08001");
        }

        println("DriverManager.getConnection(\"" + url + "\")");

        ensureDriversInitialized();

        // Walk through the loaded registeredDrivers attempting to make a connection.
        // Remember the first exception that gets raised so we can reraise it.
        SQLException reason = null;

        for (DriverInfo aDriver : registeredDrivers) {
            // If the caller does not have permission to load the driver then
            // skip it.
            if (isDriverAllowed(aDriver.driver, callerCL)) {
                try {
                    println("    trying " + aDriver.driver.getClass().getName());
                    Connection con = aDriver.driver.connect(url, info);
                    if (con != null) {
                        // Success!
                        println("getConnection returning " + aDriver.driver.getClass().getName());
                        return (con);
                    }
                } catch (SQLException ex) {
                    if (reason == null) {
                        reason = ex;
                    }
                }

            } else {
                println("    skipping: " + aDriver.driver.getClass().getName());
            }

        }

        // if we got here nobody could connect.
        if (reason != null)    {
            println("getConnection failed: " + reason);
            throw reason;
        }

        println("getConnection: no suitable driver found for "+ url);
        throw new SQLException("No suitable driver found for "+ url, "08001");
    }
해당 코드부터 GPT를 사용하여 해석해보았다.
ClassLoader callerCL = caller != null ? caller.getClassLoader() : null;

if (callerCL == null || callerCL == ClassLoader.getPlatformClassLoader()) {
    callerCL = Thread.currentThread().getContextClassLoader();
}
JDBC 드라이버가 특정 클래스 로더로 로드되어야 하는 경우를 지원하기 위해 호출자 클래스 로더를 가져오고 caller가 null이거나 플랫폼 클래스 로더라면, 현재 스레드의 컨텍스트 클래스 로더를 사용한다.
if (url == null) {
    throw new SQLException("The url cannot be null", "08001");
}
URL이 null이면 예외를 던져 메서드를 중단한다. ensureDriversInitialized()을 통해 드라이버 초기화 작업을 수행하여 등록된 드라이버가 준비되었는지 확인한다.
SQLException reason = null;

for (DriverInfo aDriver : registeredDrivers) {
    if (isDriverAllowed(aDriver.driver, callerCL)) {
        try {
            Connection con = aDriver.driver.connect(url, info);
            if (con != null) {
                return con; // 연결 성공 시 반환
            }
        } catch (SQLException ex) {
            if (reason == null) {
                reason = ex; // 첫 번째 예외를 저장
            }
        }
    }
}
등록된 드라이버 목록에서 하나씩 가져와서 요청한 URL에 맞는 드라이버를 찾아 연결을 시도한다. isDriverAllowed(aDriver.driver, callerCL)를 통해 사용 가능한 드라이버를 찾으면 드라이버가 info에 담은 정보와 URL을 바탕으로 데이터베이스 연결을 시도하여 성공시 커넥션을 반환해준다.
