
state
state는 컴포넌트 내부에서 바뀔 수 있는 값 입니다. props와의 차이점은 props는 컴포넌트에서 사용되기 위해 부모 컴포넌트가 설정해주는 값이기에 값을 바꾸기 위해서는 부모 컴포넌트에서만 접근했어야 합니다. 그래서 props는 마치 함수의 인자 처럼 외부에서 컴포넌트로 전달 되었습니다. 반면 state는 현재 컴포넌트에서 값이 바뀔 수 있다는 차이점이 있습니다. 그래서 state는 마치 함수(클래스) 내부에서 선언되어 사용되는 로컬 변수처럼 컴포넌트 내부에서 자유롭게 이용할 수 있습니다.
또 이전에 함수형과 클래스형 컴포넌트를 소개하면서 state 사용에 차이가 있다는 것을 기억하시나요? 클래스형 컴포넌트는 자유롭게 state에 접근할 수 있지만, 함수형 컴포넌트는 state를 직접 사용하진 못하고 다른 메소드를 통해서 사용해야 했습니다.
그래서 우리는 state도 마찬가지로 클래스형 컴포넌트와 함수형 컴포넌트 사용법 두 가지로 나눠서 공부해보도록 하겠습니다.
클래스형 컴포넌트에서의 state
내부 변화를 알기 쉽게해 이해를 돕도록 버튼을 누르면 숫자가 올라가는 카운터 프로그램으로 예시를 들며 state를 공부하겠습니다.
import React, {Component} from 'react';

class CounterByClass extends Component {
    //생성자
    constructor(props) {
        super(props);

        //초깃값 설정, 현재 start 조회는 this.state로 접근
        this.state = {
            count: 0,
        };
    }

    render() {
        const {count} = this.state;

        return (
            <div>
                //숫자 표시
                <h1>{count}</h1>
                //+1버튼과 그 이벤트 설정
                <button onClick={() => {
                    //setState를 통해서 state(여기서는 count)값 변경
                    this.setState({count: count + 1});
                }}>
                    +
                </button>
            </div>
        );
    }
}

export default CounterByClass;
이 예제에서 state는 count가 되고, 이때 state에 접근하기 위해서 this.state를 통해 접근할 수 있습니다. 결과를 App.js를 수정해서 확인해볼까요?
import React from 'react';
import CounterByClass from './codes/CounterByClass';

const App = () => {
  return (
      <CounterByClass />
  );
};

export default App;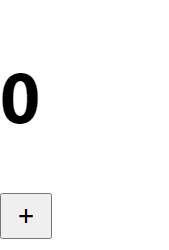
위와 같은 화면이 페이지에 그려지고, +버튼을 눌렀을 때 숫자가 증가한다면 제대로 state를 통해 상태 변화가 구현된 것 입니다.
state 객체 내부에 여러 값 넣기
state에 다수의 값이 존재할 수도 있습니다. 생성자의 state에 추가하고 싶은 staet 값을 넣고 state가 나타나도록 render해주면 됩니다.
import React, {Component} from 'react';

class CounterByClass extends Component {
    constructor(props) {
        super(props);

        this.state = {
            count: 0,
            otherNumber: 404,
        };
    }

    render() {
        const {count, otherNumber} = this.state;

        return (
            <div>
                <h1>{count}</h1>
                <p>state에 여러 값이 올 수도 있습니다: {otherNumber}</p>
                <button onClick={() => {
                    this.setState({count: count + 1});
                }}>
                    +
                </button>
            </div>
        );
    }
}

export default CounterByClass;
생성자 constructor 외부에서 state 선언하기
앞에서는 state의 초깃값 설정을 위해 클래스 생성자를 만들고 그 내부에서 state의 초깃값을 설정해 줬습니다. 이 길고 복잡한 방법(사실 그렇게 길지는 않지만)대신에 다른 방식으로 간결하게 state 초깃값 설정이 가능합니다. 이전의 코드를 다음과 같이 변경할 수 있습니다.
//변경 전
constructor(props) {
        super(props);

        this.state = {
            count: 0,
            otherNumber: 404,
        };
    }

//변경 후
state= {
	count: 0,
	otherNumber: 404,
};
훨씬 간결하지 않나요? 생성자 외부에서 state를 선언하는 것을 코드에 담아보면 다음과 같이 변합니다.
import React, {Component} from 'react';

class CounterByClass extends Component {
    state= {
        count: 0,
        otherNumber: 404,
    };

    render() {
        const {count, otherNumber} = this.state;

        return (
            <div>
                <h1>{count}</h1>
                <p>state에 여러 값이 올 수도 있습니다: {otherNumber}</p>
                <button onClick={() => {
                    this.setState({count: count + 1});
                }}>
                    +
                </button>
            </div>
        );
    }
}

export default CounterByClass;
this.state에 함수를 인자로 전달하기
위에서는 setState의 인자로 state를 넣어서 처리했습니다. 하지만 인자로 함수를 전달해서 state를 처리할 수도 있습니다. 아래와 같은 state변경 코드를 다음과 같이 함수를 인자로 전달해서 처리할 수 있습니다.
//변경 전
<button onClick={() => {
  this.setState({count: count + 1});
}}>

//변경 후
<button onClick={() => {
  this.setState(preState => ({
    count: preState.count + 1
  }));
}}>
setState의 두 번째 인자로 콜백함수 전달하기
setState에 두 번째 인자로 콜백함수를 전달함으로써 setState작업이 끝난뒤 특정한 코드를 실행시킬 수도 있습니다. 이전 코드를 가지고 두 번째 인자로 콜백 함수를 전달하는 코드를 작성해봤습니다.
import React, {Component} from 'react';

class CounterByClass extends Component {
    state = {
        count: 0,
        otherNumber: 404,
    };

    render() {
        const {count, otherNumber} = this.state;

        return (
            <div>
                <h1>{count}</h1>
                <p>state에 여러 값이 올 수도 있습니다: {otherNumber}</p>
                <button onClick={() => {
                    this.setState({
                        count: count + 1
                    }, () => { //두번째 인자로 전달한 콜백 함수
                        console.log("count가 1 증가했습니다.");
                    });
                }}>
                    +
                </button>
            </div>
        );
    }
}

export default CounterByClass;
