
이 포스팅에서는 포토 라이브러리에서 사진을 가져오거나, 카메라를 사용하여 직접 사진을 올리는 방법에 대해 설명한다.
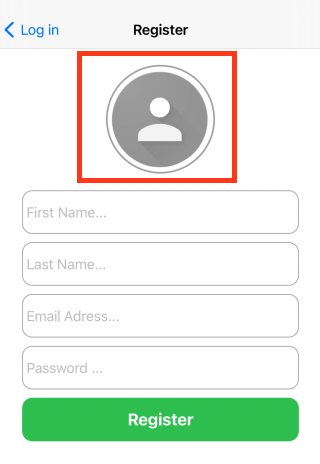
구현한 회원가입 화면이다. 표시된 아이콘을 탭하면 포토 라이브러리를 실행할 수 있도록 한다.
let gesture = UITapGestureRecognizer(target: self,
									 action: #selector(didChangeProfilePic))

imageView.addGestureRecognizer(gesture)

@objc private func didChangeProfilePic() {
	presentPhotoActionSheet()
}
ImageView에 TapGestureRecognizer을 등록하고 target-action 방식으로 presentPhotoActionSheet() 를 등록한다.
먼저 ActionSheet를 띄워 사진을 찍을것인지 presentCamera() 라이브러리에서 사진을 고를 것인지 presentPhotoPicker() 를 버튼 액션으로 추가한다.
ActionSheet에 대해 잘 모른다면 https://medium.com/swift-india/uialertcontroller-in-swift-22f3c5b1dd68 를 참고!
func presentPhotoActionSheet() {
    let actionSheet = UIAlertController(title: "Profile Picture", message: "How would you like to select a picture?", preferredStyle: .actionSheet)
    actionSheet.addAction(UIAlertAction(title: "Cancel", style: .cancel, handler: nil))
    actionSheet.addAction(UIAlertAction(title: "Take Photo", style: .default, handler: { [weak self] _ in
        self?.presentCamera()
    }))
    actionSheet.addAction(UIAlertAction(title: "Choose Photo", style: .default, handler: { [weak self] _ in
        self?.presentPhotoPicker()
    }))

    present(actionSheet, animated: true)
}
사진을 찍을래!
func presentCamera() {
    let vc = UIImagePickerController()
    vc.sourceType = .camera
    vc.delegate = self
    vc.allowsEditing = true
    present(vc, animated: true)
}
라이브러리에서 사진을 불러올래!
func presentCamera() {
    let vc = UIImagePickerController()
    vc.sourceType = .photoLibrary
    vc.delegate = self
    vc.allowsEditing = true
    present(vc, animated: true)
}
두 메소드를 보면 큰 차이는 없고 다만 UIImagePickerController.sourceType 이 .camera 냐 .photoLibrary 냐의 차이만 있을 뿐이다.
사진을 ViewController 안으로 가져올래!
찍거나 불러온 사진을 앱 내로 가져올때 delegate를 구현하기만 하면 된다.
// when user takes a photo
func imagePickerController(_ picker: UIImagePickerController, didFinishPickingMediaWithInfo info: [UIImagePickerController.InfoKey : Any]) {
        picker.dismiss(animated: true, completion: nil)

    guard let selectedImage = info[UIImagePickerController.InfoKey.editedImage] as? UIImage else {
        return
    }
    self.imageView.image = selectedImage
}

func imagePickerControllerDidCancel(_ picker: UIImagePickerController) {
    picker.dismiss(animated: true, completion: nil)
}
PickerController를 화면에서 내린다. picker.dismiss(animated:, completion:)
그리고 사용자가 선택한 이미지를 구한다. info[UIImagePickerController.InfoKey.editedImage] as? UIImage

iOS Developer