로컬 환경에서 ERC-721 개발
먼저 새로운 폴더를 생성하고 Truffle을 이용한 개발 환경을 준비한다.
$ mkdir erc721
$ cd erc721
$ truffle init
$ npm init
다음 VScode에서 몇 가지 세팅을 한다.
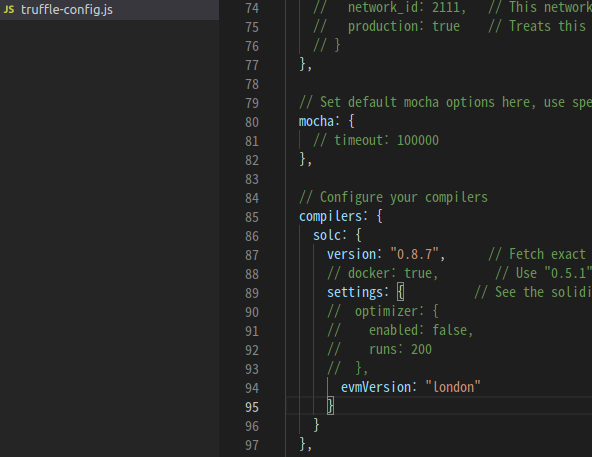
truffle-config.js에서solc을 설정한다. Solidity의 버전은0.8.7이고, Compile버전은london이다.
- 다음은 네트워크 설정을 편집한다.
Ganache를 이용하여 로컬 환경에서 테스트할 예정이므로, 먼저 Ganache를 등록한다.

- Remix에서 MyNFTs.sol의 코드를 가져와 간단히 수정한다.
- 기존 코드
//Contract based on [https://docs.openzeppelin.com/contracts/3.x/erc721](https://docs.openzeppelin.com/contracts/3.x/erc721)
// SPDX-License-Identifier: MIT
pragma solidity ^0.8.7;

import "@openzeppelin/contracts/token/ERC721/ERC721.sol";
import "@openzeppelin/contracts/utils/Counters.sol";
import "@openzeppelin/contracts/access/Ownable.sol";
import "@openzeppelin/contracts/token/ERC721/extensions/ERC721URIStorage.sol";

contract MyNFTs is ERC721URIStorage, Ownable {
    using Counters for Counters.Counter;
    Counters.Counter private _tokenIds;

    constructor() public ERC721("MyNFT", "NFT") {}

    function mintNFT(address recipient, string memory tokenURI)
        public onlyOwner
        returns (uint256)
    {
        _tokenIds.increment();

        uint256 newItemId = _tokenIds.current();
        _mint(recipient, newItemId);
        _setTokenURI(newItemId, tokenURI);

        return newItemId;
    }
}- 수정한 코드
//Contract based on [https://docs.openzeppelin.com/contracts/3.x/erc721](https://docs.openzeppelin.com/contracts/3.x/erc721)
// SPDX-License-Identifier: MIT
pragma solidity ^0.8.7;

import "@openzeppelin/contracts/token/ERC721/ERC721.sol";
import "@openzeppelin/contracts/utils/Counters.sol";
import "@openzeppelin/contracts/access/Ownable.sol";
import "@openzeppelin/contracts/token/ERC721/extensions/ERC721URIStorage.sol";

contract MyNFTs is ERC721URIStorage, Ownable {
    using Counters for Counters.Counter;
    Counters.Counter private _tokenIds;

    constructor() public ERC721("MyNFT", "NFT") {}

    function mintNFT(string memory tokenURI)
        public onlyOwner
        returns (uint256)
    {
        _tokenIds.increment();

        uint256 newItemId = _tokenIds.current();
        _mint(msg.sender, newItemId);
        _setTokenURI(newItemId, tokenURI);

        return newItemId;
    }
}
변경된 부분은 파라미터 address recipient를 삭제하고 _mint함수 실행부에서, recipient를 msg.sender로 대체하였다. 이렇게하면 오너의 지갑주소에서만 함수 mintNFT를 실행할 수 있고, NFT는 항상 오너의 지갑 주소로 발행된다.
-
contract/폴더 아래에MyNFTs.sol파일을 생성하고 코드를 붙여넣는다. -
npm을 통해
openzeppelin을 설치한다
$ npm install @openzeppelin/contracts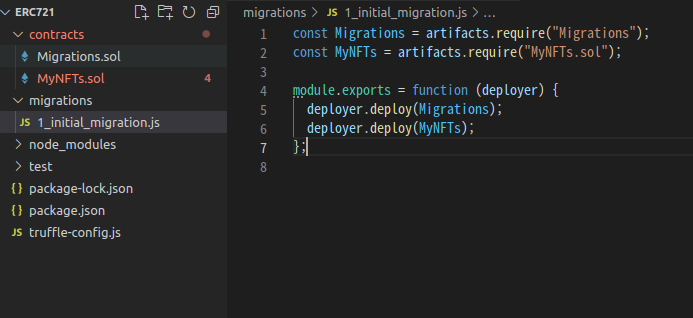
- 붙여넣은 코드가 배포되기 위해서는 migration파일을 설정해야 한다.
migration/폴더로 이동하여1_initial_migration.js파일을 열어서 코드를 수정한다.
const Migrations = artifacts.require("Migrations");
const Migrations = artifacts.require("MyNFTs.sol"); // MyNFTs.sol 파일 추가

module.exports = function (deployer) {
	deployer.deploy(Migrations);
    deployer.deploy(MyNFTs); // MyNFT를 배포에 추가
}
Truffle로 배포하기
로컬 환경에서 Ganache를 이용하여 컨트랙트를 배포한다.
터미널에서 ganache-cli를 설치하고 실행한다.
$ npn install -g ganache-cli
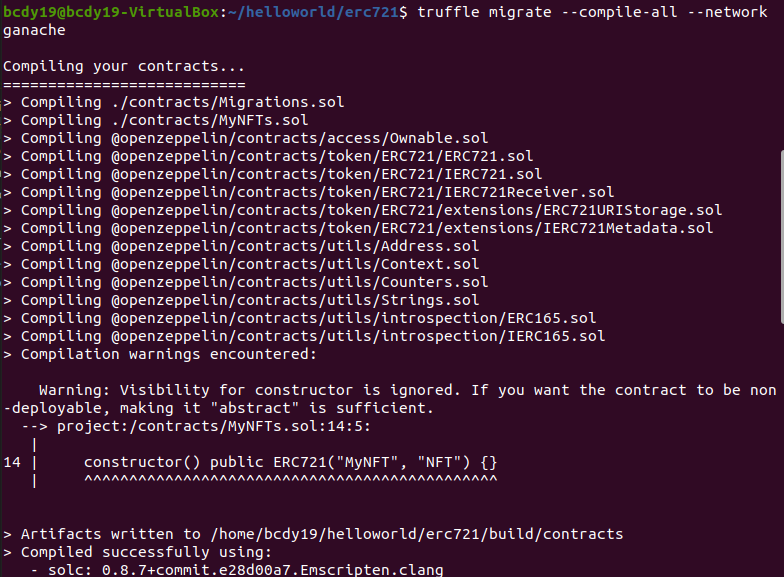
$ ganache-cli기존 폴더 내에서 Truffle을 배포한다. 이때, truffle-config.js 파일의 network에 설정한 ganache로 실행해야 한다.
$ truffle migrate --compile-all --network ganache위 명령어에서 --network에 나오는 ganache는 truffle-config.js에서 설정한 network의 키이다.

컨트랙트 배포가 잘 되었다면, Truffle console을 이용하여 컨트랙트를 조작할 수 있다.
$ truffle console --network ganache
Truffle console에서 배포한 컨트랙트의 인스턴스를 받아온다.
instance = await MyNFTs.deployed()
instance.name()
instance.symbol()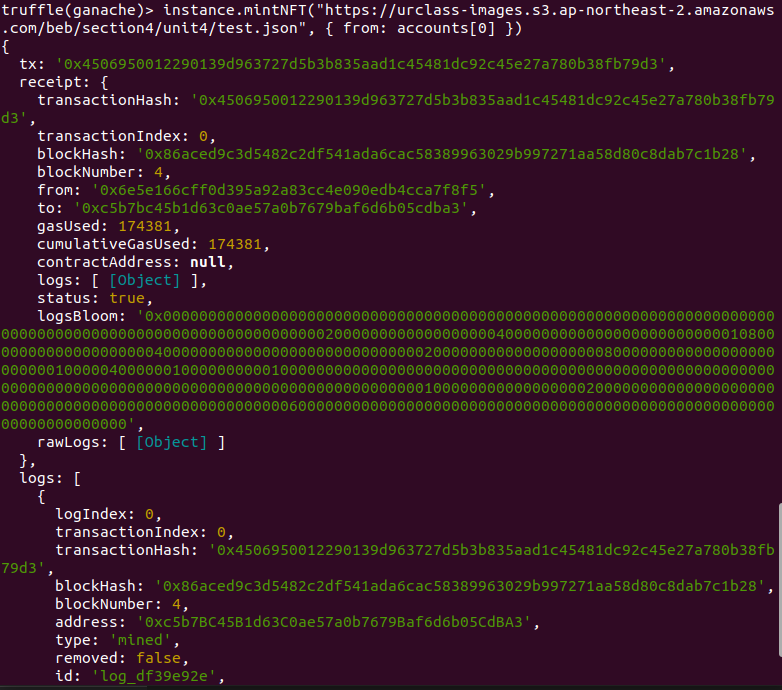
배포된 컨트랙트에 대한 확인을 마쳤으면, 작성한 함수가 잘 동작하는지 확인한다. 이때 함수의 마지막 파라미터로 실행할 지갑 주소를 함께 전달해야 한다. 이 지갑의 주소는 ganache-cli 의 첫번째 지갑(0번째 인덱스 지갑) 주소이고, Ganache를 이용해 컨트랙트를 배포할 때에는, default로 첫번째 지갑(0번째 인덱스 지갑)의 주소에서 컨트랙트를 배포한다.
instance.mintNFT("https://urclass-images.s3.ap-northeast-2.amazonaws.com/beb/section4/unit4/test.json", { from: accounts[0] })
# Tx Information
앞으로 다른 네트워크(ex. 메인넷)에 배포할 때에는 truffle-config.js 에 네트워크 정보를 추가하고, Truffle 명령어 중 옵션 --network 와 함께 네트워크의 정보를 담고있는 키를 입력하면 된다.