React Native with Expo
React-Native
Facebook의 오픈소스 프로젝트로 JS를 네이티브 언어로 컴파일 해준다.
자바스크립트로 만든 UI를 네이티브 언어로 컴파일 해주고
로직은 jabascriptcore를 통해 네이티브언어로 변경된다.
간단하게 살펴보아도 알수 있듯이 장단점이 뚜렷한데 장점은 js만 알아도 앱을 만들수 있다는것이다.
(물론 앱 개발의 기본지식 인프라 및 생태계에 대해서는 알아야 한다. )
단점은 여기서 알수 있듯이 react-native가 지원하지 않는 기능은 컴파일 할 수 없다.
따라서 복잡하거나 지원하지 않는 네이티브 기능을 구현해야 하는경우 네이티브 코드를 직접 코딩해야 한다.
Expo
Expo 는 보편적인 React 애플리케이션을 위한 프레임워크이자 플랫폼입니다. 동일한 JavaScript/TypeScript 코드베이스에서 iOS, Android 및 웹 앱을 개발, 빌드, 배포 및 빠르게 반복하는 데 도움이 되는 React Native 및 native 플랫폼을 기반으로 구축된 도구 및 서비스 세트입니다.
위의 공식 페이지에 나온 설명과 같이 Expo는 빌드와 배포를 편하게 할수 있게 도와준다 그리고 네이티브 모듈을 Expo가 지원하는 범위 내에서 편리하게 사용할 수 있다.
Expo 와 React Native CLI 비교
Expo (Managed Workflow)
- 설정할게 없어서 사용하기 쉽다.
- 내장된 많은 네이티브 모듈이 있다.
- Expo CLI를 통해 제어한다.
- Expo Wrapper를 포함한 Standalone 앱 배포가 가능하다.
- Android Studio, Xcode 필요없다.
- 배포가 편하다 매번 배포할 때 마다 검사 받을 필요가 없음 (소스코드가 바뀔때마다 자동으로 업로드)Expo서버에 위치하는 코드만 바꿔주면 된다Update와 배포하는데 훨씬 편하다
- ios 없이도 expo client를 통해 iphone test 가능(단, mac os)
- android studio, x-code 없이도 자기가 원하는 IDE를 사용하여 개발 가능
- 빠르고 간단하게 프로젝트 설치 가능
- java, kotlin, object-c, swift로 추가 작성 못하고 이것으로 작성된 원시 모듈을 사용 못함
- github에 있는 라이브러리를 잘 보고 선택해야 함expo 클라이언트에서는 잘되지만 다른 곳(실 기기)에서는 잘 안될 수 있음
(현재 Managed Workflow는 인앱결제를 할수 없다.)
Expo (Bare Workflow)
- Non-Expo 앱
- 임포트된 Expo 패키지를 사용한다.
- 상대적으로 설정, 관리가 쉽다.
- 네이티브 모듈도 사용가능하다.
- Android Studio와 XCode에서 빌드, 배포가 가능하다.
React Native CLI
- Non-Expo 앱
- Expo 패키지를 이용할 수 있다. 사용자 설정이 필요하다.
- 자신의 것을 만들기 좋다. 자유도가 높다.
- 네이티브 모듈도 사용가능하다.
- Android Studio와 XCode에서 빌드, 배포가 가능하다.
Bare Workflow의 장점
상대적으로 설정, 관리가 쉽다.
임포트된 Expo 패키지를 사용한다.
네이티브 모듈도 사용가능하다.
Android Studio와 XCode에서도 빌드, 배포가 가능하다.
Managed Workflow 장점
네이티브 코드는 expo가 알아서 관리 해준다.
js/ts 로만 코딩하면 된다.
expo가 지원하는 네이티브 기능 외에 사용이 불가능하다.(eject 하면 가능)
(현재까지 Bare Workflow에서는 expo build를 사용할수 없다.)
Bare Workflow Walkthrough - Expo Documentation
EAS build (Expo Application Service)
EAS는 Expo Application Service의 준말로, 클라우드 빌드 서비스입니다. EAS build는 실행 시 새로운 VM을 구성하고 여기에 프로젝트를 다운로드합니다. 자바스크립트 의존성과 네이티브 의존성을 설치하고 난 후, fastlane 혹은 gradle을 사용하여 빌드를 시작합니다. 빌드가 완료되면 서명과 함께 바이너리를 만듭니다.
이제 managed workflow 프로젝트를 EAS build할 수 있는 상태로 만들기 위해 eject 명령어와 별개로 javascript 앱을 기반으로 하는 ios 및 android 프로젝트를 생성하고 구성할 수 있습니다. 이 새로운 명령어를 prebuild 라고 합니다.
EAS Build에서 prebuild 명령을 실행한 다음, RN 앱과 같이 결과 프로젝트를 빌드하기만 하면되고 여기에는 더 이상 shell app은 없습니다. 이 과정에서 개발자는 사용하지 않는 네이티브 패키지를 삭제하여 앱의 사이즈를 크게 줄일수도 있습니다. 또한 prebuild에는 [config plugin](https://docs.expo.io/guides/config-plugins/)이라는 툴을 사용할 수 있습니다. 이것은 prebuild 과정에서 실행되는 기능으로써 네이티브 코드를 핸들링할 수 있습니다.
EAS build 도 Managed Workflow에서 사용이 가능하다.
EAS Build - Expo Documentation
개발환경
패키지 설치는 yarn 을 사용 하였습니다. 확인해보고 이미 설치 되어있는 부분은 스킵!
1.homebrew 설치
/bin/bash -c "$(curl -fsSL https://raw.githubusercontent.com/Homebrew/install/HEAD/install.sh)"설치를 완료 하고
brew --version을 입력하여 버전을 확인한다.
설치 참고 https://brew.sh/
2.node 설치
brew install node설치가 완료 되면
node --version and npm --version을 입력하여 설치 확인.
3.watchman 설치
(Watchman은 특정 폴더나 파일을 감시하다가 변화가 생기면, 특정 동작으로 실행하도록 설정하는 역할을 합니다.)
brew install watchman설치 완료 후
watchman -version을 입력하여 설치 확인.
4. react-native-cli 설치
yarn global add react-native-cli설치 완료 후
react-native --version을 입력하여 설치 확인.
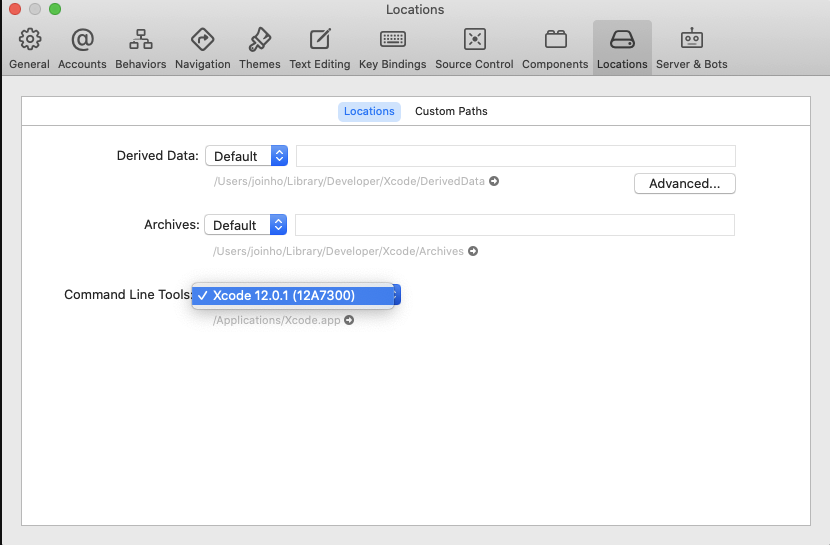
5. Xcode 설치
앱스토어에서 xcode 검색후 다운로드.
실행 후 " 커맨드+, "로 설정 탭 진입 후 commend line tools를 아래와 같이 선택한다.
6. cocoapods 설치
sudo gem install cocoapods설치 완료 후
pod --version을 입력하여 설치 확인.
7. Java Development Kit (JDK)설치
brew tap AdoptOpenJDK/openjdkbrew install --cask adoptopenjdk/openjdk/adoptopenjdk15를 차례대로 실행하여 설치 완료 후
java -version을 입력하여 설치 확인.
자바 개발 킷을 설치하면 자바 이외에도 자바를 컴파일 하기 위한 자바 컴파일러가 함께 설치된다.
자바컴파일러가 잘 설치되었는지 확인하기 위해 다음 명령어를 실행한다.
javac -version8. android studio 설치
https://developer.android.com/studio?hl=ko
위의 링크로 들어가서 안드로이드 스튜디오를 다운로드 받는다.
https://docs.expo.dev/workflow/android-studio-emulator/
다운로드가 완료되면 실행한 후 설치한다.
이후 다음과 같이 안드로이드 스튜디오의 환경변수를 설정한다.
vi ~/.zshrc위의 명령어를 사용해 .zshrc파일로 들어가서
export ANDROID_HOME=안드로이드 SDK 위치/Android/sdk
export PATH=$PATH:$ANDROID_HOME/emulator
export PATH=$PATH:$ANDROID_HOME/tools
export PATH=$PATH:$ANDROID_HOME/tools/bi
export PATH=$PATH:$ANDROID_HOME/platform-tools
를 추가해준다.
(복사해서 안된다면 직접 입력해보자!)
안드로이드 SDK 위치는 sdk manager를 실행하면 확인 할 수 있다.(아래 이미지 참고)
안드로이드 스튜디오 실행 > 우측하단 Configure 클릭 > SDK Manager 실행
자신의 안드로이드 위치는 보통 /Users/{USER_NAME}/Library/Android/sdk 이다.

자바 버전이 문제를 일으킬수 있는데
brew remove adoptopenjdk/openjdk/adoptopenjdk16
brew install --cask adoptopenjdk/openjdk/adoptopenjdk15
버전을 변경
EXPO Bare Workflow에서 EXPO GO 앱 사용하기
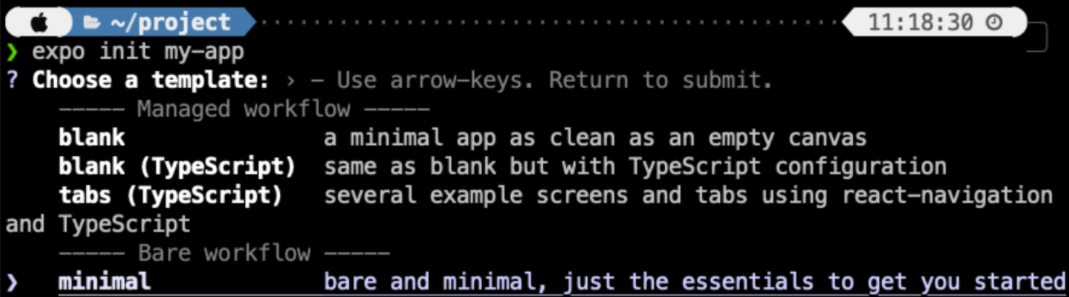
expo project init
expo init ProjectNameexpo init 을 하면 템플릿 선택이 나오는데 그중 가장 아래에 있는 minimal을 선택하면 bare workflow로 개발을 할 수 있습니다.
ts를 추가하려면 tsconfig.js 파일을 생성하고 아래의 스크립트를 넣어줍니다.
이후 app.js 를 app.tsx 로 변경합니다.
tsconfig.js
{
  "compilerOptions": {},
  "extends": "expo/tsconfig.base",
  "allowJs": true,
  "esModuleInterop": true,
  "jsx": "react-native",
  "lib": ["DOM", "ESNext"],
  "moduleResolution": "node",
  "noEmit": true,
  "resolveJsonModule": true,
  "skipLibCheck": true,
  "target": "ESNext"
}
expo install or yarn install을 실행하여 패키지를 설치한 후
yarn add react-native-unimodules
&&
npx pod-install
unimodule 설치 (react native 모듈을 각 ios 와 android에 설치) 와 pod install (ios package 관리)
expo start 명령어를 실행한다
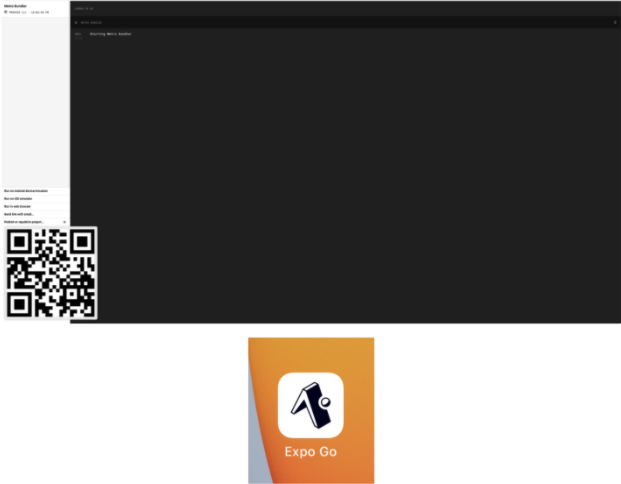
각 디바이스의 스토어에서 EXPO GO 앱을 설치하고 QR 코드를 인식하면 빌드가 된다.
Bare Workflow에서 EXPO GO 사용시 주의점
여러 네이티브 모듈들 중에 EXPO가 지원하지 않는것이 있다면 인라인으로 fallback을 제공해야한다.
// MapView.js
import * as React from 'react';
import { StyleSheet, Text, View } from 'react-native';
import Constants from 'expo-constants';

let MapView;
// expo 일때는 view를 아닐경우에 구글 맵을 사용할 수 있도록 조건부 대체하는 코드 추가
if (Constants.appOwnership === 'expo') {
  MapView = props => (
    <View
      style={[
        {
          backgroundColor: 'lightblue',
          alignItems: 'center',
          justifyContent: 'center',
        },
        props.style,
      ]}>
      <Text>🗺 (Mapbox not available)</Text>
    </View>
  );
} else {
  const Mapbox = require('@react-native-mapbox-gl/maps').default;
  Mapbox.setAccessToken('access-token-here');
  MapView = Mapbox.MapView;
}

export default MapView;
또는
import * as React from 'react';
import { StyleSheet, Text, View } from 'react-native';

let MapView;

try {
  const Mapbox = require('@react-native-mapbox-gl/maps').default;
  Mapbox.setAccessToken('access-token-here');
  MapView = Mapbox.MapView;
} catch {
  MapView = props => (
    <View
      style={[
        {
          backgroundColor: 'lightblue',
          alignItems: 'center',
          justifyContent: 'center',
        },
        props.style,
      <]}>
      <Text>🗺 (Mapbox not available)</Text>
    </View>
  );
}

export default MapView;
try catch 도 고려해볼 수 있다.
// App.js
import * as React from 'react';
import { StatusBar } from 'expo-status-bar';
import { StyleSheet, Text, View } from 'react-native';
import MapView from './MapView';

export default function App() {
  return (
    <View style={styles.container}>
      <Text style={{ fontSize: 20, marginBottom: 10, fontWeight: '600' }}>Behold, a map! ✨</Text>
      <MapView
        style={{
          height: 300,
          width: 300,
          borderRadius: 20,
          overflow: 'hidden',
        }}
      />
      <StatusBar style="default" />
    </View>
  );
}

const styles = StyleSheet.create({
  container: {
    flex: 1,
    backgroundColor: '#fff',
    justifyContent: 'center',
    alignItems: 'center',
  },
});
MapVIew 컴포넌트를 fallback처리 해놓은뒤 import 하여 사용한다.
expo go를 사용하지 않고 직접 XCode나 Android Studio를 사용하여 빌드하면 이런 처리를 할 필요는 없다.
(두가지 다 사용하면 코드가 늘어나겠지만 각각의 장점을 누릴수 있기 때문에 두가지 다 사용할수 있도록 처리를 해두면 어떨까)
Splash 및 아이콘 설정
패키지 설치
yarn add react-native-splash-screenApp.js
import { StatusBar } from 'expo-status-bar';
import React, {useEffect} from 'react';
import { StyleSheet, Text, View } from 'react-native';
import SplashScreen from 'react-native-splash-screen';

export default function App() {

  useEffect(() => {
    SplashScreen.hide();
  }, []); //SplashScreen hide 코드 추가

  return (
    <View style={styles.container}>
      <Text>Open up App.js to start working on your app!</Text>
      <StatusBar style="auto" />
    </View>
  );
}

const styles = StyleSheet.create({
  container: {
    flex: 1,
    backgroundColor: '#fff',
    alignItems: 'center',
    justifyContent: 'center',
  },
});
IOS
cd ios
&&
pod install
IOS 프로젝트를 열어 AppDelegate.m파일에
#import "RNSplashScreen.h"  // here

// 이미 해당 파일에 didFinishLaunchingWithOptions 부분이 있다

- (BOOL)application:(UIApplication *)application didFinishLaunchingWithOptions:(NSDictionary *)launchOptions
{
    ...
    [RNSplashScreen show];  //요 부분만 추가 해주자
    return YES;
}
icon추가
XCode에서 해당 프로젝트를 열고 프로젝트 내부의 Images.xcassets폴더에서 new image set을 선택한다.
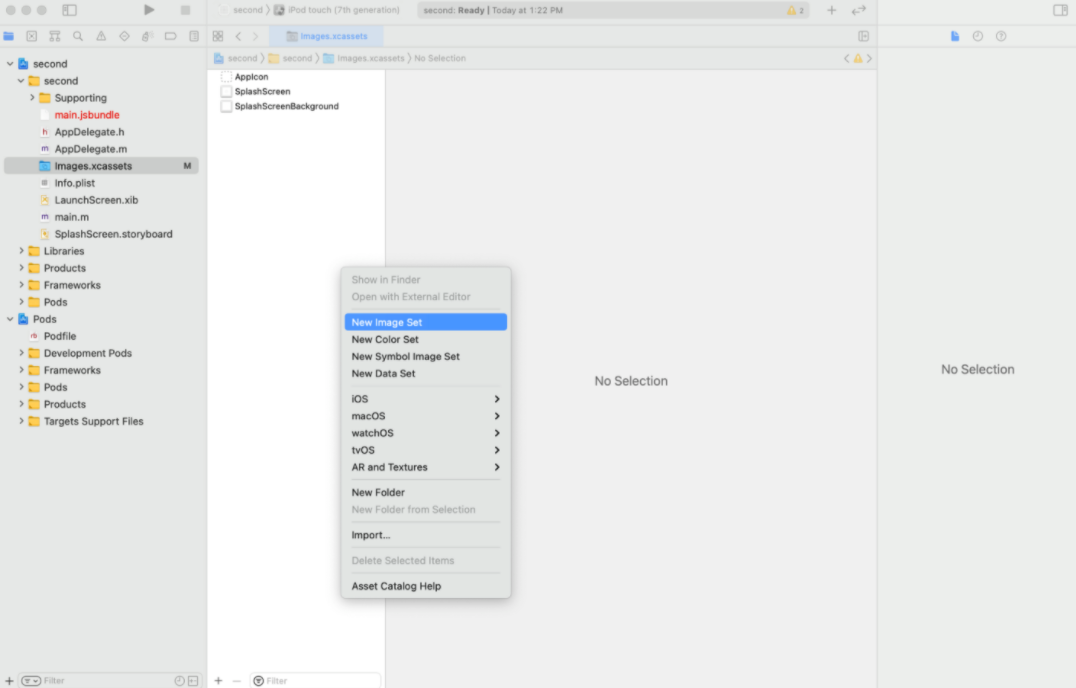
이미지를 추가하고
AppIcon 을 클릭하여 아이콘을 추가한다
ANDROID
MainActivity 파일에
android/settings.gradle file에 아래 코드를 추가한다.
...
import android.os.Bundle; // here
import com.facebook.react.ReactActivity;
import org.devio.rn.splashscreen.SplashScreen; // here
...
public class MainActivity extends ReactActivity {
   @Override
    protected void onCreate(Bundle savedInstanceState) {
        SplashScreen.show(this);
        super.onCreate(savedInstanceState);
    }
    ...
}
android/app/src/main/res/layout/launch_screen.xml 파일에 아래 코드를 추가한다.
<?xml version="1.0" encoding="utf-8"?>
<LinearLayout xmlns:android="http://schemas.android.com/apk/res/android"
    android:orientation="vertical" android:layout_width="match_parent"
    android:layout_height="match_parent"
    android:background="@drawable/launch_screen">
</LinearLayout>
drawable 폴더에 launch_screen.png를 추가한다
icon추가
res 디렉토리에서 우클릭 후 Image Asset을 클릭한다

해당 화면이 나온다.

StyleSheet
stylesheet에서 theme 설정하는 방법
image를 추가하면 아이콘이 생성된다.
app/styles/theme.style.js
export default {
  FONT_SIZE_SMALL: 12,
  FONT_SIZE_MEDIUM: 14,
  FONT_SIZE_LARGE: 16,
  PRIMARY_COLOR: 'rgb(30, 147, 242)',
  SECONDARY_COLOR: 'rgb(238, 167, 2)',
  FONT_WEIGHT_LIGHT: 200,
  FONT_WEIGHT_MEDIUM: 600,
  FONT_WEIGHT_HEAVY: 800
};
style.js
import { StyleSheet } from 'react-native';
export default StyleSheet.create({
  largeButtonText: {
    fontSize: 16,
    fontWeight: 'bold'
  },
  largeHeaderText:{
    fontSize: 16
  },
  mediumHeaderText: {
    fontSize: 14,
    color:'blue'
  }
});
style 적용
import {StyleSheet} from 'react-native';
import theme from '../../styles/theme.style';

export default StyleSheet.create({
  textArea: {
    fontSize: theme.FONT_SIZE_MEDIUM,
    fontWeight: theme.FONT_WEIGHT_LIGHT
  }
});
common style
common.style.js
import { StyleSheet } from 'react-native';
export default StyleSheet.create({
  btn: {
    padding: 10,
    borderWidth: 1
  }
});
style.js
import { StyleSheet } from 'react-native';
import common from '../style/common.style.js';
export default StyleSheet.create({
  firstBtn:{
    ...common.btn,
    backgroundColor: 'blue'
  },
  secondBtn:{
    ...common.btn,
    backgroundColor: 'red'
  }
});
App.tsx
import { StatusBar } from "expo-status-bar";
import React from "react";
import { StyleSheet, Text, View } from "react-native";

const App: React.FC = () => {
	return (
		<View style={styles.container}>
			<Text>Open up App.js to start working on your app!</Text>
			<StatusBar style="auto" />
		</View>
	);
};

const styles = StyleSheet.create({
	container: {
		flex: 1,
		backgroundColor: "#fff",
		alignItems: "center",
		justifyContent: "center",
	},
});

export default App;
style
App.tsx 의 text 부분을 green 색상으로 변경해 보자.
import { StatusBar } from "expo-status-bar";
import React from "react";
import { StyleSheet, Text, View } from "react-native";

const App: React.FC = () => {
	return (
		<View style={styles.container}>
			<Text style={styles.text}>
				Open up App.js to start working on your app!
			</Text>
			<StatusBar style="auto" />
		</View>
	);
};

const styles = StyleSheet.create({
	container: {
		flex: 1,
		backgroundColor: "#fff",
		alignItems: "center",
		justifyContent: "center",
	},
	text: {
		color: "green",
	},
});

export default App;
스타일 시트에 새로운 객체를 추가하고 컬러 값을 주었다.
그리고 Text 컴포넌트에 style을 추가하였다.
이미지 추가
import React from 'react';
import { Image,  StyleSheet, Text, View } from 'react-native';
import logo from './assets/logo.png';

const App:React.FC=()=> {
  return (
    <View style={styles.container}>
      <Image source={logo} style={{ width: 305, height: 159 }} />

      <Text style={{color: '#888', fontSize: 18}}>
        To share a photo from your phone with a friend, just press the button below!
      </Text>
    </View>
  );
}

const styles = StyleSheet.create({
  container: {
    flex: 1,
    backgroundColor: '#fff',
    alignItems: 'center',
    justifyContent: 'center',
  },
});
넓이와 높이를 명시적으로 정하지 않으면 이미지가 나오지 않는다.
url로 추가하기
import { StatusBar } from "expo-status-bar";
import React from "react";
import { StyleSheet, Text, View } from "react-native";

const App: React.FC = () => {
	return (
		<View style={styles.container}>
			<Image source={{ uri: "https://i.imgur.com/TkIrScD.png" }} style={styles.logo} />
			<Text style={styles.text}>
				Open up App.js to start working on your app!
			</Text>
			<StatusBar style="auto" />
		</View>
	);
};

const styles = StyleSheet.create({
	container: {
		flex: 1,
		backgroundColor: "#fff",
		alignItems: "center",
		justifyContent: "center",
	},
	text: {
		color: "green",
	},
	logo: {
    width: 305,
    height: 159,
    marginBottom: 10,
	}
});

export default App;
expo 요금
Expo Application Services (EAS)
참고 자료 :
Expo의 새로운 빌드 시스템 EAS build와 Expo Development Client
expo API list
React Native API list
Accelerometer - Expo Documentation
Native Module
개발을 할때 네이티브 모듈에 access해야할 필요성이 생긴다.
예를들어 애플페이나 구글페이 또는 이미지 처리와 같은 고성능 다중 스레드 코드를 작성하기 위함이다.
NativeModule 시스템은 Java/Objective-C/C++(네이티브) 클래스의 인스턴스를 JS 객체로 JavaScript(JS)에 노출하므로 JS 내에서 임의의 네이티브 코드를 실행할 수 있습니다.
하지만 일반적인 개발에는 사용되지 않을 확률이 높다.
Native Module 설정에는 두가지 방법이 있다.
- React Native 애플리케이션의 iOS/Android 프로젝트 내에서 직접
- React Native 애플리케이션에 종속성으로 설치할 수 있는 NPM 패키지 사용
캘린더 이벤트를 생성하기 위해 React Native 애플리케이션 내 JavaScript에서 iOS/Android 기본 캘린더 API에 액세스하려고 한다고 상상해보십시오. React Native는 기본 캘린더 라이브러리와 통신하기 위해 JavaScript API를 노출하지 않습니다. 그러나 기본 모듈을 통해 기본 캘린더 API와 통신하는 기본 코드를 작성할 수 있습니다. 그런 다음 React Native 애플리케이션에서 JavaScript를 통해 해당 네이티브 코드를 호출할 수 있습니다.
android
Android Native Modules · React Native
ios