데이터 파이프라인 구축 - 5회차
1. MySQL 설치
1) Ubuntu 서버 업데이트
test01@test01:~$ sudo apt update2) mysql-server 설치
test01@test01:~$ sudo apt install mysql-server- 입력하면 sql 설치가 진행됨
3) MySQL 실행
test01@test01:~$ sudo systemctl start mysql4) Ubuntu 서버 재시작시 MySQL 자동 재시작
test01@test01:~$ sudo systemctl enable mysql- 입력하면 아래와 같이 뜸
Synchronizing state of mysql.service
with SysV service script
with /lib/systemd/systemd-sysv-install.
Executing:
/lib/systemd/systemd-sysv-install enable mysql
5) MySQL 상태 확인
test01@test01:~$ sudo systemctl status mysql- 입력하면 아래와 같이 뜸
● mysql.service - MySQL Community Server
 Loaded: loaded (/lib/systemd/system/mysql.service;
 enabled; vendor preset: enabled)
 Active: active (running)
 since Sun 2025-01-19 18:58:01 KST; 3min 10s ago
 Main PID: 3916 (mysqld)
 Status: "Server is operational"
 Tasks: 37 (limit: 9415)
 Memory: 363.4M
 CGroup: /system.slice/mysql.service
 └─3916 /usr/sbin/mysqld
 1월 19 18:57:55 test01 systemd[1]:
 Starting MySQL Community Server...
 1월 19 18:58:01 test01 systemd[1]:
 Started MySQL Community Server.
※ ctrl+c 하면 밖으로 나와짐!
2. MySQL 유저 권한 부여
1) MySQL 비밀번호 없이 접속
test01@test01:~$ sudo mysqld --skip-grant-tables2) MySQL root로 접속
test01@test01:~$ sudo systemctl start mysql
test01@test01:~$ sudo mysql -u root- 입력하면 아래와 같이 뜸
Welcome to the MySQL monitor.
Commands end with ; or \g.
Your MySQL connection id is 8
Server version: 8.0.40-0ubuntu0.20.04.1 (Ubuntu)
Copyright (c) 2000, 2024, Oracle
and/or its affiliates.
Oracle is a registered trademark
of Oracle Corporation
and/or its affiliates.
Other names may be trademarks
of their respective owners.
Type 'help;' or '\h' for help.
Type '\c' to clear the current input statement.
3) 비밀번호 변경
- MySQL에 성공적으로 접속하면 터미널 창이 아래와 같이 변경됨
mysql>use mysql;입력- 여러 데이터베이스 중 mysql을 사용한다는 뜻
mysql> use mysql;- 입력하면 아래와 같은 내용이 출력됨
Reading table information
for completion of table and column names
You can turn off this feature
to get a quicker startup with -A
Database changed
ALTER USER 'root'@'localhost' IDENTIFIED BY '★';- mysql 버전이 8 이상인 경우 비밀번호 입력하는 방법
- ★ 위치에 원하는 비밀번호 입력하면 됨
- 대문자, 소문자, 특수문자 모두 들어가야 함
- 8글자 이상
mysql>
ALTER USER 'root'@'localhost' DENTIFIED BY '★';- 입력하면 아래와 같은 내용이 출력됨
Query OK, 0 rows affected (0.02 sec)FLUSH PRIVILEGES;- 변경 사항을 저장한다는 뜻
mysql> FLUSH PRIVILEGES;mysql 다른 버전의 경우
set PASSWORD for 'root'@'localhost'=PASSWORD('lululala123'); → Ver 5.7 이상
update mysql.user set password=password('lululala123') where user='root';flush privileges;
→ Ver 5.6이하
update mysql.user set authentication_string=password('lululala123') where user='root';
→ mysql.user 테이블에 password 컬럼이 없는 경우
4) root로 접속 후 test01에 권한 부여
root 계정으로 시작
test01@test01:~$ sudo su디렉토리 변경
root@test01:/home/test01# cdMySQL 접속
root@test01:~# mysql -u root -p- 접속하면 아래처럼 비밀번호 입력하라고 뜸
- 앞서 설정한 비밀번호를 넣으면 된다
Enter password:- 접속에 성공하면 아래와 같이 뜸
Welcome to the MySQL monitor.
Commands end with ; or \g.
Your MySQL connection id is 9
Server version: 8.0.40-0ubuntu0.20.04.1 (Ubuntu)
Copyright (c) 2000, 2024,
Oracle and/or its affiliates.
Oracle is a registered trademark
of Oracle Corporation and/or its affiliates.
Other names may be trademarks
of their respective owners.
Type 'help;' or '\h' for help.
Type '\c' to clear the current input statement.- test01 유저 추가
- 비밀번호는 앞에서 한 것과 동일하게 ★ 위치에 원하는 비밀번호 입력하면 됨
- 대문자, 소문자, 특수문자 모두 들어가야 함
- 8글자 이상
- 비밀번호는 앞에서 한 것과 동일하게 ★ 위치에 원하는 비밀번호 입력하면 됨
mysql>
CREATE USER 'test01'@'%' IDENTIFIED BY '★';- 입력하면 아래와 같이 뜸
Query OK, 0 rows affected (0.03 sec)- test01에 권한 부여
mysql >
GRANT ALL PRIVILEGES ON *.* TO 'test01'@'%'
WITH GRANT OPTION;
FLUSH PRIVILEGES;- 다 했으면 mysql 나가기
mysql> exit;비밀번호 변경하고 싶은 경우
sudo su root
mysql -u root
update user set authentication_string=password('new password') where user = 'test01';
3. DB 스키마 생성
test01@test01:~$ mysql -h localhost -u test01 -p
CREATE DATABASE coin_db;
USE coin_db;
CREATE TABLE stg_coin_daily (
stg_id BIGINT AUTO_INCREMENT PRIMARY KEY,
market VARCHAR(20) NOT NULL,
candle_date_time_utc DATETIME NOT NULL,
candle_date_time_kst DATETIME NOT NULL,
opening_price DECIMAL(20,8),
high_price DECIMAL(20,8),
low_price DECIMAL(20,8),
trade_price DECIMAL(20,8),
candle_acc_trade_price DECIMAL(28,8),
candle_acc_trade_volume DECIMAL(28,8),
prev_closing_price DECIMAL(20,8),
change_price DECIMAL(20,8),
change_rate DECIMAL(10,8),
timestamp_unix BIGINT,
insert_dt DATETIME DEFAULT CURRENT_TIMESTAMP,
UNIQUE KEY uq_coin_daily(market, candle_date_time_kst)
) ENGINE=InnoDB DEFAULT CHARSET=utf8mb4;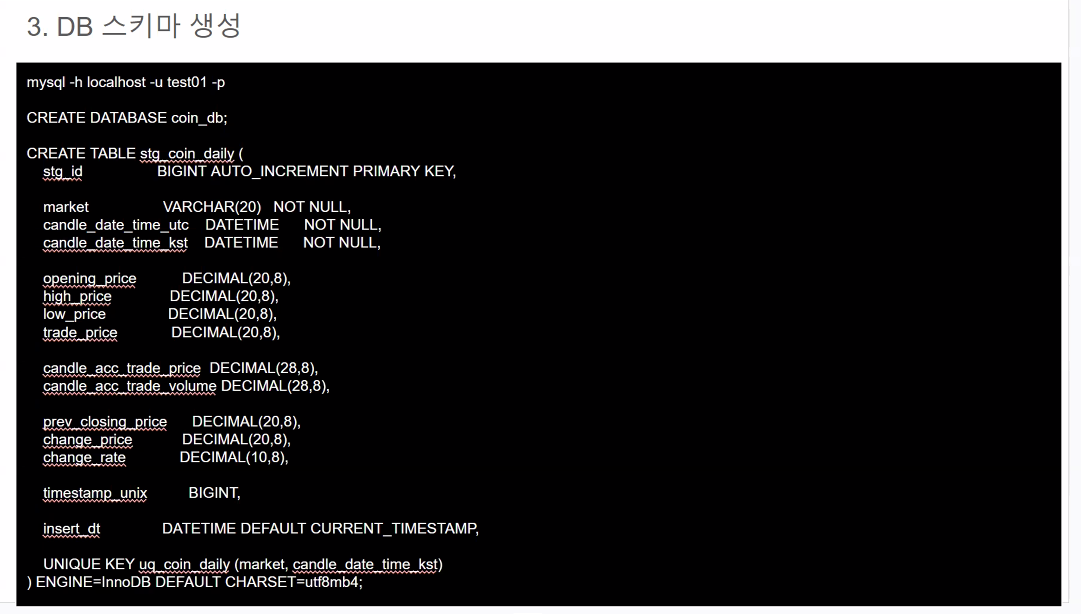
4. 테이블 연결 테스트
- ★: 설정한 비밀번호
- 특수문자는 UNIX 참고
- 예를 들어 비밀번호에 !가 들어가 있다면
%21로 써야 함
- 예를 들어 비밀번호에 !가 들어가 있다면
- 특수문자는 UNIX 참고
from sqlalchemy import create_engine, text
from sqlalchemy.exc import SQLAlchemyError
def main():
	engine = create_engine(
    "mysql+pymysql://test01:★@localhost:3306/coin_db"
    )
try:
	with engine.connect() as conn:
	# 쿼리, 세미콜론/컬럼명 주의
		result = conn.execute(
    		text("SELECT NOW() as mytime")
    	)
	row = result.fetchone()
if row:
# row[0]로 값 접근
print(f"DB Time: {row[0]}")
else:
print("No row returned.")
except SQLAlchemyError as e:
print(f"[ERROR] {e}")
if __name__ == "__main__":
main()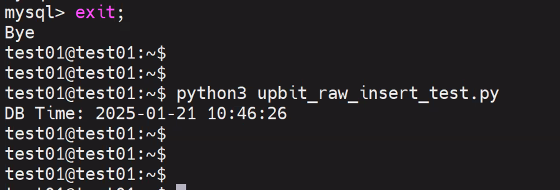
- 나는 vscode에서 했음

5. 템플릿 공유
6. 테이블 스키마
디멘션 테이블 스키마
-- =========================================
-- 1) dim_date
-- =========================================
CREATE TABLE `dim_date` (
`date_key` INT NOT NULL,
`full_date` DATE NOT NULL,
`year` INT NOT NULL,
`quarter` INT NOT NULL,
`month` INT NOT NULL,
`day` INT NOT NULL,
PRIMARY KEY (`date_key`)
)
ENGINE = InnoDB
DEFAULT CHARSET = utf8mb4
COLLATE = utf8mb4_0900_ai_ci;
-- =========================================
-- 2) dim_market
-- =========================================
CREATE TABLE `dim_market` (
`market_key` INT NOT NULL AUTO_INCREMENT,
`market` VARCHAR(20) NOT NULL COMMENT '예: KRW-BTC',
`coin_name` VARCHAR(100) NULL COMMENT '예: Bitcoin',
PRIMARY KEY (`market_key`),
UNIQUE KEY (`market`)
)
ENGINE = InnoDB
DEFAULT CHARSET = utf8mb4
COLLATE = utf8mb4_0900_ai_ci;
fact 테이블 스키마
-- =========================================
-- 3) fact_coin_daily
-- =========================================
CREATE TABLE `fact_coin_daily` (
`date_key` INT NOT NULL COMMENT 'dim_date 조인용',
`market_key` INT NOT NULL COMMENT 'dim_market 조인용',
`opening_price` DECIMAL(20,8),
`high_price` DECIMAL(20,8),
`low_price` DECIMAL(20,8),
`close_price` DECIMAL(20,8) COMMENT 'trade_price를 close_price로 가정',
`volume` DECIMAL(28,8),
`acc_trade_price` DECIMAL(28,8),
`acc_trade_volume` DECIMAL(28,8),
`insert_dt` DATETIME DEFAULT CURRENT_TIMESTAMP COMMENT 'ETL 혹은 적재 시각',
PRIMARY KEY (`date_key`, `market_key`)
)
ENGINE = InnoDB
DEFAULT CHARSET = utf8mb4
COLLATE = utf8mb4_0900_ai_ci;
-- =========================================
-- 4) fact_coin_signal
-- =========================================
CREATE TABLE `fact_coin_signal` (
`signal_date_key` INT NOT NULL COMMENT '시그널이 발생한 날짜 (dim_date)',
`market_key` INT NOT NULL COMMENT '어떤 코인/마켓인지 (dim_market)',
`signal_type` VARCHAR(50) NOT NULL COMMENT '예: UPPER_BREAKOUT, LOWER_BREAKOUT',
`breakout_price` DECIMAL(20,8) NULL COMMENT '돌파(또는 하락 돌파) 기준 가격',
`breakout_rate` DECIMAL(10,4) NULL COMMENT '돌파 % (비율)',
`d_plus_x` INT NOT NULL COMMENT 'D+X에서 X (며칠 후를 보는지)',
`return_rate` DECIMAL(10,4) NULL COMMENT '시그널 발생일로부터 D+X일 후 수익률',
`insert_dt` DATETIME DEFAULT CURRENT_TIMESTAMP COMMENT '시그널 적재 시각',
PRIMARY KEY (`signal_date_key`, `market_key`, `signal_type`, `d_plus_x`)
)
ENGINE = InnoDB
DEFAULT CHARSET = utf8mb4
COLLATE = utf8mb4_0900_ai_ci;
1. fact_coin_daily (일봉 팩트 테이블)

2 B R 0 2 B