
오늘 배운 내용
sequelize 준비
sequelize 란?

-
ORM?
DB의 entity,record에 접근할때, 자바스크립트의 객체나 클래스의 형태로 만질 수 있음
(애플리케이션과 db사이를 맵핑시켜주는 도구) -
sequelize는 a promise-based Node.js ORM
-
sequelize 지원 RDBMS (mysql, mariadb, sqlite, postgres, ms sql server)
sequelize 설치
설치하기 cli명령어
- sequelize 설치
npm install --save sequelize - sequelize-cli 설치
마이그레이션(스키마 변경에 따른 데이터 이주?)을 할 수 있도록 돕는 툴,
=>> 데이터를 선택, 준비, 추출 및 변환하여 한 컴퓨터 저장 시스템에서 다른 컴퓨터 저장 시스템으로 영구적으로 전송하는 프로세스.
CLI에서 모델을 생성해주거나, 스키마 적용을 할 수 있도록 해준다.
npm install --save-dev sequelize-cli - bootstraping
init을 통해 비어있는 프로젝트를 만들어주기.
npx sequelize-cli init
`config`: contains config file, which tells CLI how to connect with database
`models`: contains all models for your project
`migrations`: contains all migration files
`seeders`: contains all seed files
위의 4개의 폴더를 자동으로 생성해준다(직접 dir만들지 않아도 된다.)
- 이때 help명령어 참고
npx sequelize-cli --help
ORM 설정
- config/config.json를 살펴보자.
- 포트번호는 각 RDBMS 의 기본 포트넘버를 사용한다고 하는데, 별도로 지정해 주고 싶으면 port 라는 key 를 만들고, 포트번호를 그 안에 value 로 적어주면 된다고 한다.
 "development": {
    "username": "root",
    "password": null,
    "database": "database_development",
    "host": "127.0.0.1",
    "dialect": "mysql",
		"port" : 8080
}- config.json에 패스워드와 데이터베이스 이름을 변경해주는데
- 이때 비밀번호에 환경변수를 사용할 수 있음 ( dotenv, env파일 필요)
- 만약 NODE_ENV 라는 환경변수가 딱히 지정되어있지 않으면, development 를 기준으로 시작하는듯 하다.
model 생성하기 (init을 통해 만들어진 폴더에 model을 생성)
- 모델은 엔티티를 객체로 표현한 형태로, 데이터 구조를 기술하고, 데이터에 수행할 수 있는 명령의 모음을 의미합니다.
- 모델생성 cli명령어
- 필드도 함께 생성해주는데
- 이때 id, createdAt, updateAt 필드는 자동 생성이다.
- 모델 + 모델의 필드들 생성하는 명령어
npx sequelize-cli model:generate --name 모델이름 --attributes 필드1:필드타입, 필드2:필드타입,필드3:필드타입
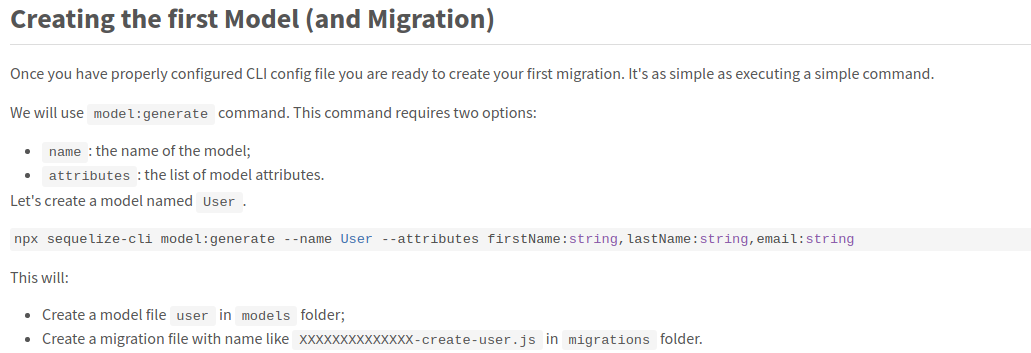
- 위의 명령어를 통해
model/생성한모델명.js그리고migrations/[타임스탬프]-create-모델명.js
이렇게 두개의 파일이 생성된다.
migration 작동시키기
- 실제 db에 반영
migration작동 즉, db에 스키마 심어주기
npx sequelize-cli db:migrate - desc 으로 생성된 테이블을 읽어올 수 있다.
desc 생성한 테이블명
(model과 함께 만들어진 migration/[타임스탬프]-create-모델명.js 파일 안에서
"createTable 메소드"로 만든 테이블명 (복수형태) ) - migration 취소
sequelize db:migrate:undo
생성된 테이블에 CRUD 하기. (루트에 controller폴더 생성)
- 다양한 메소드가 존재.
https://sequelize.org/master/manual/model-querying-basics.html - 모델을 불러와서 작업해야함
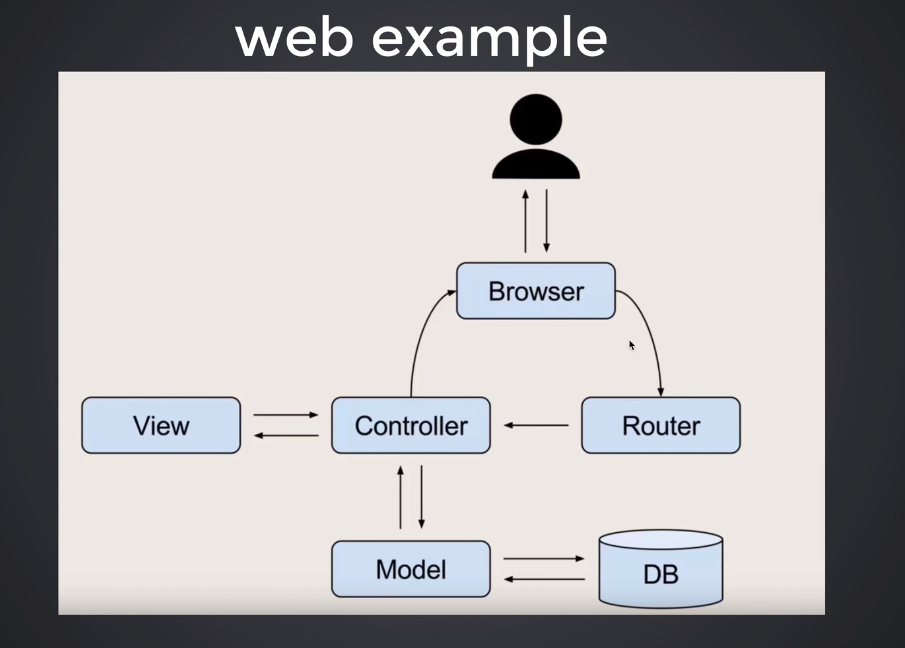
위 사진을 살펴보면, 데이터를 만지는 model이 컨트롤러에 데이터를 던지면 컨트롤러가 가공하게 되는 과정을 거치는데 이 과정에서 crud를 해주는듯 하다. const models = require("./models");또는
구조분해 할당으로 models폴더 안에있는 각각의 모델을 불러오는것도 좋은 방법.
Create (생성) : Post에서 사용됨
모델.create({
  firstname: "chulsu"
})
.then((data)=> {
  res.status(201).send(data);
 })
Read (조회)
 모델.findAll()
 .then((data)=> {
    res.status(200).send(data);
})
findAll()
Update (수정) : 수정할것 가져오고 업데이트를 진행
모델.findOne({
  where: { firstname: "chulsu" }
})
.then(data => {
  if (data) {
    data.update({
      firstname: "yunhee"
    })
 res.send(data.url);
  }
});
DELETE (삭제) : destroy()
모델.destroy({
  where: { firstname: "chulsu"
         }})
.then( data => console.log("deleted"));
기타 (주말 정리할것)
- bitly
url을 짧게 축약해 줌1.줄이고 싶은 url을 넣는다
2.shorten을 누른다
3.축약된 링크가 생성된다
4.해당링크를 누르면 원본 url로 이동한다.
[post links 컨트롤러]
1.url을 포스트 요청으로 받는다.
{ url: github.com} 이러한 형태로 받음
2.요청에 있는 주소를 db에 레코드로 생성함.
-url이 저장이 되고
-url의 id가 저장이 되고
-title이 저장되고
-방문횟수가 저장이 된다(이부분은 업데이트도 진행해야함)
3.만약 이미 존재하는 url이라면, 그냥 넘어간다.
[get links/:id 컨트롤러 ]
4.links/1 get요청이 오면
5.id를 통해 레코드를 조회
6.해당 레코드의 url을
7.컨트롤러에서 리다이렉트시킴
8.그리고 visits필드 값을 1 추가함
더 살펴보야할 내용
- seed부분
- association
- 테이블을 생성할 때 init 과 define의 차이점 (모델.js부분을 살펴보자)
Models can be defined in two equivalent ways in Sequelize:

Calling sequelize.define(modelName, attributes, options) API documentation on define

Extending Model and calling init(attributes, options) API documentation on init

After a model is defined, it is available within sequelize.models by its model name.

Internally, sequelize.define calls Model.init, so both approaches are essentially equivalent.```

프론트엔드 개발자