
Webpack 웹팩이란?
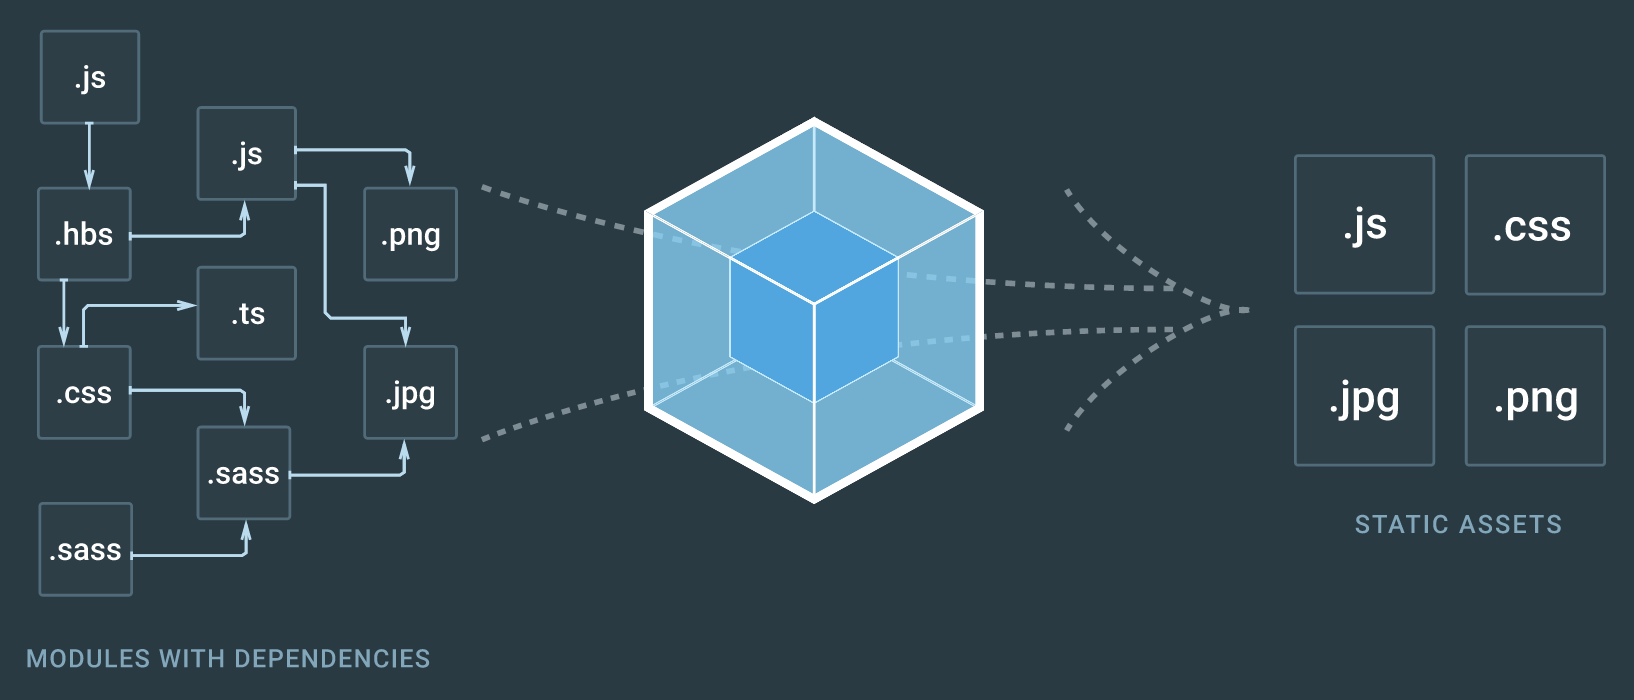
At its core, webpack is a static module bundler for modern JavaScript applications.
모던 자바스크립트 애플리케이션을 위한 정적 모듈 번들러. 내부적으로 프로젝트가 필요한 모듈을 맵핑하는 dependency graph 를 빌드하고 하나 이상의 번들을 생성한다.
Why Webpack?
문서의 마지막 문단에 요약이 잘 나와있다.
Wouldn't it be nice…
...to have something that will not only let us write modules but also support any module format (at least until we get to ESM) and handle resources and assets at the same time?
This is why webpack exists. It's a tool that lets you bundle your JavaScript applications (supporting both ESM and CommonJS), and it can be extended to support many different assets such as images, fonts and stylesheets.
webpack cares about performance and load times; it's always improving or adding new features, such as async chunk loading and prefetching, to deliver the best possible experience for your project and your users.
Webpack 의 장점
- 네트워크 병목 현상 해결
- 모듈 단위의 개발 가능 (모듈 의존성 관리)
- 다양한 loader 사용 가능 - webpack 이 컴파일하기 전 원하는 파일에 전처리를 할 수 있음
- 기타 등등 ...
Webpack 의 단점
- 러닝 커브가 높다
- 초기 구축에 어려움이 있을 수 있다
Webpack's Core Concept
1) Entry
An entry point indicates which module webpack should use to begin building out its internal dependency graph. webpack will figure out which other modules and libraries that entry point depends on (directly and indirectly).
Dependency graph 의 시작점.
module.exports = {
  entry: './path/to/my/entry/file.js',
};
2) Output
The output property tells webpack where to emit the bundles it creates and how to name these files. It defaults to ./dist/main.js for the main output file and to the ./dist folder for any other generated file.
You can configure this part of the process by specifying an output field in your configuration:
생성할 번들의 이름과 위치를 지정할 수 있다. Output 을 따로 설정하지 않을 시, 메인 아웃풋 파일은 './dist/main.js' 로 저장된다.
const path = require('path');

module.exports = {
  entry: './path/to/my/entry/file.js',
  output: {
    path: path.resolve(__dirname, 'dist'),
    filename: 'my-first-webpack.bundle.js',
  },
};
3) Loaders
Out of the box, webpack only understands JavaScript and JSON files. Loaders allow webpack to process other types of files and convert them into valid modules that can be consumed by your application and added to the dependency graph.
Webpack 은 자바스크립트와 JSON 파일만을 이해하기 때문에 Loader 를 통해 다른 파일 (css, txt, img 등) 을 처리한다.
const path = require('path');

module.exports = {
  output: {
    filename: 'my-first-webpack.bundle.js',
  },
  module: {
    rules: [{ test: /\.txt$/, use: 'raw-loader' }],
    // test : 변환할 파일을 지정
    // use : 변환 시에 사용할 loader 를 지정
  },
};
4) Plugins
While loaders are used to transform certain types of modules, plugins can be leveraged to perform a wider range of tasks like bundle optimization, asset management and injection of environment variables.
In order to use a plugin, you need to require() it and add it to the plugins array. Most plugins are customizable through options. Since you can use a plugin multiple times in a configuration for different purposes, you need to create an instance of it by calling it with the new operator.
번들된 파일에 추가적인 기능을 더하고 싶을 때 사용한다.
const HtmlWebpackPlugin = require('html-webpack-plugin'); //installed via npm
const webpack = require('webpack'); //to access built-in plugins

module.exports =
  module: {
    rules: [{ test: /\.txt$/, use: 'raw-loader' }],
  },
  plugins: [new HtmlWebpackPlugin({ template: './src/index.html' })],
};
5) Mode
By setting the mode parameter to either development, production or none, you can enable webpack's built-in optimizations that correspond to each environment. The default value is production.
모드에는 development, production 과 none 값이 존재하며, 각 환경에 맞는 webpack 의 빌트인 최적화 기능을 활성화시킬 수 있다.
module.exports = {
  mode: 'production',
};
참고자료:
