개요
EKS 클러스터 위에서 helm chart apache-airflow/airflow v1.9.0으로 airflow v2.5.3를 간단히 배포해보자. (굳이 EKS가 아니어도 큰 틀은 같음.)
구체적인 구현 내용은 아래와 같다.
- Service는
aws-load-balancer-controller로 LoadBalancer 타입을 사용. - dags 폴더는
aws-efs-csi-driver를 사용해 EFS를 persistent volume으로 dynamic provisioning. - dags에 대해 aws codeCommit을 소스로 바라보게 gitSync.
전제
aws-load-balancer-controlleraws-efs-csi-driver- (옵션) RDS 생성, 관련 SG 설정
- (옵션) eksctl로 IRSA 생성
- airflow를 배포할 k8s에 대한 워크로드 배포 권한
- helm cli (v3.10.0 에서 테스트됨)
개념
헬름 차트 airflow-v2.5.3-chart-1.9.0에서 사용할 수 있는 database 버전 호환성
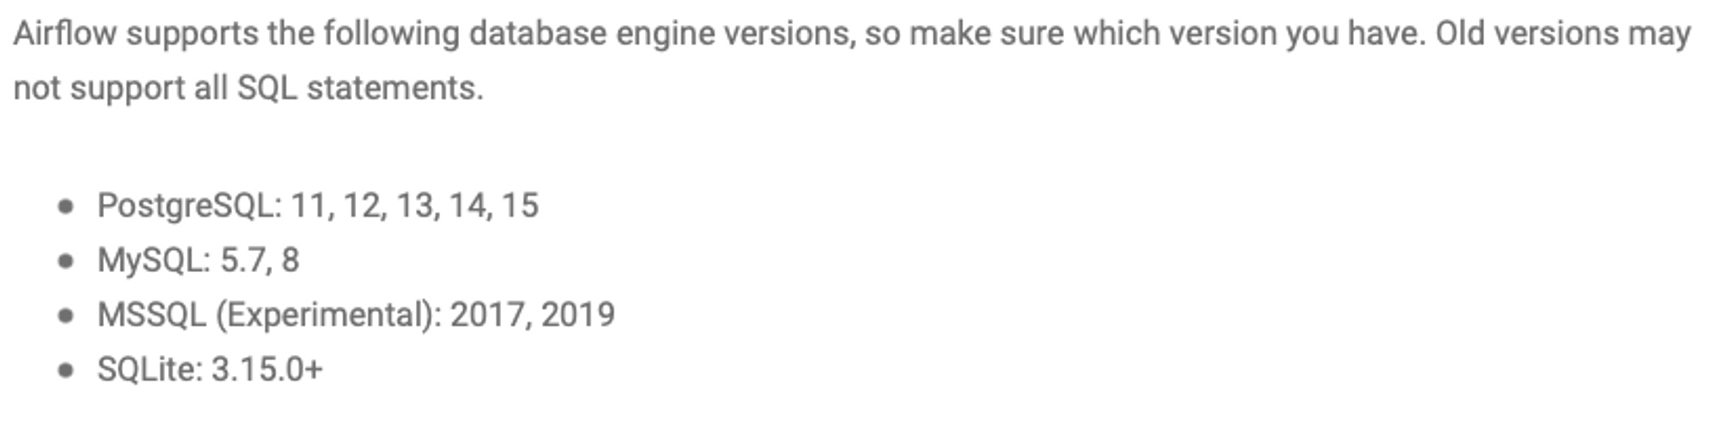
- RDS에서 pgsql v15.2를 사용하자.
아키텍처
- DAG : pv와 gitSync
- run의 log : persistent volume (efs-csi-controller)
- executor : KubernetesExecutor
- webserver : ALB (aws-load-balancer-controller)
- database : RDS (PostgreSQL v15.2-R2)
(옵션) RDS 생성
airflow의 metadata database로 사용할 postgresql이 없다면 새로 생성하자. 나는 aws RDS를 새로 생성해서 사용했다.
(생성하는 내용은 생략했음.)
> RDS를 생성할 경우, 비용이 발생하니 주의하세요!!
RDS는 private한 네트워크 특성이 있으므로 방화벽 오픈 작업을 해줘야 함. 특히, eks 클러스터에 올라간 airflow에서 RDS를 metadata database로 사용하므로 eks 클러스터가 있는 subnet으로부터 5432 포트로 인바운드 allow 정책을 추가해야 함.
보안그룹 설정 작업
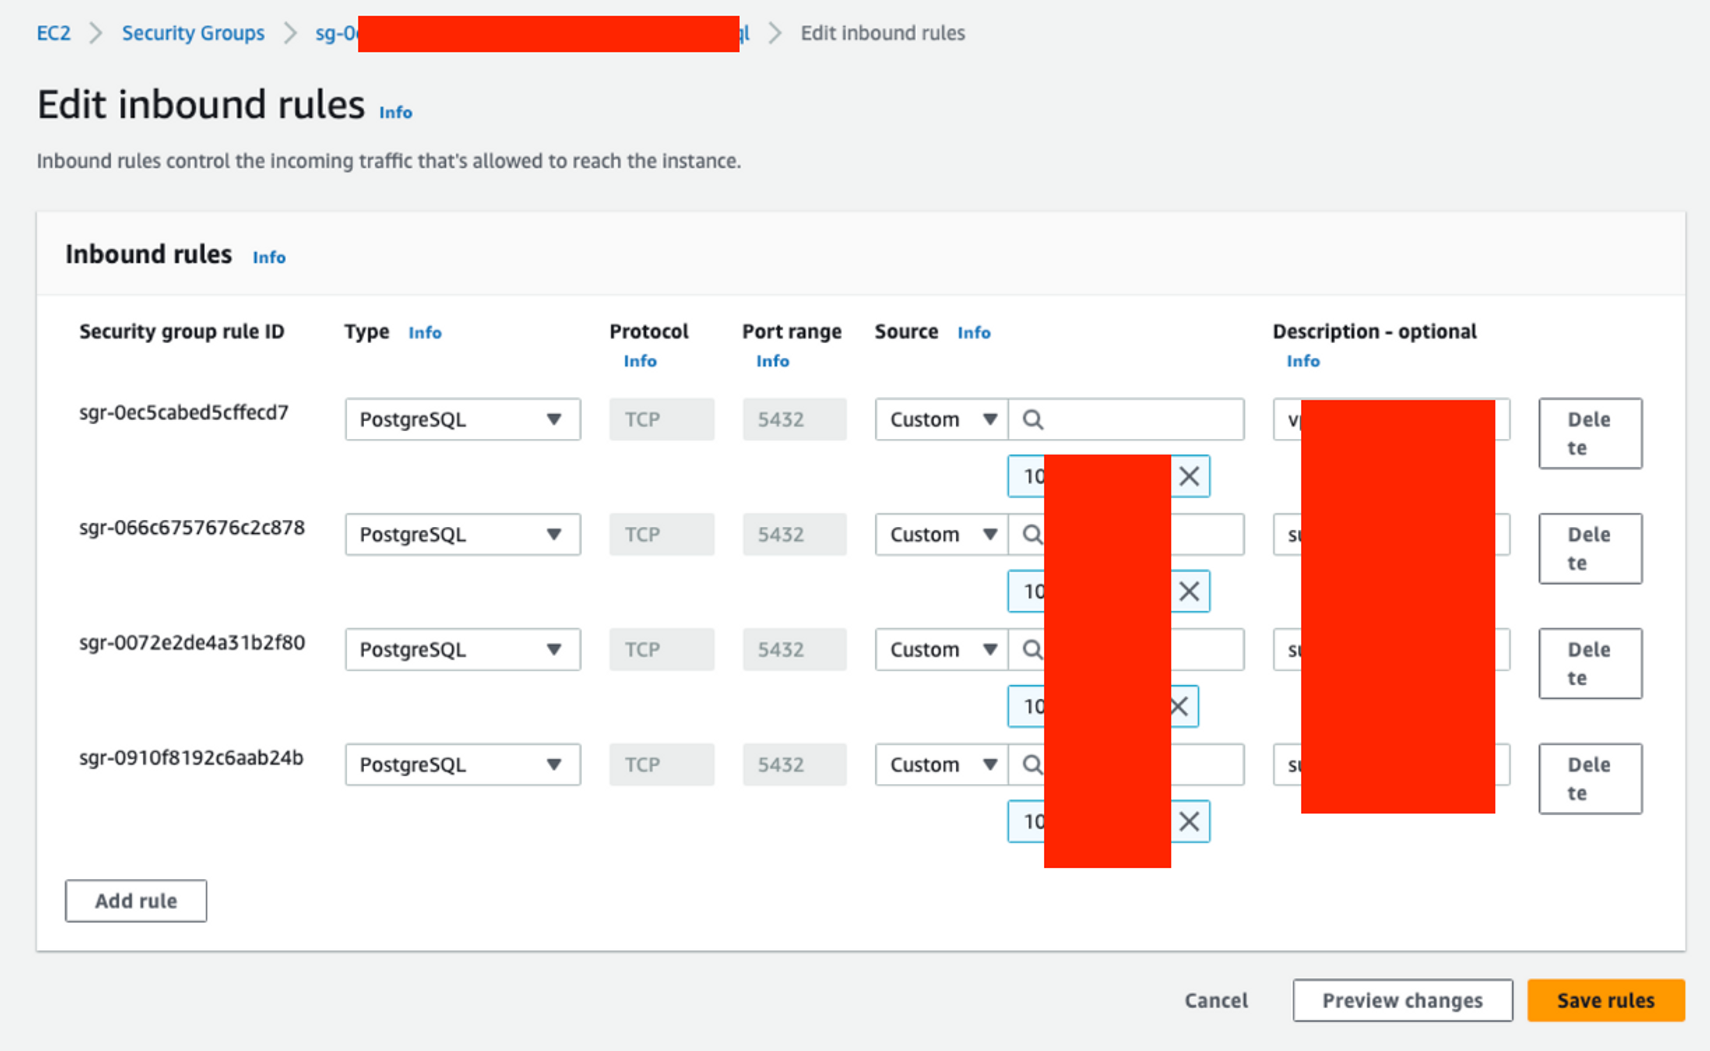
- k8s에서 접근 : k8s 워크로드들이 접근 가능하게 서브넷 IP CIDR으로부터 Inbound 규칙을 추가함.
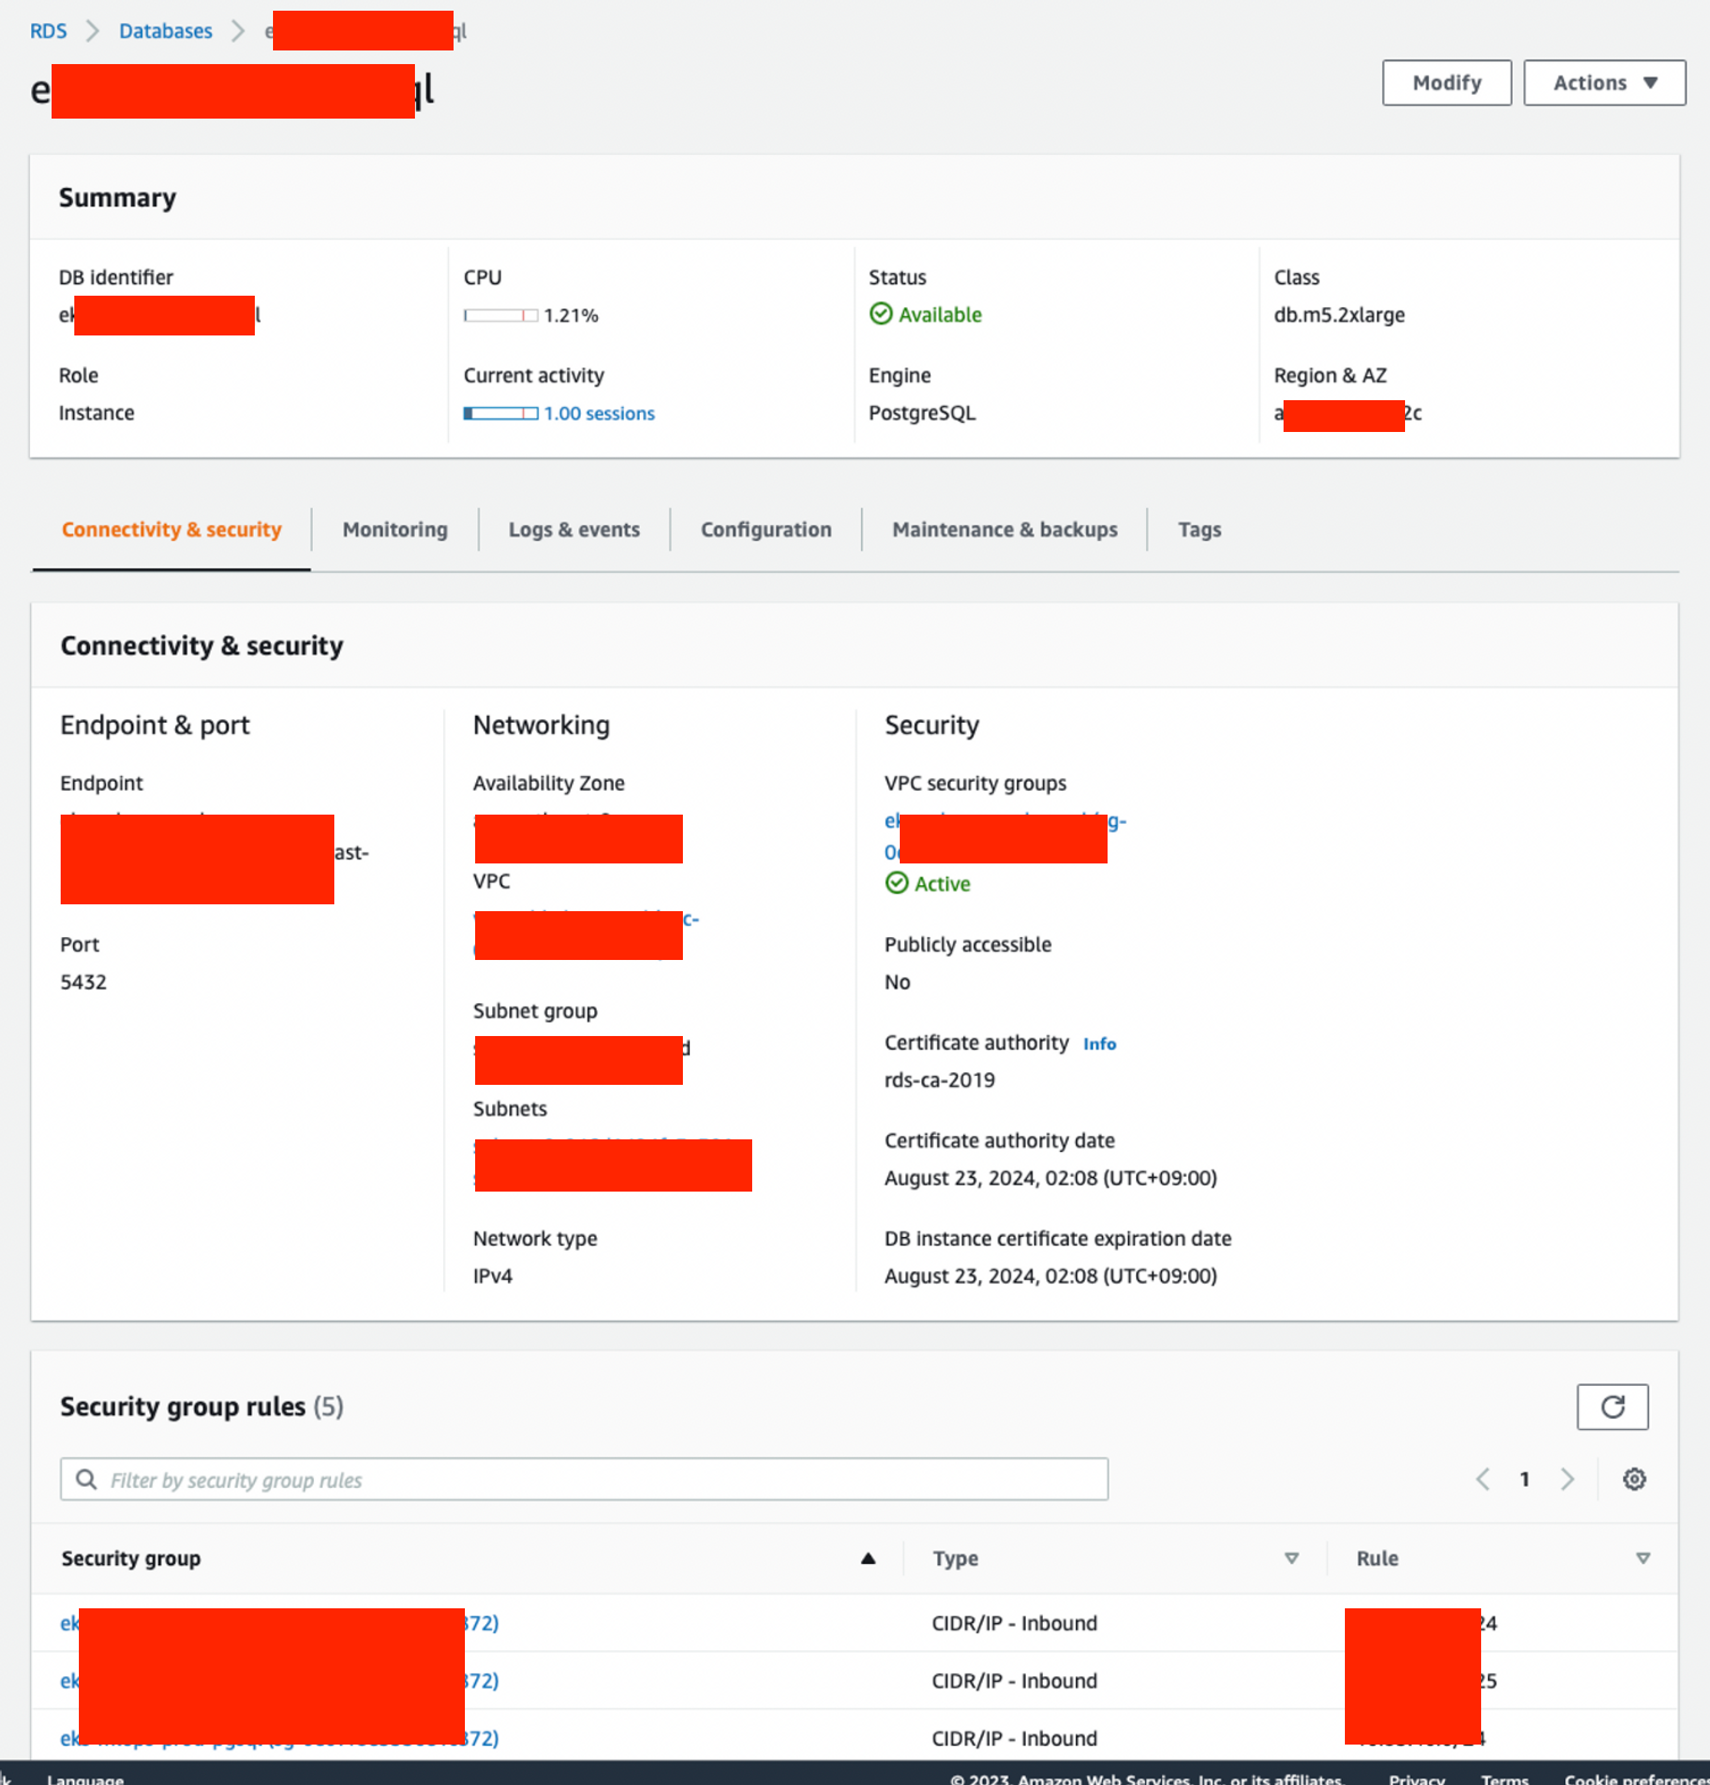
rds 생성 확인
tag 추가
- 왠만하면 리소스 관리를 위해 tag를 추가하자.
airflow에서 DB에 접근하기 위한 아래에 기본 정보들을 기억해두자.
DB 정보 요약
- endpoint : [db instance identifier].[random string].[region].rds.amazonaws.com
- username: [위에서 설정한 값]
- password: [위에서 설정한 값]
파드 안에서 DB 커넥션 테스트
- 앞서 RDS에 대해 NSG 설정을 해줬는데 실제로 airflow를 배포할 eks 위에서 pod를 띄워 RDS에 접근 가능한지 테스트해보자.
$ NAMESPACE=[airflow 배포할 네임스페이스 혹은 아무거나]
  PG_HOST=[앞서 확인한 RDS의 endpoint]
  PG_PORT=5432
  PG_USER=[앞서 확인한 RDS의 username]
  PG_DATABASE=postgres
  PG_PASSWORD=[앞서 확인한 RDS의 password]
  kubectl delete pod postgresql-ha-client -n $NAMESPACE 2> /dev/null || true; \
  kubectl run postgresql-ha-client --rm --tty -i --restart='Never' \
    --namespace $NAMESPACE \
    --image docker.io/bitnami/postgresql-repmgr:14.4.0-debian-11-r13 \
    --env="PGPASSWORD=$PG_PASSWORD" \
    --command -- psql -h $PG_HOST -p $PG_PORT -U $PG_USER -d $PG_DATABASE -c "select 1"

?column?
----------
        1
(1 row)- 연결이 정상적으로 되면 위와 같은 출력을 함.
airflow를 위한 데이터베이스 작업
airflow 데이터베이스 생성
postgres=> CREATE DATABASE airflow;
CREATE DATABASE
postgres=> \list
                                  List of databases
   Name    |  Owner   | Encoding |   Collate   |    Ctype    |   Access privileges
-----------+----------+----------+-------------+-------------+-----------------------
 airflow   | postgres | UTF8     | en_US.UTF-8 | en_US.UTF-8 |
 postgres  | postgres | UTF8     | en_US.UTF-8 | en_US.UTF-8 |
 rdsadmin  | rdsadmin | UTF8     | en_US.UTF-8 | en_US.UTF-8 | rdsadmin=CTc/rdsadmin+
           |          |          |             |             | rdstopmgr=Tc/rdsadmin
 template0 | rdsadmin | UTF8     | en_US.UTF-8 | en_US.UTF-8 | =c/rdsadmin          +
           |          |          |             |             | rdsadmin=CTc/rdsadmin
 template1 | postgres | UTF8     | en_US.UTF-8 | en_US.UTF-8 | =c/postgres          +
           |          |          |             |             | postgres=CTc/postgres
(5 rows)
airflow_user 계정 생성 및 airflow 데이터베이스에 권한 부여
postgres=> CREATE USER airflow_user WITH PASSWORD '[사용할 패스워드 입력]';
postgres=> GRANT ALL PRIVILEGES ON DATABASE airflow TO airflow_user;
postgres=> \c airflow;
postgres=> GRANT ALL ON SCHEMA public TO airflow_user;
helm으로 airflow 배포
차트 다운로드
### (옵션)워킹 디렉토리 확인
$ pwd
helm/

### airflow helm repo 추가 및 업데이트
$ helm repo add apache-airflow https://airflow.apache.org
  helm repo update

### 설치 가능한 버전 조회
$ helm search repo apache-airflow/airflow --versions

NAME                    CHART VERSION   APP VERSION     DESCRIPTION
apache-airflow/airflow  1.9.0           2.5.3           The official Helm chart to deploy Apache Airflo...
apache-airflow/airflow  1.8.0           2.5.1           The official Helm chart to deploy Apache Airflo...
apache-airflow/airflow  1.7.0           2.4.1           The official Helm chart to deploy Apache Airflo...
...

### 최신버전 차트 다운로드 및 폴더명에 버전 추가
$ helm fetch --untar apache-airflow/airflow --version 1.9.0
  mv airflow airflow-v2.5.3-chart1.9.0
override 할 values.yaml 생성
$ cd airflow-v2.5.3-chart1.9.0
  touch override-values-prod-alb-efs-gitSync-k8sExec.yaml
override-values-prod-alb-efs-gitSync-k8sExec.yaml 작성
extraSecrets:
  'git-credentials':
    data: |
      GIT_SYNC_USERNAME: [gitSync를 위한 권한을 입력하자]
      GIT_SYNC_PASSWORD: [[gitSync를 위한 권한을 입력하자]

dags:
  persistence:
    enabled: true
    storageClassName: [사용하고자 하는 storageClass 이름]
    accessMode: ReadWriteMany
    size: 100Gi

  gitSync:
    enabled: true

    # git repo clone url
    # ssh examples ssh://git@github.com/apache/airflow.git
    # git@github.com:apache/airflow.git
    # https example: https://github.com/apache/airflow.git
    repo: [dag를 가져올 git repo url]
    branch: master
    rev: HEAD
    depth: 1
    # the number of consecutive failures allowed before aborting
    maxFailures: 0
    # subpath within the repo where dags are located
    # should be "" if dags are at repo root
    subPath: "dags"
    # if your repo needs a user name password
    # you can load them to a k8s secret like the one below
    #   ---
    #   apiVersion: v1
    #   kind: Secret
    #   metadata:
    #     name: git-credentials
    #   data:
    #     GIT_SYNC_USERNAME: <base64_encoded_git_username>
    #     GIT_SYNC_PASSWORD: <base64_encoded_git_password>
    # and specify the name of the secret below
    #
    credentialsSecret: 'git-credentials'
    #
    #
    # If you are using an ssh clone url, you can load
    # the ssh private key to a k8s secret like the one below
    #   ---
    #   apiVersion: v1
    #   kind: Secret
    #   metadata:
    #     name: airflow-ssh-secret
    #   data:
    #     # key needs to be gitSshKey
    #     gitSshKey: <base64_encoded_data>
    # and specify the name of the secret below
    # sshKeySecret: airflow-ssh-secret
    #
    # If you are using an ssh private key, you can additionally
    # specify the content of your known_hosts file, example:
    #
    # knownHosts: |
    #    <host1>,<ip1> <key1>
    #    <host2>,<ip2> <key2>
    # interval between git sync attempts in seconds
    wait: 10
    containerName: git-sync
    uid: 65533

    # When not set, the values defined in the global securityContext will be used
    securityContext: {}
    #  runAsUser: 65533
    #  runAsGroup: 0

    extraVolumeMounts: []
    env: []
    resources: {}
    #  limits:
    #   cpu: 100m
    #   memory: 128Mi
    #  requests:
    #   cpu: 100m
    #   memory: 128Mi

webserver:
  service:
    type: LoadBalancer
    ports:
      - name: airflow-ui
        port: "{{ .Values.ports.airflowUI }}"
  defaultUser:
    enabled: true
    role: Admin
    username: admin
    email: [필요에 따라 관리자 이메일 설정]
    firstName: admin
    lastName: user
    password: [admin 계정 비밀번호 설정]

postgresql:
  enabled: false

data:
  metadataConnection:
    user: airflow_user  #postgres
    pass: [앞서 RDS 생성 시에 설정한 airflow_user의 패스워드]
    protocol: postgresql
    host: [앞서 생성한 RDS의 endpoint]
    port: 5432
    db: airflow
    sslmode: require  # disable

logs:
  persistence:
    # Enable persistent volume for storing logs
    enabled: true #false
    # Volume size for logs
    size: 100Gi
    # If using a custom storageClass, pass name here
    storageClassName: [storage class 이름]
    ## the name of an existing PVC to use
    # existingClaim:

# Airflow executor
# One of: LocalExecutor, LocalKubernetesExecutor, CeleryExecutor, KubernetesExecutor, CeleryKubernetesExecutor
executor: "KubernetesExecutor"extraSecrets: gitSync와 관련하여 AWS CodeCommit에 대한 git clone를 하기 위해 권한이 있는 인증 정보 HTTPS Git credentials for AWS CodeCommit을GIT_SYNC_USERNAME과GIT_SYNC_PASSWORD변수에 저장한git-credentialssecret을 추가함.dags: dag에 대한 설정들.persistence: dags 폴더에 대한 persistent volume 설정. 여기서는 storage class를 사용함.gitSync: dag들을 git에서 주기적으로 clone 해오도록 함.repo는 코드커밋 주소를 사용했고branch,rev(revision),depth,subPath(폴더 경로) 등을 설정할 수 있음. 특히credentialsSecret을 지정할 때, 앞서extraSecrets에서 설정한git-credentialssecret을 사용함. wait에 몇 초마다 git clone할 건지 정할 수 있음.containerName필드도 설정할 수 있는데 이는 스케줄러 파드의 사이드카 컨테이너로 뜨기 때문임.
webserver: airflow의 웹서버에 대한 설정.service: 여기서는 ingress말고 LoadBalancer를 사용함.defaultUser: 기본 어드민 유저 생성함.
postgresql.enabled: 이미 RDS를 사용하기로 했으므로 이 값을false로 설정하여 airflow 릴리즈 배포 시에 pgsql도 배포하지 않도록 함.data.metadataConnection: RDS postgresql에 대한 설정들.logs.persistence: dag의 run들에 대한 로그를 저장하도록 함. storage class를 활용함.executor: k8s를 활용하므로KubernetesExecutor를 설정함.
릴리즈 배포를 위한 주요 helm 명령어
$ helm upgrade --install \
        $RELEASE_NAME \
        $CHART_PATH \
        --namespace $NAMESPACE --create-namespace \
-f ./$CHART_PATH/$VALUES_FILE_NAME- 릴리즈를 배포할 때, 직접 작성한 스크립트를 사용했는데 여기서 주요 내용은 위와 같으므로 위 명령어만 잘 사용해도 충분히 배포가 됨. 단, 위에서 사용하는 환경 변수들을 잘 지정해서 사용하자.
릴리즈 배포
$ bash exec-helm.sh -u
23-05-07 21:20:55 [INFO] [current working directory: helm]
23-05-07 21:20:55 [INFO] [PREFLIGHT - START]
23-05-07 21:20:55 [INFO] [PREFLIGHT - your current k8s context is]
 |    *****
 * Do you want to do things about this cluster? (y/n) [y]:
 * Enter a value for VALUES_FILE_NAME [override-values-prod-alb-efs-gitSync-k8sExec.yaml]:
 * Enter a value for CHART_PATH [airflow-v2.5.3-chart1.9.0]:
 * Enter a value for NAMESPACE [airflow]:
 * Enter a value for RELEASE_NAME [airflow]:
23-05-07 21:20:57 [INFO] [PREFLIGHT - END]
23-05-07 21:20:57 [INFO] [variable list]
 |   VALUES_FILE_NAME : override-values-prod-alb-efs-gitSync-k8sExec.yaml
 |   CHART_PATH : airflow-v2.5.3-chart1.9.0
 |   NAMESPACE : airflow
 |   RELEASE_NAME : airflow
 * Do you want to upgrade(or install) release 'airflow'? (y/n) [y]:
23-05-07 21:20:58 [INFO] [UPGRADE(or INSTALL) RELEASE - START]
Release "airflow" does not exist. Installing it now.
NAME: airflow
LAST DEPLOYED: Sun May  7 21:21:00 2023
NAMESPACE: airflow
STATUS: deployed
REVISION: 1
TEST SUITE: None
NOTES:
Thank you for installing Apache Airflow 2.5.3!

Your release is named airflow.
You can now access your dashboard(s) by executing the following command(s) and visiting the corresponding port at localhost in your browser:

Airflow Webserver:     kubectl port-forward svc/airflow-webserver 8080:8080 --namespace airflow
Default Webserver (Airflow UI) Login credentials:
    username: admin
    password: ******

You can get Fernet Key value by running the following:

    echo Fernet Key: $(kubectl get secret --namespace airflow airflow-fernet-key -o jsonpath="{.data.fernet-key}" | base64 --decode)

###########################################################
#  WARNING: You should set a static webserver secret key  #
###########################################################

You are using a dynamically generated webserver secret key, which can lead to
unnecessary restarts of your Airflow components.

Information on how to set a static webserver secret key can be found here:
https://airflow.apache.org/docs/helm-chart/stable/production-guide.html#webserver-secret-key
23-05-07 21:21:51 [INFO] [UPGRADE(or INSTALL) RELEASE - END]
23-05-07 21:21:51 [INFO] [UPGRADE(or INSTALL) RELEASE - PRINT release's values]
USER-SUPPLIED VALUES:
dags:
  gitSync:
    branch: master
    containerName: git-sync
    credentialsSecret: git-credentials
    depth: 1
    enabled: true
    env: []
    extraVolumeMounts: []
    maxFailures: 0
    repo: [gitSync할 repo URL]
    resources: {}
    rev: HEAD
    securityContext: {}
    subPath: dags
    uid: 65533
    wait: 60
  persistence:
    accessMode: ReadWriteMany
    enabled: true
    size: 100Gi
    storageClassName: [사용할 storage class name]
data:
  metadataConnection:
    db: airflow
    host: [앞서 생성한 RDS endpoint]
    pass: [앞서 생성한 RDS password]
    port: 5432
    protocol: postgresql
    sslmode: require
    user: airflow_user
executor: KubernetesExecutor
extraSecrets:
  git-credentials:
    data: |
      GIT_SYNC_USERNAME: [gitSync할 권한]
      GIT_SYNC_PASSWORD: [[gitSync할 권한]
logs:
  persistence:
    enabled: true
    size: 100Gi
    storageClassName: [사용할 storage class name]
postgresql:
  enabled: false
webserver:
  defaultUser:
    email: [사용할 어드민 이메일]
    enabled: true
    firstName: admin
    lastName: user
    password: [admin 계정의 비밀번호]
    role: Admin
    username: admin
  service:
    ports:
- name: airflow-ui- 직접 작성한
exec-helm.sh를 사용함.
배포 확인
$ helm ls -n airflow
NAME NAMESPACE REVISION UPDATED STATUS CHART APP VERSION
airflow airflow 1 2023-05-07 21:21:00.43613 +0900 KST deployed airflow-1.9.0 2.5.3
$ kubectl get all -n airflow
NAME READY STATUS RESTARTS AGE
pod/airflow-scheduler-57f6c9b46c-**** 3/3 Running 0 9m10s
pod/airflow-statsd-d8c8f886c-**** 1/1 Running 0 9m10s
pod/airflow-triggerer-548c8b5bb-**** 2/2 Running 0 9m10s
pod/airflow-webserver-6f5645ddc-**** 1/1 Running 0 9m10s
NAME TYPE CLUSTER-IP EXTERNAL-IP PORT(S) AGE
service/airflow-statsd ClusterIP 172.20.197.64 <none> 9125/UDP,9102/TCP 9m11s
service/airflow-webserver LoadBalancer 172.20.27.79 ****.[region].elb.amazonaws.com 8080:30848/TCP 9m11s
NAME READY UP-TO-DATE AVAILABLE AGE
deployment.apps/airflow-scheduler 1/1 1 1 9m11s
deployment.apps/airflow-statsd 1/1 1 1 9m11s
deployment.apps/airflow-triggerer 1/1 1 1 9m11s
deployment.apps/airflow-webserver 1/1 1 1 9m11s
NAME DESIRED CURRENT READY AGE
replicaset.apps/airflow-scheduler-57f6c9b46c 1 1 1 9m10s
replicaset.apps/airflow-statsd-d8c8f886c 1 1 1 9m11s
replicaset.apps/airflow-triggerer-548c8b5bb 1 1 1 9m10s
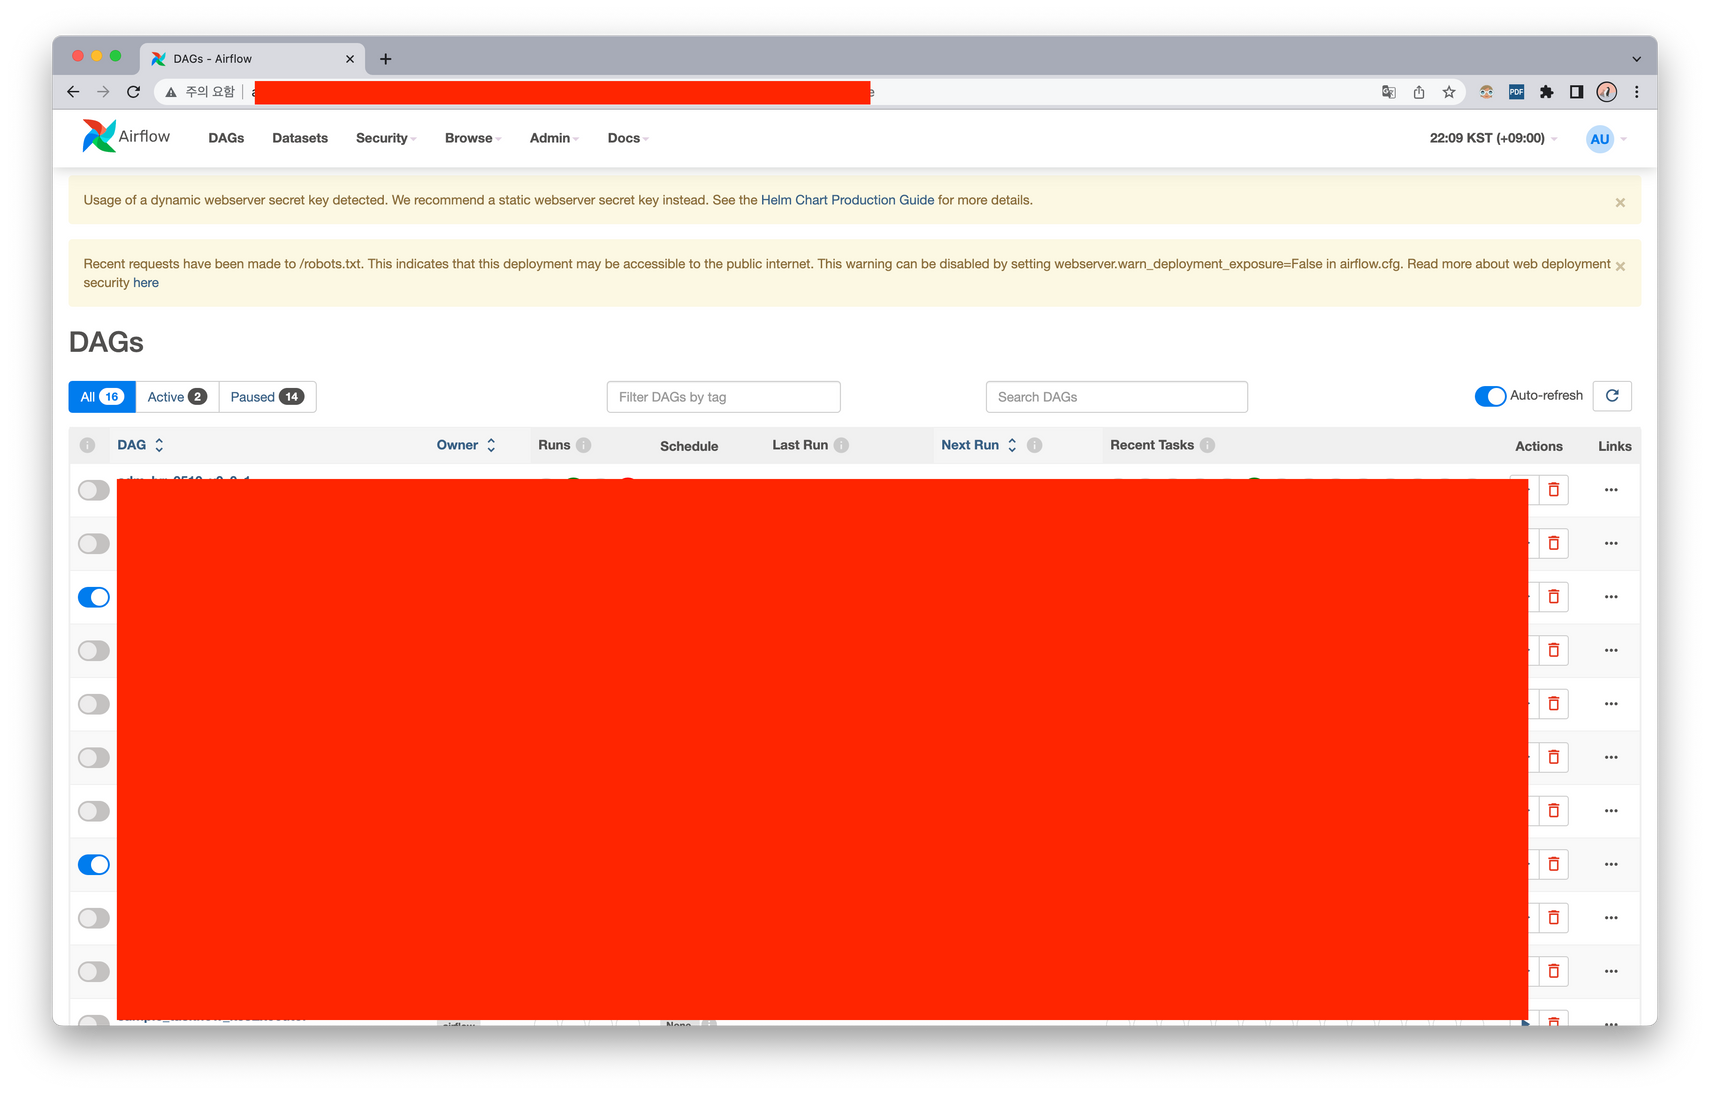
replicaset.apps/airflow-webserver-6f5645ddc 1 1 1 9m10sUI 확인
(옵션) IRSA 생성
$ eksctl create iamserviceaccount \
    --cluster [eks 클러스터 이름] \
    --namespace airflow \
    --name [사용할 IRSA 이름] \
    --attach-policy-arn=arn:aws:iam::aws:policy/AWSCodeCommitReadOnly \
    --approve \
--region ap-northeast-2- IRSA를 생성하는 이유는 dag의 특정 task에서 내 aws 계정에 작업을 하기 위해서이다. 굳이 IRSA를 만들지 않고 이미 IAM user나 role이 있다면 활용해도 좋다. 필요애 따라 수행하자.
- 사실 aws 권한을 사용하기 위한 방법은 다양하다. 이 방법의 특징으로는 eksctl을 활용해 role을 직접 만들고 관리하며 pod로 뜨는 task에 직접 service account를 지정해줘야하기 때문에 k8s, aws에 더 근접한 방법이라고 생각된다. 즉, 전적으로 사용자의 입장이라면 좋은 방법이 될 수 없는 것 같다. 이 경우, IAM 작업을 관리자에게 요청하여 키패어를 airflow connection 등을 활용할 수 있을 것 같다.
- 아무튼 위 eksctl 명령어의 내용은 다음과 같다. 내 eks 클러스터에서 airflow 네임스페이스의 특정 이름의 service account에 대해 IRSA를 생성함.
k8s에서 확인
$ k get sa -n airflow [사용할 IRSA 이름]
NAME              SECRETS   AGE
[사용할 IRSA 이름]   1         73s

$ k get sa -n airflow [사용할 IRSA 이름] -o yaml
apiVersion: v1
kind: ServiceAccount
metadata:
  annotations:
    eks.amazonaws.com/role-arn: arn:aws:iam::[aws account id]:role/eksctl-[cluster name]-addon-iamserviceaccoun-Role1-****
  creationTimestamp: "2023-05-08T08:24:19Z"
  labels:
    app.kubernetes.io/managed-by: eksctl
  name: [사용할 IRSA 이름]
  namespace: airflow
  resourceVersion: "54168173"
  uid: ecc77ed8-0cf2-44fb-8624-3e43d74ae820
secrets:
- name: airflow-***-token-****
IRSA에 S3 접근 권한 부여 (inline-policy)
{
    "Version": "2012-10-17",
    "Id": "ReadS3MyBucket",
    "Statement": [
        {
            "Sid": "ListBUcket",
            "Effect": "Allow",
            "Action": "s3:ListBucket",
            "Resource": "arn:aws:s3:::[내 버킷 이름]"
        },
        {
            "Sid": "GetPutObject",
            "Effect": "Allow",
            "Action": [
                "s3:GetObject",
                "s3:PutObject"
            ],
            "Resource": "arn:aws:s3:::[내 버킷 이름]/*"
        }
    ]
}- 나는 특정 S3 버킷에 Read, Write 해야하는 권한이 필요했으므로 이에 대한 권한을 부여함.
권한 테스트
- 임의로 파드를 하나 만들어 IRSA를 통해 부여받은 권한 s3 접근을 테스트 해봄.
### 파드 생성
$ cat <<EOF | kubectl apply -f -
apiVersion: v1
kind: Pod
metadata:
  name: irsa-pod
  namespace: airflow
spec:
  serviceAccountName: [IRSA를 사용하는 Service Account 이름]
  containers:
  - name: python-container
    image: python:3.7
    command: ["sleep", "1000000000"]
EOF
### 해당 bucket의 파일을 읽어오는 python 코드
import boto3
s3_client = boto3.client('s3')
response = s3_client.get_object(Bucket="[앞서 권한 설정한 버킷 이름]", Key="[읽을 csv 파일 이름]")
csv_data = response['Body'].read().decode('utf-8')
print(df)