drag관련해서 좋은 라이브러리들이 있지만 순수하게 구현해보고 싶다.
더 나아가 관련해서 drag and drop, resize, carousel 등 다양한 기능까지 구현해볼 생각이다.
아래의 스펙으로 구현을 시작해보자 🏄🏻♂️
NextJSReactTypescriptTilwind괜히 진입장벽이 생긴 것 같다... 미얀합니다...라이브러리onDragStart
TL;DR
mousedown에서mousemovemouseup이벤트를 등록한다.
mousemove에서event.pageX와mousedown의event.pageX차이를 활용해 엘리먼트를 이동시킨다.
mouseup에서mousemove이벤트를 해제시킨다.
사전 지식 — DOM 이해
마우스의 움직임 바탕으로 element의 위치를 이동시켜야 한다.
따라서 마우스 관련 이벤트를 잘 이해해야 한다.
mousedown — 마우스 클릭 이벤트
mousemove — 마우스 이동 이벤트
mouseup — 마우스 클릭 해제 이벤트
https://developer.mozilla.org/en-US/docs/Web/API/MouseEvent
위 DOM 이벤트를 활용하여 마우스의 정보를 받아 올 수 있을 것 같다.
그렇다면 MouseEvent는 어떤 속성을 가지고 있을까?
비슷 비슷하게 보이는 친구들이 많은데 차이를 비교해보자.
| Properties | |
|---|---|
| x, clientX | in local (DOM content) coordinates. event가 발생되는 element 기준으로 위치를 산정한다. |
| pageX | relative to the whole document. page document을 기준으로 위치를 산정한다. |
| screenX | in global (screen) coordinates. 더 나아가 듀얼 모니터의 주 모니터를 기준으로 위치를 산정한다. |
무엇을 사용하던 크게 문제될 것이 없어보여 screenX을 사용해보자.
기본 원리 — Drag 이벤트 등록
그렇다면 DOM 이벤트를 활용하여 마우스의 움직임을 추적해보자!
주요 로직은 아래와 같다.
- 클릭시(
onMouseDown) document에mousemovemouseup이벤트를 등록한다. - 클릭된 상태에서 마우스를 움직일시
mousemove에 등록 된 함수가 계속 호출된다. mouseup이벤트에서mousemove이벤트를 제거한다.
<div
  onMouseDown={() => {
    // 2️⃣
    const mouseMoveHandler = (e: MouseEvent) => {
      console.log(`mouse move x:${e.screenX} y:${e.screenY}`);
    };

    // 3️⃣
    const mouseUpHandler = (e: MouseEvent) => {
      console.warn(`>>>> mouse up x:${e.screenX} y:${e.screenY}`);
      document.removeEventListener('mousemove', mouseMoveHandler);
    };

    // 1️⃣
    document.addEventListener('mousemove', mouseMoveHandler);
    document.addEventListener('mouseup', mouseUpHandler, { once: true });
    // mouseup 이벤트는 한번만 실행되면 되기에 { once: true } 옵션을 추가해준다.
  }}
/>
기본 응용 — Drag 위치 이동
마우스의 움직임을 추적하였으니,
이제 이를 활용하여 element를 drag해서 위치를 움직여보자!
- element의
position상태를 정의한다. - 클릭(
mousedown) 이벤트 발생시의 커서 위치를 기준으로,
이동(mousemove) 이벤트에서 상대적으로 이동한 거리(deltaX, deltaY)를 계산한다. position상태를 변경하여 element를 움직이게 한다.
// 1️⃣
const [{ x, y }, setPosition] = useState({
	x: 0,
	y: 0,
});

return <div>
	<div
		style={{ transform: `translateX(${x}px) translateY(${y}px)` }}
        onMouseDown={(clickEvent: React.MouseEvent<Element, MouseEvent>) => {
            const mouseMoveHandler = (moveEvent: MouseEvent) => {
              // 2️⃣
              const deltaX = moveEvent.screenX - clickEvent.screenX;
              const deltaY = moveEvent.screenY - clickEvent.screenY;

              // 3️⃣
              setPosition({
                  x: x + deltaX,
                  y: y + deltaY,
              });
            };

            const mouseUpHandler = () => {
              document.removeEventListener('mousemove', mouseMoveHandler);
            };

            document.addEventListener('mousemove', mouseMoveHandler);
            document.addEventListener('mouseup', mouseUpHandler, { once: true });
      	}}
	/>
</div>
(TIP)
에니메니션 인터랙션을 고려할 경우,
실제 drag할 element(Box)를 div로 씌워서 이벤트, style를 등록 것이 좋다.
transition: transform 경우 원치않게 에니메이션 효과가 적용될 수 있다.
<div
style={...}
onMouseDown={...}
>
<Box />
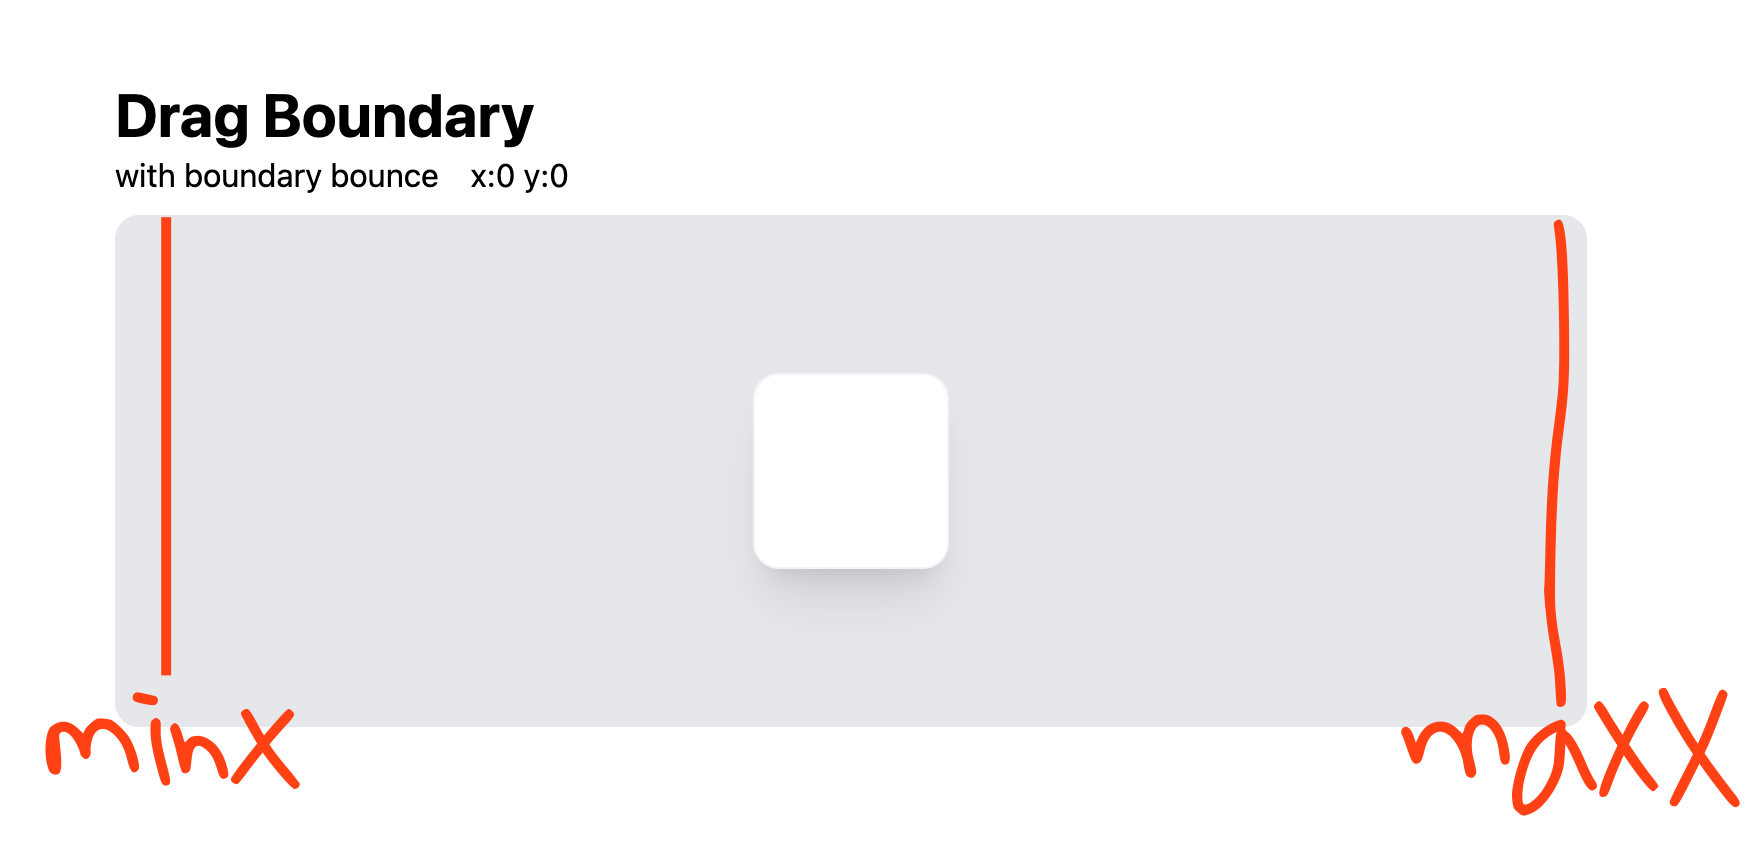
</div>심화 응용 — Drag Boundary
drag할 때 특정 영역(boundary)을 벗어나지 않길 원할 수 있다.
위 2번 과정, mousemove이벤트에서 특정 범위를 벗어나지 않도록 제한하면 된다.
1. boundary, box element의 크기를 얻는다.
getBoundingClientRect을 활용하여 element의 정보를 얻을 수 있다.
const boundary = boundaryRef.current.getBoundingClientRect();
const box = boxRef.current.getBoundingClientRect();
// x, y, width, height
2. drag할 수 있는 경계(minx, maxx, miny, maxy)를 계산한다.
element를 놓는 기준에 따라 boundary가 달라지는데 상황에 맞게 잘 계산하면 된다.
drag element이 중앙 정렬되었다고 생각해보자.
기본 box의 위치는 x:0, y:0(중앙) 이다.
따라서 element의 제한 범위를 계산해보면
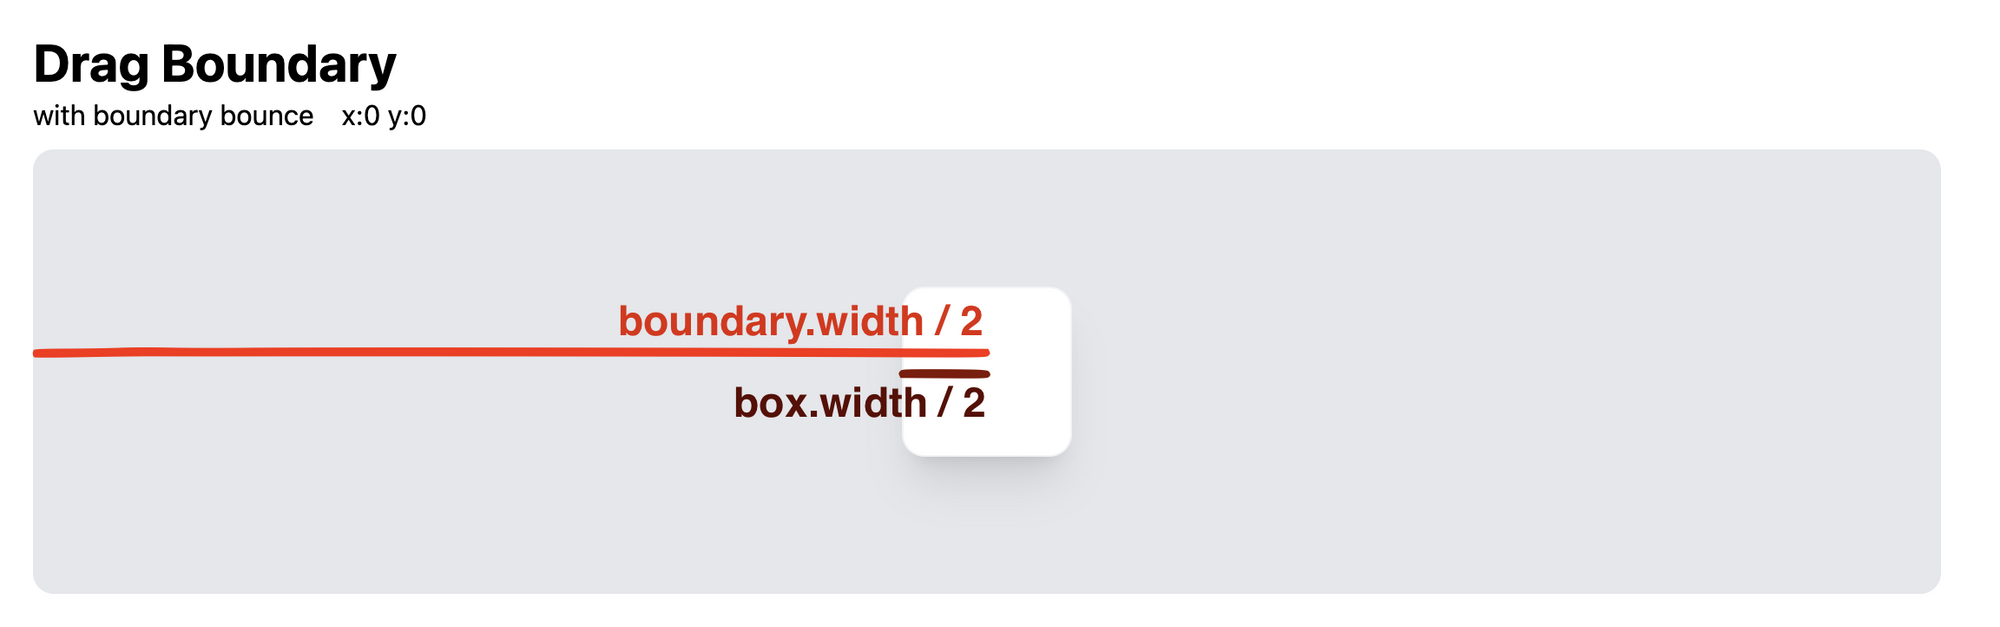
좌측 끝 = -boundary.width/2 + box.width/2 + margin
우측 끝 = boundary.width/2 - box.width/2 - margin
먼저, 범위를 얻는 유틸함수를 만들면 코드가 더 깔끔해질 것 같다.
const inrange = (v: number, min: number, max: number) => {
  if (v < min) return min;
  if (v > max) return max;
  return v;
};
코드에 적용하면 아래와 같다.
const BOUNDARY_MARGIN = 12;
const deltaX = moveEvent.screenX - clickEvent.screenX;
const deltaY = moveEvent.screenY - clickEvent.screenY;
setPosition({
x: inrange(
x + deltaX,
Math.floor(-boundary.width / 2 + box.width / 2 + BOUNDARY_MARGIN),
Math.floor(boundary.width / 2 - box.width / 2 - BOUNDARY_MARGIN),
),
y: inrange(
y + deltaY,
Math.floor(-boundary.height / 2 + box.height / 2 + BOUNDARY_MARGIN),
Math.floor(boundary.height / 2 - box.height / 2 - BOUNDARY_MARGIN),
),
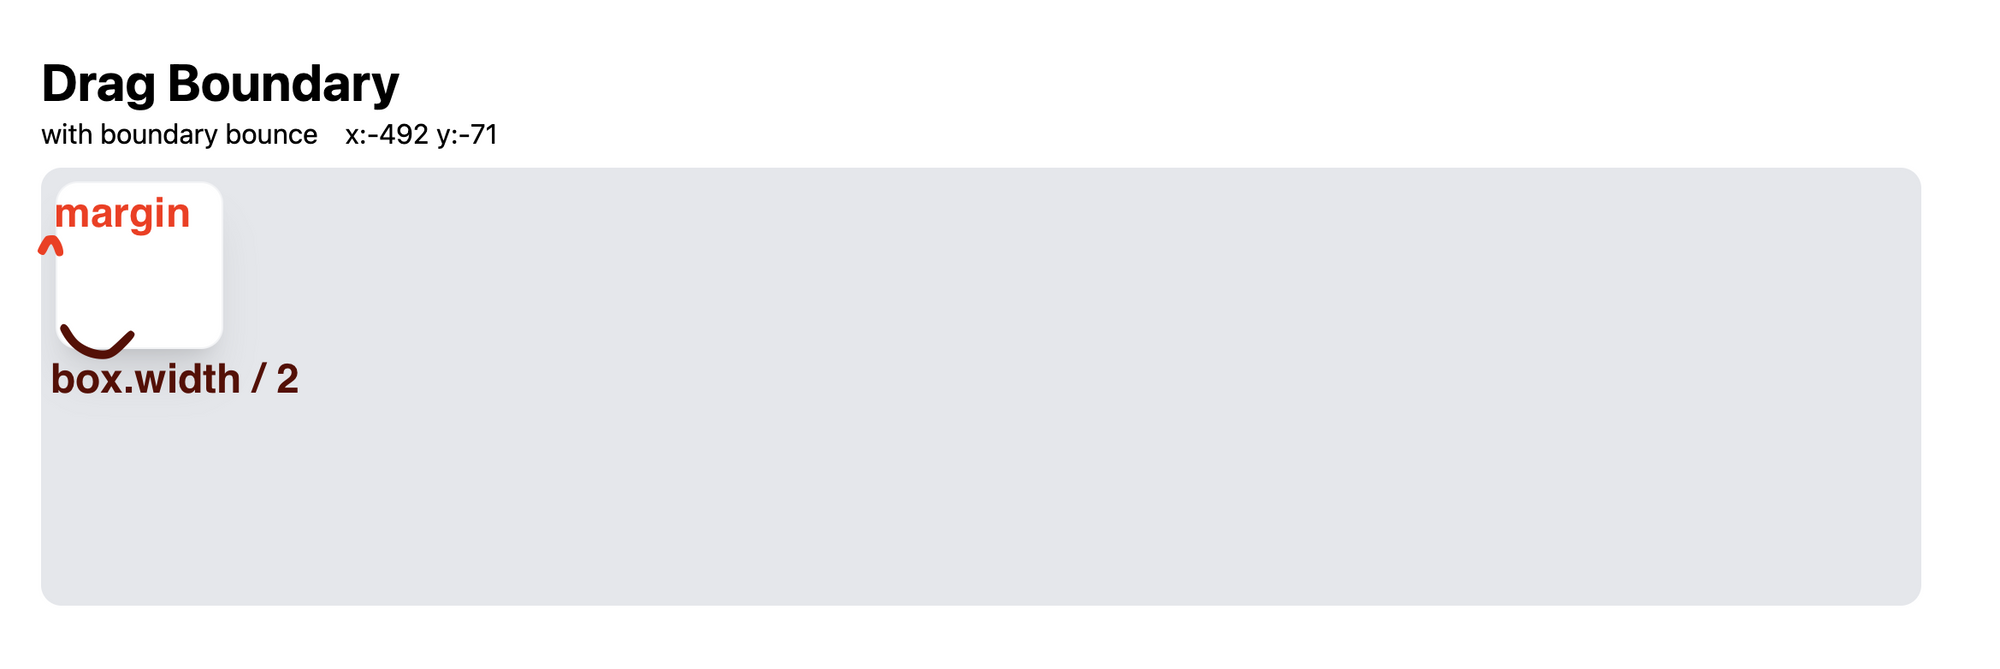
});이제 drag element가 absolute하다고 생각해보자.
기본 box의 위치는 boundary의 좌상단(x:0, y:0) 이다.
따라서 element의 제한 범위를 계산해보면
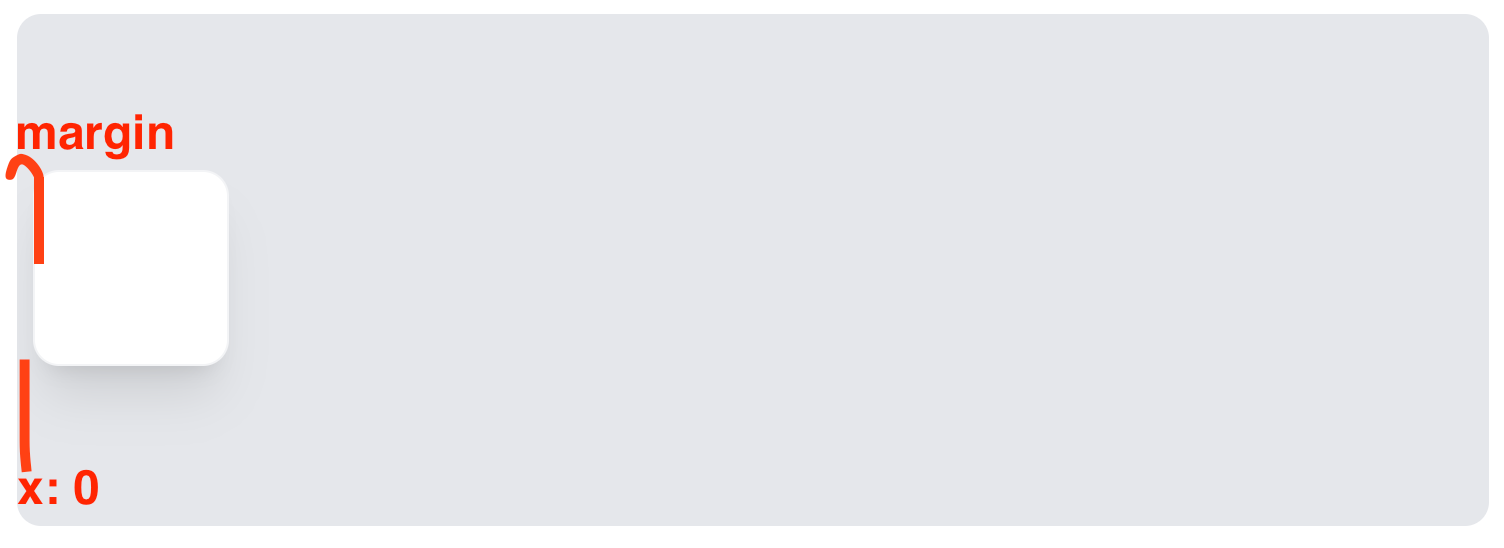
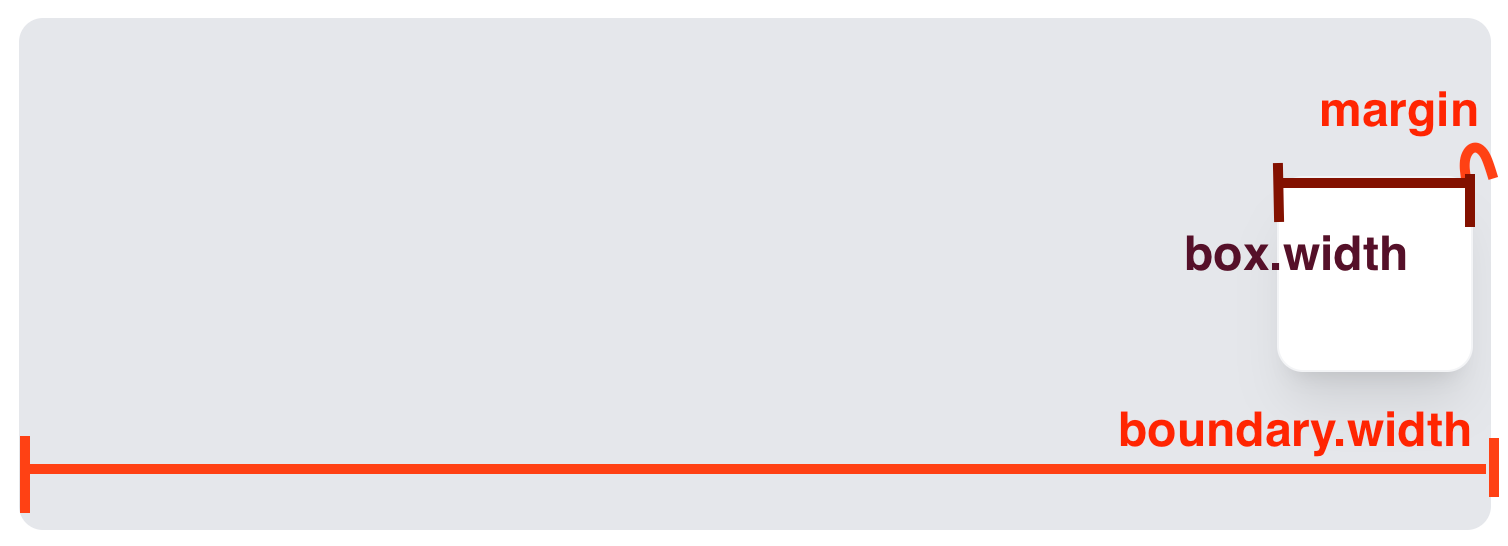
좌측 끝 = margin
우측 끝 = boundary.width - box.width - margin
코드에 적용하면 아래와 같다.
코드가 더 깔끔한 느낌은 기분탓인가..
const BOUNDARY_MARGIN = 12;
const deltaX = moveEvent.screenX - clickEvent.screenX;
const deltaY = moveEvent.screenY - clickEvent.screenY;

setPosition({
  x: inrange(
    x + deltaX,
    BOUNDARY_MARGIN,
    boundary.width - box.width - BOUNDARY_MARGIN
  ),
  y: inrange(
    y + deltaY,
    BOUNDARY_MARGIN
    boundary.height - box.height - BOUNDARY_MARGIN,
  ),
});
뭔가 그럴듯한 결과물이 나왔다 ✨✨
응용 마무리 — 유틸 함수로 만들기
관련된 기능을 유틸 함수로 추출하면 쉽게 element를 적용시킬 수 있을 거 같다.
export default function registMouseDownDrag(
  onDragChange: (deltaX: number, deltaY: number) => void,
  stopPropagation?: boolean,
) {
  return {
    onMouseDown: (clickEvent: React.MouseEvent<Element, MouseEvent>) => {
      if (stopPropagation) clickEvent.stopPropagation();

      const mouseMoveHandler = (moveEvent: MouseEvent) => {
        const deltaX = moveEvent.screenX - clickEvent.screenX;
        const deltaY = moveEvent.screenY - clickEvent.screenY;
        onDragChange(deltaX, deltaY);
      };

      const mouseUpHandler = () => {
        document.removeEventListener('mousemove', mouseMoveHandler);
      };

      document.addEventListener('mousemove', mouseMoveHandler);
      document.addEventListener('mouseup', mouseUpHandler, { once: true });
    },
  };
}
stopPropagation 경우 click이벤트가 전파되지 않기 위함이다.
부모 div의 click이벤트가 실행되면 곤란한 경우가 있다...
onDragChange를 콜벡으로 받아서 쉽게 커스터마이징을 할 수 있을 것 같다.
코드에 응용해보자.
const [{ x, y }, setPosition] = useState({
  x: 0,
  y: 0,
});<div
style={{ left: x, top: y }}
{...registMouseDownDrag((deltaX, deltaY) => {
setConfig({
x: x + deltaX,
y: y + deltaY,
});
})}
>실제 동작은 아래 링크에서 볼 수 있다.
https://dnd-playground.vercel.app/
style 정보, 전체 코드는 아래 깃허브에서 살펴보면 될 것 같다.
https://github.com/bepyan/dnd-playground


오 이거 재밌네요ㅋㅋㅋㅋ 덕분에 잘 알아갑니다 :)