The Life of an Entity
카탈로그 백앤드의 내부 동작 방식에 관련된 설명이다. 주로 카탈로그를 설치하거나 확장하려는 대상으로 한다.
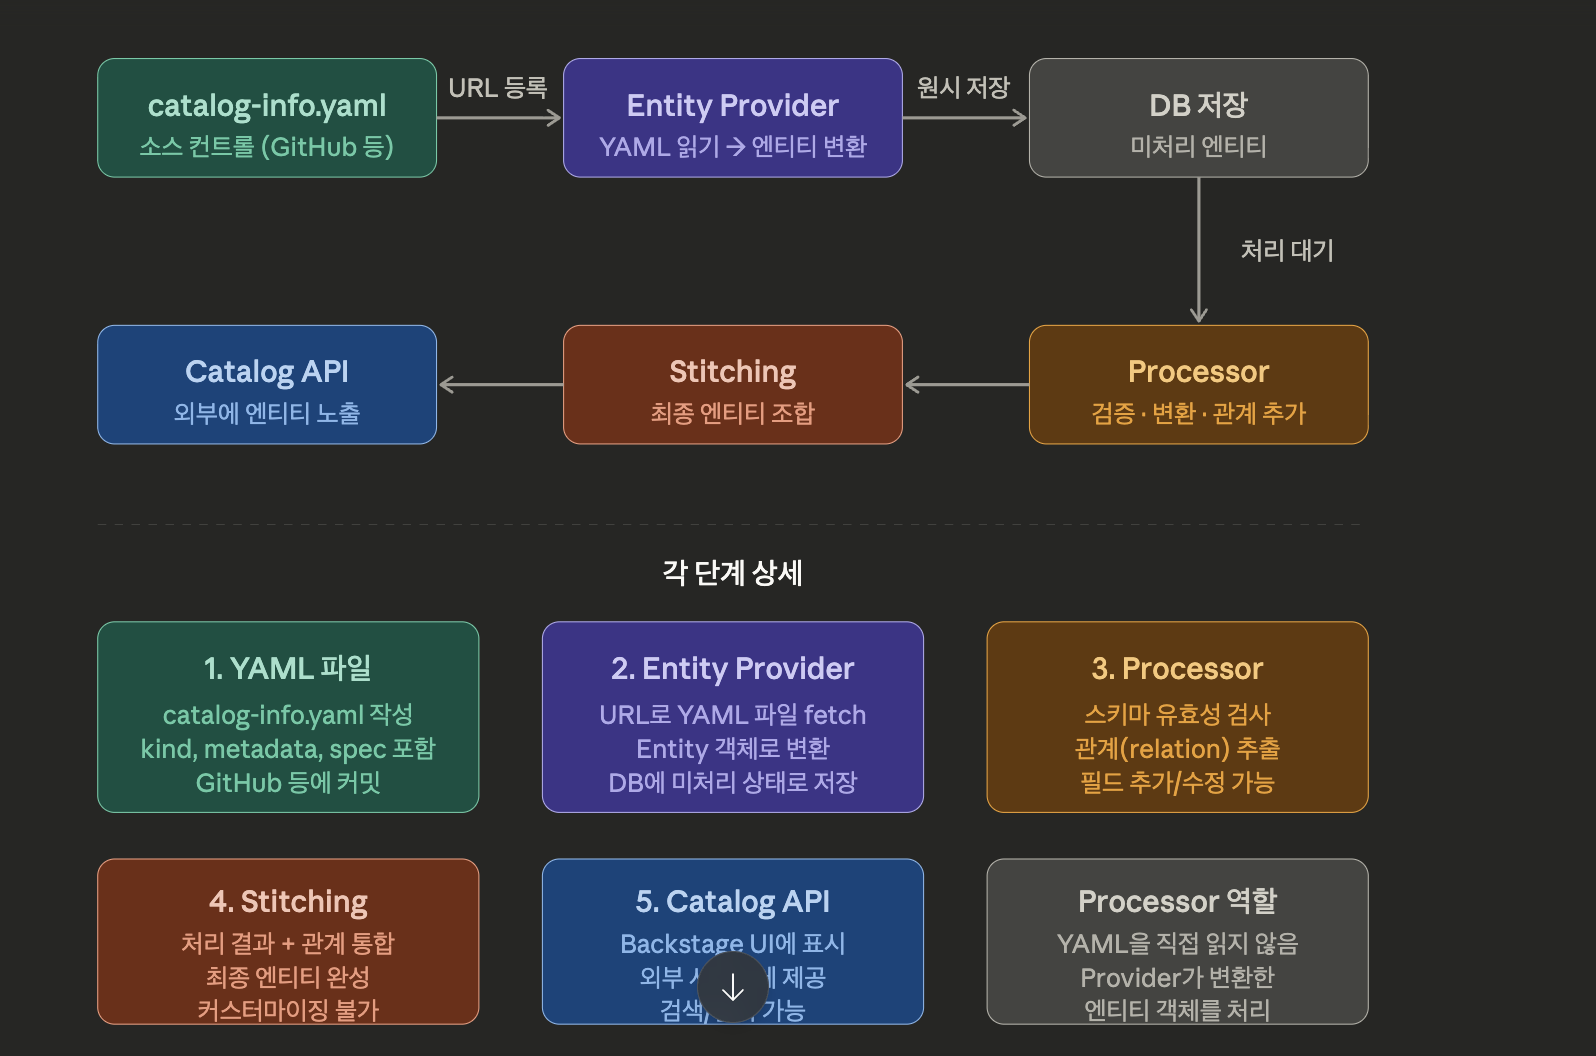
핵심개념
- 카탈로그는 허버 역할을 한다. 다양한 출처에서 엔티티를 수집하고 데이터베이스에 저장한뒤, 자동 처리 후 API를 통해 외부에 제공한다.
개발자가 커스터마이징 할 수 있는 주요 확장 포인트는 3가지이다.
- entity provider- 외부 소스에서 원시 데이터 카탈로그 공급
- Policy- 엔티티 형태에 대한 기본 규칙 설정
- Processor- 원시 데이터를 검증,분석, 변환하며 최종 형태로 만듬
3단계 처리 흐름
1.단계(수집)
- Entity Provider가 외부 소스에서 데이터를 가져와 데이터 베이스에 저장
- 기본 Provider: 사용자 등록 URL처리용, 앱 설정 처리용
- 엔티티가 kind, metadata.name 등 기본 스키마를 갖추는지 최소한의 유효성 검사 수행
- Provider가 엔티티 삭제를 알리면 -> 해당 엔티티 관련 데이터 즉시 삭제
2단계. 처리(Processing)
- 수집된 엔티티를 Processor들이 순서대로 처리
- 각 Processor는 엔티티를 수정하거나, 관계(오류), 새 엔티티등을 생성
- 오류가 발생하면 이전 정상 버전을 유지하고 오류를 정보를 별도 저장
3단계 스티칭(stiching)
리 단계의 모든 결과물을 하나의 최종 엔티티로 조합
처리된 엔티티 + 오류 + 관계(들어오는 것 + 나가는 것 모두) 통합
엔티티 해시값을 비교해서 변경이 있을 때만 재스티칭 (성능 최적화)
현재 이 단계는 커스터마이징 불가 → 수정이 필요하면 수집/처리 단계에서 해야 함
예시 코드는 아래에 대한 설명이다.
전체 Entity.yaml 파일
# catalog-info.yaml
apiVersion: backstage.io/v1alpha1
kind: Component
metadata:
  name: my-service
  description: "주문 처리 서비스"
  tags:
    - backend
    - order
  annotations:
    github.com/project-slug: my-org/my-service
spec:
  type: service
  lifecycle: production
  owner: team-backend
  dependsOn:
    - component:payment-service
    - resource:my-database
- 카탈로그 설정(app-config.yaml)
# app-config.yaml
catalog:
  orphanStrategy: keep  # 고아 엔티티 유지 설정

  locations:
    # 단일 파일 등록
    - type: url
      target: https://github.com/my-org/my-service/blob/main/catalog-info.yaml

    # 여러 파일을 한번에 등록
    - type: url
      target: https://github.com/my-org/my-repo/blob/main/all-services.yaml
- Entity Provider(Typescript)
import {
  EntityProvider,
  EntityProviderConnection,
} from '@backstage/plugin-catalog-node';
import { Entity } from '@backstage/catalog-model';

export class MyCustomProvider implements EntityProvider {
  private connection?: EntityProviderConnection;

  // Provider의 고유 식별자
  getProviderName(): string {
    return 'MyCustomProvider';
  }

  // 백엔드 시작 시 연결
  async connect(connection: EntityProviderConnection): Promise<void> {
    this.connection = connection;
    await this.refresh();
  }

  // 외부 소스에서 엔티티를 가져와 카탈로그에 전달
  async refresh(): Promise<void> {
    const entities: Entity[] = [
      {
        apiVersion: 'backstage.io/v1alpha1',
        kind: 'Component',
        metadata: {
          name: 'my-service',
          namespace: 'default',
        },
        spec: {
          type: 'service',
          lifecycle: 'production',
          owner: 'team-backend',
        },
      },
    ];

    // 카탈로그에 엔티티 목록을 통째로 교체(upsert)
    await this.connection?.applyMutation({
      type: 'full',
      entities: entities.map(entity => ({
        entity,
        locationKey: 'my-custom-provider',
      })),
    });
  }
}- Processor
import {
  CatalogProcessor,
  CatalogProcessorEmit,
} from '@backstage/plugin-catalog-node';
import { Entity } from '@backstage/catalog-model';
import { LocationSpec } from '@backstage/plugin-catalog-common';

export class MyCustomProcessor implements CatalogProcessor {
  getProcessorName(): string {
    return 'MyCustomProcessor';
  }

  // 엔티티를 받아서 변환하거나 관계를 추가
  async preProcessEntity(
    entity: Entity,
    _location: LocationSpec,
    emit: CatalogProcessorEmit,
  ): Promise<Entity> {

    // Component 타입일 때만 처리
    if (entity.kind !== 'Component') {
      return entity;
    }

    // 태그 자동 추가
    const tags = entity.metadata.tags ?? [];
    if (!tags.includes('auto-tagged')) {
      tags.push('auto-tagged');
    }

    // 관계(Relation) 추가
    emit({
      type: 'relation',
      relation: {
        source: { kind: 'Component', namespace: 'default', name: entity.metadata.name },
        type: 'ownedBy',
        target: { kind: 'Group', namespace: 'default', name: 'team-backend' },
      },
    });

    // 수정된 엔티티 반환
    return {
      ...entity,
      metadata: {
        ...entity.metadata,
        tags,
      },
    };
  }
}
backend에 등록
import { MyCustomProvider } from './providers/MyCustomProvider';
import { MyCustomProcessor } from './processors/MyCustomProcessor';

export default async function createPlugin(env: PluginEnvironment) {
  const builder = await CatalogBuilder.create(env);

  // Provider 등록
  builder.addEntityProvider(new MyCustomProvider());

  // Processor 등록
  builder.addProcessor(new MyCustomProcessor());

  const { processingEngine, router } = await builder.build();
  await processingEngine.start();

  return router;
}
흐름 요약
[외부 소스 (GitHub, LDAP 등)]
        ↓
  Entity Provider   ← MyCustomProvider
        ↓
   (수집/Ingestion)
        ↓
    Processor       ← MyCustomProcessor
        ↓
   (처리/Processing)
        ↓
    Stitching (자동)
        ↓
  [카탈로그 API로 노출]

안녕하세요