스프링에서 Tymeleaf, ajax를 이용해 댓글 작성 기능을 구현해보자!
📋 사전지식
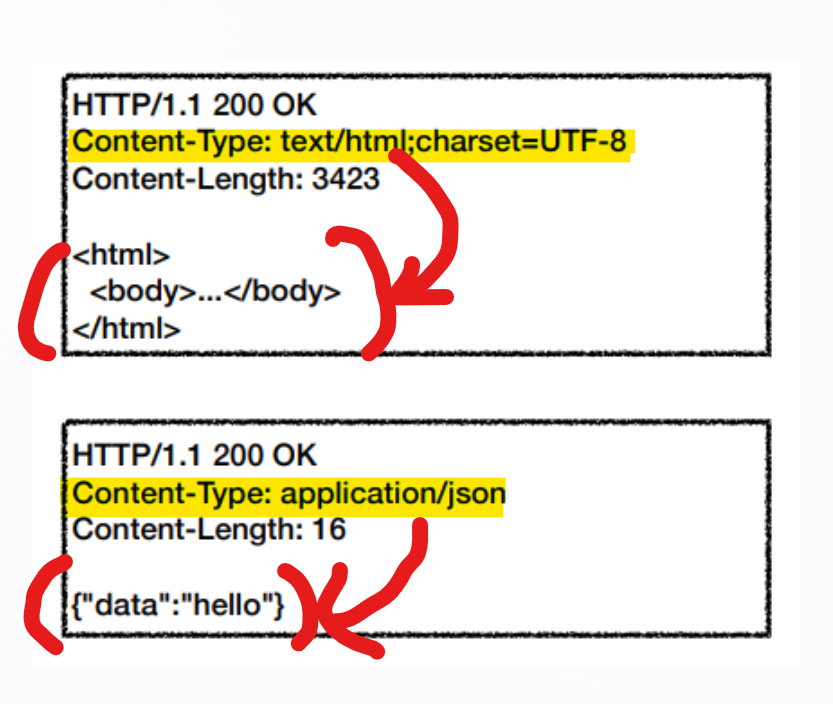
📗 Content-Type
- 메시지의 바디에 들어가는 내용의 형식을 설명한다.

📗 HTTP 요청 파라미터
http 요청 메시지를 통해 클라이언트에서 서버로 데이터를 전달하는 방법에는 크게 3가지가 있다. 거의 이 세가지가 다 이므로 확실하게 구분해서 알아두자!
Get: query parameter
/url?username=hello&age=20- 메시지 Body가 없이, url에 데이터를 포함해 전달한다.
- 따라서 Content-Type도 필요가 없을 것이다.
POST: HTML Form
content-type: application/x-www-form-urlencoded- 메시지 Body에 쿼리 파라미터 형식으로 전달한다.
username=hello&age=20이 경우
@ModelAttribute를 사용한다.

이런식으로 Body에 쿼리 파라미터 형식으로 데이터가 담겨간다.
HTTP message body
- HTTP API에서 주로 사용한다. (JSON, XML, TEXT)
content-type: application/json{"username": "hello", "age": 20}이 경우
@RequestBody를 사용한다.

이런식으로 Body에 JSON 형식으로 데이터가 담겨간다.
📗 @RequestBody & @ModelAttribute
HTTP 요청 메시지에 담겨오는 데이터를 바인딩하는데 사용되는 애노테이션에는 @RequestParam, @ModelAttribute, @RequestBody가 있다. 앞서 이미지로 확인했듯이 넘어오는 데이터의 형식이 다르기 때문에, 데이터 타입에 따라 적절한 애노테이션을 선택해야 한다.
자세한 애노테이션에 대한 설명은 인프런 김영한님 스프링 강의 정리본을 참조하자.
@RequestParam
- 1개의 HTTP 요청 파라미터를 받기 위해 사용한다.
- Get query paremeter, Post Html form 데이터에 사용될 수는 있다.
- 그러나 주로 폼(Form) 형식 데이터엔
@ModelAttribute를 사용한다.
- 그러나 주로 폼(Form) 형식 데이터엔
@ModelAttribute
- 클라이언트가 전송하는 폼(form) 형태의 HTTP Body와 요청 파라미터들을 생성자나 Setter로 바인딩하기 위해 사용된다.
@RequestParam은 파라미터를 하나씩밖에 못 받는것에 비해@ModelAtribute는 한번에 객체를 받을 수 있다.
@RequestBody
- Json(application/json) 형태의 HTTP Body를 Java 객체로 변환시켜준다.
- Spring의 MessageConverter들 중
MappingJackson2HttpMessageConverter를 이용하는데, 이 클래스 내부에서 ObjectMapper 클래스를 사용한다.
아래는 서블릿 쪽에서 사용한 코드다. ObjectMapper를 이용해 전달받은 json 데이터를 파싱하고 있다.
@WebServlet(name="requestBodyJsonServlet", urlPatterns = "/request-body-json")
public class RequestBodyJsonServlet extends HttpServlet {

    private ObjectMapper objectMapper = new ObjectMapper();

    @Override
    protected void service(HttpServletRequest request, HttpServletResponse response) throws ServletException, IOException {
        ServletInputStream inputStream = request.getInputStream();
        String messageBody = StreamUtils.copyToString(inputStream, StandardCharsets.UTF_8);

        System.out.println("messageBody = " + messageBody);
        // http body에 있는거 다 뿌려주는 것.

        HelloData helloData = objectMapper.readValue(messageBody, HelloData.class);

        System.out.println("helloData.getUsername() = " + helloData.getUsername());
        System.out.println("helloData.getAge() = " + helloData.getAge());

        response.getWriter().write("ok");
    }
}
이처럼 넘어오는 데이터 형식이 다르기 때문에,
@RequestBody,@ModelAttribute애노테이션 내부에서 HTTP 요청 데이터를 파싱하고 다루는 방식도 다르다. 스프링이 원체 추상화가 잘 되어있고, 눈치껏 해주는 부분이 많아서 두 애노테이션의 차이를 간과하기 쉬운 것 같다.
💻 ReplyController
    @PostMapping("/reply")
    public void saveReply(@RequestBody ReplyDTO paramReply,
                          HttpServletRequest request) {
        log.info("paramReply = {}", paramReply);

        // 세션의 관리자 id를 DTO에 담습니다.
        HttpSession session = request.getSession();
        AdminDTO adminDTO = (AdminDTO) session.getAttribute(SessionConst.LOGIN_ADMIN);

        paramReply.setAdminId(adminDTO.getId());

        replyService.saveReply(paramReply);
}- 컨트롤러에서 댓글 작성 파라미터를
@RequestBody로 받고 있다. 그럼 클라이언트 쪽에서 어떤 요청 파라미터를 보내야 할까?- Json 데이터를 전송해야 할 것이다.
- Content-Type이 application/json이어야 할 것이다.
💻 HTML
			 <div class="reply-container" th:if="${replyList}">
                <div class="reply-write-box row">
                    <input type="hidden" id="board-seq" th:value="${freeBoardDTO.seq}">
                    <input type="hidden" id="reply-writer" th:value="${session['loginAdmin'].id}">
                    <input type="text" class="col-md-10" id="reply-content" placeholder="댓글을 입력해 주세요">
                    <div class="col-md-2">
                        <button type="button" class="btn btn-light" th:onclick="|saveReply()|">등록</button>
                    </div>
                </div>
                <div class="reply-content-box row" th:each="reply : ${replyList}">
                    <div class="col-md-10">
                        <div class="reply-label">
                            <span th:if="${reply.memberId}" th:text="${reply.memberId}"></span>
                            <span th:unless="${reply.memberId}" th:text="${reply.adminId}"></span>
                            <span th:text="${#temporals.format(reply.date, 'yyyy-MM-dd HH:mm')}"></span>
                        </div>
                        <div class="reply-content">
                            <span th:text="${reply.content}"></span>
                        </div>
                    </div>
                    <div class="col-md-2">
                        <button type="button" class="btn btn-outline-dark"
                                th:onclick="|deleteComment(${reply.seq})|">삭제
                        </button>
                    </div>
                </div>
타임리프를 이용해 댓글과 관련된 코드를 작성해보았다. (부트스트랩도 사용했다.)
- 댓글 작성에 요구되는 게시글번호(BoardSeq), 댓글작성자(ReplyWriter), 댓글내용(ReplyContent)를 input으로 가지고 있다.
- 이후 script 코드에서 id로 접근해서 value를 가져온다.
- session에 관리자 정보가 AdminDTO로 담겨있었기 때문에, id로 접근했다.
AdminDTO(id=admin, password=null, confirmPassword=null, name=관리자, date=2023-08-01T20:58:19)이런식으로 객체에 정보가 담겨있다.
💻 Ajax
function saveReply() {
            const replyContents = $("#reply-content").val();
            const replyWriter = $("#reply-writer").val();
            const boardSeq = $("#board-seq").val();
            console.log("replyContents : " + replyContents);
            console.log("replyWriter : " + replyWriter);
            $.ajax({
                type: 'POST',
                url: '/api/reply',
                data: JSON.stringify({
                    'adminId': replyWriter,
                    'content': replyContents,
                    'boardSeq': boardSeq
                }),
                // dataType: 'json',
                contentType: 'application/json; charset=utf-8',
                success: function () {
                    location.reload();
                    document.getElementById('reply-content').value = '';
                },
                error: function (error) {
                    alert('댓글 작성에 실패했습니다.');
                    console.log(error)
                }
            })
        };
앞서 살펴본것 처럼, 컨트롤러에서 @RequestBody로 http 요청 데이터를 받고 있기 때문에, JSON 데이터를 전송해야 하고 content-type도 그와 일치해야 한다.
📗 dataType vs contentType
-
contentType
- Http message Body에 담길 내용의 데이터 타입
- ex)
application/json; charset-utf-8 - 기본값은
application/x-www-form-urlencoded; charset=utf-8이다.
-
dataType
- 서버에서 어떤 타입을 받을 것인지를 의미한다. (내가 수령할건지)
- ex)
json,html,text
📗 JSON.stringify
JSON.stringify()를 사용한 경우
data: JSON.stringify({
    'adminId': replyWriter,
    'content': replyContents,
    'boardSeq': boardSeq
})
이 경우 데이터가 JSON 문자열로 변환되어 서버에 전송된다. 따라서 컨트롤러에서 @RequesstBody로 수령 가능하다.
객체 형태로 보낸 경우
data: {
    'adminId': replyWriter,
    'content': replyContents,
    'boardSeq': boardSeq
}
이 경우 데이터가 객체로 유지되며, 브라우저가 자동으로 해당 객체를 폼 데이터로 처리하고 서버에 전송한다. 따라서 컨트롤러에서 @ModelAttribute나 @RequestParam으로 받아야 한다.
⛑️ Trouble Shooting
이제 우리가 마주할 수 있는 다양한 문제 상황을 살펴보자.
💣 ContentType을 작성하지 않으면?
문제상황
컨트롤러에서 @RequestBody로 요청 데이터를 수령하는데, ajax에서 따로 contentType을 설정해주지 않으면 default값인 application/x-www-form-urlencoded; charset=utf-8로 전송된다. 이런 경우 415 HTTP status code를 만날 수 있다.

The HTTP 415 Unsupported Media Type client error response code indicates that the server refuses to accept the request because the payload format is in an unsupported format.
해결방법
적절한 Content-Type을 ajax 코드에 추가한다. (Content-Type의 기본값은 form 형식이니 생략하면 안된다.)
contentType: 'application/json; charset=utf-8'
💣 dataType을 json으로 설정하면?
문제상황
제일 처음에는 dataType이 contentType인 줄 알았다. 그래서 json으로 설정해두었다.
		function saveReply() {
            const replyContents = $("#reply-content").val();
            const replyWriter = $("#reply-writer").val();
            const boardSeq = $("#board-seq").val();
            console.log("replyContents : " + replyContents);
            console.log("replyWriter : " + replyWriter);
            $.ajax({
                type: 'POST',
                url: '/api/reply',
                data: JSON.stringify({
                    'adminId': replyWriter,
                    'content': replyContents,
                    'boardSeq': boardSeq
                }),
                dataType: 'json',
                contentType: 'application/json; charset=utf-8',
                success: function () {
                    location.reload();
                    document.getElementById('reply-content').value = '';
                },
                error: function (error) {
                    alert('댓글 작성에 실패했습니다.');
                    console.log(error)
                }
            })
        };
이런 식으로 코드를 작성하고 댓글을 작성해보면,

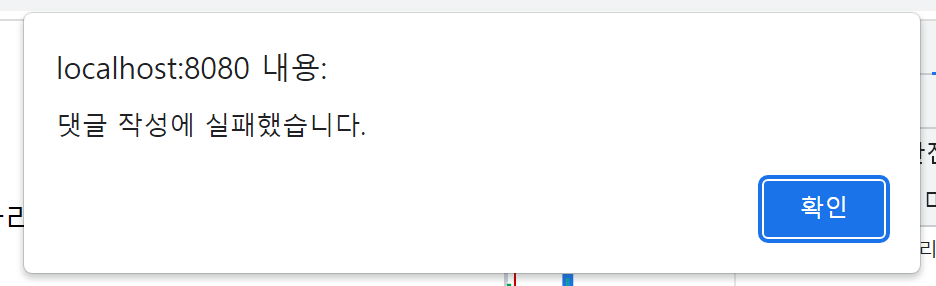
이렇게 댓글이 잘 작성되었다는 Http status code(200)와 댓글 작성 실패 안내 문자를 동시에 받을 수 있다.(새로고침 하면 댓글도 db에 저장되어 있었다.)
왜 status code가 200으로 반환되었는데 success의 콜백함수가 아닌 error의 콜백함수가 시행되었을까? 로그를 찍어보면 알 수 있다.
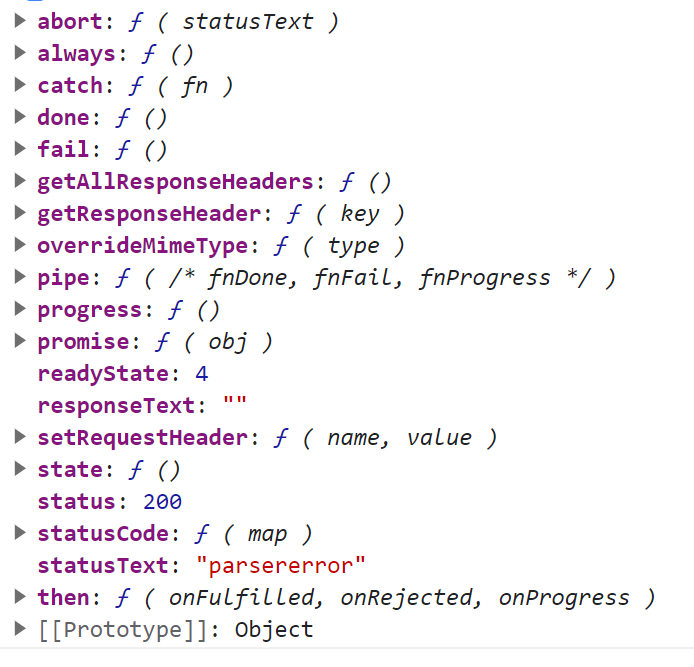
statusText: "parsererror" 로그가 찍혀있다. dataType을 적절하게 설정하지 못해 나타나는 로그라고 한다. 컨트롤러에서 댓글 저장만 수행하고 다른 json데이터를 반환하지 않는데 dataType을 json으로 설정해둔것이 문제가 된거였다.
해결방법
그냥 dataType 코드를 지우면 된다! 필요하다면 적절한 타입으로 수정한다.
💣 JSON.stringify()를 사용하지 않으면?
문제상황
data: {
    'adminId': replyWriter,
    'content': replyContents,
    'boardSeq': boardSeq
}
ajax에서 요청 데이터를 JSON.stringify를 거치지 않고 전송하면 어떻게 될까?

클라이언트 측 오류로 400번 status code로 응답이 왔고, 실제로 코드에서 지정한 contentType으로 요청이 전송되었다.
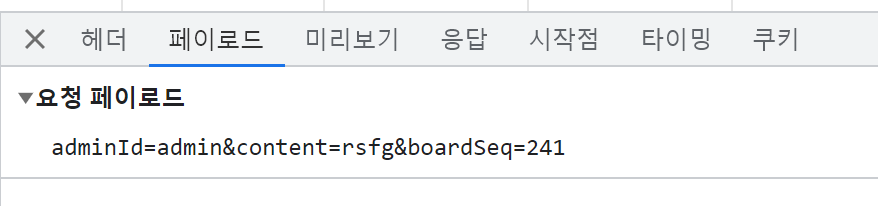
하지만 body를 살펴보니 브라우저에서 자체적으로 form 데이터 형식으로 데이터를 전송한것을 확인할 수 있었다!
해결방법
JSON.stringifh()로 감싸서 데이터를 보내자!
data: JSON.stringify({
    'adminId': replyWriter,
    'content': replyContents,
    'boardSeq': boardSeq
})
ajax 요청을 처음 보내봤는데 정말 다채롭고 화려한 에러들의 향연이였다. 한 에러를 해결하니 이중, 삼중으로 저질러놓은 실수 탓에 새로운 문제들이 계속 생겨났다. 한 기능 구현 코드로 내가 알고있다고 착각하고 있었던 여러 지식의 허점들을 확인 할 수 있어서 기쁘다.
Refrence