오늘의 목표

오늘은 이렇게 편집 모드에 따라 리스트의 UI가 바뀌는 것을 구현해볼 것이다..!
어떻게 할 수 있을까?
당장 생각대로하면.. 이게 편집모드일대, View를 조건부로 바꿔주는..걸 생각했지만
기쁜소식은 iOS에서 공식적으로 편집모드를 지원한다는 것이다.
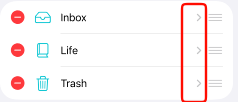
시작전의 앱 UI

지금은 편집버튼을 눌러도 아무일도 일어나지 않지만, editMode를 넣어보도록하자!
그전에 일단 editMode에는 3가지 모드가있다.
1. inactive
2. transient
3. active
공식코드
 /// The user can't edit the view content.
    ///
    /// The ``isEditing`` property is `false` in this state.
    case inactive

    /// The view is in a temporary edit mode.
    ///
    /// The use of this state varies by platform and for different
    /// controls. As an example, SwiftUI might engage temporary edit mode
    /// over the duration of a swipe gesture.
    ///
    /// The ``isEditing`` property is `true` in this state.
    case transient

    /// The user can edit the view content.
    ///
    /// The ``isEditing`` property is `true` in this state.
    case active

    /// Indicates whether a view is being edited.
    ///
    /// This property returns `true` if the mode is something other than
    /// inactive.
구현
그래서 나는 상단에 다음과같이 현재 편집모드를 선언해줄 것이다. 바로바로 반영이 되어야하기때문에 @State로 선언해주었다.
@State private var editMode: EditMode = .inactive이제 선언을했으면 이걸 List와 연결을 해주어야하는데, List에 모디파이어로 environment에 담아주면된다.
 List {
	ForEach(folders) { folder in
    	NavigationLink(value: "Folder") {
        	Label(folder.rawValue, systemImage: folder.symbolName)
            	.font(.body)
				}
			}
	}
    .environment(\.editMode, $editMode)
자 이제 연결은 했는데...

아무런 효과가없다!!
사실 편집모드는 들어갔는데, 그래서 너는 편집모드에서 무엇을할건데??를 내가 알려주지 않았기때문이다.
편집모드에서는 총 2가지 역할이 수행가능하다.
- onMove (순서바꾸기)
- onDelete (삭제하기)
이제 이걸 연결해주면된다.
List {
ForEach(folders) { folder in
NavigationLink(value: "Folder") {
Label(folder.rawValue, systemImage: folder.symbolName)
.font(.body)
}
}
.onMove { indices, newOffset in
folders.move(fromOffsets: indices, toOffset: newOffset)
}
.onDelete { indexSet in
folders.remove(atOffsets: indexSet)
}
}
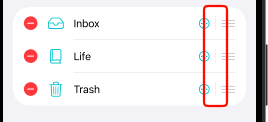
.environment(\.editMode, $editMode)구현 결과
이제 잘 나온것을 볼수가 있다. 편집모드에 들어가면 저렇게 UI가 표시된다!

세부 UI 조정
거의다 온 것 같은데, 메모앱과는 살짝 다르다. 메모앱은 저 NavigationLink 인터렉션 버튼이 사라지고, 설정으로 바뀌기 때문에, 세부변경이 필요하다.
조건에 따라 NavigationLink 와 Hstack을 번갈아가게끔해줬다.
List {
	ForEach(folders) { folder in
		if editMode.isEditing {
			HStack {
				Label(folder.rawValue, systemImage: folder.symbolName)
					.font(.body)
				Spacer()
				Button {} label: {
					Image(systemName: "ellipsis.circle")
				}
				Divider()
			}
		} else {
			NavigationLink(value: "Folder") {
				Label(folder.rawValue, systemImage: folder.symbolName)
					.font(.body)
				}
			}
		}
		.onMove { indices, newOffset in
			folders.move(fromOffsets: indices, toOffset: newOffset)
			}
		.onDelete { indexSet in
			folders.remove(atOffsets: indexSet)
			}
	}
	.environment(\.editMode, $editMode)
구현

자 원하는대로 나오긴했는데, 살짝 아쉬운게 있다.
여기 Divider()에서 볼 수 있듯이, 약간의 리스트 자체의 패딩값이 들어가있어서 위아래가 Divider()로 연결되는 구조가 안나왔다.
.listRowInsets(EdgeInsets(top: 0, leading: 16, bottom: 0, trailing: 16))로 위아래 패딩을 0으로 줄여줄 것이다.
완성

배운것
- 리스트 패딩값 조절하기
.listRowInsets(EdgeInsets(top: 0, leading: 16, bottom: 0, trailing: 16)) - editMode의 존재 - 쉽게 적용할 수 있는 delete와 순서바꾸기(드래깅)