Rental Application (React & Spring boot Microservice) - 7 : AUTH-SERVICE(4)
#1 로그인 처리
저번 포스트까지 로그인 처리에 대한 결과까지 확인을 했고 이번에는 jwt를 이용한 토큰 발급을 다뤄보도록 하겠습니다. jwt 토큰 발급 이전에 수정하고 추가할 부분이 있어서 먼저 구현을 진행하도록 하겠습니다.
- AuthenticationFilter.successfulAuthentication
@Override
protected void successfulAuthentication(
    HttpServletRequest request,
    HttpServletResponse response,
    FilterChain chain,
    Authentication authResult
) throws IOException, ServletException {
    // 로그인시 사용자의 이메일 값
    String email = ((User)authResult.getPrincipal()).getUsername();
    UserDto userDto = authService.getUserDetailsByEmail(email);


}
인증 성공시 처리에 관한 부분입니다. 로그인시 사용자의 이메일 값을 받아와 UserDto 객체로 만들어 로직을 처리합니다. 그 과정에서 authService.getUserDetailsByEmail()이라는 메서드가 필요하므로 구현을 하도록 하겠습니다.
- AuthService.getUserDetailsByEmail()
public interface AuthService extends UserDetailsService {
    UserDto registerUser(UserDto userDto);

    UserDto getUserDetailsByEmail(String email);
}
- AuthServiceImpl.getUserDetailsByEmail()
@Transactional
@Override
public UserDto getUserDetailsByEmail(String email) {
    log.info("Auth Service's Service Layer :: Call getUserDetailsByEmail Method!");

    UserEntity userEntity = authRepository.findByEmail(email);

    if(userEntity == null) throw new UsernameNotFoundException(email);

    return UserDto.builder()
    		  .email(userEntity.getEmail())
                  .nickname(userEntity.getNickname())
                  .phoneNumber(userEntity.getPhoneNumber())
                  .userId(userEntity.getUserId())
                  .encryptedPwd(userEntity.getEncryptedPwd())
                  .build();
}
이렇게 사용자의 정보를 이메일로 얻어오는 로직을 구현했습니다. 그리고 AuthenticationFilter.successfulAuthentication 메서드에서는 authService를 호출하므로 생성자를 만들어 AuthService를 주입받고, 추후에 Environment에서 토큰 관련 설정을 만들 예정이므로 Enviornment 객체도 주입받도록 하겠습니다.
AutenticationFilter
private AuthService authService;
private Environment env;

public AuthenticationFilter(
    AuthenticationManager authenticationManager,
    AuthService authService,
    Environment env
) {
    super.setAuthenticationManager(authenticationManager);

    this.authService = authService;
    this.env = env;
}
그리고 이에 따라 WebSecurity.getAuthenticationFilter와 생성자를 통해 주입받아야 할 객체들이 생겼으므로 살펴 보겠습니다.
WebSecurity
private AuthService authService;
private BCryptPasswordEncoder passwordEncoder;
private Environment env;

@Autowired
public WebSecurity(
    AuthService authService,
    BCryptPasswordEncoder passwordEncoder,
    Environment env
) {
    this.authService = authService;
    this.passwordEncoder = passwordEncoder;
    this.env = env;
}
WebSecurity.getAuthenticationFilter()
private AuthenticationFilter getAuthenticationFilter() throws Exception {
    AuthenticationFilter authenticationFilter = new AuthenticationFilter(
        authenticationManager(),
        authService,
        env
    );

    return authenticationFilter;
}
이 정도로 설정을 대략적으로 마치고 jwt 토큰으로 넘어가겠습니다.
#2 Jwt
jwt란 json web token의 약자로 서버와 클라이언트 간 정보를 주고 받을 때 헤더에 이 값을 실어 별도의 인증과정 없이 이 토큰 만으로 인증을 진행합니다.
jwt 토큰은 다음과 같이 구성됩니다.
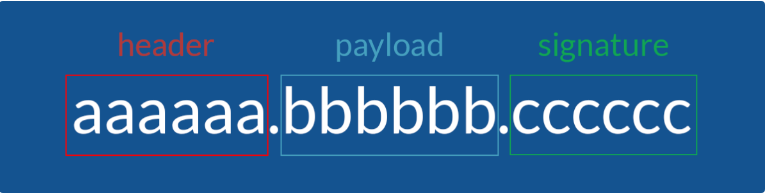
header는 토큰의 타입, 해시 암호화 알고리즘으로 구성되어 있습니다. payload는 클레임 정보를 포함하고 있으며, 이 클레임은 name-value 한 쌍으로 이루어져 있습니다. 토큰에는 이 클레임들을 여러 개 넣을 수 있습니다. 마지막으로 sinature는 secret key를 포함하여 암호화되어 있습니다.
jwt의 프로세스는 다음과 같이 이루어집니다.
1) 클라이언트는 email / password 정보를 서버에 로그인을 위해 POST합니다.
2) 서버는 JWT 토큰을 클라이언트에게 보냅니다.
3) 클라이언트는 GET을 위해 이 토큰을 헤더에 남아 서버에 보냅니다.
4) 서버는 이 토큰을 확인하고 유효한 토큰인지 확인합니다.
5) 유효한 토큰이라면 서버는 GET을 위한 정보를 클라이언트에게 전송합니다.
JWT의 장점은 클라이언트 독립적인 서비스(STATELESS)하며 유효시간동안 지속적으로 토큰을 저장할 수 있다는 점이 있습니다.
#3 Jwt 구현
jwt 토큰을 사용하기 위해서는 해당 디펜던시를 추가해야합니다.
<dependency>
    <groupId>io.jsonwebtoken</groupId>
    <artifactId>jjwt</artifactId>
    <version>0.9.1</version>
</dependency>
그리고 application.yml 파일에 해당 설정을 명시하도록 하겠습니다.
token:
  exp_time: 43200000
  secret: user_token
exp_time은 만료기한입니다. millsecond단위로 계산을 진행하기 때문에 12시간 기준으로 12 3600 1000으로 계산을 진행하였고, secret은 plain text로 후에 토큰을 만들때 이 text와 섞여서 유니크한 토큰을 발급합니다.
그러면 이 코드들을 이용해서 AuthenticationFilter의 successfulAuthentication메서드를 완성해보도록 하겠습니다.
@Override
protected void successfulAuthentication(
    HttpServletRequest request,
    HttpServletResponse response,
    FilterChain chain,
    Authentication authResult
) throws IOException, ServletException {
    // 로그인시 사용자의 이메일 값
    String email = ((User)authResult.getPrincipal()).getUsername();
    UserDto userDto = authService.getUserDetailsByEmail(email);
    String token = Jwts.builder()
                       .setSubject(userDto.getUserId())
                       .setExpiration(new Date(System.currentTimeMillis() + Long.parseLong(env.getProperty("token.exp_time"))))
                       .signWith(SignatureAlgorithm.HS512, env.getProperty("token.secret"))
                       .compact();

    response.addHeader("token", token);
    response.addHeader("userId", userDto.getUserId());
}
token 변수를 보겠습니다. token은 Jwts객체를 생성하는데요, 이 과정에서 userId를 받고, 이전에 만들어두었던 token.exp_time, token.secret 설정을 이용하여 만료기한과 토큰을 생성하는 모습을 볼 수 있습니다.
그리고 이러한 토큰 값을 헤더에 실어 응답을 하는 방식으로 메서드가 구현이 됩니다.
마지막으로 apigateway-service에 jsonwebtoken 디펜던시를 추가하여 헤더필터를 구현해보고 결과값을 확인해보도록 하겠습니다.
pom.xml
<dependency>
    <groupId>io.jsonwebtoken</groupId>
    <artifactId>jjwt</artifactId>
    <version>0.9.1</version>
</dependency>
그리고 filter 패키지에 AuthorizationHeaderFilter 클래스를 추가하여 필터를 구현하겠습니다.
- AuthorizationHeaderFilter
@Component
@Slf4j
public class AuthorizationHeaderFilter extends AbstractGatewayFilterFactory<AuthorizationHeaderFilter.Config> {
    private Environment env;

    public AuthorizationHeaderFilter(Environment env) {
        super(Config.class);

        this.env = env;
    }

    @Override
    public GatewayFilter apply(Config config) {
        return ((exchange, chain) -> {
            ServerHttpRequest request = exchange.getRequest();

            if(!request.getHeaders().containsKey(HttpHeaders.AUTHORIZATION)
            ) {
                return onError(
                    exchange,
                    "No authorization header",
                    HttpStatus.UNAUTHORIZED
                );
            }

            String authorizationHeader = request.getHeaders()
                                                .get(HttpHeaders.AUTHORIZATION)
                                                .get(0);
            String jwt = authorizationHeader.replace("Bearer", "");

            if(!isJwtValid(jwt)) {
                return onError(
                    exchange,
                    "JWT token is not valid",
                    HttpStatus.UNAUTHORIZED
                );
            }

            return chain.filter(exchange);
        });
    }

    private boolean isJwtValid(String jwt) {
        boolean _valid = true;
        String subject = null;

        try {
            subject = Jwts.parser()
                          .setSigningKey(env.getProperty("token.secret"))
                          .parseClaimsJws(jwt)
                          .getBody()
                          .getSubject();
        } catch(Exception ex) {
            _valid = false;
        }

        if(subject == null || subject.isEmpty()) {
            _valid = false;
        }

        return _valid;
    }

    private Mono<Void> onError(
        ServerWebExchange exchange,
        String err,
        HttpStatus httpStatus
    ) {
        ServerHttpResponse response = exchange.getResponse();

        response.setStatusCode(httpStatus);

        log.error(err);

        return response.setComplete();
    }


    public static class Config {}
}
AuthorizationFilter는 인증이 잘 되었을 때 GET에 대한 요청을 위한 필터입니다. 코드를 살펴보겠습니다.
AuthorizationFilter.apply는 request 요청의 Header부분을 살펴봅니다. 이 Header에 AUTHORIZATION값을 찾아봅니다. 인가가 된 클라이언트인지 확인하겠다는 뜻이겠죠. 그리고 인가가 되었다면 jwt토큰을 변환하는 작업을 합니다. 클라이언트에서 서버로 오는 jwt토큰은 (Bearer token.... ) 이런 string 값으로 오기 때문에 bearer를 제거해주고 isJwtValid라는 메서드를 통해 타당한 토큰인지 확인을 해애합니다.
isJwtToken은 jwt값을 받아와 복호화를 하는 과정을 거칩니다. subject = Jwts.parser()의 코드를 살펴보면 setSigningKey()에서 application.yml파일에 설정해두었던 token의 plain text를 이용해 복호화를 합니다. 복호화가 타당하다면 true를, 예외나 비어있는 값이라면 false를 반환하는 메서드입니다.
- apigateway-service - application.yml
spring:
  application:
    name: apigateway-service

  cloud:
    gateway:
      routes:
        - id: auth
          uri: lb://AUTH-SERVICE
          predicates:
            - Path=/auth-service/login
            - Method=POST
          filters:
            - RemoveRequestHeader=Cookie
            - RewritePath=/auth-service/(?<segment>.*), /$\{segment}

        - id: auth
          uri: lb://AUTH-SERVICE
          predicates:
            - Path=/auth-service/register
            - Method=POST
          filters:
            - RemoveRequestHeader=Cookie
            - RewritePath=/auth-service/(?<segment>.*), /$\{segment}

        - id: auth
          uri: lb://AUTH-SERVICE
          predicates:
            - Path=/auth-service/**
            - Method=GET
          filters:
            - RemoveRequestHeader=Cookie
            - RewritePath=/auth-service/(?<segment>.*), /$\{segment}
            - AuthorizationHeaderFilter

    default-filters:
        - name: GlobalFilter
          args:
            baseMessage: Spring Cloud Gateway Global Filter
            preLogger: true
            postLogger: true

server:
  port: ${port:8900}

eureka:
  client:
    register-with-eureka: true
    fetch-registry: true
    service-url:
      defaultZone: http://localhost:8761/eureka

token:
  secret: user_token
이렇게 GET 요청이 들어오는 조건에 AuthorizationHeaderFilter를 넣어주도록 하겠습니다.
#4 결과 확인
우선 GET 요청인 health_check를 실행해보면 401 Unauthorizated라는 HttpStatus를 확인할 수 있습니다. AuthorizationHeaderFilter의 메서드인 isJwtValid에서 타당하지 않다는 결과를 보냈고 이에 따라 401 에러가 나는 모습입니다.
.png)
로그인을 위한 회원가입을 진행하겠습니다.
.png)
정상적으로 로그인이 되면 아래와 같이 200 OK HttpStatus코드를 응답받고 Header 필드에 가면 token이 발급되는 모습을 볼 수 있습니다. 앞으로 GET 요청시 이 토큰 값을 헤더에 실어서 인가를 받도록 하겠습니다.
.png)
다음 사진처럼 health_check 요청을 할 때, Authorization필드에 들어가 앞서 발급받은 토큰 값을 실어서 요청을 해보겠습니다.
.png)
정상적으로 200 OK Status값을 받았고 반환 값도 잘 나온 모습을 볼 수 있습니다.
.png)
다음 포스트에서는 Cloud Config를 이용해 서비스의 정보를 외부 Git-Repository 혹은 내부 Local-file에서 관리하는 방법을 살펴보도록 하겠습니다.
참고
- 인프런: Spring Cloud로 개발하는 마이크로서비스 애플리케이션(MSA) - 이도원
- #2 jwt
http://www.opennaru.com/opennaru-blog/jwt-json-web-token/
