물론 시큐리티 없이도 로그인을 구현 할 수 있지만, 시큐리티를 사용하면 많은 부분을 처리해주기에 편리하니, 공부를 조금 해서 사용하기로 하였다.
Spring Security
개요
스프링 시큐리티는 스프링의 보안을 담당하는 하위 프레임워크이다.
크게 인증(Authentication)과 인가(Authorization)으로 나눠져있는데, 인증을 통해 인가를 얻어서 접근하는 방식이다.
용어
-
접근 주체(Principal) : 보호된 리소스에 접근하는 대상, 흔히 생각하는 유저의 개념이다.
-
인증(Authentication) : 보호된 리소스에 접근한 대상에 대해 누구인지, 애플리케이션의 작업을 수행해도 되는 주체인지 확인하는 과정 -> 로그인 과정이다.
-
인가(Authorize) : 해당 리소스에 대해 접근 가능한 권한을 가지고 있는지 확인하는 과정 -> 인증된 사용자가 어디까지 할 수 있는지 확인하는 과정
-
권한 : 어떠한 리소스에 대한 접근 제한, 모든 리소스는 접근 제어 권한이 걸려있음. 인가 과정에서 해당 리소스에 대한 제한된 최소한의 권한을 가졌는지 확인
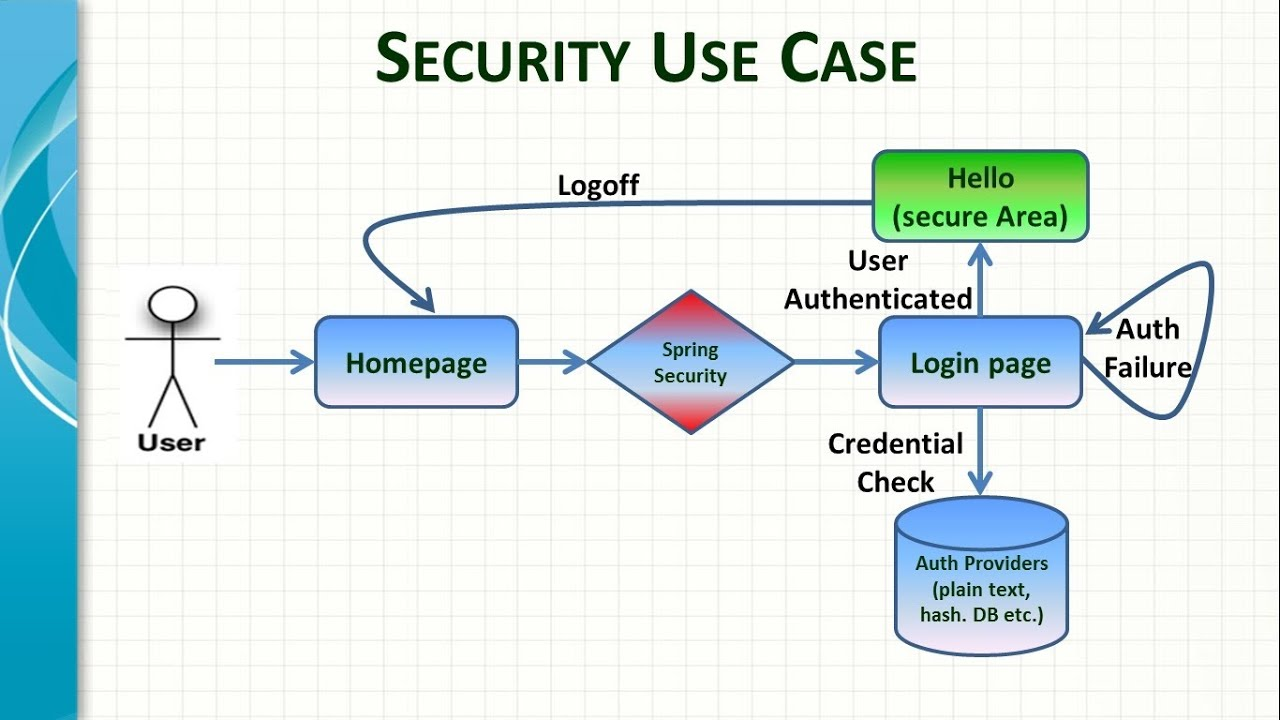
기본 구조
스프링으로 요청이 오면, 요청한 컨트롤러에 가기 전에 미리 설정해둔 필터들을 거치면서 인증 및 인가 작업을 통하고 이에 따른 결과를 이용해 컨트롤러에 연결해주거나 405 오류를 반환해 주는 구조이다.
스프링 시큐리티는 여러 필터가 얽혀서 작동하는 구조이다. 각 필터들의 실행순서는 다음과 같다.
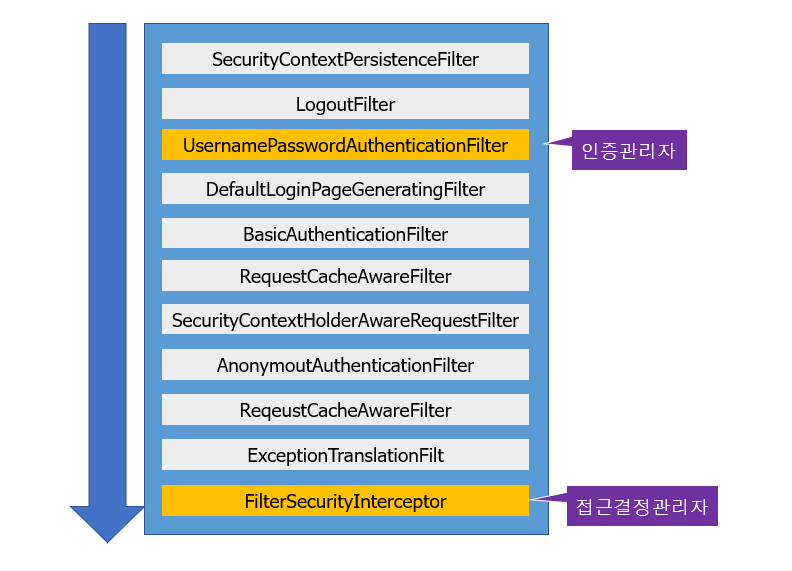
각 필터들의 설명은 링크를 보자.
코드로 보는 시큐리티
import org.springframework.context.annotation.Bean;
import org.springframework.context.annotation.Configuration;
import org.springframework.security.config.annotation.method.configuration.EnableGlobalMethodSecurity;
import org.springframework.security.config.annotation.web.builders.HttpSecurity;
import org.springframework.security.config.annotation.web.builders.WebSecurity;
import org.springframework.security.config.annotation.web.configuration.EnableWebSecurity;
import org.springframework.security.config.annotation.web.configuration.WebSecurityConfigurerAdapter;
import org.springframework.security.crypto.bcrypt.BCryptPasswordEncoder;

@Configuration
@EnableWebSecurity
public class SecurityConfig extends WebSecurityConfigurerAdapter{

	@Bean
	public BCryptPasswordEncoder encodePwd() {
		return new BCryptPasswordEncoder();
	}

	@Override
	protected void configure(HttpSecurity http) throws Exception {

		http.csrf().disable();
		http.authorizeRequests()
			.antMatchers("/user/**").authenticated()		.antMatchers("/admin/**").access("hasRole('ROLE_ADMIN')")
			.anyRequest().permitAll()
		.and()
			.formLogin()
			.loginPage("/login")
			.loginProcessingUrl("/loginProc")
			.defaultSuccessUrl("/");
	}
}
가장 기본적인 폼 로그인을 구현한 방식이다.
config 파일을만들어서 WebSecurityConfig 파일을 등록하고 그 안에서 configure를 통해 설정을 하고 사용ㅎ나다.
configure.authorization
		http.authorizeRequests()
			.antMatchers("/user/**").authenticated()	.antMatchers("/admin/**").access("hasRole('ROLE_ADMIN')")
			.anyRequest().permitAll()
각 url별로 접근권한을 설정해주는 기능을 한다.
지금은 단순하게 /user/** 으로 가는 경우는 로그인 된 사용자, 나머지는 전부 허용으로 설정해두었지만, 관리자 페이지나 매니저용 페이지등 활용방법은 다양하다.
로그인 방식 설정
로그인 컨트롤러를 따로 지정하지 않고 페이지를 따로 만들어주지 않아도, 시큐리티에서는 기본적으로 로그인 페이지와 컨트롤러를 만들어서 제공한다. 해당 방식을 설정한다.
제일 기본적인 방식은 위에 코드에도 있는 formLogin 방식이다.
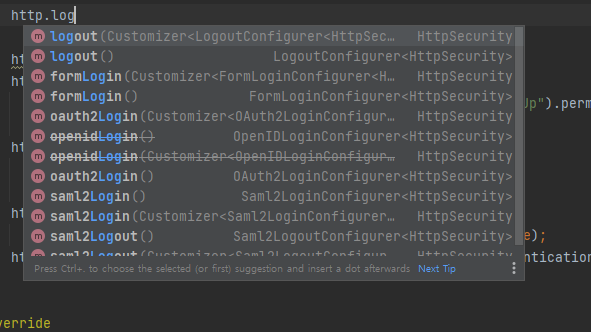
최근에는 소셜로그인 OAuth2도 많이 사용되고 있으며 이 밖에도 openIdLogin, Saml2 Login 등이 있다.
http
                .formLogin()
                .loginProcessingUrl("/loginProc")
                .successHandler()
                .defaultSuccessUrl()
                .loginPage()
로그인 방식 설정 및 로그인 처리 url, 성공 처리 핸들러, 실패 처리 핸들러, 성공시 연결할 url, 로그인 전용 페이지(기본값 없음) 등을 설정해서 사용할 수 있다.
Principal Detail
인증절차를 거치고 나면 인가를 해주는데 그 과정에서 인가 안에는 Authentication 객체가 생기고 필요하다. 그 객체 안에 들어갈 수 있는 유일한 타입이 UserDetails타입이다. 이 Details 안에는 사용자 정보와 유효기간, 비밀번호 변경기간, 역할등이 들어가게 된다.
// Authentication 객체에 저장할 수 있는 유일한 타입
@Data
public class PrincipalDetails implements UserDetails{

	private User user;

	public PrincipalDetails(User user) {
		super();
		this.user = user;
	}

	@Override
	public String getPassword() {
		return user.getPassword();
	}

	@Override
	public String getUsername() {
		return user.getUsername();
	}

	@Override
	public boolean isAccountNonExpired() {
		return true;
	}

	@Override
	public boolean isAccountNonLocked() {
		return true;
	}

	@Override
	public boolean isCredentialsNonExpired() {
		return true;
	}

	@Override
	public boolean isEnabled() {
		return true;
	}

	@Override
	public Collection<? extends GrantedAuthority> getAuthorities() {
		Collection<GrantedAuthority> collet = new ArrayList<GrantedAuthority>();
		collet.add(()->{ return user.getRole();});
		return collet;
	}
}
PrincipalDetailService
import org.springframework.beans.factory.annotation.Autowired;
import org.springframework.security.core.userdetails.UserDetails;
import org.springframework.security.core.userdetails.UserDetailsService;
import org.springframework.security.core.userdetails.UsernameNotFoundException;
import org.springframework.stereotype.Service;

import com.cos.securityex01.model.User;
import com.cos.securityex01.repository.UserRepository;

@Service
public class PrincipalDetailsService implements UserDetailsService{

	@Autowired
	private UserRepository userRepository;

	@Override
	public UserDetails loadUserByUsername(String username) throws UsernameNotFoundException {
		User user = userRepository.findByUsername(username);
		if(user == null) {
			return null;
		}
		return new PrincipalDetails(user);
	}

}
로그인 요청이 오면 자동으로 UserDetailsService 타입으로 IOC 되어있는 loadByUserName이 실행되고 이를 통해 유저를 찾아오게 된다. 즉, 우리가 직접 만든 서비스의 기능과 유사하다.
폼 로그인의 흐름

스프링 컨트롤러에 의해 자동적으로 로그인 페이지가 생기고 여기에 회원정보를 입력해서 로그인을 시도하면 다음과 같은 일이 발생한다.
-
시큐리티가 /login 주소요청이 오면 낚아채서 로그인 지행
-
login요청이 오면 자동으로 UserDetailsService 타입으로 IoC 되어있는 loadUserByUserName 함수가 실행된다.
-
유저를 발견하면 로그인 완료 처리를 하고 시큐리티 session 에 넣어줘야함 (Security ContextHolder)
-
시큐리티가 가지고 있는 세션에 들어갈 수 있는 오브젝트가 정해져있고, 그 오브젝트가 바로 Authentication 타입 객체이다. 이 객체안에는 UserDetails만 들어갈수 있고 이에 따라 PrincipalDetails가 들어가게 된다.
-
로그인이 완료되면 handler를 따르거나 defaultsucessUrl로 간다.
폼 로그인의 한계
폼 로그인은 말 그대로 데이터를 폼 형태로 받는다.

하지만 지금 진행중인 프로젝트는 API 통신을 하고있고 API 통신에서는 Json을 사용한다.
물론 Json을 받아서 파싱해주는 필터를 하나 만들면 Json을 받아서 처리할 수도 있긴하다. 하지만 이런저러한 사유로 일단 OAuth를 하기로 했으니 Oauth역시 정리하도록 하겠다.