Spring Security 작동원리
동기
spring security는 spring 진영에서 가장 유명한 인증, 인가 라이브러리 입니다. 그러나 자주 사용하는 도구임에도 정확한 동작 방식을 공부하고 정리해 본적은 없는 것 같아 시작하게 되었습니다.
전체 구조

위 그림을 토대로 로그인 요청이 들어왔을때 플로우는 아래와 같습니다.
- 요청이 필터 체인으로 들어옵니다.
- AuthenticationFilter에서 인증 정보가 처리됩니다.
- AuthenticationManager와 AuthenticationProvider가 인증을 수행합니다.
- 인증이 성공하면, SecurityContextHolder에 인증 정보를 저장합니다.
- 요청이 컨트롤러로 전달되어 처리됩니다.
이제 각 부분에 대해 좀 더 자세히 설명해드리겠습니다.
AuthenticationFilter
사용자의 인증 요청을 처리하는 핵심 컴포넌트로 사용자가 로그인 또는 인증을 위해 애플리케이션에 요청을 보낼 때, 해당 요청을 가로채고 인증 과정을 시작합니다.
역할
-
요청 가로채기: 인증 관련 요청(예: 로그인)을 가로채고 인증 정보(예: 아이디, 비밀번호)를 처리합니다. 보통 특정 URL 패턴(예: /login)에 매핑됩니다.
-
Authentication 객체 생성: 사용자의 입력 데이터를 기반으로 Authentication 객체를 생성합니다.예: UsernamePasswordAuthenticationToken.
-
AuthenticationManager로 인증 위임:생성된 Authentication 객체를 AuthenticationManager에 전달하여 실제 인증 작업을 수행합니다.
-
성공 또는 실패 처리:인증 성공 시, AuthenticationSuccessHandler를 호출. 인증 실패 시, AuthenticationFailureHandler를 호출. 요청은 AuthenticationFilter에서 시작됩니다.
이 필터는 인증을 처리하는 역할을 합니다.
주요 구현 클래스
Spring Security에서 AuthenticationFilter는 일반적으로 AbstractAuthenticationProcessingFilter를 기반으로 구현됩니다.
public abstract class AbstractAuthenticationProcessingFilter
extends org.springframework.web.filter.GenericFilterBean
implements org.springframework.context.ApplicationEventPublisherAware, org.springframework.context.MessageSourceAware
AbstractAuthenticationProcessingFilter는 브라우저 기반의 Http 기반 인증에 대한 추상
클래스입니다. GenericFilterBean의 상속을 받고 있고, subclass로는 OAuth2LoginAuthenticationFilter, Saml2WebSsoAuthenticationFilter, UsernamePasswordAuthenticationFilter가 있습니다.
이 중에서 가장 많이 사용하는 필터는 아이디/비밀번호를 처리하는 필터와 jwt 토큰 인증을 처리하는 필터입니다.
- UsernamePasswordAuthenticationFilter
- 아이디와 비밀번호를 사용한 인증을 처리합니다.
- 폼 기반 인증에서 주로 사용됩니다.
- 사용자가 POST 요청으로 로그인 정보를 제출하면, 이를 Authentication 객체로 변환합니다.
- 기본적으로 /login URL에 매핑됩니다.
- JwtAuthenticationFilter (Custom 구현 예시)
- JWT 토큰 기반으로 인증을 처리합니다. 이때 HTTP 요청 헤더에서 JWT를 추출합니다.
동작과정
-
요청 가로채기
- 클라이언트가 /login과 같은 URL로 요청을 보냅니다.
- 해당 요청이 AuthenticationFilter에 의해 가로채집니다.
-
인증 정보 추출
- 요청 본문(Body) 또는 헤더에서 사용자의 인증 정보를 추출합니다.
- 예: JSON 포맷에서 아이디와 비밀번호를 읽기
-
Authentication 객체 생성
- 사용자의 인증 정보를 Authentication 객체로 래핑
- 예: new UsernamePasswordAuthenticationToken(username, password).
-
AuthenticationManager로 전달
- 생성된 Authentication 객체를 AuthenticationManager로 전달합니다.
- AuthenticationManager는 인증 작업을 수행하고 결과를 반환합니다.
-
인증 결과 처리
- 성공: AuthenticationSuccessHandler를 호출하여 응답을 반환합니다.
- 예: 성공 페이지로 리다이렉션 또는 JWT 토큰 발행
- 실패: AuthenticationFailureHandler를 호출하여 에러 응답 반환합니다.
- 예: 잘못된 비밀번호나 사용자 정보를 알리는 메시지 발행
Authentication 객체?
현재 인증된 사용자나 인증 요청 정보를 표현하는 데 사용되는 객체.주로 SecurityContext에 저장되어 애플리케이션 전역에서 인증 정보를 공유하는데 사용
- 성공: AuthenticationSuccessHandler를 호출하여 응답을 반환합니다.
AuthenticationManager
AuthenticationManager는 인증을 책임지는 인터페이스로 인증 요청을 받아 적절한 인증 제공자(AuthenticationProvider)에게 위임하고, 성공 또는 실패 여부를 반환합니다.
역할
-
인증 요청 처리
- 클라이언트의 인증 요청(Authentication 객체)을 받아 인증을 수행합니다.
인증 요청에는 사용자 이름, 비밀번호, 토큰 등 다양한 인증 정보가 포함될 수 있습니다.
- 클라이언트의 인증 요청(Authentication 객체)을 받아 인증을 수행합니다.
-
AuthenticationProvider와의 협업
- 여러 종류의 AuthenticationProvider를 조합하여 다양한 인증 방식을 처리할 수 있도록 위임합니다.
- 예: 데이터베이스 기반 인증, LDAP 인증, OAuth2 인증.
-
인증 성공/실패 결과 반환
- 인증 성공 시, 인증된 Authentication 객체를 반환합니다. 인증 실패 시, 예외(AuthenticationException)를 던집니다.
주요 구현 클래스
AuthenticationManager는 인터페이스로, 구현체를 통해 동작합니다. Spring Security에서 제공하는 기본 구현체는 ProviderManager입니다.
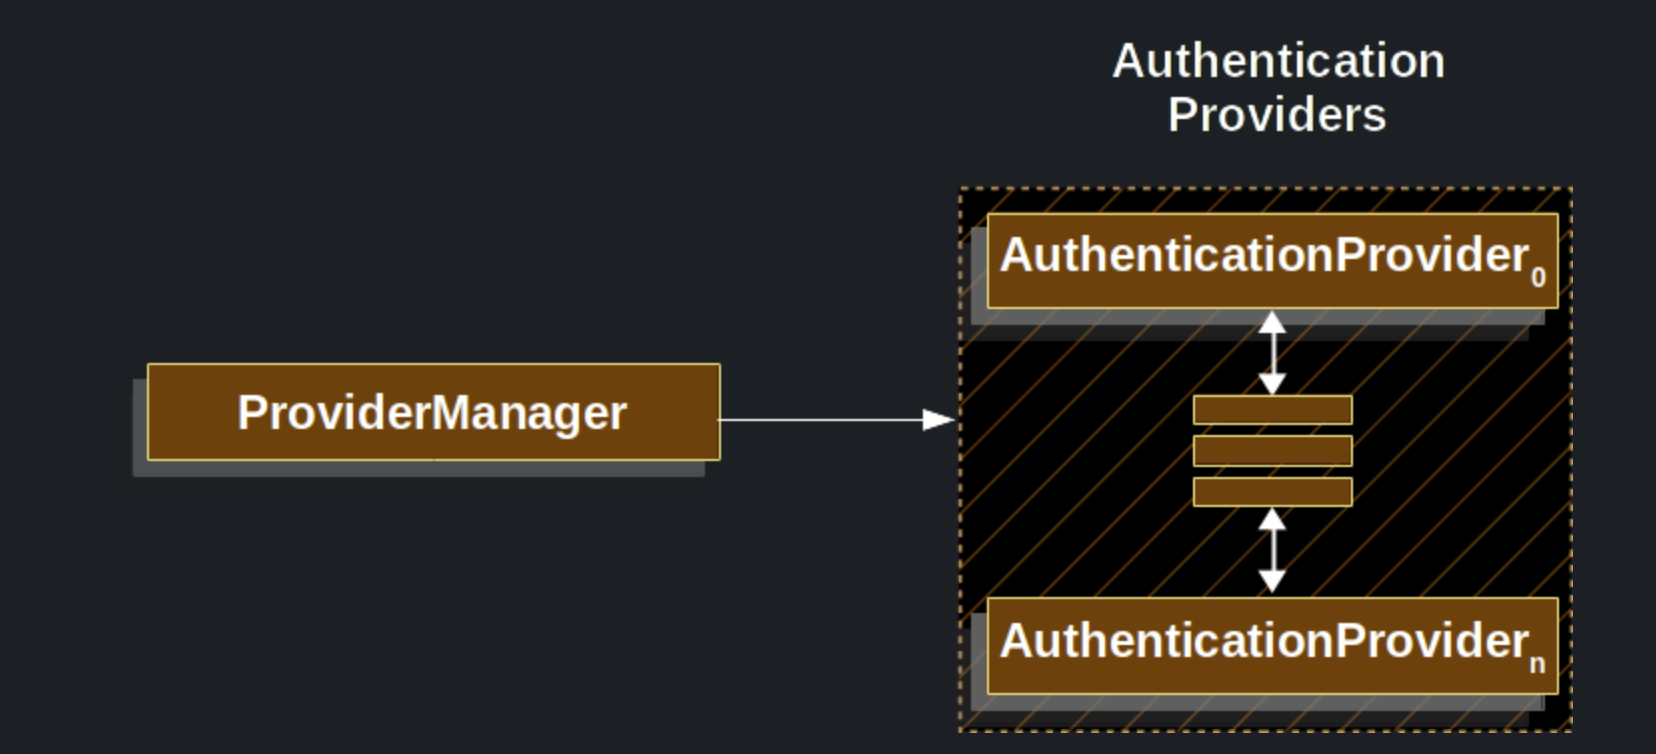
- ProviderManager
여러 AuthenticationProvider를 등록하고, 요청을 적절한 제공자에게 위임합니다. 각 AuthenticationProvider는 특정 인증 방식(예: Username/Password)을 처리합니다.
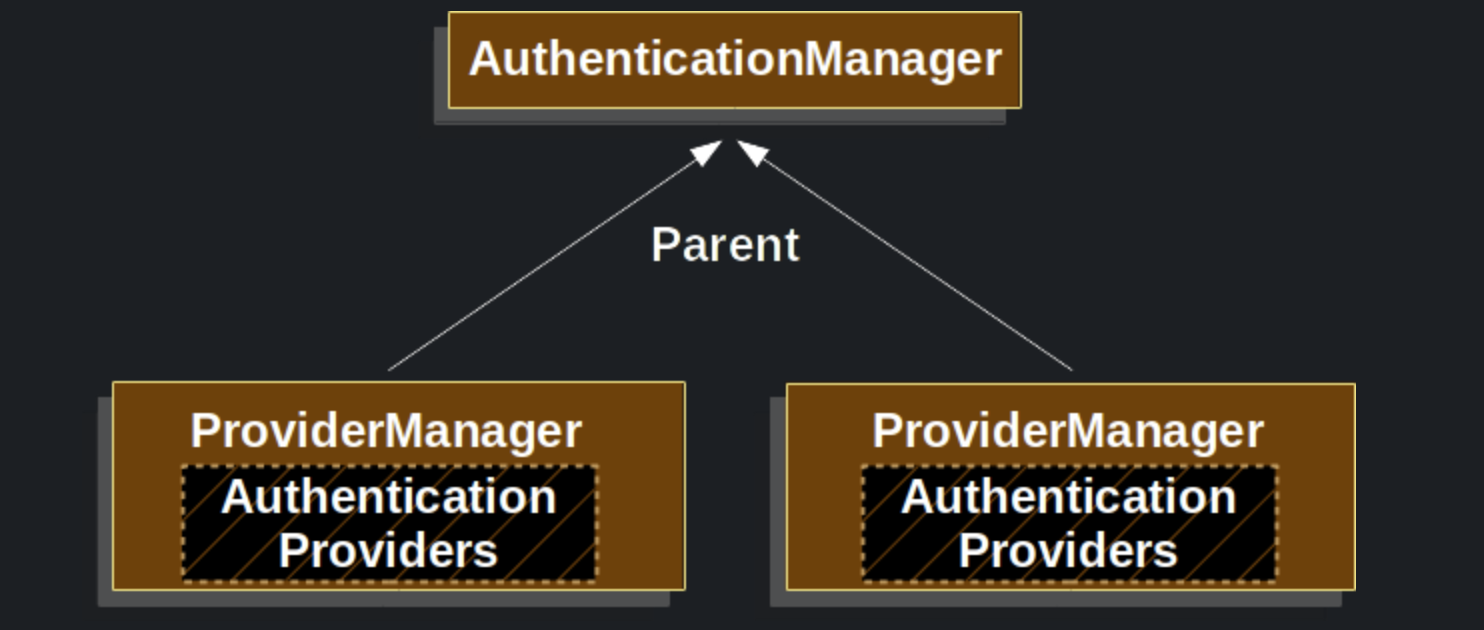
위와 같이 두개의 ProviderManager을 설정할 수도 있는데, 이는 SecurityFilterChanin을 두개 생성할 때 각 FilterChain에 서로 다른 ProviderManager을 적용하고 싶을 때 유용합니다.코드에서는 AuthenticationManager인터페이스로 받고 각각 구현된 ProviderManager를 배정하면 됩니다.
동작 과정
-
인증 요청 생성 : 사용자 요청에서 인증 정보를 추출하여 Authentication 객체를 생성합니다. 예: UsernamePasswordAuthenticationToken.
-
ProviderManager로 전달 : ProviderManager는 등록된 여러 AuthenticationProvider를 순차적으로 호출합니다. 각 AuthenticationProvider는 인증 정보의 타입을 확인하고, 처리할 수 있으면 인증을 수행합니다.
- ProviderManager은 어떤 AuthenticationProvider가 null이 아닌 return 을 제공 할 때까지 목록을 차례대로 반복합니다.
- AuthenticationProvider가 null 이 아닌값을 반환했다는 것은 인증 요청을 결정할 수 있는 권한이 있으며 더이상 다음 AuthenticationProvider를 시도하지 않아도 됨을 의미합니다.
- 한 AuthenticationProvider가 요청을 성공적으로 인증하면, 이전 AuthenticationException이 무시되고 성공적인 인증이 사용됩니다.
-
인증 결과 반환 :
인증 성공 -> 인증된 Authentication 객체 반환합니다.
인증 실패-> AuthenticationException 예외를 던집니다.
구현
public interface AuthenticationManager {

	Authentication authenticate(Authentication authentication) throws AuthenticationException;

}
1. 직접 구현할 경우
authenticationManger 코드를 작성하고 security 설정이 필요합니다
@Component
public class CustomAuthenticationManager implements AuthenticationManager {

    @Override
    public Authentication authenticate(Authentication authentication) throws AuthenticationException {
        String username = authentication.getName();
        String password = authentication.getCredentials().toString();

        // 사용자 인증 로직
        if ("user".equals(username) && "password".equals(password)) {
            return new UsernamePasswordAuthenticationToken(username, password, new ArrayList<>());
        } else {
            throw new BadCredentialsException("Invalid credentials");
        }
    }
}
@Configuration
@EnableWebSecurity
public class SecurityConfig extends WebSecurityConfigurerAdapter {
@Autowired
private CustomAuthenticationManager customAuthenticationManager;
@Override
protected void configure(AuthenticationManagerBuilder auth) throws Exception {
auth.parentAuthenticationManager(customAuthenticationManager);
}
}
2. Spring Boot의 자동 설정 활용
authenticationManger 코드 작성은 필요없고 security 설정만 해주면 됩니다.
in-memory
@Configuration
public class SecurityConfig extends WebSecurityConfigurerAdapter {

    @Override
    protected void configure(AuthenticationManagerBuilder auth) throws Exception {
        auth.inMemoryAuthentication()
                .withUser("user")
                .password("{noop}password") // 비밀번호 암호화 사용 안 함
                .roles("USER");
    }

    @Bean
    @Override
    public AuthenticationManager authenticationManagerBean() throws Exception {
        return super.authenticationManagerBean();
    }
}
jdbc
@Configuration
public class SecurityConfig extends WebSecurityConfigurerAdapter {

    @Override
    protected void configure(AuthenticationManagerBuilder auth) throws Exception {
        auth.jdbcAuthentication()
                .dataSource(dataSource)
                .withDefaultSchema()
                .withUser("user")
                .password("{noop}password")
                .roles("USER");
    }
}
3. providerManger 활용
여러 인증 제공자(AuthenticationProvider)를 조합하여 다양한 인증 방식 처리할 수 있습니다.
확장성이 뛰어나고, 실무에서 자주 사용됩니다.
@Bean
public AuthenticationManager authenticationManager() {
    List<AuthenticationProvider> providers = Arrays.asList(
        new DaoAuthenticationProvider(), // 기본 사용자 인증
        new CustomAuthenticationProvider() // 커스텀 인증 방식
    );
    return new ProviderManager(providers);
}
@Component
public class CustomAuthenticationProvider implements AuthenticationProvider {
@Override
public Authentication authenticate(Authentication authentication) throws AuthenticationException {
String username = authentication.getName();
String password = (String) authentication.getCredentials();
// 커스텀 인증 로직 (예: 외부 서비스 호출)
if ("customUser".equals(username) && "customPass".equals(password)) {
return new UsernamePasswordAuthenticationToken(username, password, new ArrayList<>());
} else {
throw new BadCredentialsException("Invalid custom credentials");
}
}
@Override
public boolean supports(Class<?> authentication) {
return UsernamePasswordAuthenticationToken.class.isAssignableFrom(authentication);
}
}@Configuration
@EnableWebSecurity
public class SecurityConfig extends WebSecurityConfigurerAdapter {
@Autowired
private CustomAuthenticationProvider customAuthenticationProvider;
@Override
protected void configure(AuthenticationManagerBuilder auth) throws Exception {
auth.authenticationProvider(customAuthenticationProvider);
}
}
AuthenticationProvider
public interface AuthenticationProvider {

	Authentication authenticate(Authentication authentication) throws AuthenticationException;

	boolean supports(Class<?> authentication);

}
AuthenticationProvider는 실제 인증 로직을 처리하는 인터페이스로 AuthenticationManager로부터 호출됩니다. 이때 AuthenticationProvider는 특정 인증 방식(예: 아이디/비밀번호, JWT, OAuth2 등)에 대해 인증을 수행합니다.
역할
-
인증 처리: 사용자 요청에서 전달된 Authentication 객체를 기반으로 인증을 수행합니다.
성공하면 인증된 Authentication 객체를 반환하고, 실패하면 예외를 던집니다. -
특정 인증 방식 지원:AuthenticationProvider는 자신이 지원하는 인증 방식만 처리합니다.
지원 여부는 supports(Class<?> authentication) 메서드로 판단합니다. -
다양한 인증 로직 구현:데이터베이스 인증, LDAP 인증, OAuth2 인증, JWT 토큰 검증 등 여러 인증 방식을 구현할 수 있습니다.
인터페이스
AuthenticationProvider는 다음 두 가지 메서드를 제공합니다
-
authenticate(Authentication authentication)
- 전달된 Authentication 객체를 기반으로 인증을 수행합니다.
- 인증 성공 시, 인증된 Authentication 객체를 반환합니다.
- 인증 실패 시, AuthenticationException 예외를 던집니다.
-
supports(Class<?> authentication)
- 현재 AuthenticationProvider가 처리할 수 있는 Authentication 객체 타입을 명시합니다.
- 예: UsernamePasswordAuthenticationToken 타입을 처리하는 경우, 해당 타입에 대해 true를 반환합니다.
기본 구현체
1. DaoAuthenticationProvider
데이터베이스 기반 인증을 처리하는 가장 일반적인 구현체입니다.
특징
- 데이터베이스에서 사용자 정보를 로드하여 인증을 수행합니다.
- UserDetailsService를 사용하여 사용자 정보를 가져옵니다.
- PasswordEncoder를 통해 비밀번호 검증.
- Spring Security에서 가장 기본적이고 널리 사용되는 인증 방식입니다.
구성 요소
- UserDetailsService:
- 사용자의 인증 정보를 가져오기 위한 인터페이스.
- 사용자 이름을 기반으로 사용자 데이터를 로드합니다.
- PasswordEncoder:
- 비밀번호를 암호화하고, 제출된 비밀번호와 데이터베이스에 저장된 암호화된 비밀번호를 비교합니다.
사용법
설정
@Configuration
public class SecurityConfig extends WebSecurityConfigurerAdapter {

    @Bean
    public PasswordEncoder passwordEncoder() {
        return new BCryptPasswordEncoder(); // 비밀번호 암호화 방식 설정
    }

    @Bean
    public DaoAuthenticationProvider daoAuthenticationProvider(UserDetailsService userDetailsService,
                                                               PasswordEncoder passwordEncoder) {
        DaoAuthenticationProvider provider = new DaoAuthenticationProvider();
        provider.setUserDetailsService(userDetailsService);
        provider.setPasswordEncoder(passwordEncoder);
        return provider;
    }

    @Override
    protected void configure(AuthenticationManagerBuilder auth) throws Exception {
        auth.authenticationProvider(daoAuthenticationProvider(userDetailsService(), passwordEncoder()));
    }
}
UserDetailsService
@Service
public class CustomUserDetailsService implements UserDetailsService {

    @Autowired
    private UserRepository userRepository;

    @Override
    public UserDetails loadUserByUsername(String username) throws UsernameNotFoundException {
        User user = userRepository.findByUsername(username)
                .orElseThrow(() -> new UsernameNotFoundException("User not found"));

        return new org.springframework.security.core.userdetails.User(
                user.getUsername(),
                user.getPassword(),
                Collections.singletonList(new SimpleGrantedAuthority(user.getRole()))
        );
    }
}
2. PreAuthenticatedAuthenticationProvider
이미 인증된 사용자를 처리하기 위한 AuthenticationProvider입니다. 주로 SSO(Single Sign-On)와 같은 외부 인증 시스템과 통합할 때 사용됩니다.
특징
- 인증은 외부 시스템에서 이미 처리되었으며, Spring Security는 이를 확인하는 역할만 수행합니다.
- PreAuthenticatedAuthenticationToken을 사용하여 인증 정보를 처리합니다.
구성 요소
1. PreAuthenticatedUserDetailsService: 인증된 사용자에 대한 세부 정보를 로드합니다.
사용법
@Configuration
public class SecurityConfig extends WebSecurityConfigurerAdapter {

    @Bean
    public PreAuthenticatedAuthenticationProvider preAuthenticatedAuthenticationProvider() {
        PreAuthenticatedAuthenticationProvider provider = new PreAuthenticatedAuthenticationProvider();
        provider.setPreAuthenticatedUserDetailsService(userDetailsServiceWrapper());
        return provider;
    }

    @Bean
    public AuthenticationUserDetailsService<PreAuthenticatedAuthenticationToken> userDetailsServiceWrapper() {
        return token -> {
            // 외부 시스템에서 인증된 사용자 정보 로드
            String username = token.getName();
            return new User(username, "", List.of(new SimpleGrantedAuthority("ROLE_USER")));
        };
    }

    @Override
    protected void configure(AuthenticationManagerBuilder auth) {
        auth.authenticationProvider(preAuthenticatedAuthenticationProvider());
    }
}
3. AnonymousAuthenticationProvider
익명 사용자를 처리하기 위한 AuthenticationProvider입니다.
특징
- 인증되지 않은 사용자에게 기본적인 권한을 부여합니다.
- 익명 사용자로부터 오는 요청을 식별하고 처리할 수 있도록 설정되어 있습니다.
구성 요소
- AnonymousAuthenticationToken: 익명 사용자에 대한 인증 토큰.
사용법
AnonymousAuthenticationProvider는 Spring Security가 기본적으로 등록하므로, 추가 설정이 필요하지 않습니다. 따라서, 익명 사용자를 활성화하려면 Security 설정에서 .anonymous()를 명시하면 됩니다.
@Configuration
public class SecurityConfig extends WebSecurityConfigurerAdapter {

    @Override
    protected void configure(HttpSecurity http) throws Exception {
        http
            .authorizeRequests()
                .antMatchers("/public").permitAll()
                .anyRequest().authenticated()
            .and()
            .anonymous() // 익명 사용자 활성화
            .and()
            .formLogin();
    }
}
4. RememberMeAuthenticationProvider
"Remember Me" 기능을 처리하는 AuthenticationProvider입니다.
특징
- 사용자가 브라우저를 닫은 후에도 인증 상태를 유지하도록 처리합니다.
- "Remember Me" 쿠키를 통해 사용자 인증 상태를 유지합니다.
구성 요소
-
RememberMeServices: Remember Me 쿠키를 생성하고, 인증 정보를 유지합니다.
-
키: Remember Me 기능은 고유한 키를 사용하여 인증 상태를 검증합니다.
사용법
Security 설정에서 Remember Me 활성화
@Configuration
public class SecurityConfig extends WebSecurityConfigurerAdapter {

    @Override
    protected void configure(HttpSecurity http) throws Exception {
        http
            .authorizeRequests()
                .anyRequest().authenticated()
            .and()
            .rememberMe()
                .key("uniqueAndSecret") // Remember Me를 위한 고유 키
                .tokenValiditySeconds(86400); // 쿠키 유효 시간
    }
}
custom 구현체
Custom AuthenticationProvider로 기본 AuthenticationProvider가 아니라 요구사항에 맞는 맞춤형 인증 로직을 구현할 수 있습니다.
특징
-
특수 인증 로직 구현
- 데이터베이스 인증 외에도 외부 서비
스(API, LDAP 등) 또는 사용자 정의 인증 방식을 추가로 처리할 수 있습니다.
- 데이터베이스 인증 외에도 외부 서비
-
Spring Security와의 통합
- Spring Security의 기존 컴포넌트(AuthenticationManager, SecurityContextHolder)와 자연스럽게 통합됩니다.
-
유연성
- 여러 AuthenticationProvider와 함께 사용하여 다양한 인증 방식을 처리할 수 있습니다.
구현
AuthenticationProvider 인터페이스를 구현하고, 인증 로직을 authenticate 메서드에 정의합니다.
이때 주의해야 할 점으로
1. authenticate 메서드에서 인증 로직 정의, 인증 성공/실패를 명확히 처리해야하고
2. supports 메서드에서 처리 가능한 인증 객체 타입을 지정해야 합니다.
- 기본
public interface AuthenticationProvider {
    Authentication authenticate(Authentication authentication) throws AuthenticationException;
    boolean supports(Class<?> authentication);
}
@Component
public class CustomAuthenticationProvider implements AuthenticationProvider {
@Override
public Authentication authenticate(Authentication authentication) throws AuthenticationException {
// 인증 요청에서 사용자 이름과 비밀번호를 가져옴
String username = authentication.getName();
String password = (String) authentication.getCredentials();
// 사용자 인증 로직 (예: 외부 API 호출, DB 검증 등)
if ("customUser".equals(username) && "customPassword".equals(password)) {
// 인증 성공: 인증된 Authentication 객체 반환
return new UsernamePasswordAuthenticationToken(username, password, new ArrayList<>());
} else {
// 인증 실패: 예외 던짐
throw new BadCredentialsException("Invalid credentials");
}
}
@Override
public boolean supports(Class<?> authentication) {
// 처리 가능한 Authentication 객체 타입 정의
return UsernamePasswordAuthenticationToken.class.isAssignableFrom(authentication);
}
}- 외부 api
@Component
public class ApiAuthenticationProvider implements AuthenticationProvider {

    @Autowired
    private ExternalAuthService externalAuthService;

    @Override
    public Authentication authenticate(Authentication authentication) throws AuthenticationException {
        String username = authentication.getName();
        String password = (String) authentication.getCredentials();

        // 외부 API 호출을 통해 사용자 인증
        if (externalAuthService.authenticate(username, password)) {
            // 인증 성공: 권한 정보 추가
            List<GrantedAuthority> authorities = List.of(new SimpleGrantedAuthority("ROLE_USER"));
            return new UsernamePasswordAuthenticationToken(username, password, authorities);
        } else {
            // 인증 실패
            throw new BadCredentialsException("Invalid credentials from external service");
        }
    }

    @Override
    public boolean supports(Class<?> authentication) {
        return UsernamePasswordAuthenticationToken.class.isAssignableFrom(authentication);
    }
}- jwt
@Component
public class JwtAuthenticationProvider implements AuthenticationProvider {

    @Autowired
    private JwtTokenService jwtTokenService;

    @Override
    public Authentication authenticate(Authentication authentication) throws AuthenticationException {
        String token = (String) authentication.getCredentials();

        // JWT 토큰 검증
        if (jwtTokenService.validateToken(token)) {
            // 토큰에서 사용자 정보 추출
            String username = jwtTokenService.getUsernameFromToken(token);
            List<GrantedAuthority> authorities = jwtTokenService.getAuthoritiesFromToken(token);

            // 인증 성공: 인증된 Authentication 객체 반환
            return new UsernamePasswordAuthenticationToken(username, token, authorities);
        } else {
            // 인증 실패
            throw new BadCredentialsException("Invalid JWT token");
        }
    }

    @Override
    public boolean supports(Class<?> authentication) {
        return JwtAuthenticationToken.class.isAssignableFrom(authentication);
    }
}
spring security 등록
- AuthenticationManagerBuilder를 사용하여 등록
@Configuration
@EnableWebSecurity
public class SecurityConfig extends WebSecurityConfigurerAdapter {

    @Autowired
    private CustomAuthenticationProvider customAuthenticationProvider;

    @Autowired
    private ApiAuthenticationProvider apiAuthenticationProvider;

    @Override
    protected void configure(AuthenticationManagerBuilder auth) throws Exception {
        auth.authenticationProvider(customAuthenticationProvider)
            .authenticationProvider(apiAuthenticationProvider);
    }
}- ProviderManager로 직접 설정
@Bean
public AuthenticationManager authenticationManager() {
    List<AuthenticationProvider> providers = List.of(
        new CustomAuthenticationProvider(),
        new ApiAuthenticationProvider()
    );
    return new ProviderManager(providers);
}
UserDetailsService
사용자의 인증 정보(아이디, 비밀번호, 권한 등)를 제공하는 핵심 인터페이스입니다. UserDetailsService는 주로 데이터베이스에서 사용자의 세부 정보를 가져오고, 이를 Spring Security의 인증 처리 과정에서 활용합니다.
역할
-
사용자 정보 로드
- 주어진 사용자 이름(Username)을 기반으로 사용자 정보를 데이터베이스나 외부 소스에서 로드합니다.
- 사용자 정보는 Spring Security에서 정의한 UserDetails 객체로 반환됩니다.
-
인증 과정 지원
- AuthenticationManager와 AuthenticationProvider가 인증 과정에서 사용자 정보를 확인하기 위해 호출됩니다.
-
권한 제공
- 로드된 사용자 정보에는 권한(Role 또는 Authority) 정보도 포함되며, 이를 통해 인가(Authorization)가 수행됩니다.
인터페이스
1. UserDetailsService 인터페이스
public interface UserDetailsService {
    UserDetails loadUserByUsername(String username) throws UsernameNotFoundException;
}- loadUserByUsername(String username):
- 주어진 사용자 이름으로 사용자 정보를 로드하는 메서드
- 사용자가 존재하지 않으면 UsernameNotFoundException 예외
- 반환값은 UserDetails 타입
2. UserDetails 인터페이스
public interface UserDetails {
    Collection<? extends GrantedAuthority> getAuthorities(); // 권한 정보
    String getPassword();                                    // 비밀번호
    String getUsername();                                    // 사용자 이름
    boolean isAccountNonExpired();                          // 계정 만료 여부
    boolean isAccountNonLocked();                           // 계정 잠금 여부
    boolean isCredentialsNonExpired();                      // 비밀번호 만료 여부
    boolean isEnabled();                                     // 계정 활성화 여부
}
구현
UserDetailsService는 직접 구현해야 하며, 데이터베이스 또는 외부 서비스에서 사용자 정보를 가져오는 로직을 정의합니다.
@Service
public class CustomUserDetailsService implements UserDetailsService {

    @Autowired
    private UserRepository userRepository; // JPA 기반 사용자 저장소

    @Override
    public UserDetails loadUserByUsername(String username) throws UsernameNotFoundException {
        // 데이터베이스에서 사용자 검색
        User user = userRepository.findByUsername(username)
                .orElseThrow(() -> new UsernameNotFoundException("User not found: " + username));

        // UserDetails 객체 반환
        return new org.springframework.security.core.userdetails.User(
                user.getUsername(),
                user.getPassword(),
                getAuthorities(user)
        );
    }

    // 권한 설정 메서드
    private Collection<? extends GrantedAuthority> getAuthorities(User user) {
        return user.getRoles().stream()
                .map(role -> new SimpleGrantedAuthority(role.getName()))
                .collect(Collectors.toList());
    }
}
Security 설정
@Configuration
@EnableWebSecurity
public class SecurityConfig extends WebSecurityConfigurerAdapter {

    @Autowired
    private CustomUserDetailsService customUserDetailsService;

    @Bean
    public PasswordEncoder passwordEncoder() {
        return new BCryptPasswordEncoder(); // 비밀번호 암호화
    }

    @Override
    protected void configure(AuthenticationManagerBuilder auth) throws Exception {
        auth.userDetailsService(customUserDetailsService) // UserDetailsService 등록
            .passwordEncoder(passwordEncoder());          // 비밀번호 암호화 사용
    }
}
Custom UserDetails
설정
사용자 ID, 이메일, 전화번호, 활성화 상태와 같은 추가 필드가 필요하다면 custom user details를 정의해서 사용할 수 있습니다.
public class CustomUserDetails implements UserDetails {

    private String username; // 사용자 이름
    private String password; // 비밀번호
    private String email;    // 이메일 (추가 필드)
    private boolean enabled; // 활성화 여부
    private List<GrantedAuthority> authorities; // 권한

    //생성자
    //필수메서드
}
이 경우에 Custom UserDetailsService에서 CustomUserDetails 객체를 반환하도록 구현합니다.
@Service
public class CustomUserDetailsService implements UserDetailsService {

    @Autowired
    private UserRepository userRepository;

    @Override
    public UserDetails loadUserByUsername(String username) throws UsernameNotFoundException {
        // 데이터베이스에서 사용자 조회
        User user = userRepository.findByUsername(username)
                .orElseThrow(() -> new UsernameNotFoundException("User not found: " + username));

        // CustomUserDetails 객체로 변환
        return new CustomUserDetails(
                user.getUsername(),
                user.getPassword(),
                user.getEmail(),
                user.isEnabled(),
                user.getRoles().stream()
                    .map(role -> new SimpleGrantedAuthority(role.getName()))
                    .collect(Collectors.toList())
        );
    }
}
사용
Spring Security의 SecurityContextHolder를 통해 CustomUserDetails 정보를 가져올 수 있습니다.
@RestController
@RequestMapping("/user")
public class UserController {

    @GetMapping("/me")
    public ResponseEntity<?> getCurrentUser() {
        // 현재 인증된 사용자 정보 가져오기
        CustomUserDetails userDetails = (CustomUserDetails) SecurityContextHolder
                .getContext()
                .getAuthentication()
                .getPrincipal();

        return ResponseEntity.ok(Map.of(
                "username", userDetails.getUsername(),
                "email", userDetails.getEmail(),
                "roles", userDetails.getAuthorities()
        ));
    }
}
SecurityContextHolder
현재 실행 중인 스레드의 보안 컨텍스트(Security Context)를 저장하고 관리하는 핵심 클래스로 보안 컨텍스트에는 사용자의 인증 정보와 권한이 저장되며, Spring Security의 인증 및 권한 관리를 위해 사용됩니다.
인증이 성공하면, 인증된 Authentication 객체는 SecurityContextHolder에 저장되고 이 컨텍스트는 현재 요청에 대한 인증 정보를 유지하며, 이후 요청에서도 사용됩니다.
구성 요소
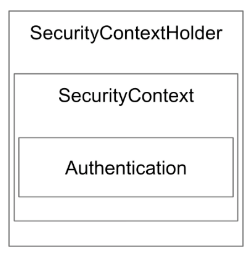
-
SecurityContext
- SecurityContextHolder가 관리하는 객체로, 현재 인증 정보를 포함합니다.
- 내부에 Authentication 객체를 포함하며, Authentication 객체는 인증 및 권한 정보를 담고 있습니다.
public interface SecurityContext {
   Authentication getAuthentication();
   void setAuthentication(Authentication authentication);
}
-
Authentication
- Spring Security의 인증 정보를 표현하는 인터페이스.
- 사용자 이름, 비밀번호, 권한 정보, 인증 상태 등을 가지고 있습니다.
사용
- 현재 사용자 정보 가져오기
import org.springframework.security.core.context.SecurityContextHolder;
import org.springframework.security.core.Authentication;
import org.springframework.security.core.userdetails.UserDetails;

public class UserService {

    public String getCurrentUsername() {
        // SecurityContext에서 Authentication 객체 가져오기
        Authentication authentication = SecurityContextHolder.getContext().getAuthentication();

        if (authentication == null || !authentication.isAuthenticated()) {
            return null; // 인증되지 않은 경우
        }

        // 사용자 이름 반환
        return authentication.getName();
    }

    public UserDetails getCurrentUserDetails() {
        Authentication authentication = SecurityContextHolder.getContext().getAuthentication();

        if (authentication != null && authentication.getPrincipal() instanceof UserDetails) {
            return (UserDetails) authentication.getPrincipal(); // 사용자 정보 반환
        }

        return null;
    }
}- 인증 정보 설정
커스텀 인증 로직이나 테스트 환경에서 SecurityContextHolder에 인증 정보를 설정할 수 있습니다.
import org.springframework.security.authentication.UsernamePasswordAuthenticationToken;
import org.springframework.security.core.context.SecurityContextHolder;
import org.springframework.security.core.authority.SimpleGrantedAuthority;

public class AuthenticationUtil {

    public static void setAuthentication(String username, String role) {
        // 인증 객체 생성
        UsernamePasswordAuthenticationToken authentication =
                new UsernamePasswordAuthenticationToken(
                        username,
                        null,
                        List.of(new SimpleGrantedAuthority(role))
                );

        // SecurityContext에 설정
        SecurityContextHolder.getContext().setAuthentication(authentication);
    }
}- 인증 정보 초기화
사용자가 로그아웃하거나 인증 정보가 필요하지 않은 경우 SecurityContextHolder를 초기화할 수 있습니다.
전략
SecurityContextHolder는 기본적으로 ThreadLocal을 사용하여 SecurityContext를 관리합니다.
전략 종류
-
MODE_THREADLOCAL (기본값)
각 스레드에서 독립적으로 SecurityContext를 저장합니다.
동시성 문제가 없도록 설계되어 있으며, 대부분의 애플리케이션에서 사용합니다. -
MODE_INHERITABLETHREADLOCAL
부모 스레드의 SecurityContext를 자식 스레드로 전달합니다.
자식 스레드에서 부모 스레드의 인증 정보를 활용하는 경우에 사용합니다. -
MODE_GLOBAL
애플리케이션 전체에서 하나의 SecurityContext를 공유합니다.
여러 사용자가 동시에 요청하는 애플리케이션에서는 사용하지 않는 것이 좋습니다.
SecurityContextHolder.clearContext();Filter Chain
HTTP 요청을 가로채고, 인증(Authentication) 및 인가(Authorization) 관련 작업을 수행하는 일련의 필터(필터 체인)입니다. 모든 클라이언트 요청은 Spring Security의 Filter Chain을 통과하며, 보안 관련 로직은 이 체인을 통해 처리됩니다.
인증이 완료되면 요청은 다음 필터로 전달됩니다.
이후 필터에서 추가적인 작업(예: 권한 검사)을 수행하거나 최종적으로 Spring Controller로 요청이 전달됩니다.
특징
-
요청 가로채기
HTTP 요청이 컨트롤러에 도달하기 전에 Filter Chain에서 가로채어 보안 작업을 수행합니다. -
순차적 처리
요청은 등록된 필터들을 순서대로 통과하며, 각 필터는 특정 보안 작업(예: 인증, 권한 검사)을 담당합니다. -
유연한 확장성
기본 제공 필터를 커스터마이징하거나, 필요에 따라 사용자 정의 필터를 추가할 수 있습니다.
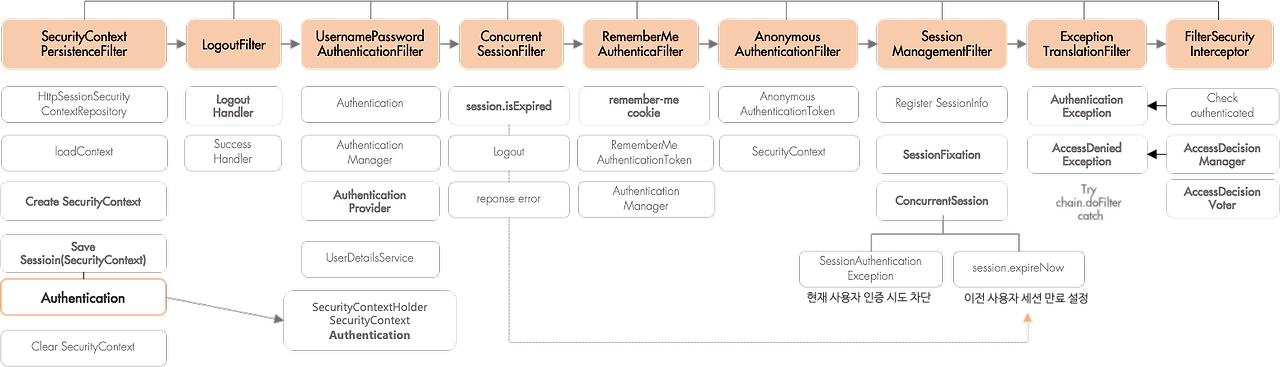
구성요소
1. SecurityContextPersistenceFilter
- 역할
- SecurityContext를 생성하거나 기존 세션에서 복원합니다.
- 요청마다 SecurityContextHolder에 SecurityContext를 저장하여 인증 정보를 유지합니다.
- 주요 기능
- HttpSessionSecurityContextRepository를 통해 세션에서 SecurityContext를 로드하거나 저장합니다.
- 요청 종료 시 SecurityContextHolder를 정리하여 메모리 누수를 방지합니다.
- 흐름
- 요청 → loadContext() → SecurityContext 생성/복원 → SecurityContextHolder에 저장
2. LogoutFilter
- 역할
- 사용자의 로그아웃 요청을 처리
- 주요 기능
- 로그아웃 시 세션을 무효화하고, SecurityContextHolder를 초기화합니다.
- LogoutHandler와 LogoutSuccessHandler를 호출하여 후속 작업 수행합니다.
- 흐름
- 로그아웃 요청 → LogoutHandler 처리 → 세션 초기화 → 성공 응답
3. UsernamePasswordAuthenticationFilter
- 역할
- 사용자 이름과 비밀번호를 사용한 인증 요청을 처리합니다.
- 주요 기능
- /login 엔드포인트에서 아이디와 비밀번호를 처리합니다.
- AuthenticationManager를 호출하여 인증을 수행합니다.
- 인증 성공 시 SecurityContextHolder에 인증 정보 저장합니다.
- 흐름
- 인증 요청 → AuthenticationManager → AuthenticationProvider → 인증 성공/실패
4. ConcurrentSessionFilter
- 역할
- 사용자 세션의 동시 사용 제한
- 로그인 후의 동시 세션 상태 관리
- 주요 기능
- 현재 사용자 계정으로 인증을 받은 사용자가 두 명 이상일 때 실행되는 필터
- 세션이 만료되거나 다른 세션에서 동일 계정으로 로그인된 경우 기존 세션을 로그아웃
- session.isExpired()를 확인하여 만료된 세션 응답을 반환합니다.
- 흐름
- 요청 → 세션 확인 → 만료된 세션 → 로그아웃 처리
5. RememberMeAuthenticationFilter
- 역할
- Remember-Me 쿠키를 사용하여 인증 상태를 유지
- 주요 기능
- 요청에 포함된 Remember-Me 쿠키를 검증하고, 유효한 경우 인증 정보를 복원합니다.
- RememberMeServices를 통해 쿠키 생성 및 검증을 진행합니다.
- 흐름
- 쿠키 존재 → RememberMeAuthenticationToken 생성 → 인증 성공 → SecurityContextHolder 저장
6. AnonymousAuthenticationFilter
- 역할
- 인증되지 않은 사용자를 익명 사용자로 처리
- 주요 기능
- 이 필터가 호출되는 시점까지, 인증 시도를 하지 않고 권한도 없이 어떤 자원에 바로 접속을 시도하는 경우 실행
- 인증되지 않은 요청에 대해 AnonymousAuthenticationToken을 생성하여 기본 권한 부여
- 흐름
- 인증 정보 없음 → 익명 토큰 생성 → 요청 처리
7. SessionManagementFilter
- 역할
- 세션 관련 보안 작업 수행
- 로그인 과정에서 세션을 관리
- 주요 기능
- 세션 고정 공격 방지(Session Fixation)
- 사용자 세션 정보 등록 및 관리
- 동시 세션 제한(Concurrent Session)
- 흐름
- 요청 → 세션 고정 방지 처리 → 세션 정보 등록
8. ExceptionTranslationFilter
- 역할
- 인증 및 권한 오류(Exception) 처리
- 주요 기능
- AuthenticationException 발생 시 로그인 페이지로 리다이렉트 또는 에러 응답 반환
- AccessDeniedException 발생 시 적절한 접근 거부 응답 반환(403 Forbidden)
- 흐름
- 요청 → 예외 발생 → 적절한 핸들링 → 응답 반환
9. FilterSecurityInterceptor
- 역할
- 최종적으로 요청된 리소스에 대한 접근 권한 확인
- 주요 기능
- 요청 URL, HTTP 메서드에 따라 리소스 접근 권한을 확인
- AccessDecisionManager를 통해 권한 확인 로직 실행
- 권한 없을 시 AccessDeniedException 발생
- 흐름
- 요청 → 권한 확인 → 접근 허용/거부
📢ConcurrentSessionFilter와 SessionManagementFilter의 차이점
ConcurrentSessionFilter : 이미 로그인한 상태에서 동작하며, 사용자가 동시에 여러 세션(동시 로그인)을 가질 수 없도록 제한, 만약 사용자가 다른 곳에서 동일한 계정으로 로그인하면, 현재 세션은 만료 처리
SessionManagementFilter: 로그인 시점에 동작하며, 세션과 관련된 보안 작업을 수행, 로그인 후 새 세션을 만들거나 기존 세션을 재사용정리
ConcurrentSessionFilter: "동시 로그인 제한을 통해, 한 계정으로 여러 곳에서 로그인하지 못하게 막아!"
[사용자 A - 컴퓨터 로그인] → OK
[사용자 A - 스마트폰 로그인] → 컴퓨터 세션 만료
SessionManagementFilter: "로그인할 때 새로운 세션을 만들어 안전하게 관리하자!"
[로그인 전: 기존 세션] → 로그인 → [새로운 세션 생성]
설정
- 기본 Filter Chain 설정
Spring Boot와 Spring Security는 기본적으로 Filter Chain을 자동 구성합니다.
@Configuration
@EnableWebSecurity
public class SecurityConfig extends WebSecurityConfigurerAdapter {

    @Override
    protected void configure(HttpSecurity http) throws Exception {
        http
            .authorizeRequests()
                .antMatchers("/public/**").permitAll() // 공개 리소스
                .anyRequest().authenticated()         // 나머지 요청은 인증 필요
            .and()
            .formLogin() // 기본 로그인 폼 활성화
            .and()
            .logout();   // 로그아웃 활성화
    }
}- Custom Filter 추가
필요한 경우, 기본 필터 외에 사용자 정의 필터를 추가할 수 있습니다.
@Component
public class CustomAuthenticationFilter extends OncePerRequestFilter {

    @Override
    protected void doFilterInternal(HttpServletRequest request, HttpServletResponse response, FilterChain filterChain)
            throws ServletException, IOException {
        // 요청 헤더에서 사용자 정의 인증 로직 처리
        String customHeader = request.getHeader("X-Custom-Auth");
        if (customHeader != null && customHeader.equals("valid-token")) {
            SecurityContextHolder.getContext().setAuthentication(
                new UsernamePasswordAuthenticationToken("customUser", null, List.of(new SimpleGrantedAuthority("ROLE_USER")))
            );
        }
        filterChain.doFilter(request, response); // 다음 필터로 요청 전달
    }
}
Custom Filter 등록
@Configuration
@EnableWebSecurity
public class SecurityConfig extends WebSecurityConfigurerAdapter {

    @Autowired
    private CustomAuthenticationFilter customAuthenticationFilter;

    @Override
    protected void configure(HttpSecurity http) throws Exception {
        http
            .addFilterBefore(customAuthenticationFilter, UsernamePasswordAuthenticationFilter.class) // 커스텀 필터 추가
            .authorizeRequests()
                .anyRequest().authenticated();
    }
}- 특정 필터 비활성화
csrf 비활성화
@Override
protected void configure(HttpSecurity http) throws Exception {
    http.csrf().disable();
}- 특정 URL에 필터 적용
필터를 특정 URL 패턴에만 적용하거나 제외할 수 있습니다.
@Override
protected void configure(HttpSecurity http) throws Exception {
    http
        .authorizeRequests()
            .antMatchers("/public/**").permitAll()
            .anyRequest().authenticated()
        .and()
        .addFilter(new CustomFilter()); // 특정 URL에만 적용 가능
}
참고
https://www.elancer.co.kr/blog/detail/235
https://velog.io/@on5949/SpringSecurity-Authentication-%EA%B3%BC%EC%A0%95-%EC%A0%95%EB%A6%AC
https://ohtaeg.tistory.com/8
https://gngsn.tistory.com/160
https://juran-devblog.tistory.com/240