
Swagger란?
Swagger는 코드에 어노테이션만 추가하면 API 문서를 자동으로 생성하고, 웹 UI에서 바로 테스트할 수 있는 도구입니다.
핵심 기능
- API 문서 자동 생성
- 웹 UI에서 직접 테스트 가능
- 코드 변경 시 문서도 자동 업데이트
1. 프로젝트 설정
build.gradle
dependencies {
    // Swagger
    implementation 'org.springdoc:springdoc-openapi-starter-webmvc-ui:2.5.0'
}
application.properties (선택사항)
# Swagger UI 경로 설정
springdoc.swagger-ui.path=/swagger-ui.html
springdoc.api-docs.path=/api-docs

# Swagger UI 활성화 여부
springdoc.swagger-ui.enabled=true
2. Security 설정 (JWT 사용 시)
SecurityConfig.java
JWT 인증을 사용하는 경우, Swagger 접근 허용 설정이 필요합니다.
@Configuration
@EnableWebSecurity
public class SecurityConfig {

    @Bean
    public SecurityFilterChain filterChain(HttpSecurity http) throws Exception {
        http
            .authorizeHttpRequests(auth -> auth
                // Swagger 관련 경로 허용
                .requestMatchers(
                    "/swagger-ui/**",
                    "/v3/api-docs/**",
                    "/swagger-ui.html"
                ).permitAll()

                // 나머지 요청은 인증 필요
                .anyRequest().authenticated()
            );

        return http.build();
    }
}
3. DTO에 @Schema 적용
QnaDTO.java
@Getter
@Setter
public class QnaDTO {

    @Schema(description = "문의 ID", example = "1")
    private Long id;

    @Schema(description = "상품 ID", example = "100")
    private Long productId;

    @Schema(description = "문의 제목", example = "배송 문의")
    private String title;

    @Schema(description = "문의 내용", example = "배송은 언제 되나요?")
    private String content;

    @Schema(description = "답변 상태", example = "PENDING",
            allowableValues = {"PENDING", "ANSWERED"})
    private String status;

    @Schema(description = "작성자", example = "user123")
    private String userId;

    @Schema(description = "작성일", example = "2025-01-15T10:30:00")
    private LocalDateTime createdAt;
}
4. Controller에 Swagger 적용
QnaRestController.java
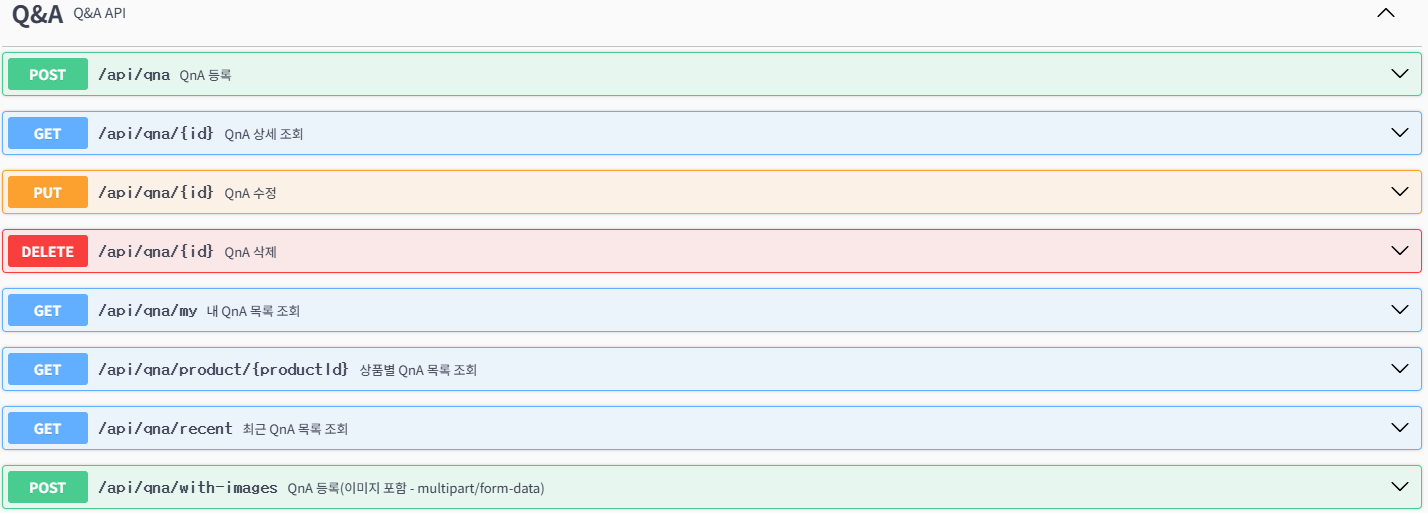
@Tag(name = "Q&A", description = "Q&A API")
@RestController
@RequestMapping("/api/qna")
@RequiredArgsConstructor
public class QnaRestController {

    private final QnaService qnaService;

    /**
     * 상품별 문의 목록 조회
     */
    @Operation(
        summary = "상품별 문의 조회",
        description = "특정 상품의 모든 문의를 조회합니다."
    )
    @ApiResponses({
        @ApiResponse(responseCode = "200", description = "조회 성공"),
        @ApiResponse(responseCode = "404", description = "상품을 찾을 수 없음"),
        @ApiResponse(responseCode = "500", description = "서버 오류")
    })
    @GetMapping("/product/{productId}")
    public ResponseEntity<Map<String, Object>> getQnaByProduct(
            @Parameter(description = "상품 ID", required = true, example = "1")
            @PathVariable Long productId) {

        Map<String, Object> response = new HashMap<>();
        try {
            List<QnaDTO> qnaList = qnaService.getQnaByProduct(productId);

            response.put("success", true);
            response.put("data", qnaList);
            return ResponseEntity.ok(response);
        } catch (Exception e) {
            response.put("success", false);
            response.put("message", "문의를 불러올 수 없습니다.");
            return ResponseEntity.status(500).body(response);
        }
    }

    /**
     * 문의 등록
     */
    @Operation(
        summary = "문의 등록",
        description = "새로운 문의를 등록합니다. (이미지 첨부 가능)"
    )
    @PostMapping(consumes = MediaType.MULTIPART_FORM_DATA_VALUE)
    public ResponseEntity<Map<String, Object>> createQna(
            @Parameter(description = "문의 정보", required = true)
            @RequestPart("qna") QnaDTO qnaDTO,

            @Parameter(description = "첨부 이미지 (최대 3장)")
            @RequestPart(value = "images", required = false) List<MultipartFile> images,

            @Parameter(description = "JWT 인증 토큰", required = true)
            @RequestHeader("Authorization") String authHeader) {

        Map<String, Object> response = new HashMap<>();
        try {
            QnaDTO createdQna = qnaService.createQna(qnaDTO, images);

            response.put("success", true);
            response.put("data", createdQna);
            response.put("message", "문의가 등록되었습니다.");
            return ResponseEntity.ok(response);
        } catch (Exception e) {
            response.put("success", false);
            response.put("message", "문의 등록 중 오류가 발생했습니다.");
            return ResponseEntity.status(500).body(response);
        }
    }

    /**
     * 문의 삭제
     */
    @Operation(summary = "문의 삭제", description = "문의를 삭제합니다.")
    @DeleteMapping("/{id}")
    public ResponseEntity<Map<String, Object>> deleteQna(
            @Parameter(description = "문의 ID", required = true, example = "1")
            @PathVariable Long id,
            @RequestHeader("Authorization") String authHeader) {

        Map<String, Object> response = new HashMap<>();
        try {
            qnaService.deleteQna(id);

            response.put("success", true);
            response.put("message", "문의가 삭제되었습니다.");
            return ResponseEntity.ok(response);
        } catch (Exception e) {
            response.put("success", false);
            response.put("message", "문의 삭제 중 오류가 발생했습니다.");
            return ResponseEntity.status(500).body(response);
        }
    }
}
5. 주요 어노테이션
Controller 레벨
@Tag(name = "API 그룹명", description = "그룹 설명")Method 레벨
@Operation(summary = "API 요약", description = "상세 설명")
@ApiResponses({
    @ApiResponse(responseCode = "200", description = "성공"),
    @ApiResponse(responseCode = "400", description = "잘못된 요청")
})
Parameter
@Parameter(description = "파라미터 설명", required = true, example = "예시값")DTO 필드
@Schema(description = "필드 설명", example = "예시값")6. Swagger UI 사용법
접속
http://localhost:8080/swagger-ui/index.html테스트 방법
1단계: API 선택
- 좌측에서 테스트할 API 그룹 선택 (예: Q&A)
- 엔드포인트 클릭
2단계: Try it out
Try it out버튼 클릭
3단계: 파라미터 입력
- Path Variable: URL 경로 값
- Query Parameter: 쿼리 스트링 값
- Request Body: JSON 데이터 입력
- Authorization: JWT 토큰 입력 (필요 시)
4단계: 실행
Execute버튼 클릭- 응답 확인 (Response Body, Status Code)
7. JWT 토큰 설정
매번 토큰을 입력하는 불편함을 해소하는 방법:
- Swagger UI 우측 상단
Authorize버튼 클릭 - Value 입력란에 토큰 입력:
Bearer eyJhbGciOiJIUzI1NiJ9.eyJ1c2VySWQiOi... - Authorize 클릭
- 이후 모든 API에 자동으로 토큰 적용됨
Swagger 적용 순서
1. build.gradle에 의존성 추가
   ↓
2. SecurityConfig에서 Swagger 경로 허용 (JWT 사용 시)
   ↓
3. DTO에 @Schema 추가
   ↓
4. Controller에 @Tag, @Operation 추가
   ↓
5. Swagger UI에서 테스트
주요 어노테이션
| 위치 | 어노테이션 | 설명 |
|---|---|---|
| 클래스 | @Tag | API 그룹 분류 |
| 메서드 | @Operation | API 설명 |
| 메서드 | @ApiResponses | 응답 코드 정의 |
| 파라미터 | @Parameter | 파라미터 설명 |
| DTO 필드 | @Schema | 필드 설명 및 예시 |
