
본 시리즈는 프로그래머스 백엔드 데브코스 과정에 포함된 Spring Security 강의를 수강하며 작성한 학습 일지입니다.
Spring Security의 인증 처리
Spring Security의 인증 과정을 이해하기 위해서는 우선 SecurityContextHolder, SecurityContext, Authentication에 대해 알아야 한다.
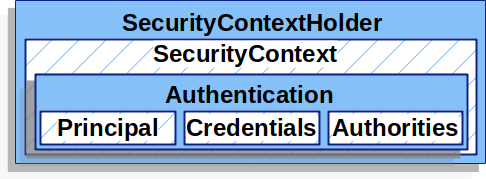
- SecurityContextHolder → 인증된 사용자의 상세 정보를 보관해주는 장소
- SecurityContext → SecurityContextHolder를 통해 얻을 수 있으며, 현재 인증된 사용자의 정보(Authentication)를 포함한다
- Authentication → principal, credentials, authorities 필드를 가지며, 인증 전 상황과 인증 후 상황에 따라 사용되는 목적이 달라진다.
- 인증 전 - 인증을 요구하는 주체가 인증에 필요한 정보(로그인 아이디, 패스워드)를 제공하기 위해 사용
- principal - 로그인 시도 아이디(String)
- credentials - 로그인 시도 비밀번호(String)
- 인증 후 - 인증이 완료된 사용자의 정보를 저장하는데 사용
- principal - 인증이 완료된 사용자 객체(UserDetails의 구현체)
- credentials - 인증 완료후 유출 가능성을 줄이기 위해 삭제
- authorities - 인증된 사용자가 가지는 권한 목록
- 인증 전 - 인증을 요구하는 주체가 인증에 필요한 정보(로그인 아이디, 패스워드)를 제공하기 위해 사용
Authentication은 인터페이스이며, 인증하는 여러 상황에 따라 다양한 구현체로 표현된다.
- id,password를 통한 인증(가장 많이 사용)에서 Authentication은
UsernamePasswordAuthenticationToken구현체로 표현된다. - remeber-me를 통한 인증(쿠키를 통한 자동 로그인)에서 Authentication은
RememberMeAuthenticationToken구현체로 표현된다. - 익명 사용자에 대한 인증에서 Authentication은
AnonymousAuthenticationToken구현체로 표현된다.
(Spring Security는 이 외에도 다양한 인증 방식을 지원한다)
즉, Spring Security의 인증 과정에 대해 아주 간단히 요약하면 SecurityContextHolder가 관리하는 SecurityContext에 Authentication(…Token) 객체를 넣어주는 과정이다. 인증 과정은 크게 2가지 단계로 생각해 볼 수 있다.
- 인증에 필요한 사용자 정보를 받아 준비하는 단계
- 로그인 시도 아이디, 비밀번호를 저장한 Authentication 생성
- 만들어진 Authentication을 기반으로 인증을 진행하는 단계
- 전달받은 아이디, 패스워드를 검증(주로 DB에 저장된 정보와 비교)
- 인증된 사용자의 정보를 저장한 Authentication 생성
- 생성된 Authentication을 SecurityContext에 보관
이를 그림으로 표현하면 아래와 같다.
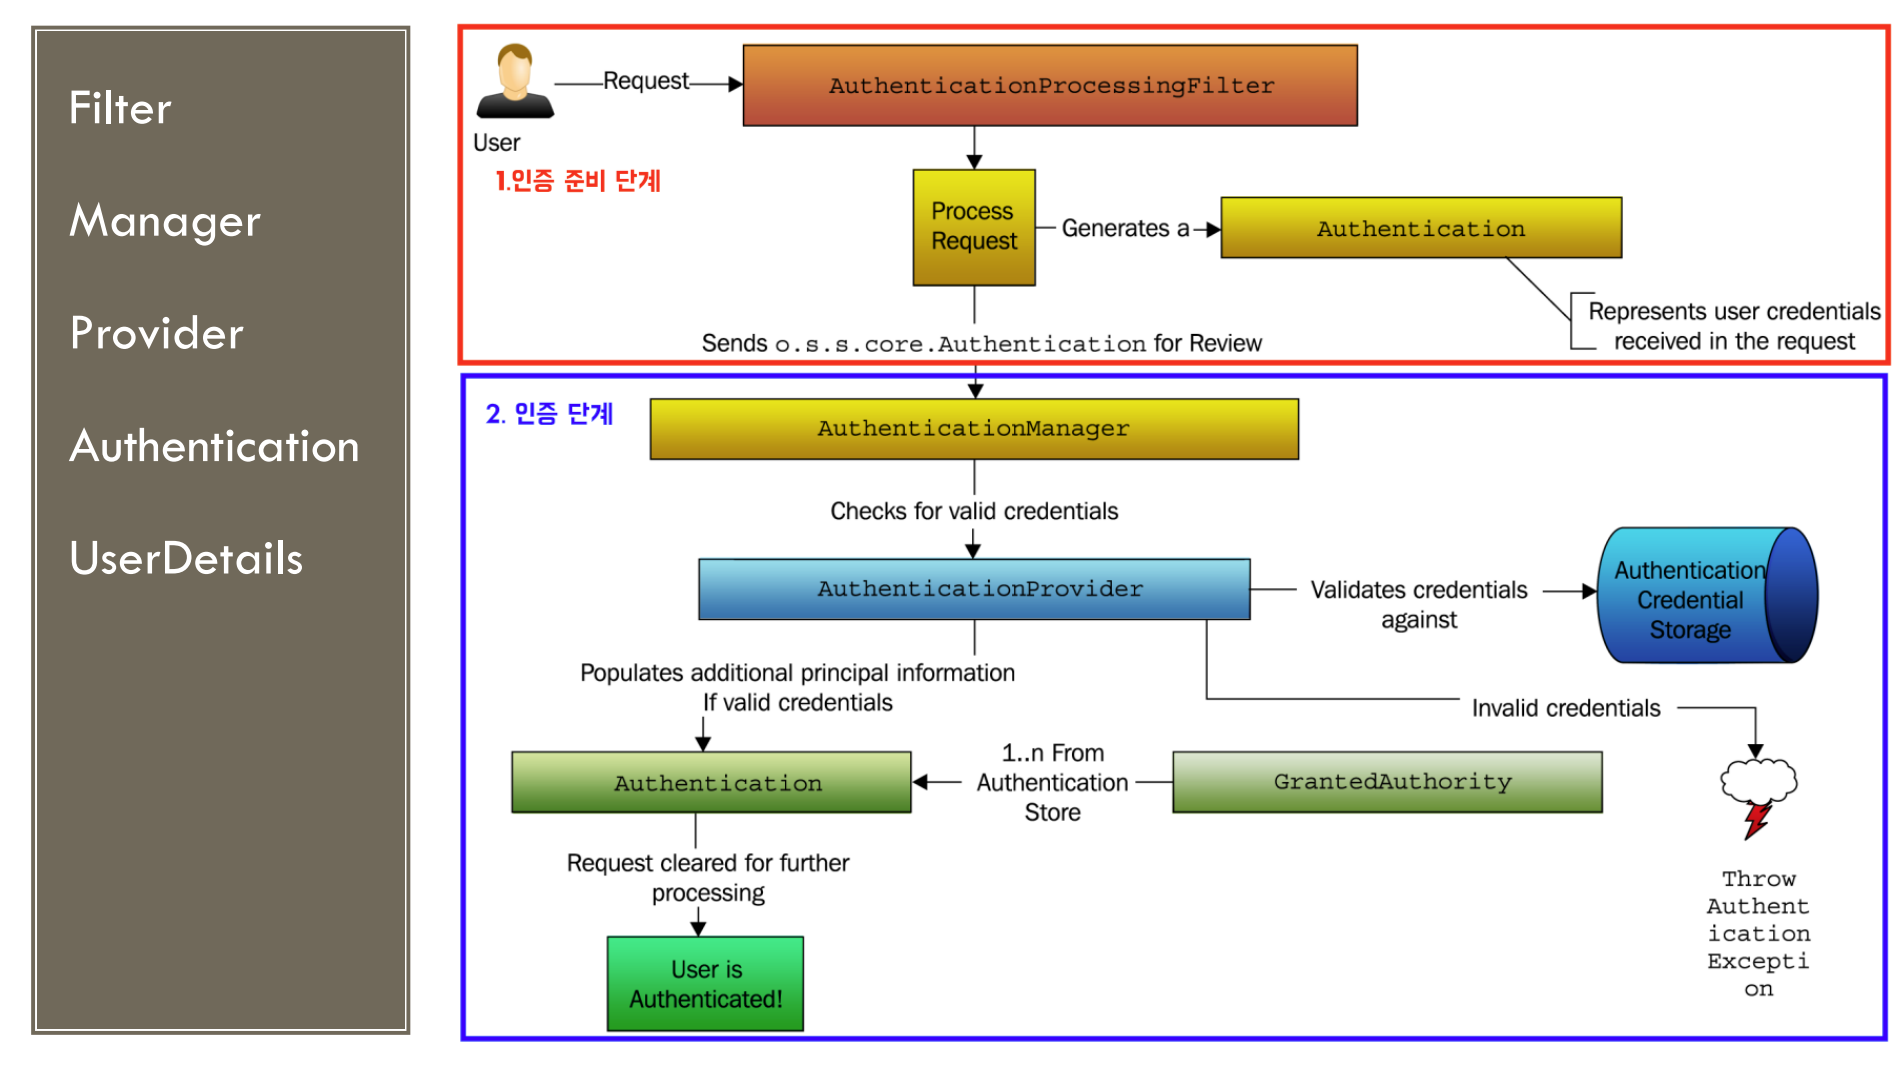
1. 인증 준비 단계
인증 준비 단계는 인증 단계에 비하면 비교적 간단하다. 우선 Spring Security에서 기본적으로 인증 관련 요청을 처리하는 필터는 UsernamePasswordAuthenticationFilter 다. 추상 클래스인 AbstractAuthenticationProcessingFilter 를 상속하고 있으며 attemptAuthentication 메소드를 통하여 인증을 시작한다.
@Override
	public Authentication attemptAuthentication(HttpServletRequest request, HttpServletResponse response)
			throws AuthenticationException {
		if (this.postOnly && !request.getMethod().equals("POST")) {
			throw new AuthenticationServiceException("Authentication method not supported: " + request.getMethod());
		}
		String username = obtainUsername(request);
		username = (username != null) ? username : "";
		username = username.trim();
		String password = obtainPassword(request);
		password = (password != null) ? password : "";
		UsernamePasswordAuthenticationToken authRequest = new UsernamePasswordAuthenticationToken(username, password);
		// Allow subclasses to set the "details" property
		setDetails(request, authRequest);
		return this.getAuthenticationManager().authenticate(authRequest);
	}
attemptAuthentication 메소드가 하는 역할은 다음과 같다.
- http 요청에 저장된 username,과 password를 얻어온다
- username, password를 기반으로 인증 되지 않은 Authentication 객체를 생성한다.(UsernamePasswordAuthenticationToken)
- AuthenticationManager에게 인증 과정을 위임한다. → 2단계 시작
2. 인증 진행 단계
위에서 getAutheticationManager().authenticate() 메소드를 통해 인증 과정이 시작됨을 확인하였다.
Spring Security에서 실질적인 인증에 가담하는 클래스는 AuthenticationManager, ProviderManager, AuthenticationProvider 이다.
AuthenticationManager→ Spring Security Filter의 인증 수행 방식을 정의하는 API.
ProviderManager→AuthenticationManager의 구현체. AuthenticationProvider 리스트를 가지고 있으며, 실제 인증 작업을 AuthenticationProvider에게 위임한다. 각 AuthenticationProvider마다 처리하는 인증 유형이 다르다.
AuthenticationProvider→ 실질적으로 인증 작업을 수행하는 주체.
세 클래스의 관계는 아래와 같다.
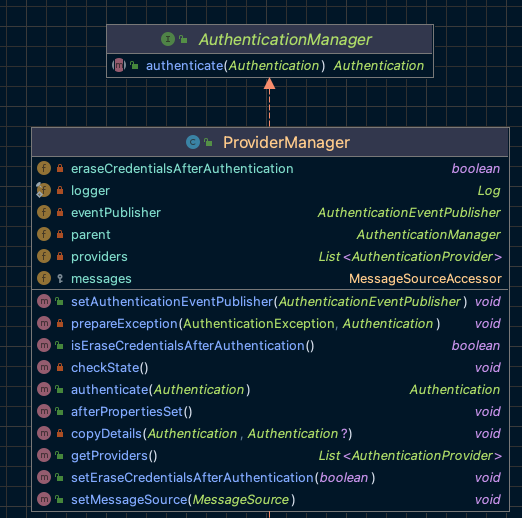
- ProviderManager가 AuthenticationManager 구현(authenticate 메소드 구현)
- ProviderManager가 List 참조(providers 필드)
인증 진행 단계는 3단계로 분류할 수 있다.
1. AuthenticationProvier 찾기
getAutheticationManager.authenticate() 호출 시 실제로 호출되는 메소드는 ProviderManager의 authenticate 메소드이며, 내부적으로 List를 순회하며 supoorts메소드를 호출해 Authentication 객체를 처리할 수 있는지 확인하고, 처리 가능하다면 해당 AuthenticationProvider에게 인증 처리를 위임한다.
// ProviderManager.class

@Override
	public Authentication authenticate(Authentication authentication) throws AuthenticationException {
		Class<? extends Authentication> toTest = authentication.getClass();
		AuthenticationException lastException = null;
		AuthenticationException parentException = null;
		Authentication result = null;
		Authentication parentResult = null;
		int currentPosition = 0;
		int size = this.providers.size();
		for (AuthenticationProvider provider : getProviders()) {
			if (!provider.supports(toTest)) {
				continue;
			}
			if (logger.isTraceEnabled()) {
				logger.trace(LogMessage.format("Authenticating request with %s (%d/%d)",
						provider.getClass().getSimpleName(), ++currentPosition, size));
			}
			try {
				result = provider.authenticate(authentication);
				if (result != null) {
					copyDetails(authentication, result);
					break;
				}
			}
			catch (AccountStatusException | InternalAuthenticationServiceException ex) {
				prepareException(ex, authentication);
				// SEC-546: Avoid polling additional providers if auth failure is due to
				// invalid account status
				throw ex;
			}
			catch (AuthenticationException ex) {
				lastException = ex;
			}
		}
		if (result == null && this.parent != null) {
			// Allow the parent to try.
			try {
				parentResult = this.parent.authenticate(authentication);
				result = parentResult;
			}
			catch (AuthenticationException ex) {
				parentException = ex;
				lastException = ex;
			}
		}
		if (result != null) {
			if (this.eraseCredentialsAfterAuthentication && (result instanceof CredentialsContainer)) {
				((CredentialsContainer) result).eraseCredentials();
			}
			if (parentResult == null) {
				this.eventPublisher.publishAuthenticationSuccess(result);
			}

			return result;
		}

		// Parent was null, or didn't authenticate (or throw an exception).
		if (lastException == null) {
			lastException = new ProviderNotFoundException(this.messages.getMessage("ProviderManager.providerNotFound",
					new Object[] { toTest.getName() }, "No AuthenticationProvider found for {0}"));
		}

		if (parentException == null) {
			prepareException(lastException, authentication);
		}
		throw lastException;
	}
인증 준비 단계에서 만들어진 Authentication은 UsernamePasswordAuthenticationToken 이며, 이 타입을 처리할 수 있는 AuthenticationProvider은 AbstractUserDetailsAuthenticationProvider 추상클래스를 상속하는 DaoAuthenticationProvider 클래스다. 실행 로직은 이 클래스로 넘어가게 된다.
2. 유저 정보 저장소와 연동하여 인증 진행
DaoAuthenticationProvider 가 부모인 AbstractUserDetailsAuthenticationProvider 의authenticate 메소드를 호출해 인증 과정을 진행한다.
// AbstractUserDetailsAuthenticationProvider.class

@Override
	public Authentication authenticate(Authentication authentication) throws AuthenticationException {
		Assert.isInstanceOf(UsernamePasswordAuthenticationToken.class, authentication,
				() -> this.messages.getMessage("AbstractUserDetailsAuthenticationProvider.onlySupports",
						"Only UsernamePasswordAuthenticationToken is supported"));
		String username = determineUsername(authentication);
		boolean cacheWasUsed = true;
		UserDetails user = this.userCache.getUserFromCache(username);
		if (user == null) {
			cacheWasUsed = false;
			try {
				user = retrieveUser(username, (UsernamePasswordAuthenticationToken) authentication);
			}
			catch (UsernameNotFoundException ex) {
				this.logger.debug("Failed to find user '" + username + "'");
				if (!this.hideUserNotFoundExceptions) {
					throw ex;
				}
				throw new BadCredentialsException(this.messages
						.getMessage("AbstractUserDetailsAuthenticationProvider.badCredentials", "Bad credentials"));
			}
			Assert.notNull(user, "retrieveUser returned null - a violation of the interface contract");
		}
		try {
			this.preAuthenticationChecks.check(user);
			additionalAuthenticationChecks(user, (UsernamePasswordAuthenticationToken) authentication);
		}
		catch (AuthenticationException ex) {
			if (!cacheWasUsed) {
				throw ex;
			}
			// There was a problem, so try again after checking
			// we're using latest data (i.e. not from the cache)
			cacheWasUsed = false;
			user = retrieveUser(username, (UsernamePasswordAuthenticationToken) authentication);
			this.preAuthenticationChecks.check(user);
			additionalAuthenticationChecks(user, (UsernamePasswordAuthenticationToken) authentication);
		}
		this.postAuthenticationChecks.check(user);
		if (!cacheWasUsed) {
			this.userCache.putUserInCache(user);
		}
		Object principalToReturn = user;
		if (this.forcePrincipalAsString) {
			principalToReturn = user.getUsername();
		}
		return createSuccessAuthentication(principalToReturn, authentication, user);
	}
여기서 눈 여겨 볼 점은 유저 정보 저장소에서 인증 대상 정보를 가져오는 retrieveUser 메소드이다. 일반적으로 회원 정보는 DB에 저장되어 있고, 상황마다 세부 구현 방식이 다르기 때문에 추상메소드로 선언되어있다. 현재 DaoAuthenticationProvider 에 retrieveUser 메소드가 오버라이딩 되어있다.
//DaoAuthenticationProvider.class

@Override
	protected final UserDetails retrieveUser(String username, UsernamePasswordAuthenticationToken authentication)
			throws AuthenticationException {
		prepareTimingAttackProtection();
		try {
			UserDetails loadedUser = this.getUserDetailsService().loadUserByUsername(username);
			if (loadedUser == null) {
				throw new InternalAuthenticationServiceException(
						"UserDetailsService returned null, which is an interface contract violation");
			}
			return loadedUser;
		}
		catch (UsernameNotFoundException ex) {
			mitigateAgainstTimingAttack(authentication);
			throw ex;
		}
		catch (InternalAuthenticationServiceException ex) {
			throw ex;
		}
		catch (Exception ex) {
			throw new InternalAuthenticationServiceException(ex.getMessage(), ex);
		}
	}
코드를 살펴보면 유저 정보를 가져오는 역할을 다시 UserDetailsService에게 위임하고 있으며 UserDetails 타입으로 받아오고 있다. Spring Security에서 기본적으로 UserDetailsService 구현체를 제공하며(JdbcUserDetailsManager, JdbcDaoImpl, InMemoryUserDetailsManager …) UserDetailsService를 구현하여 자신의 상황에 맞도록 커스터마이징 할 수 있도록 지원한다.
3. SecurityContext에 유저 정보 등록
유저 정보를 가져오는데 성공하면 createSuccessAuthentication 메소드를 호출한다.
// AbstractUserDetailsAuthenticationProvider.class

protected Authentication createSuccessAuthentication(Object principal, Authentication authentication,
			UserDetails user) {
		// Ensure we return the original credentials the user supplied,
		// so subsequent attempts are successful even with encoded passwords.
		// Also ensure we return the original getDetails(), so that future
		// authentication events after cache expiry contain the details
		UsernamePasswordAuthenticationToken result = new UsernamePasswordAuthenticationToken(principal,
				authentication.getCredentials(), this.authoritiesMapper.mapAuthorities(user.getAuthorities()));
		result.setDetails(authentication.getDetails());
		this.logger.debug("Authenticated user");
		return result;
	}
이 메소드를 통해 인증이 완료된 새로운 UsernamePasswordAuthenticationToken객체를 생성한다.
준비 단계에서 전달받은 UsernamePasswordAuthenticationToken 과는 다른 객체이다.
- 인증 전 - 인증을 요구하는 주체가 인증에 필요한 정보(로그인 아이디, 패스워드)를 제공하기 위해 사용
- principal - 로그인 시도 아이디(String)
- credentials - 로그인 시도 비밀번호(String)
- 인증 여부 - false
- 인증 후 - 인증이 완료된 사용자의 정보를 저장하는데 사용
- principal - 인증이 완료된 사용자 객체(UserDetails의 구현체)
- credentials - 인증 완료후 유출 가능성을 줄이기 위해 삭제
- authorities - 인증된 사용자가 가지는 권한 목록
- 인증 여부 - true
이후 AbstractAuthenticationProcessingFilter의 successfulAuthentication 메소드가 실행되고 이 메소드에서 생성된UsernamePasswordAuthenticationToken 이 SecurityContext에 저장되고 인증 과정이 마무리된다.
// AbstractAuthenticationProcessingFilter.class

protected void successfulAuthentication(HttpServletRequest request, HttpServletResponse response, FilterChain chain,
			Authentication authResult) throws IOException, ServletException {
		SecurityContext context = SecurityContextHolder.createEmptyContext();
		context.setAuthentication(authResult);
		SecurityContextHolder.setContext(context);
		if (this.logger.isDebugEnabled()) {
			this.logger.debug(LogMessage.format("Set SecurityContextHolder to %s", authResult));
		}
		this.rememberMeServices.loginSuccess(request, response, authResult);
		if (this.eventPublisher != null) {
			this.eventPublisher.publishEvent(new InteractiveAuthenticationSuccessEvent(authResult, this.getClass()));
		}
		this.successHandler.onAuthenticationSuccess(request, response, authResult);
	}
후기
이걸로 Spring Security의 인증 과정을 전부 이해했다고는 할 수 없지만 그래도 커스텀 인증 기능을 추가할 때 어떤 부분을 손봐야할지 대략적으로 감이 잡혔다. 처음 강의로 들었을때는 다 비슷해 보이는 클래스 이름과 위임에 위임에 위임을 거듭하는 구조에 어안이 벙벙했지만, 한줄 한줄 흐름을 따라 반복적으로 코드를 읽다보니 각 과정별로 어떤 클래스가 관여하는지 윤곽이 그려졌다.
특히 Interface를 이용한 다형성으로 확장에 쉽도록 코드를 작성한다는게 어떤 의미인지 느낄 수 있었다. 또한 Abstract 클래스로 기본적인 골격을 제공하고 세부적으로 달라지는 내용을 추상메소드로 오버라이딩 하도록 만드는 부분은 실제로 내 코드에도 적용해 볼 수 있을것같다. [ex)AbstractUserDetailsAuthenticationProvider 클래스의 retrieveUser 추상 메소드]
단순히 Spring Security의 동작 원리를 이해하는것 이상으로 확장에 용이한 코드의 구조에 대해 이해할 수 있는 좋은 경험이었다.Spring Security 시리즈 -1 인증 처리