Overloading
-> 보통 개발을 하면서 패키지나 라이브러리들을 많이 사용할 것 같은데, 이것들이 오버로딩을 많이 사용한다.
오버로딩 : 함수가 여러개의 call Signatures가 있는 함수다.
type Add = {
    (a: number, b:number) :number
    (a: number, b:string) :number
}

const add: Add = (a,b) => {
    if(typeof b==='string') return a
    return a+b
}
// string 혹은 object으로 보낼 수 있다. (오버로딩)
Router.push({
path: "/home",
state: 1
})
Router.push('/home')// 실제 오버로딩은 이렇게 되어있다.
type Config = {
path: string,
state: object,
}
type Push = {
(path:string) :void
(config: Config): void
}
// Push는 string과 Config의 type을 갖기 때문에 config는 string 혹은 Config를 type으로 갖게 된다.
const push:Push = (config) => {
if(typeof config === 'string') console.log(config)
else console.log(config.path, config.state)
}여러개의 argument를 가질 때의 효과
-> call Signatures 파라미터의 인자 개수가 다르면 작동하지 않는다.
-> 옵션으로 선택할 수 있다.
type Add = {
    (a:number, b:number):number
    (a:number, b:number, c:number): number
}

// 파라미터의 개수가 다를 때 -> 옵션 (선택사항)
const add:Add = (a,b,c?:number) => {
    if(c) return a+b+c
    return a+b
}

add(1, 2)
add(1,2,3
Polymorphism(다형성)
Poly(many) morphism(형태, 구조)
-> 여러 가지 다른 모양, 형태 ...
concrete type : 전부터 봐왔던 타입을 말함.
ex) number, boolean, string, unknown ...
// 배열을 받아서 그 배열의 요소를 console에 찍는 작업을 할 것이다.
type SuperPrint = {
    (arr: number[]):void
    (arr: boolean[]):void
    // 여기서 타입스크립트에게 generic 타입을 받을거라고 열려준다.
    (arr: string[]):void
}

const superPrint:SuperPrint = (arr) => {
    arr.forEach(i => console.log(i))
}

superPrint([1,2,3,4])
superPrint([true, false, true])
superPrint(['1','2','3','4'])
Generic
generic 타입은 placeholder 같은건데, concrete type 대신 사용할 수 있다.
-> 그러면 타입스크립트는 추론해서 함수를 사용하게 된다.
why use?
-> call signature을 작성할 때, 확실한 타입을 모를 때 generic을 사용한다.
type SuperPrint = {
    // <?> 타입스크립트에게 call signature가 generic을 받는다는 것을 알려줌.
    // ? 안에는 아무거나 입력 가능함.
    <TypePlaceholder>(arr: TypePlaceholder[]):TypePlaceholder
}

// 리턴 타입을 바꾸고 싶다. -> 배열의 첫번째 요소를 리턴하고 싶다.
const superPrint:SuperPrint = (arr) => arr[0]

const a = superPrint([1,2,3,4])
const b = superPrint([true, false, true])
const c = superPrint(['1','2','3','4'])
const d = superPrint([1, 2, true, false, 'hello!'])
// 제네릭을 하나 더 추가하고 싶다.
// 함수의 두번째 인자로 사용하고 있다.
// 타입스크립트는 제네릭이 처음 사용되는 지점을 기반으로 이 타입이 무엇인지 알게된다.
// 타입스크립트는 제네릭을 처음 인식했을 때와 제네릭의 순서를 기반으로 제네릭의 타입을 알게된다.
type SuperPrint = <T,M>(a: T[], b:M) => T
// 리턴 타입을 바꾸고 싶다. -> 배열의 첫번째 요소를 리턴하고 싶다.
const superPrint:SuperPrint = (arr) => arr[0]
const a = superPrint([1,2,3,4], 'sgrnd')
const b = superPrint([true, false, true], 1)
const c = superPrint(['1','2','3','4'], [1,2,3,4])
const d = superPrint([1, 2, true, false, 'hello!'], [])call signature을 입력할 때 placeholder를 사용한다.
-> any를 쓰지 않는 이유 중 하나다.
-> any를 사용하게 되면 타입스크립트의 보호장치에서 벗어나니까.
Generic은 요구한 대로 signature을 생성해줄 수 있는 도구
(x:number, y:number)=>number는
{
	(x:number, y:number):number
}와 같다.
-> generic은 라이브러리를 만들거나, 다른 개발자가 사용할 기능을 개발하는 경우에 유용하다.
nextjs, nestjs, reactjs를 한다면, generic을 사용하게 될거다.
// 또 다른 방법으로 generic을 만들어줌
function superPrint<V>(a: V[]){
    return a[0]
}

const a = superPrint([1,2,3,4], 'sgrnd')
const b = superPrint([true, false, true], 1)
const c = superPrint(['1','2','3','4'], [1,2,3,4])
const d = superPrint([1, 2, true, false, 'hello!'], [])
-> 타입스크립트가 스스로 어떤 타입인지 찾게 하는 것이 제일 좋다.
// 세 가지 모두 같은 경우
type Player<E> = {
    name:string
    extraInfo:E
}


const nico: Player<{favFood:string}> = {
    name:"nico",
    extraInfo: {
        favFood: "Kimchi"
    }
}
type Player<E> = {
name:string
extraInfo:E
}
type NicoPlayer = Player<{favFood:string}>
const nico: NicoPlayer = {
name:"nico",
extraInfo: {
favFood: "Kimchi"
}
}type Player<E> = {
name: string
extraInfo: E
}
type NicoExtra = {
favFood:string
}
type NicoPlayer = Player<NicoExtra>
const nico: NicoPlayer = {
name: "nico",
extraInfo: {
favFood: "Kimchi"
}
}// 하나가 계속 달라질 수 있는 타입이라면 제네릭을 사용하면 된다.
type Player<E> = {
    name: string
    extraInfo: E
}
type NicoExtra = {
    favFood:string
}
type NicoPlayer = Player<NicoExtra>

const nico: NicoPlayer = {
    name: "nico",
    extraInfo: {
        favFood: "Kimchi"
    }
}
// type들끼리는 재사용이 가능하다.
const lynn:Player<null> = {
name: "lynn",
extraInfo: null
}// 또 다른 제네릭 사용법
type A = Array<number>
let a:A = [1,2,3,4]
//////
function printAllNumbers(arr: Array<number>) {
}Classes
-> 객체지향 코드를 만들어줄 것 이다.
접근 지정자 사용 가능
// code.ts

class Player {
    constructor (
        // private : 타입스크립트가 보호해주기 위해서만 사용하는 것
        // 그래서 자바스크립트에서는 사용되지 않음.
        // 실제 자바스크립트에서는 private, public 구분 없이 모두 사용 된다.
        private firstName:string,
        private lastNmae:string,
        public nickName:string
    ) {}
}

const nico = new Player('nico', 'las', '니꼬')

nico.firstName
// code.js
class Player {
constructor(firstName, lastNmae, nickName) {
this.firstName = firstName;
this.lastNmae = lastNmae;
this.nickName = nickName;
}
}
const nico = new Player('nico', 'las', '니꼬');
nico.firstName;
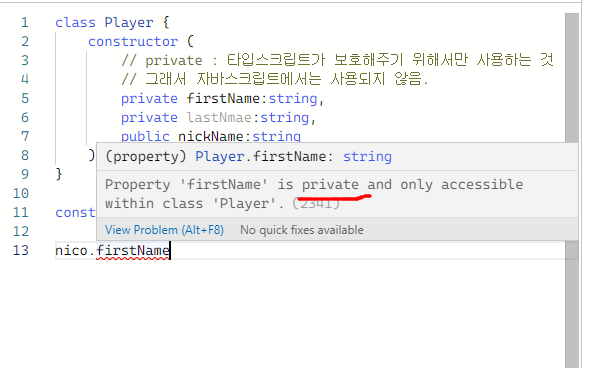
-> private 이기 때문에 코드가 동작하지 않는다.
추상클래스
// 추상클래스 : 다른 클래스가 상속받을 수 있는 클래스
// 하지만 직접 새로운 인스턴스를 만들 수 없다.
// -> 오직 다른 곳에서 상속 받을수만 있는 클래스
abstract class User {
    constructor (
        private firstName:string,
        private lastNmae:string,
        // public은 기본적으로 모든 곳에서 접근 가능함.
        public nickName:string
    ) {}
}

class Player extends User {

}
// 타입스크립트가 추상클래스의 인스턴스를 만들 수 없다고 경고하기 때문에
// 아래 코드는 동작하지 않는다.
const nico = new User('nico', 'las', '니꼬')
// code.ts

abstract class User {
    constructor (
        // private : 접근 지정자
        private firstName:string,
        private lastNmae:string,
        protected nickName:string
    ) {}

	// User 추상클래스가 getNickName이라는 추상 메소드를 가진다.
    // 즉, 구현 되지 않는(코드가 없는) 메소드
    // 리턴은 void
    // 추상 메소드를 만드려면, 메소드를 클래스 안에서 구현하지 않으면 된다.
    // 추상 메소드 구현 방법 : 메소드의 call signature만 적어주면 된다.
    // 이것은 메소드의 call signature만을 가지고 있다.
    // 추상메소드가 만들어지면 아래 Player(User을 상속 받은 클래스)가 getNickName을 구현해야한다고 알려주고 있다.
    // 추상 클래스를 상속받게 되면, 해당 클래스 안에서 메소드를 구현해야한다.
    // 추상 메소드가 있는 경우, 추상 클래스를 상속받는 클래스에서 추상 메소드를 구현해야함.
    abstract getNickName():void

    // 메소드는 클래스 안에 존재하는 함수다.
    // 추상 클래스 안의 메소드
    // Player은 User로부터 상속 받았으므로 getFullName을 사용할 수 있다.
    protected getFullName() {
        // 아래가 구현
        return `${this.firstName} ${this.lastNmae}`
    }
}

// 접근 지정자를 private을 사용한다면, 클래스를 상속하였을지라도 해당 property에 접근할 수 없다.
class Player extends User {
    getNickName() {
    	// 사용 가능함. -> getFullName() 메소드의 접근 지정자가 protected 이기 때문에
    	this.getFullName()
        // Player은 추상클래스 User을 상속받았기 때문에 사용 가능함.
        console.log(this.nickName)
    }
}
const nico = new Player('nico', 'las', '니꼬')

// protected는 클래스 밖에서는 사용할 수 없음.
console.log(this.nickName)
// code.js
// js 코드에서는 접근 지정자가 없기 떄문에 타입스크립트에서 지정해준 private 아이도 실행
class User {
constructor(firstName, lastNmae, nickName) {
this.firstName = firstName;
this.lastNmae = lastNmae;
this.nickName = nickName;
}
getFullName() {
return `${this.firstName} ${this.lastNmae}`;
}
}
class Player extends User {
getNickName() {
console.log(this.nickName);
}
}
const nico = new Player('nico', 'las', '니꼬');
console.log(this.nickName);해시맵
// type을 만드는 방법
// object의 type을 선언해야할 때 쓸 수 있다.
// 이 object는 제한된 양의 property 만을 가질 수 있고,
// property의 이름은 모르지만, 타입만을 알 때 사용한다.
type Words = {
    // 제한된 양의 property 혹은 key를 가지는 타입을 정의해주는 방법
    [key:string]: string
}

class Dict {
	// words라는 프로퍼티를 만든다.
    // Words 타입이 string만을 property를 가지는 오브젝트라는 것을 말해준다.
    // words은 private이므로, Dict 안에서만 words를 보기 원한다.
    private words: Words
    constructor() {
        // 프로퍼티 words를 수동 초기화해준다.
        this.words = {}
    }

    // 단어를 추가하기 위한 메소드를 만든다.
    // **Word 클래스를 타입처럼 만들 수 있다.** (중요함)
    // -> 파라미터 부분에 클래스를 입력해준 적은 없지만, 클래스를 타입으로 쓸 때는 가능함.
    // 즉, word 파라미터가 Word 클래스의 인스턴스이기를 원한다면, 클래스를 타입처럼 쓸 수 있다.
    add(word:Word) {
        // 주어진 단어가 사전에 존재하지 않다면,
        if(this.words[word.term] === undefined) {
            this.words[word.term] = word.def
        }
    }

    // term을 이용해서 단어를 불러오는 기능을 만든다.
    def(term:string){
        return this.words[term]
    }
}

class Word {
    constructor (
    	// 수정 불가하게 만들어주고 싶다면 readonly를 사용하면 됨.
        public (readonly) term:string,
        public def:string
    ) {}
}

// 새로운 단어를 만들어준다. 클래스를 만들 수 있다.
const kimchi = new Word("kimchi", "한국의 음식")

const dict = new Dict()
dict.add(kimchi);
dict.def('kimchi')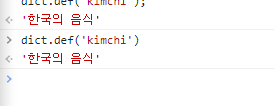
단어찾는 기능 -> 잘 작동한다.
homework
< 단어를 삭제하고, 단어를 업데이트하는 메소드를 만들고, Word 클래스에서는 단어의 정의를 추가하거나 수정하는 메소드, 그리고 단어를 출력하는 메소드를 만들어봐라 >
	// 본래 js꺼
    static hello() {
        return "hello"
    }
인터페이스
// ts에게 object의 모양을 알려주는 것이다. 프로퍼티의 이름과 타입은 무엇인지

// 인터페이스는 object의 모양을 특정해주기 위한 것이다.
// object 모양을 알려주는 방법
// 1. type <Name> = {} 2. interface <Name> = {}
// -> 둘 다 object 모양을 결정한다
// 활용도 : type >>> interface
// interface는 오직 object 모양을 타입스크립트에게 설명해주기 위해서만 사용됨.
interface Player {
    nickname: string,
    healthBar: number
}

type Player1 = {
    nickname: string,
    healthBar: number
}
// class 모양과 비슷하다.
interface User {
name:string
}
// 인터페이스는 다른 인터페이스에 상속 가능하다.
interface Player extends User {
}
const nico : Player ={
name: "nico"
} type User = {
name:string
}
// &(and 연산자)
type Player = User & {
}
const nico : Player ={
name: "nico"
}// 인터페이스는 property를 축적시킬 수 있다. type는 불가능.
// 조금 더 합치는 능력이 type보다 interface가 더 뛰어나다.
interface User {
name: string
}
interface User {
lastName:string
}
interface User {
nickName:string
}
// 동일한 인터페이스를 3번씩 만들어도, 타입스크립트가 알아서 하나로 합쳐준다.
const nico: User = {
name: "nco",
lastName: "n",
nickName: "mn",
}추상클래스
// 추상 클래스는 다른 클래스가 가져야할 property랑 메소드를 명시할 수 있도록 도와준다.
// 추상클래스는 상속받는 다른 클래스가 가질 property와 메소드를 지정
// 추상 클래스는 인스턴스를 허용하지 않는다.
// 추상클래스를 사용하는 이유는 추상 받는 클래스가 어떻게 동작해야할지 알려주기 위해서
// 추상 클래스는 클래스를 어떻게 구현할지 말해주지는 않지만, 무엇을 구현해야할지는 알려주기 때문.
// ex) sayHi와 fullName이 있어야한다는 것을 알려준다.(각각 string으로 return)
// 문제점 : JS에는 abstract의 개념이 없다. -> 일반 클래스로 바꿔준다.
// why 추상클래스를 만들까? -> 표준화된 property와 메소드를 갖도록 해주는 청사진을 만들기 위해
// 인터페이스는 컴파일하면 js로 바뀌지 않고 사라진다. (인터페이스는 가볍다.)
// 인터페이스를 쓸 때 클래스가 특정 형태를 따르도록 어떻게 강제할까?
abstract class User {
    constructor(
        protected firstName:string,
        protected lastName:string
    ) {}
    abstract sayHi(name:string):string
    abstract fullName():string
}

// protected는 추상 클래스로부터 상속받은 클래스들이 property에 접근하도록 해준다.
class Player extends User {
    fullName(){
        return `${this.firstName} ${this.lastName}`
    }
    sayHi(name:string) {
        return `Hello ${name}. My name is ${this.fullName}`
    }
}
// 추상 클래스를 사용하면, JS 환경에서 클래스로 변한다.
// -> 인터페이스를 상속하면 더 간단하다. -
// + 타입스크립트에서만 인터페이스가 존재하기 때문에 js 기반에서는 interface는 보여지지 않는다.
// 파일 사이즈를 줄이 수 있다.
// 클래스의 모양을 알려주는 점에서 유용하다. -> 그런데도 자바스크립트에 적용되지 않는다.
// 인터페이스를 상속하는 것의 문제점 : private, property를 사용하지 못한다.
// 당연하게 하나 이상의 인터페이스를 동시에 상속할 수 있다.
// 모두가 같은 인터페이스를 사용한다면, 같은 property와 method를 가지게 된다.
// 인터페이스는 클래스가 아니지만, 클래스의 모양을 특정할 수 있게 해주는 간단한 방법
// object의 모양을 결정지을 수도 있지만, 클래스의 모양을 특정짓기도 한다.
interface User {
firstName:string,
lastName:string,
sayHi(name:string):string
fullName():string
}
interface Human {
health:number
}
// extends를 쓰게 되면 자바스크립트로 변한다.
// extends -> implements로 변환한다.
// implements를 쓰게 되면 코드가 더 가벼워진다. -> interface User를 추적할 수 없다.
// 인터페이스는 타입스크립트에서만 존재하기 때문이다.
// -> 타입스크립트 Player는 User 인터페이스를 상속해야한다고 알려주고 있다.
// 한 클래스 안에서 여러개의 인터페이스를 상속할 수 있다.
class Player implements User, Human {
constructor(
// interface를 상속할 때는 property를 private로 만들지 못한다.
// public이 되어야한다.
public firstName:string,
public lastName:string,
public health:number
) {}
fullName() {
return `${this.firstName} ${this.lastName}`
}
sayHi(name:string) {
return `Hello ${name}. My name is ${this.fullName}`
}
}
// makeUser을 만들 때 interface를 type로 사용할 수 있다. (class도 type 사용 가능)
function makeUser(user: User) {
return "Heloo"
}
makeUser({
firstName: "nico",
lastName: "las",
fullName: () => "ss",
sayHi: (name) => "string"
})
// interface를 리턴한다면 interface의 내용을 적어주면 된다.
function makerUser(user: User): User {
return {
firstName: "nico",
lastName: "las",
fullName: () => "ss",
sayHi: (name) => "string"
}
}