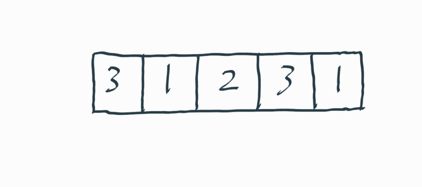
캐러셀이란?
이미지를 순환하거나 슬라이드하는 기능을 갖춘 UI 요소이다.

설계
캐러셀
우선 캐러셀은 img를 담은 div를 이동하는 방식으로 구현할 것이다.
이때 고려해야 할 점이 있다.
예를 들어 사진이 1 2 3 이렇게 있다고 가정하자.
1 -> 2, 2 -> 3, 1 <- 2, 2 <- 3 은 별 문제 없이 div를 이동하는 방식으로
이미지가 전환되는 효과를 줄 수 있지만 무한으로 넘어가는 캐러셀을 만들고 싶다면
1 -> 3, 3 -> 1 의 이미지 전환은 단순히 div를 움직이는 방식으로 만들기에는 까다로워 보인다.
그렇다면 어떻게 해결해야 할까?
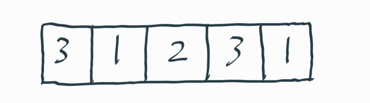
내가 선택한 해결책은 양옆으로 넘어가야할 이미지를 하나씩 덧붙이는 방법이다.
위에 방법으로 예를 들어 맨 우측에서 3 -> 1 을 처리하는 법을 생각해보면
먼저 3 -> 1 이동할 때는 transition으로 all 0.5s ease-in-out을 줌으로 써 이미지가 전환되는 애니메이션을 주고 정상적으로 이미지 전환 후 맨 우측 이미지 1인 상태에서 transition을 제거 한 후에 앞에서 2번째에 있는 1로 위치를 순간이동 시키는 것이다!
구현
// HomePage.tsx
const CAROUSEL_IMAGES = [
  '/images/1.jpg',
  '/images/2.jpg',
  '/images/3.jpg',
  '/images/4.jpg',
];

const HomePage = () => {
  return (
    <FullScreen>
      <Notification />
      <Carousel carouselList={CAROUSEL_IMAGES} />
      <CategoryList />
    </FullScreen>
  );
};
캐러셀 컴포넌트 톺아보기
  interface Button {
    $isLeft: boolean;
  }
  const Button = styled.button<Button>`
    position: absolute;
    top: 50%;
    transform: translateY(-50%);
    ${({ $isLeft }) => ($isLeft ? 'left: 0;' : 'right: 0;')}
    z-index: 1;
  `;
캐러셀 안에 button을 두기위해
position: absolute을 활용하여 버튼을 배치하였다.
const carouselRef = useRef<HTMLDivElement>(null);캐러셀 div에 접근하기 위해 사용한 hook
const [curIdx, setCurIdx] = useState(0);현재 바라보는 사진의 index
const carouselArray = [
    carouselList[carouselList.length - 1],
    ...carouselList,
    carouselList[0],
  ];
캐러셀을 위해 앞 뒤로 이미지를 추가해준 배열
const fakeMove = (index: number) => {
    setTimeout(() => {
      setCurIdx(index);
      if (carouselRef.current !== null) {
        carouselRef.current.style.transition = '';
      }
    }, 500);
  };
];
500ms이후에 바라보는 사진의 인덱스를 바꾸는 함수이다.
순간이동하기 위해 사용되며 first사진에서 < 버튼을 누르거나
last사진에서 > 버튼을 누른 경우에 호출한다.
const handleClick = (shift: number) => {
    const nextIdx = curIdx + shift;
    if (nextIdx === carouselList.length) {
      fakeMove(0);
    } else if (nextIdx === -1) {
      fakeMove(carouselList.length - 1);
    }
    setCurIdx(nextIdx);
    if (carouselRef.current !== null) {
      carouselRef.current.style.transition = 'all 0.5s ease-in-out';
    }
  };
버튼을 눌렀을 때 실행되는 함수이다.
조건부로 fakeMove함수를 호출한다.
  useEffect(() => {
    if (carouselRef.current !== null) {
      carouselRef.current.style.transform = `translateX(-${curIdx + 1}00%)`;
    }
  }, [curIdx]);
curIdx가 바뀔 때마다 캐러셀 div의 위치를 전환해주는 hook이다.
최종
// Carousel.tsx
import styled from 'styled-components';
import { IoIosArrowBack, IoIosArrowForward } from 'react-icons/io';
import { useEffect, useRef, useState } from 'react';

const Container = styled.div`
  position: relative;
  width: 100%;
  height: 38rem;
  overflow: hidden;
`;

const CarouselBox = styled.div`
  display: flex;
  width: 100%;
  height: 100%;
`;

const Img = styled.img`
  width: 100%;
  height: 100%;
`;

interface Button {
  $isLeft: boolean;
};

const Button = styled.button<Button>`
  position: absolute;
  top: 50%;
  transform: translateY(-50%);
  ${({ $isLeft }) => ($isLeft ? 'left: 0;' : 'right: 0;')}
  z-index: 1;
`;

interface Carousel {
  carouselList: Array<string>;
};

const Carousel = ({ carouselList }: Carousel) => {
  const carouselRef = useRef<HTMLDivElement>(null);

  const [curIdx, setCurIdx] = useState(0);

  const carouselArray = [
    carouselList[carouselList.length - 1],
    ...carouselList,
    carouselList[0],
  ];

  const fakeMove = (index: number) => {
    setTimeout(() => {
      setCurIdx(index);
      if (carouselRef.current !== null) {
        carouselRef.current.style.transition = '';
      }
    }, 500);
  };

  const handleClick = (shift: number) => {
    const nextIdx = curIdx + shift;
    if (nextIdx === carouselList.length) {
      fakeMove(0);
    } else if (nextIdx === -1) {
      fakeMove(carouselList.length - 1);
    }
    setCurIdx(nextIdx);
    if (carouselRef.current !== null) {
      carouselRef.current.style.transition = 'all 0.5s ease-in-out';
    }
  };

  useEffect(() => {
    if (carouselRef.current !== null) {
      carouselRef.current.style.transform = `translateX(-${curIdx + 1}00%)`;
    }
  }, [curIdx]);

  return (
    <Container>
      <Button onClick={() => handleClick(-1)} $isLeft={true}>
        <IoIosArrowBack size={36} />
      </Button>
      <CarouselBox ref={carouselRef}>
        {carouselArray.map((src, idx) => (
          <Img key={idx} src={src} />
        ))}
      </CarouselBox>
      <Button onClick={() => handleClick(1)} $isLeft={false}>
        <IoIosArrowForward size={36} />
      </Button>
    </Container>
  );
};

export default Carousel; 
Comment
다음 편에서는 모바일 유저를 고려한 스와이프 기능을 추가해보도록 하겠다.
Reference
