모듈과 모듈 번들러
모듈의 필요성
네임 스페이스 문제
모듈 번들러가 없는 상황에서 아래와 같이 두 개의 자바스크립트 파일을 로드한다고 가정해보자.
//./source/hello.js
var word = "hello";
//./source/world.js
var word = "world";
<!DOCTYPE html>
<html>
  <head>
    <!-- 자바스크립트 파일을 불러온다. -->
    <script src="./source/world.js"></script>
    <script src="./source/hello.js"></script>
  </head>
  <body>
    <div id="root"></div>
    <script>
      // 불러온 자바스크립트 파일을 이용해 root 태그에 글자를 넣어준다.
      document.querySelector("#root").textContent = word;
    </script>
  </body>
</html>
아래와 같이 출력된다.
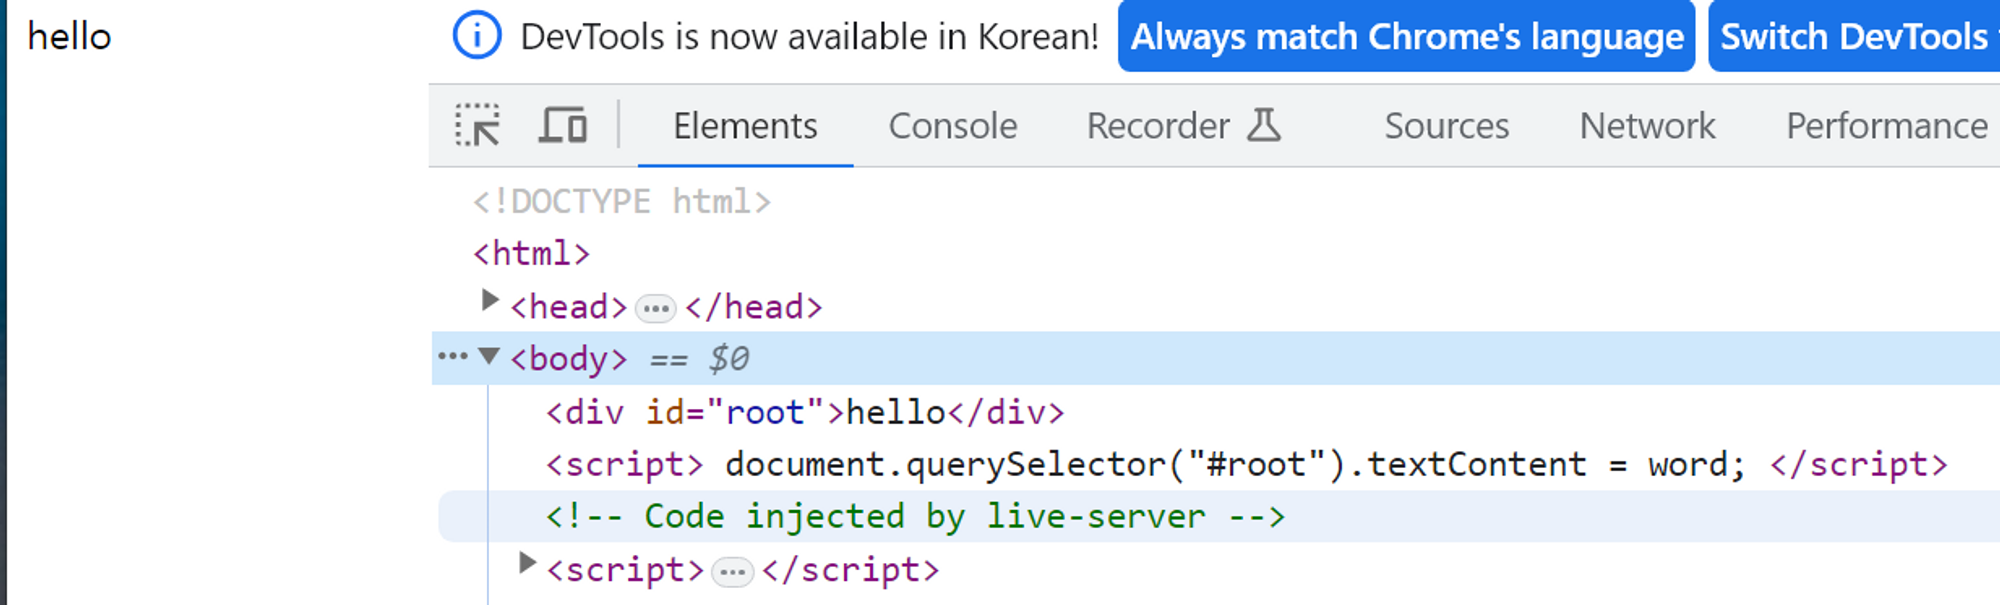
나중에 삽입한 ‘hello.js’ 파일에서 word에 할당한 문자열이 표시되는 것을 알 수 있다.
위의 HTML문서는 아래와 같게 동작하였다.
<!DOCTYPE html>
<html>
  <body>
    <div id="root"></div>
    <script>
			var word = "world"; //world.js의 부분
			var word = "hello"; //hello.js의 부분
      document.querySelector("#root").textContent = word; //word에 hello가 할당되어있음
    </script>
  </body>
</html>
여러 개의 자바스크립트가 하나의 네임 스페이스를 공유하며 순차적으로 실행되기에 유지 보수성이 낮고 원치 않는 동작이 발생할 수 있다.
네임스페이스 문제를 해결하고, 각각의 파일이 독립적으로 동작할 수 있도록,
각각의 파일을 ‘모듈’로 관리할 필요성이 있다.
이에 따라 ES6에서 모듈 방식이 지원되고 있으며,
HTML의 <script> 태그에 type="module"값을 줄 수 있다.
  //./source/hello.js
var word = "hello";

//각각의 파일에서 export할 정보를 지정함.
export default word;
//./source/world.js
var word = "world";
export default word;<!DOCTYPE html>
<html>
<body>
<div id="root"></div>
<!-- script 태그의 type 어트리뷰트의 값을 "module"로 지정함 -->
<script type="module">
//각각의 모듈에 이름을 붙여 import 함
import hello from "./source/hello.js";
import world from "./source/world.js";
//모듈에서 export한 내용을 화면에 표시함
document.querySelector("#root").textContent = `${hello} ${world}`;
</script>
</body>
</html>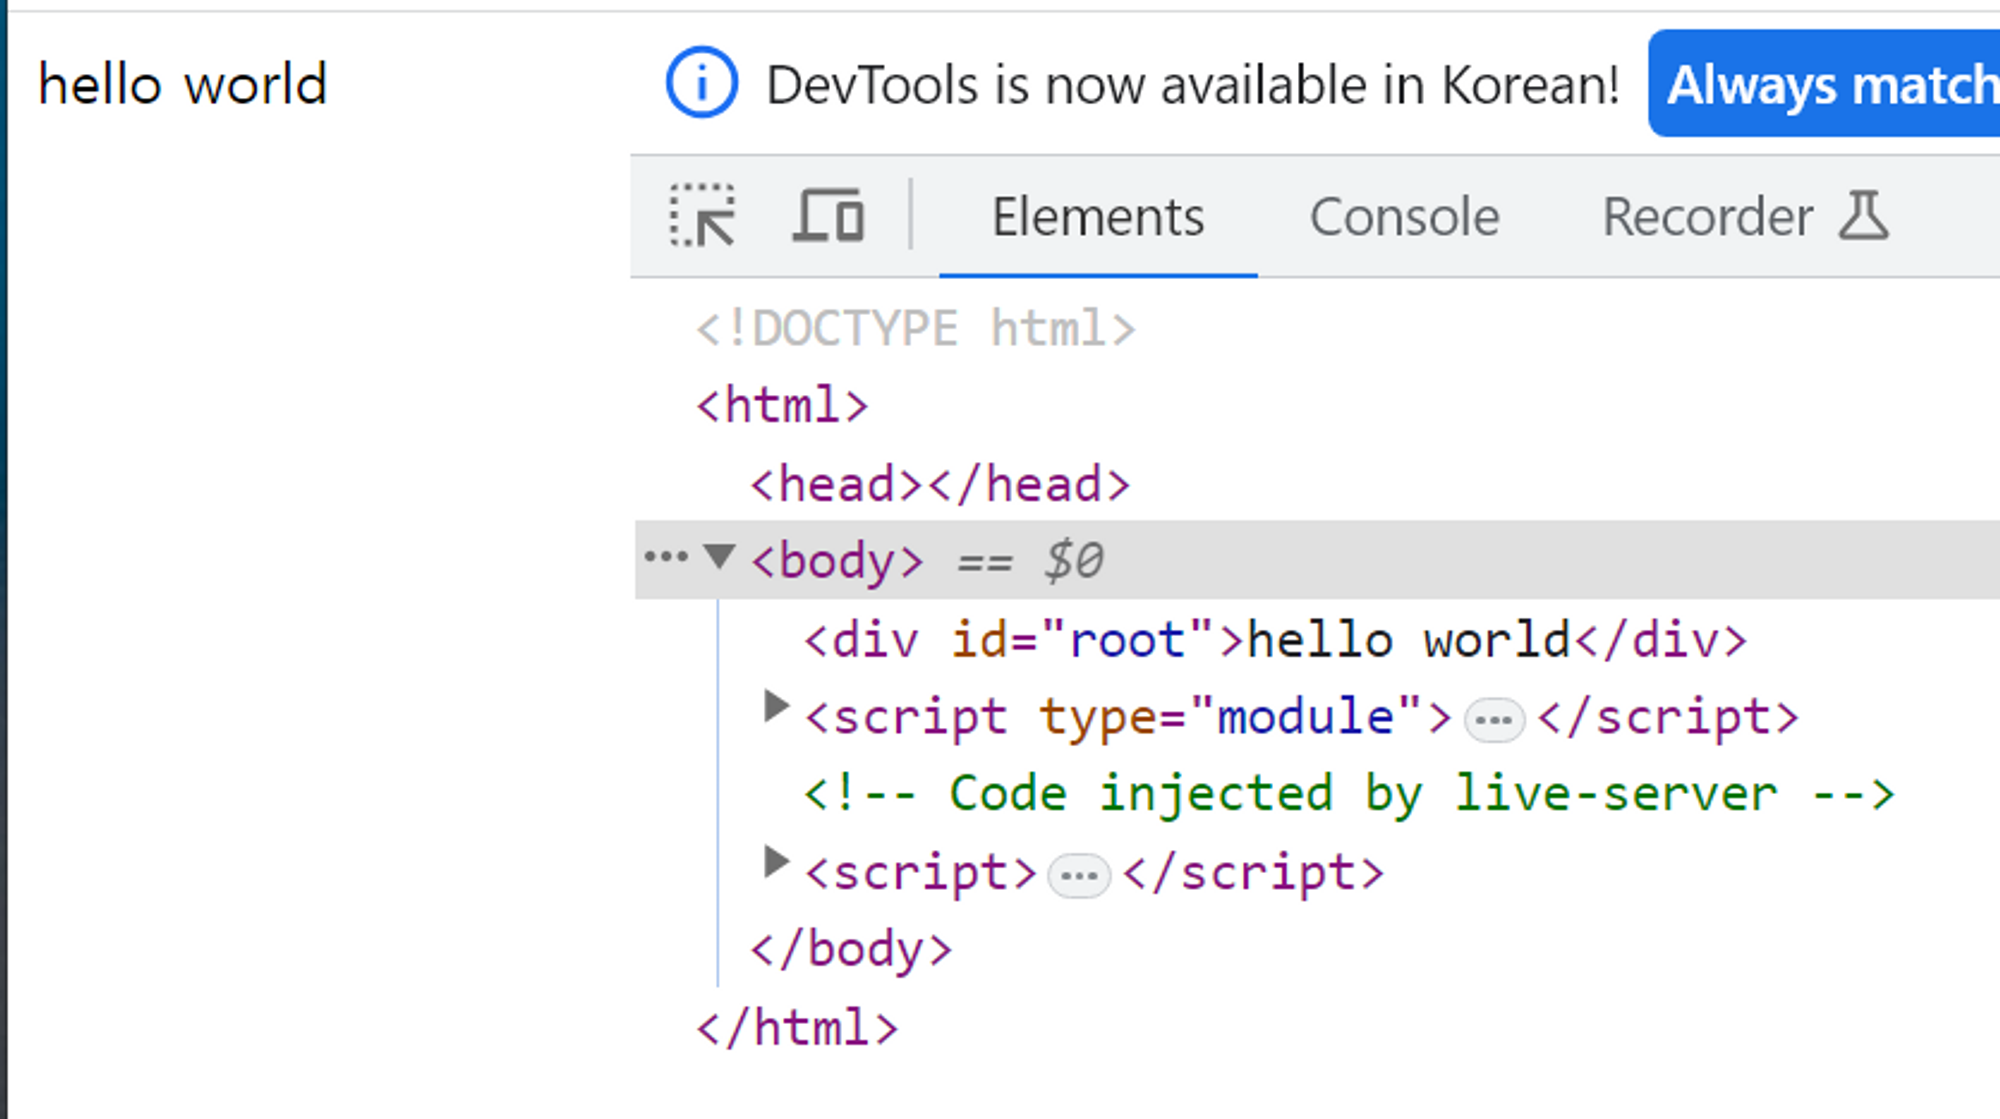
해당 방식은 2015년에 소개되어 순차적으로 적용되었기 때문에 구형 브라우저에서 동작하지 않는 문제가 발생할 수 있다.
파일 전송 속도의 문제
-
서버의 처리 비용이 증가할 수 있다.
요청에 따라 서버에 저장된 파일을 찾아 전송해야 하기 때문에 서버의 연산이 증가할 수 있다. -
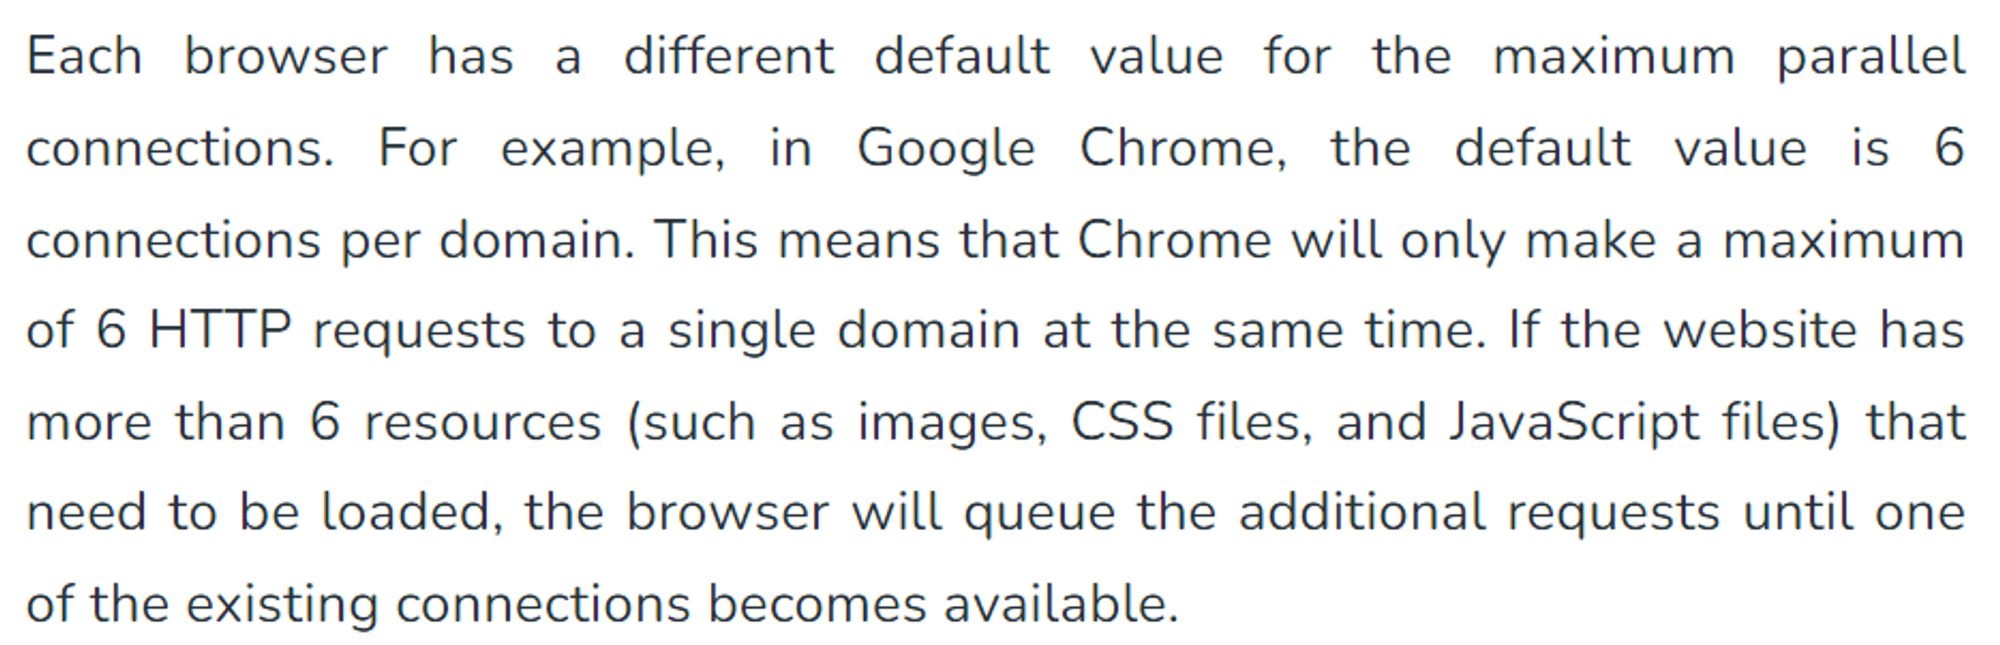
커넥션이 다수 발생할 수 있다.
HTTP/1.1 에서 동시에 처리할 수 있는 EventStream은 6개로 제한되어 있으며,
이에 따라 상당수의 브라우저가 Connection당 6개의 요청만 처리하도록 제한하고 있다.
즉, 브라우저를 렌더링하는데 필요한 파일(이미지, CSS, JavaScript 등)이 6개 이상이라면 다수의 Connection이 발생할 수 있다.
모듈 번들러의 역할
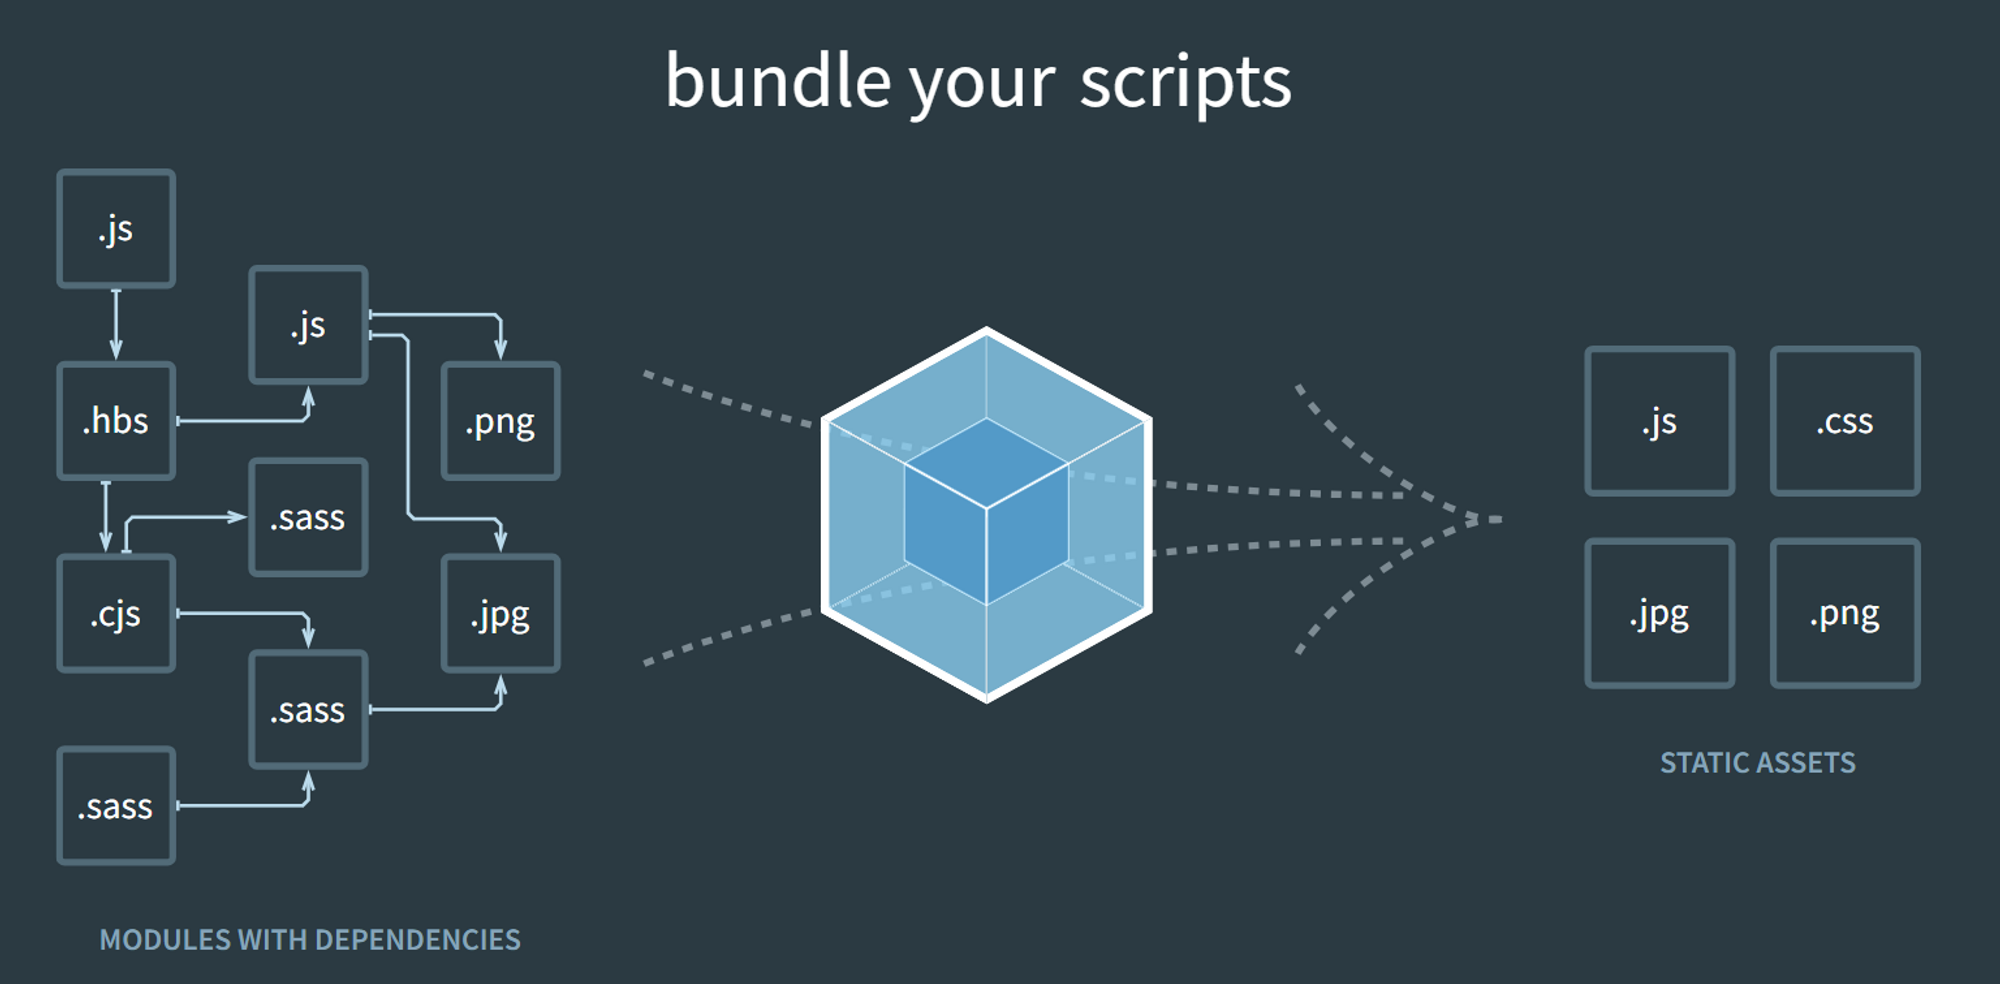
모듈 번들러는 아래와 같은 역할을 한다.
참조
1. 모듈 시스템을 지원하지 않는 브라우저(IE 등)에서도 모듈 시스템을 사용하도록 한다.
2. 렌더링에 필요한 다수의 파일(이미지, CSS, JavaScript 등)을 통합할 수 있다.
- 경우에 따라 해당 이미지들을 하나의 main.js 파일로 번들링할 수 있게 된다.
3. 모듈의 종속성 관계를 관리하는데 도움이 되며, 종속성 순서에 따라 모듈을 로드한다.
모듈 시스템
모듈 패턴
Closure를 이용하여 아래와 같은 모듈 패턴을 만들 수 있다.
//각각의 모듈이 독립된 렉시컬 환경을 갖게 된다.
const hello = (function () {
  var word = "hello";
  return word;
})();

const world = (function () {
  var word = "world";
  return word;
})();

document.querySelector("#root").textContent = `${hello} ${world}`;
CommonJS
CommonJS는 구글이 공개한 V8 엔진의 성능에 고무받아 2009년 1월 발표한 모듈화 라이브러리이다.
Node.JS에서는 초기 버전(2009년 5월)에서부터 도입되었다.
Scope : 모든 모듈은(각각의 파일은) 각각의 독립적인 실행영역을 가진다.
Definition: 모듈 정의는 exports 객체를 이용한다.
Usage: 모듈 사용은 require 함수를 이용한다.
//hello.js
var word = "hello";

module.exports = word;
//world.js
var world = "world";

module.exports = word;
const hello = require("./hello");
const world = require("./world");

console.log(`${hello} ${world}`); // "hello world"
ESM (ECMAScript Module)
ES6 (2015년)에서 공개된 모듈 시스템이다.
Node.js에는 12버전(2019년)부터 도입되었다.
- export - import구문으로 작동한다.
- 파일의 비동기 삽입을 제한한다.
- 파일의 최적화에 집중하며, 정적으로 import 한다.
import hello from "./source/hello.js";
import world from "./source/world.js";

console.log(`${hello} ${world}`);
순환 종속성 (CommonJS vs ESM)
참조 : Node.JS 디자인 패턴 바이블
아래와 같이, 모듈 a와 b가 서로에게 종속성이 있다고 가정한다.
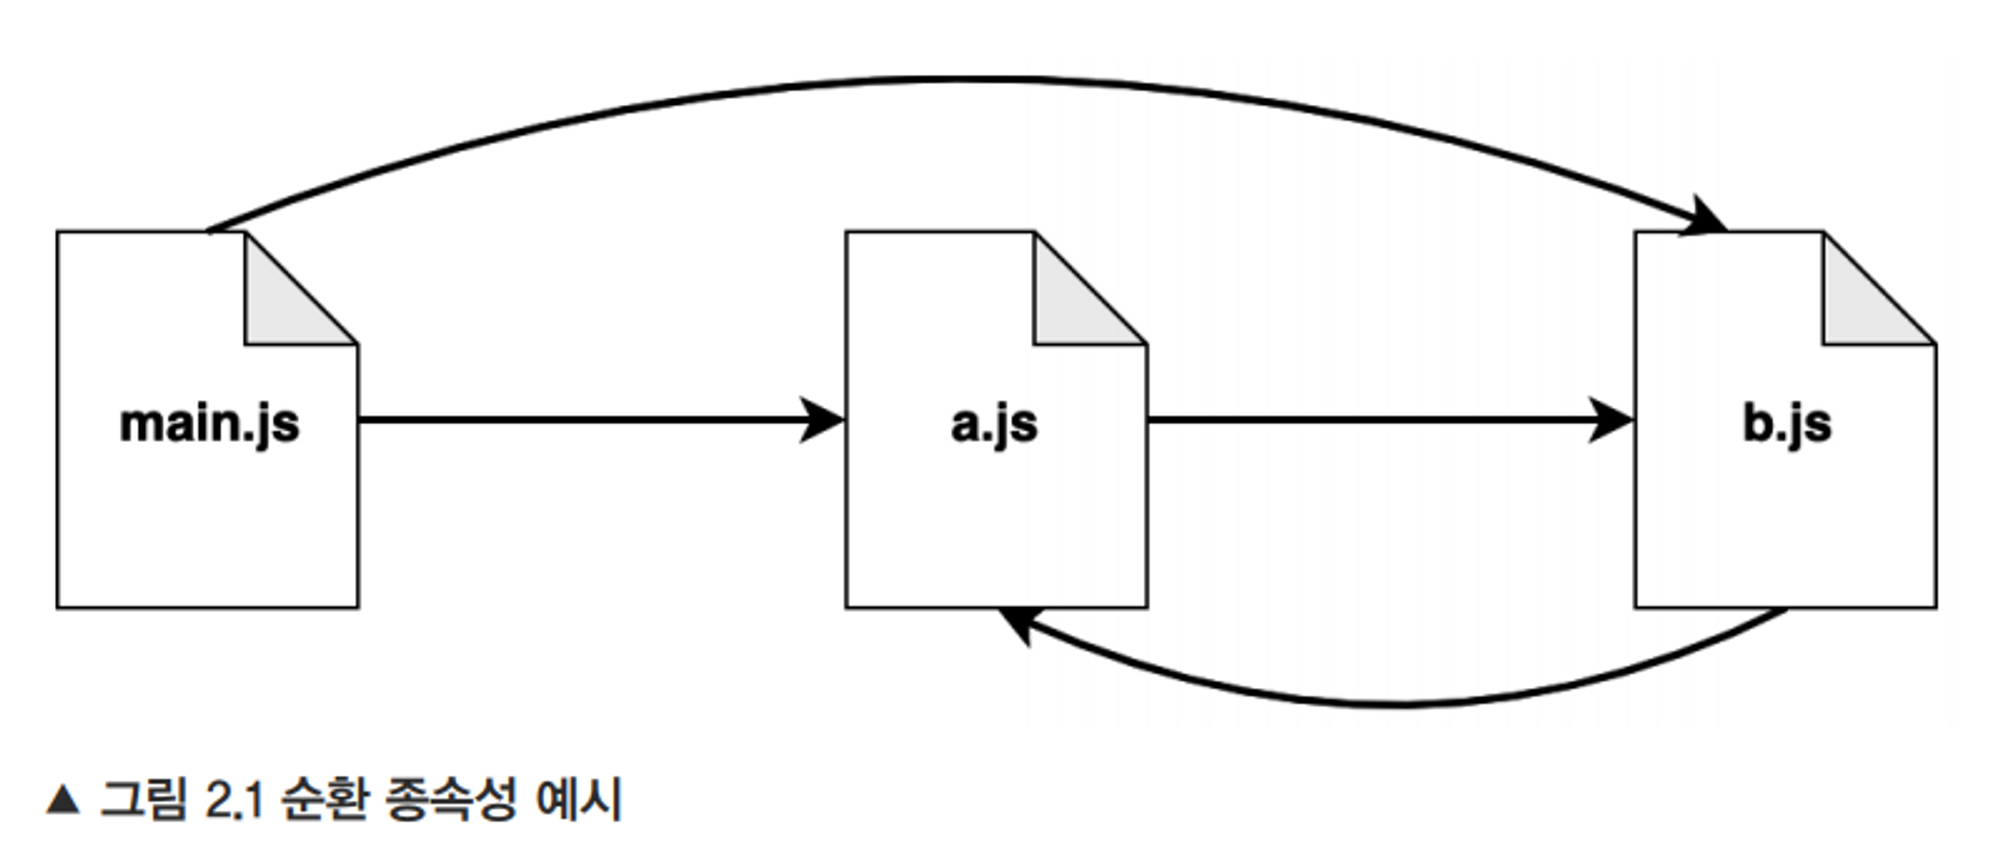
모듈 a와 b가 모두 main.js에 삽입되었을 때에
Common.js(동적, 비동기적)와 ESM(정적)의 동작 방식에 차이가 있다.
CommonJS
// a.js
// loaded의 초기값을 false로 한다,
exports.loaded = false;
const b = require("./b");

// module이 실행되고 나면, b모듈과 함께 loaded의 값을 true로 바꾼다.
module.exports = {
  b,
  loaded: true,
};
// b.js
exports.loaded = false;
const a = require("./a");
module.exports = {
  a,
  loaded: true,
};
//main.js
//모듈 a와 b를 차례로 import한 후, 그 결과값을 출력한다.
const a = require("./a");
const b = require("./b");
console.log("a->", JSON.stringify(a, null, 2));
console.log("b->", JSON.stringify(b, null, 2));
결과값
a-> {
  "b": {
    "a": {
      "loaded": false
    },
    "loaded": true
  },
  "loaded": true
}
b-> {
  "a": {
    "loaded": false
  },
  "loaded": true
}
위의 예제에서 b를 통해 로드된 a모듈은 loaded: false 상태인 것을 확인할 수 있다.
즉 모듈이 실행되지 않은채로 import되는 것이다.
// a.js
exports.loaded = false;
const b = require("./b"); //1. 해당 위치에서 b가 실행된다.
module.exports = {
  b,
  loaded: true,
};
// b.js
exports.loaded = false;
const a = require("./a"); //2. a 모듈은 이미 실행중에 있으며,
//b는 a를 실행하지 못하고, 이미 처리된 결과값 loaded=false 만을 받게 된다.

module.exports = {
  a, //loaded=false
  loaded: true,
};
//3. b의 실행을 마치고 a로 제어권이 돌아간다.
ESM
같은 패턴을 ESM으로 구현하면 아래와 같다.
//a.js
import * as bM from "./b.js";

export let loaded = false;
export const b = bM;
loaded = true;
//b.js
import * as aM from "./a.js";

export let loaded = false;
export const a = aM;
loaded = true;
// main.js
//모듈 a와 b를 차례로 import한 후, 그 결과값을 출력한다.
import * as a from "./a.js";
import * as b from "./b.js";

console.log("a->", a);
console.log("b->", b);
a-> <ref *1> [Module: null prototype] {
  b: [Module: null prototype] { a: [Circular *1], loaded: true },
  loaded: true
}
b-> <ref *1> [Module: null prototype] {
  a: [Module: null prototype] { b: [Circular *1], loaded: true },
  loaded: true
}
두 개의 모듈이 loaded : true 인 완전한 모듈을 로드하고 있는 것을 확인할 수 있다.
ESM은 아래와 같은 단계로 종속성을 해결한다.
- 파싱 단계
파싱 단계에서 모든 import 구문을 찾는다.
이때 이미 탐색한 파일은 더 이상 탐색하지 않는다.
main.js를 실행하면
main.js의 import * as a from "./a.js";
a.js의 import * as bM from "./b.js";
b.js의 import * as aM from "./a.js"; (이미 탐색함)
main.js의 import * as b from "./b.js"; (이미 탐색함) 순으로 파싱하게 된다.
이를 통해
main.js
|
a.js
|
b.js
의 트리를 얻게 된다.
- 인스턴스화 단계
트리를 역순으로 각각의 모듈에서 exports되는 속성들을 맵으로 관리한다.
b.js - {loaded : <실행되지 않음>, a : <실행되지 않음>}
|
a.js - {loaded : <실행되지 않음>, b : <실행되지 않음>}
|
main.js
exports 속성에 따라 참조를 링크한다.
                      main.js
             {a : a.js, b : b.js }
				/             \
             a.js             b.js
         {bModule : b.js}   {aModule : a.js}
			|                            |
		b.js                        a.js
- 평가 단계
트리의 역순으로 실행 및 평가를 실행한다.
- b.js를 실행한다.
b.js - {loaded : true, a : <ref>}
|
a.js - {loaded : <실행되지 않음>, b : <실행되지 않음>}
|
main.js- a.js를 실행한다.
b.js - {loaded : true, a : <ref>}
|
a.js - {loaded : true, b : <ref>}
|
main.js
main.js가 실행될 때에는 평가가 끝난 a.js와 b.js가 import 된다.
모듈 번들링의 방식
참조
예시를 위해 아래와 같이 circle.js, square.js, app.js의 세 모듈이 있다고 가정해보자.
//circle.js
const PI = 3.141;
export default function area(radius) {
  return PI * radius * radius;
}
//squre.js
export default function area(side) {
return side * side;
}//app.js
import squareArea from './square';
import circleArea from './circle';
console.log('Area of square: ', squareArea(5));
console.log('Area of circle', circleArea(5));웹팩 방식
const modules = {
  'circle.js': function(exports, require) {
    const PI = 3.141;
    exports.default = function area(radius) {
      return PI * radius * radius;
    }
  },
  'square.js': function(exports, require) {
    exports.default = function area(side) {
      return side * side;
    }
  },
  'app.js': function(exports, require) {
    const squareArea = require('square.js').default;
    const circleArea = require('circle.js').default;
    console.log('Area of square: ', squareArea(5))
    console.log('Area of circle', circleArea(5))
  }
}

webpackStart({
  modules,
  entry: 'app.js'
});- 모듈 맵
- 각각의 모듈은 Map 형태로 매핑된다.
- 모듈은 모듈 스코프를 시뮬레이션하는 함수(모듈 팩토리 함수)와 맵핑된다.
const modules = {
  'circle.js': function(exports, require) {
    const PI = 3.141;
    exports.default = function area(radius) {
      return PI * radius * radius;
    }
  },
  'square.js': function(exports, require) {
    exports.default = function area(side) {
      return side * side;
    }
  },
  'app.js': function(exports, require) {
    const squareArea = require('square.js').default;
    const circleArea = require('circle.js').default;
    console.log('Area of square: ', squareArea(5))
    console.log('Area of circle', circleArea(5))
  }
}- webpackStart() 함수를 통해 실행된다.
- entry로 지정된 이름과 함께 어플리케이션을 실행한다.
webpackStart({
  modules,
  entry: 'app.js'
});
webpackStart에서 의존성 문제 해결 원리는 CommonJS의 작동 방식과 비슷하다. 이미 실행중인 모듈은 작동시키지 않고 캐시된 값을 반환한다.
롤업 방식
const PI = 3.141;

function circle$area(radius) {
  return PI * radius * radius;
}

function square$area(side) {
  return side * side;
}

console.log('Area of square: ', square$area(5));
console.log('Area of circle', circle$area(5));
롤업 방식은 매우 간단하다.
위 예시의 $area와 같이 임의의 문자열로 Name Space 문제를 해결한다.
롤업 방식은 ‘순환 참조’에 취약하다는 단점이 있다.
Vite는 ESM을 지원함으로서 순환 참조 문제를 해결한다.
Vite
ESBuild
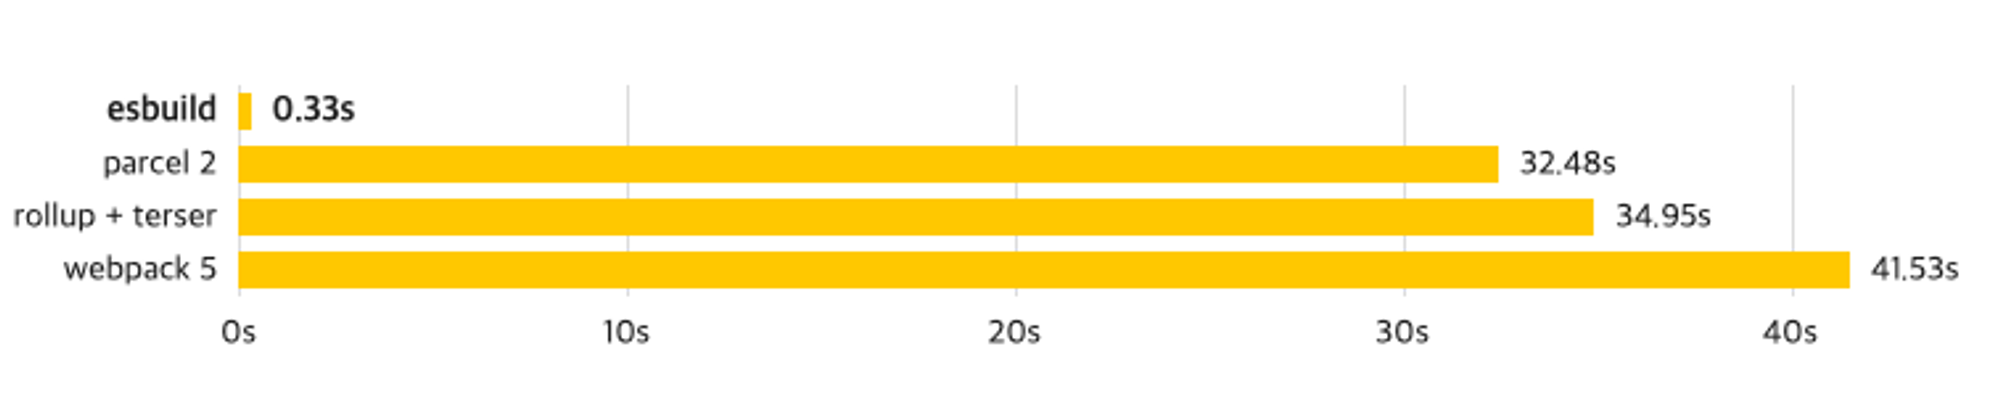
Vite는 dev mode에서 build시 ESBuild를 통한 빠른 빌드를 제공한다.
(단 production 빌드 시에는 Rollup을 사용한다.)
ESBuild는 2020년 4월 공개된 번들링 도구이다. 벤치마크상 Webpack보다 100배 빠른 번들링 속도를 보여준다.
- Go 언어 사용: Go 언어는 빠른 실행속도와 경량화된 바이너리 생성을 이점으로 한다.
- 코드 최적화와 트리 쉐이킹: ESBuild는 번들링 과정에서 사용하지 않는 코드를 제거하는 코드 최적화와 트리 쉐이킹을 수행합니다. 이를 통해 번들 크기를 최소화하고 성능을 향상시킨다.
- 컴파일러 최적화
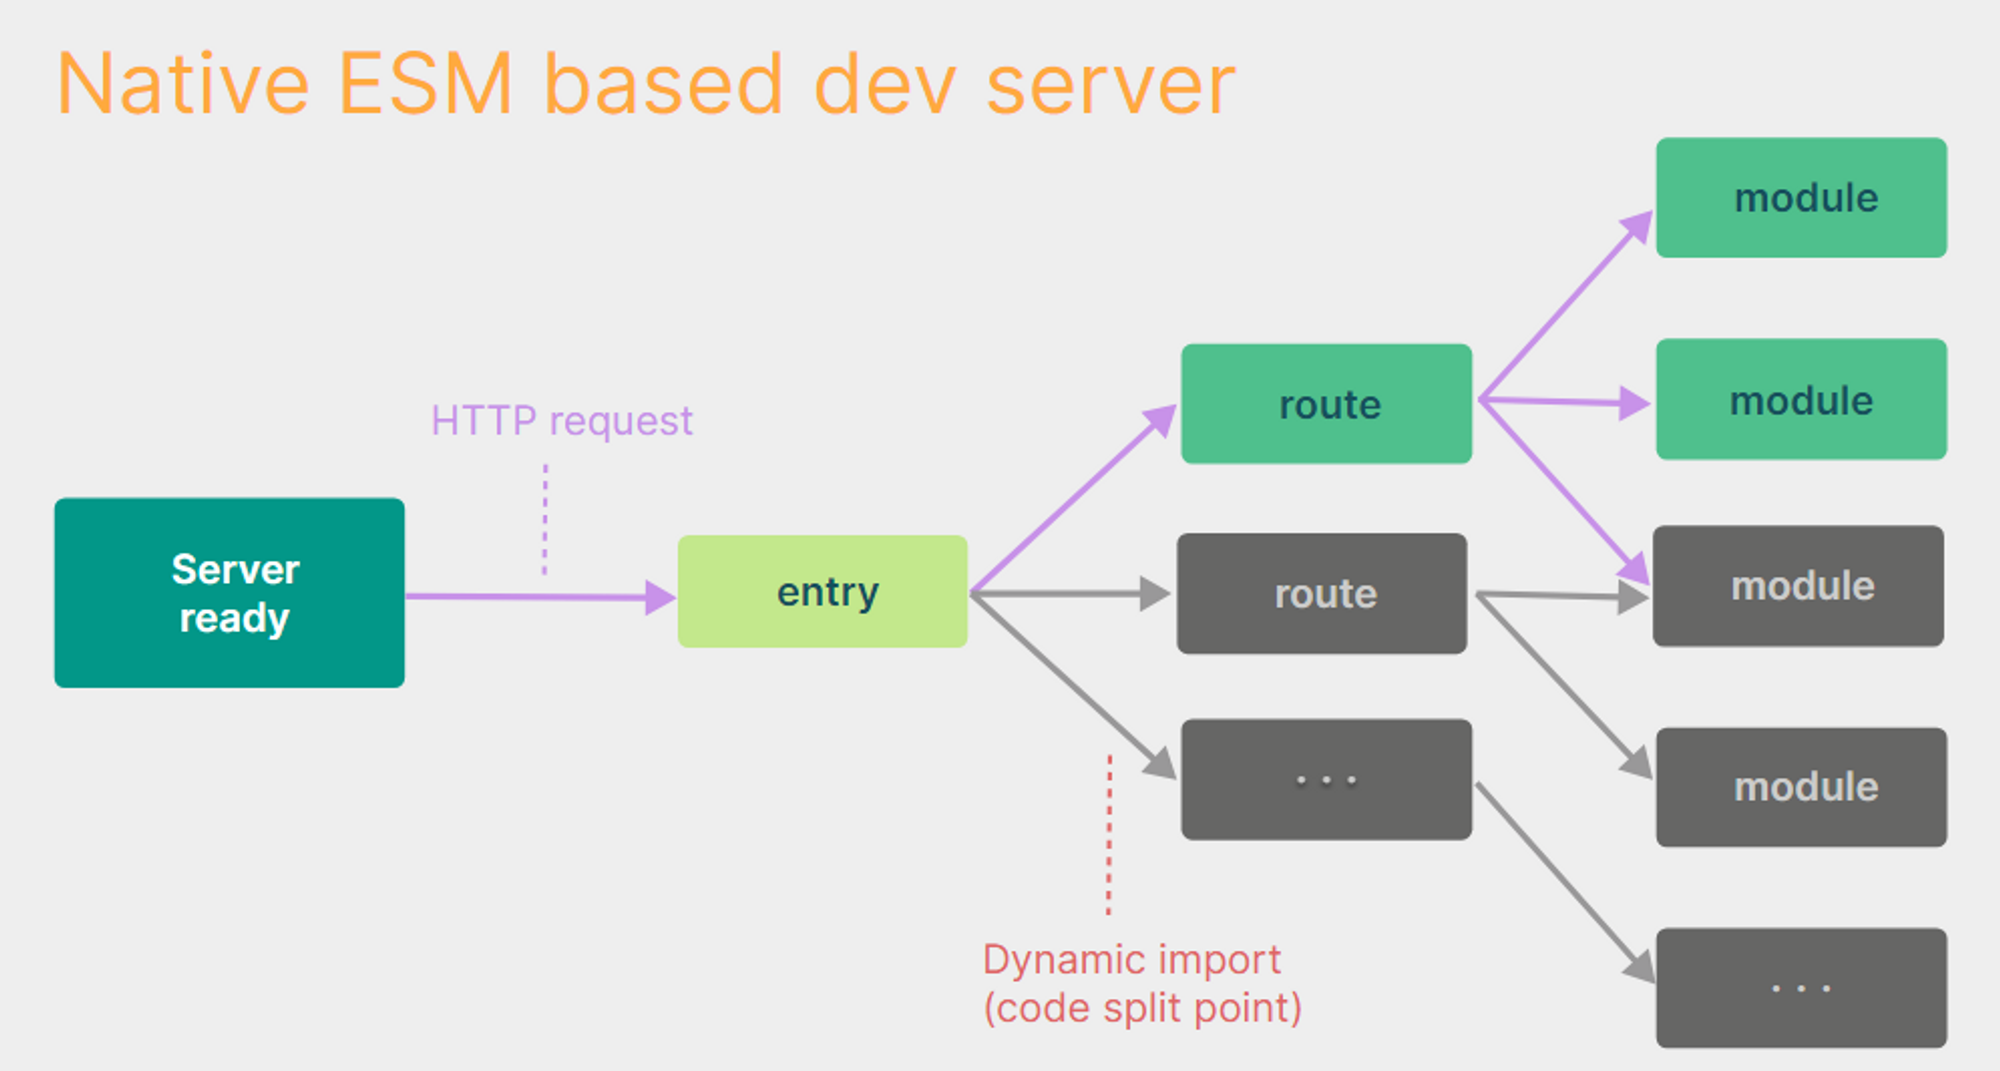
Native ESM 기반
- 기존 방식
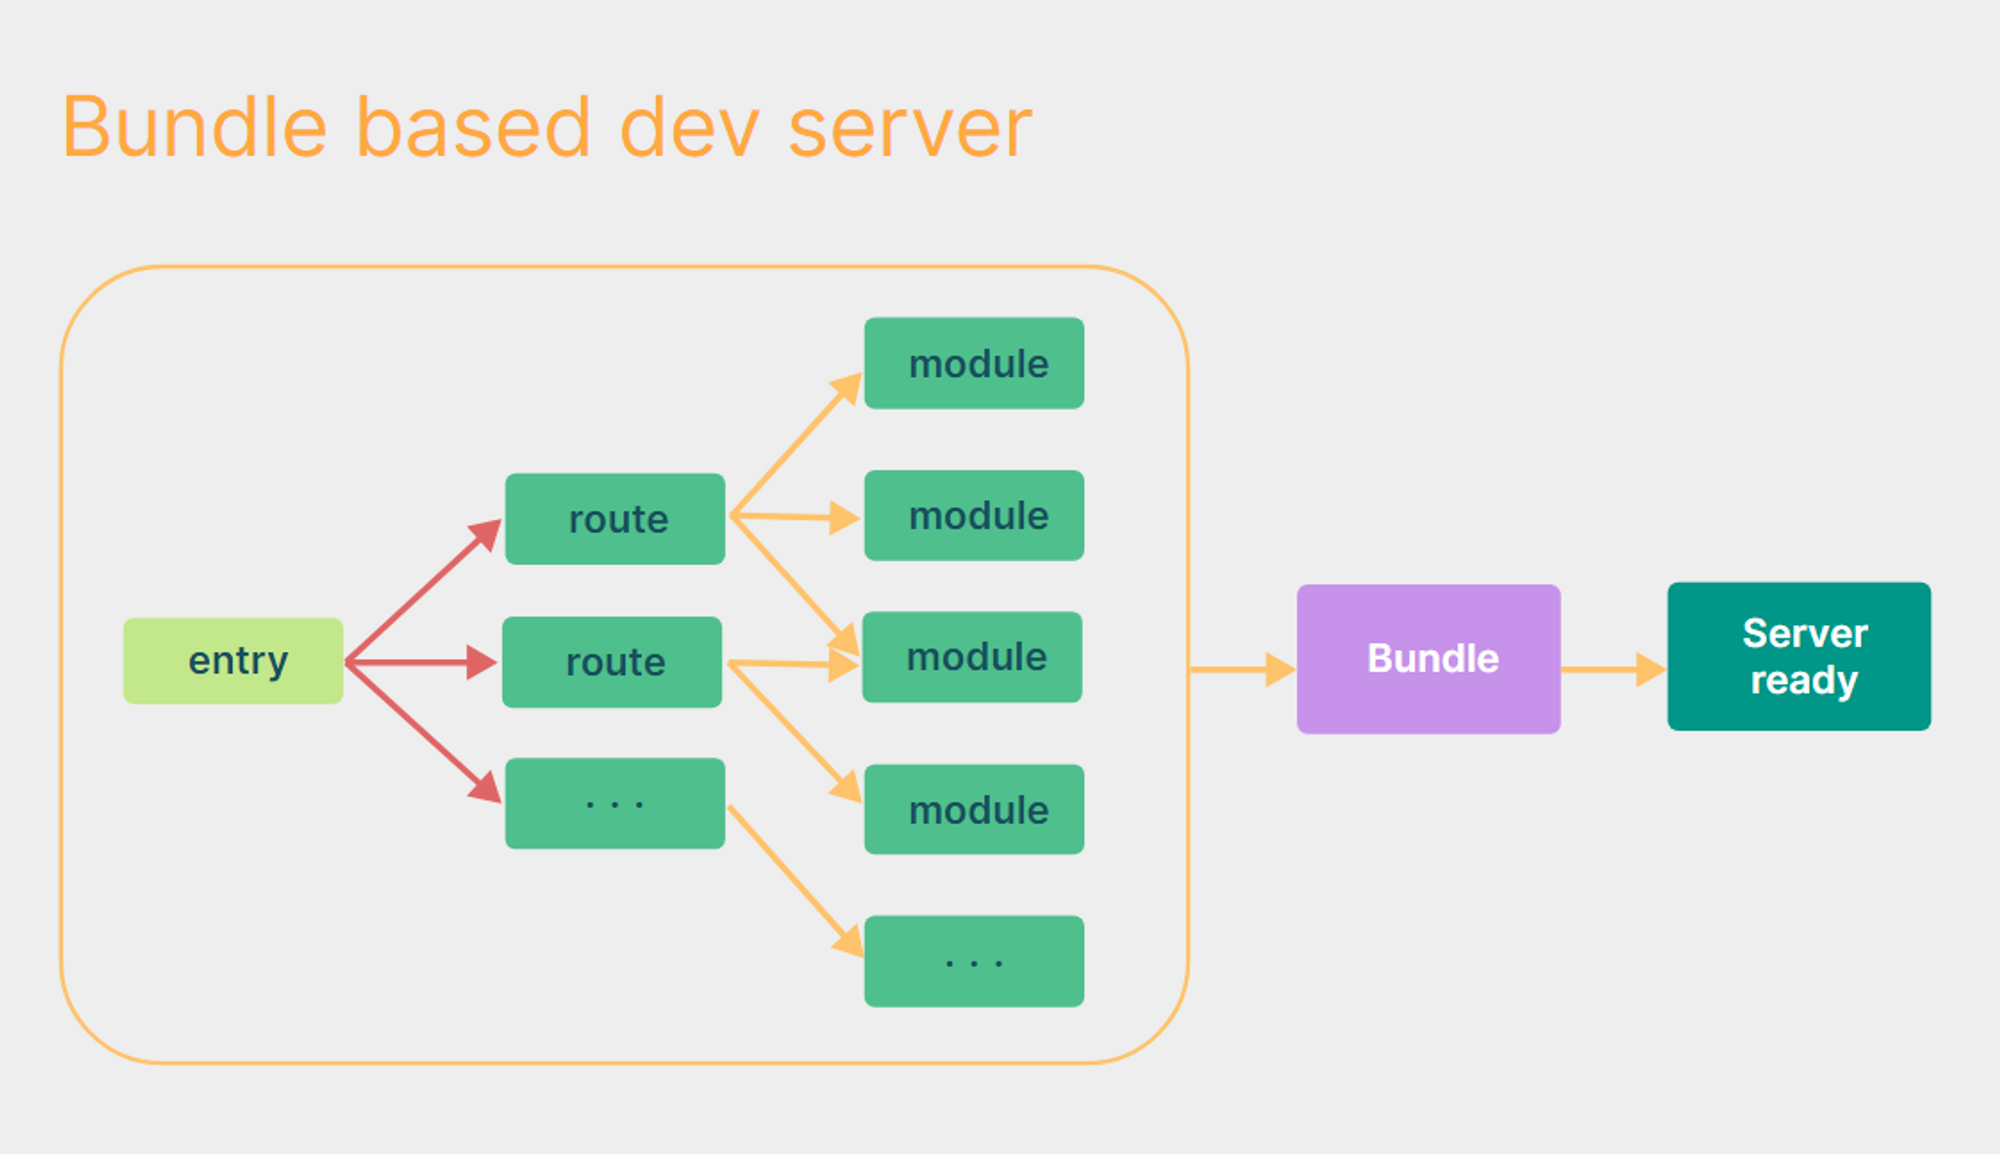
기존 번들링 방식은 서버를 실행할 때마다 모든 소스코드를 실행하며 새로운 의존성 트리를 생성한다.
HMR(Hot Module Replacement) 기능을 재공하지만, 이는 페이지를 재실행시키므로써 자바스크립트가 Full Reload 된다.
- ESM 기반 Live Reload
ESM 기반으로 번들링하는 경우, Static한 의존성 트리가 생성된다.
Vite는 변경된 모듈에 대해서만 재평가하여 의존성 트리를 수정한다.
또한 HMR 방식과 달리, 변경된 모듈의 내용을 브라우저에 전달하여 Live Reload한다.
설정하기
-
프로젝트 폴더에서 package.json을 만든다.
yarn init -y
(-y 플래그는 모든 응답을 yes로 한다.) -
리액트에 필요한 모듈을 설치한다
yarn add react react-dom

yarn add --dev @types/react @types/react-dom sass typescript-
vite를 설치한다.
yarn add --dev @vitejs/plugin-react vite -
package.json 파일에 script를 추가한다.
"scripts": {
	"clean": "rm -rf dist/*", //dist 폴더내의 모든 파일을 삭제한다.
    "build": "vite --config vite.config.js build",
    "dev": "vite --config vite.config.js serve",
    "preview": "vite --config vite.config.js preview"
},- tsconfig.json 파일을 생성한다.
{
  "compilerOptions": {
    "incremental": true,
    "target": "es6",
    "module": "commonjs",
    "lib": ["dom", "dom.iterable", "es6"],
    "allowJs": true,
    "jsx": "react",
    "sourceMap": true,
    "outDir": "./dist/",
    "rootDir": ".",
    "removeComments": true,
    "strict": true,
    "moduleResolution": "node",
    "allowSyntheticDefaultImports": true,
    "esModuleInterop": true,
    "experimentalDecorators": true
  },
  "include": [
    "./src"
  ],
  "exclude": [
    "./node_modules",
    "./build",
    "./dist"
  ]
}- vite.config.js 를 설정한다.
import { defineConfig } from 'vite'
import react from '@vitejs/plugin-react'

// <https://vitejs.dev/config/>
export default defineConfig({
  plugins: [react(
    {
      include: '**/*.{ts,js,tsx}',
    }
  )],
  base: '',
  root: 'src',
  build: {
    outDir: '../dist',
  },
  server: {
    port: 8080
  },
  preview: {
    port: 8080
  }
})
- SRC 폴더 내에 index.html 파일과 app.tsx 파일을 만든다.
<!DOCTYPE html>
<html>
  <head>
    <meta charset="utf-8" />
    <meta name="viewport" content="width=device-width, initial-scale=1.0" />
    <title>React TypeScript</title>
  </head>

  <body>
    <div id="app"></div>
    <script type="module" src="./app.tsx"></script>
  </body>
</html>
빌드 결과물
yarn build 스크립트를 실행한다.
vite --config vite.config.js build 라는 명령과 함께 vite.config.js의 설정을 토대로 빌드가 이루어 진다.
빌드된 결과물은 dist 폴더에 생성된다.
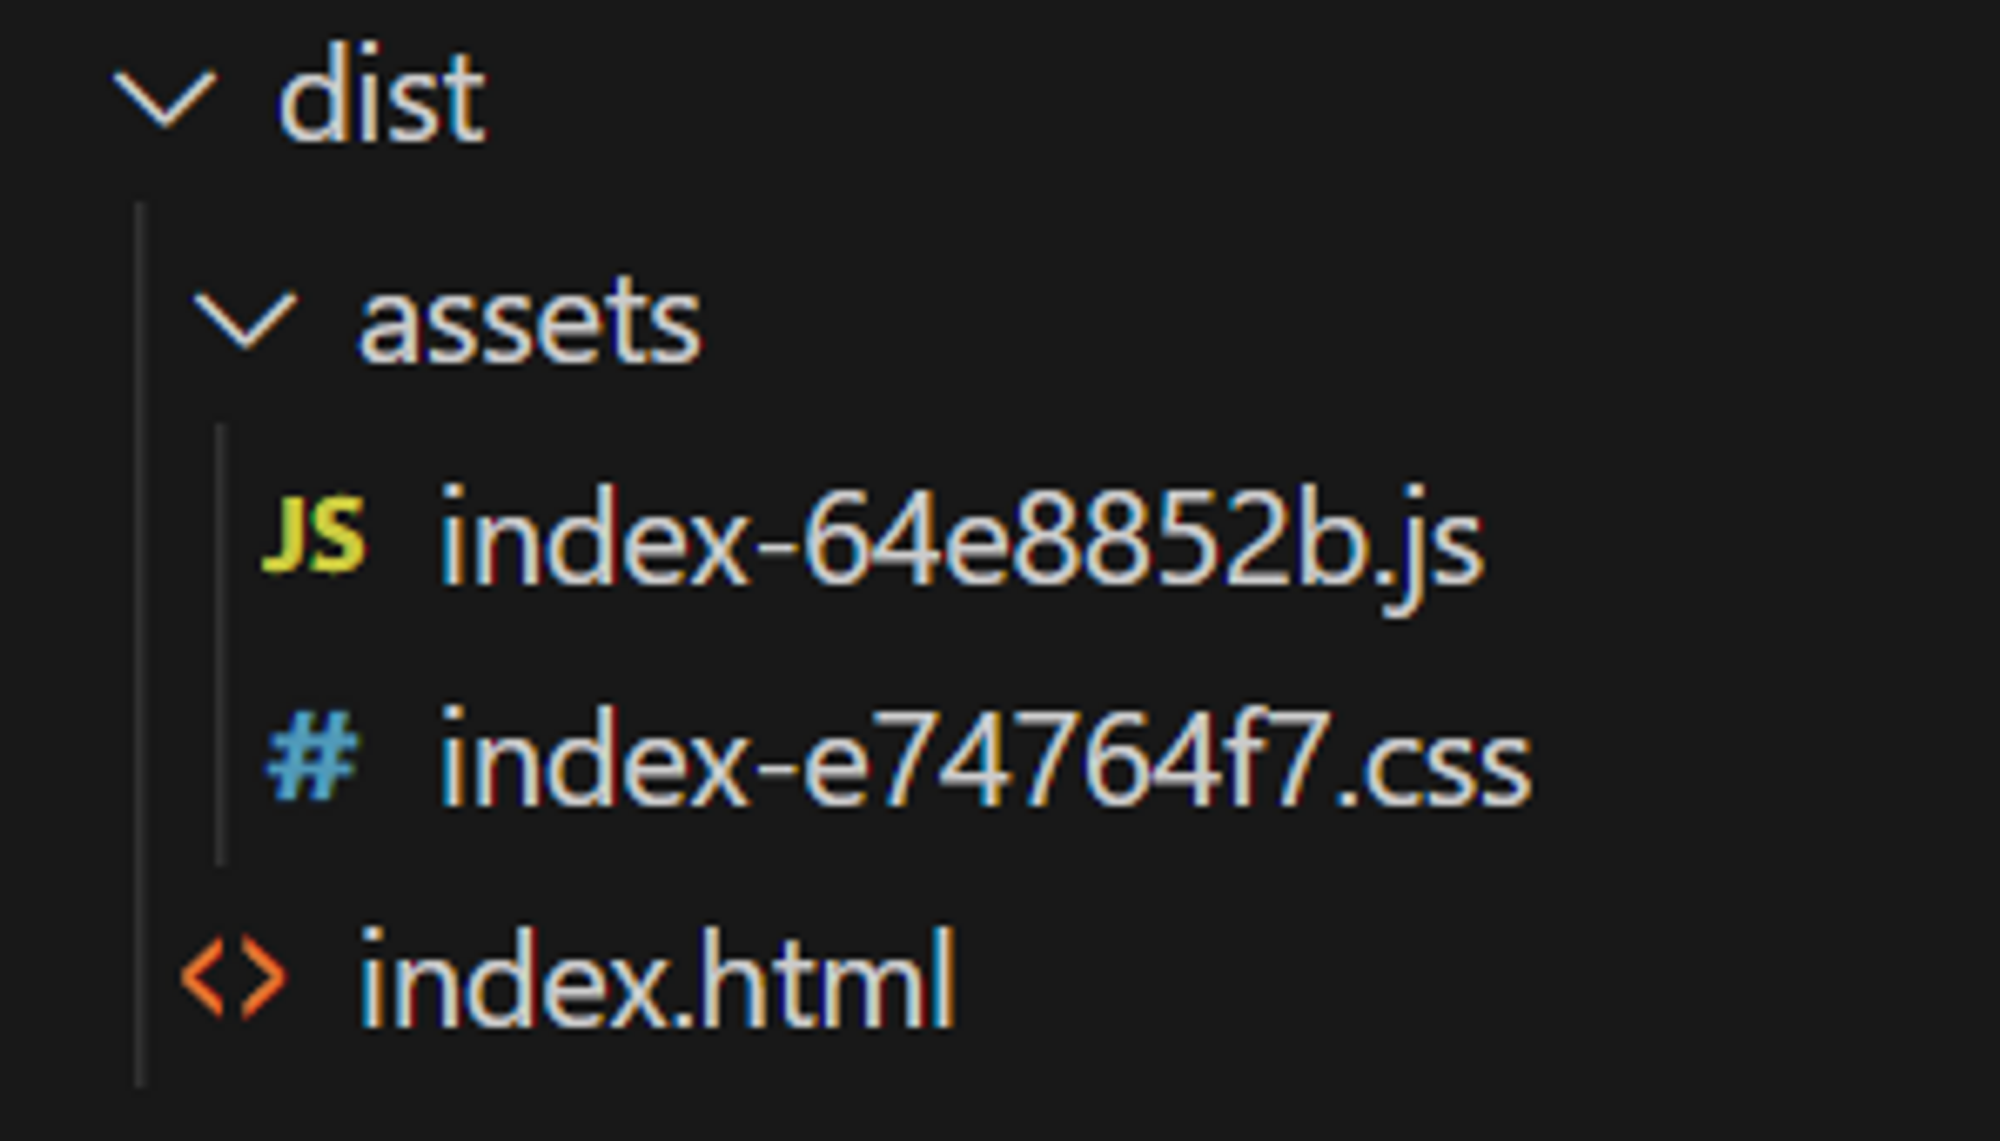
index.html
<!DOCTYPE html>
<html>
  <head>
    <meta charset="utf-8" />
    <meta name="viewport" content="width=device-width, initial-scale=1.0" />
    <title>React TypeScript</title>
    <script type="module" crossorigin src="./assets/index-64e8852b.js"></script>
    <link rel="stylesheet" href="./assets/index-e74764f7.css">
  </head>

  <body>
    <div id="app"></div>

  </body>
</html>
dist 폴더 내의 js파일과 css 파일을 불러온다.
index.js
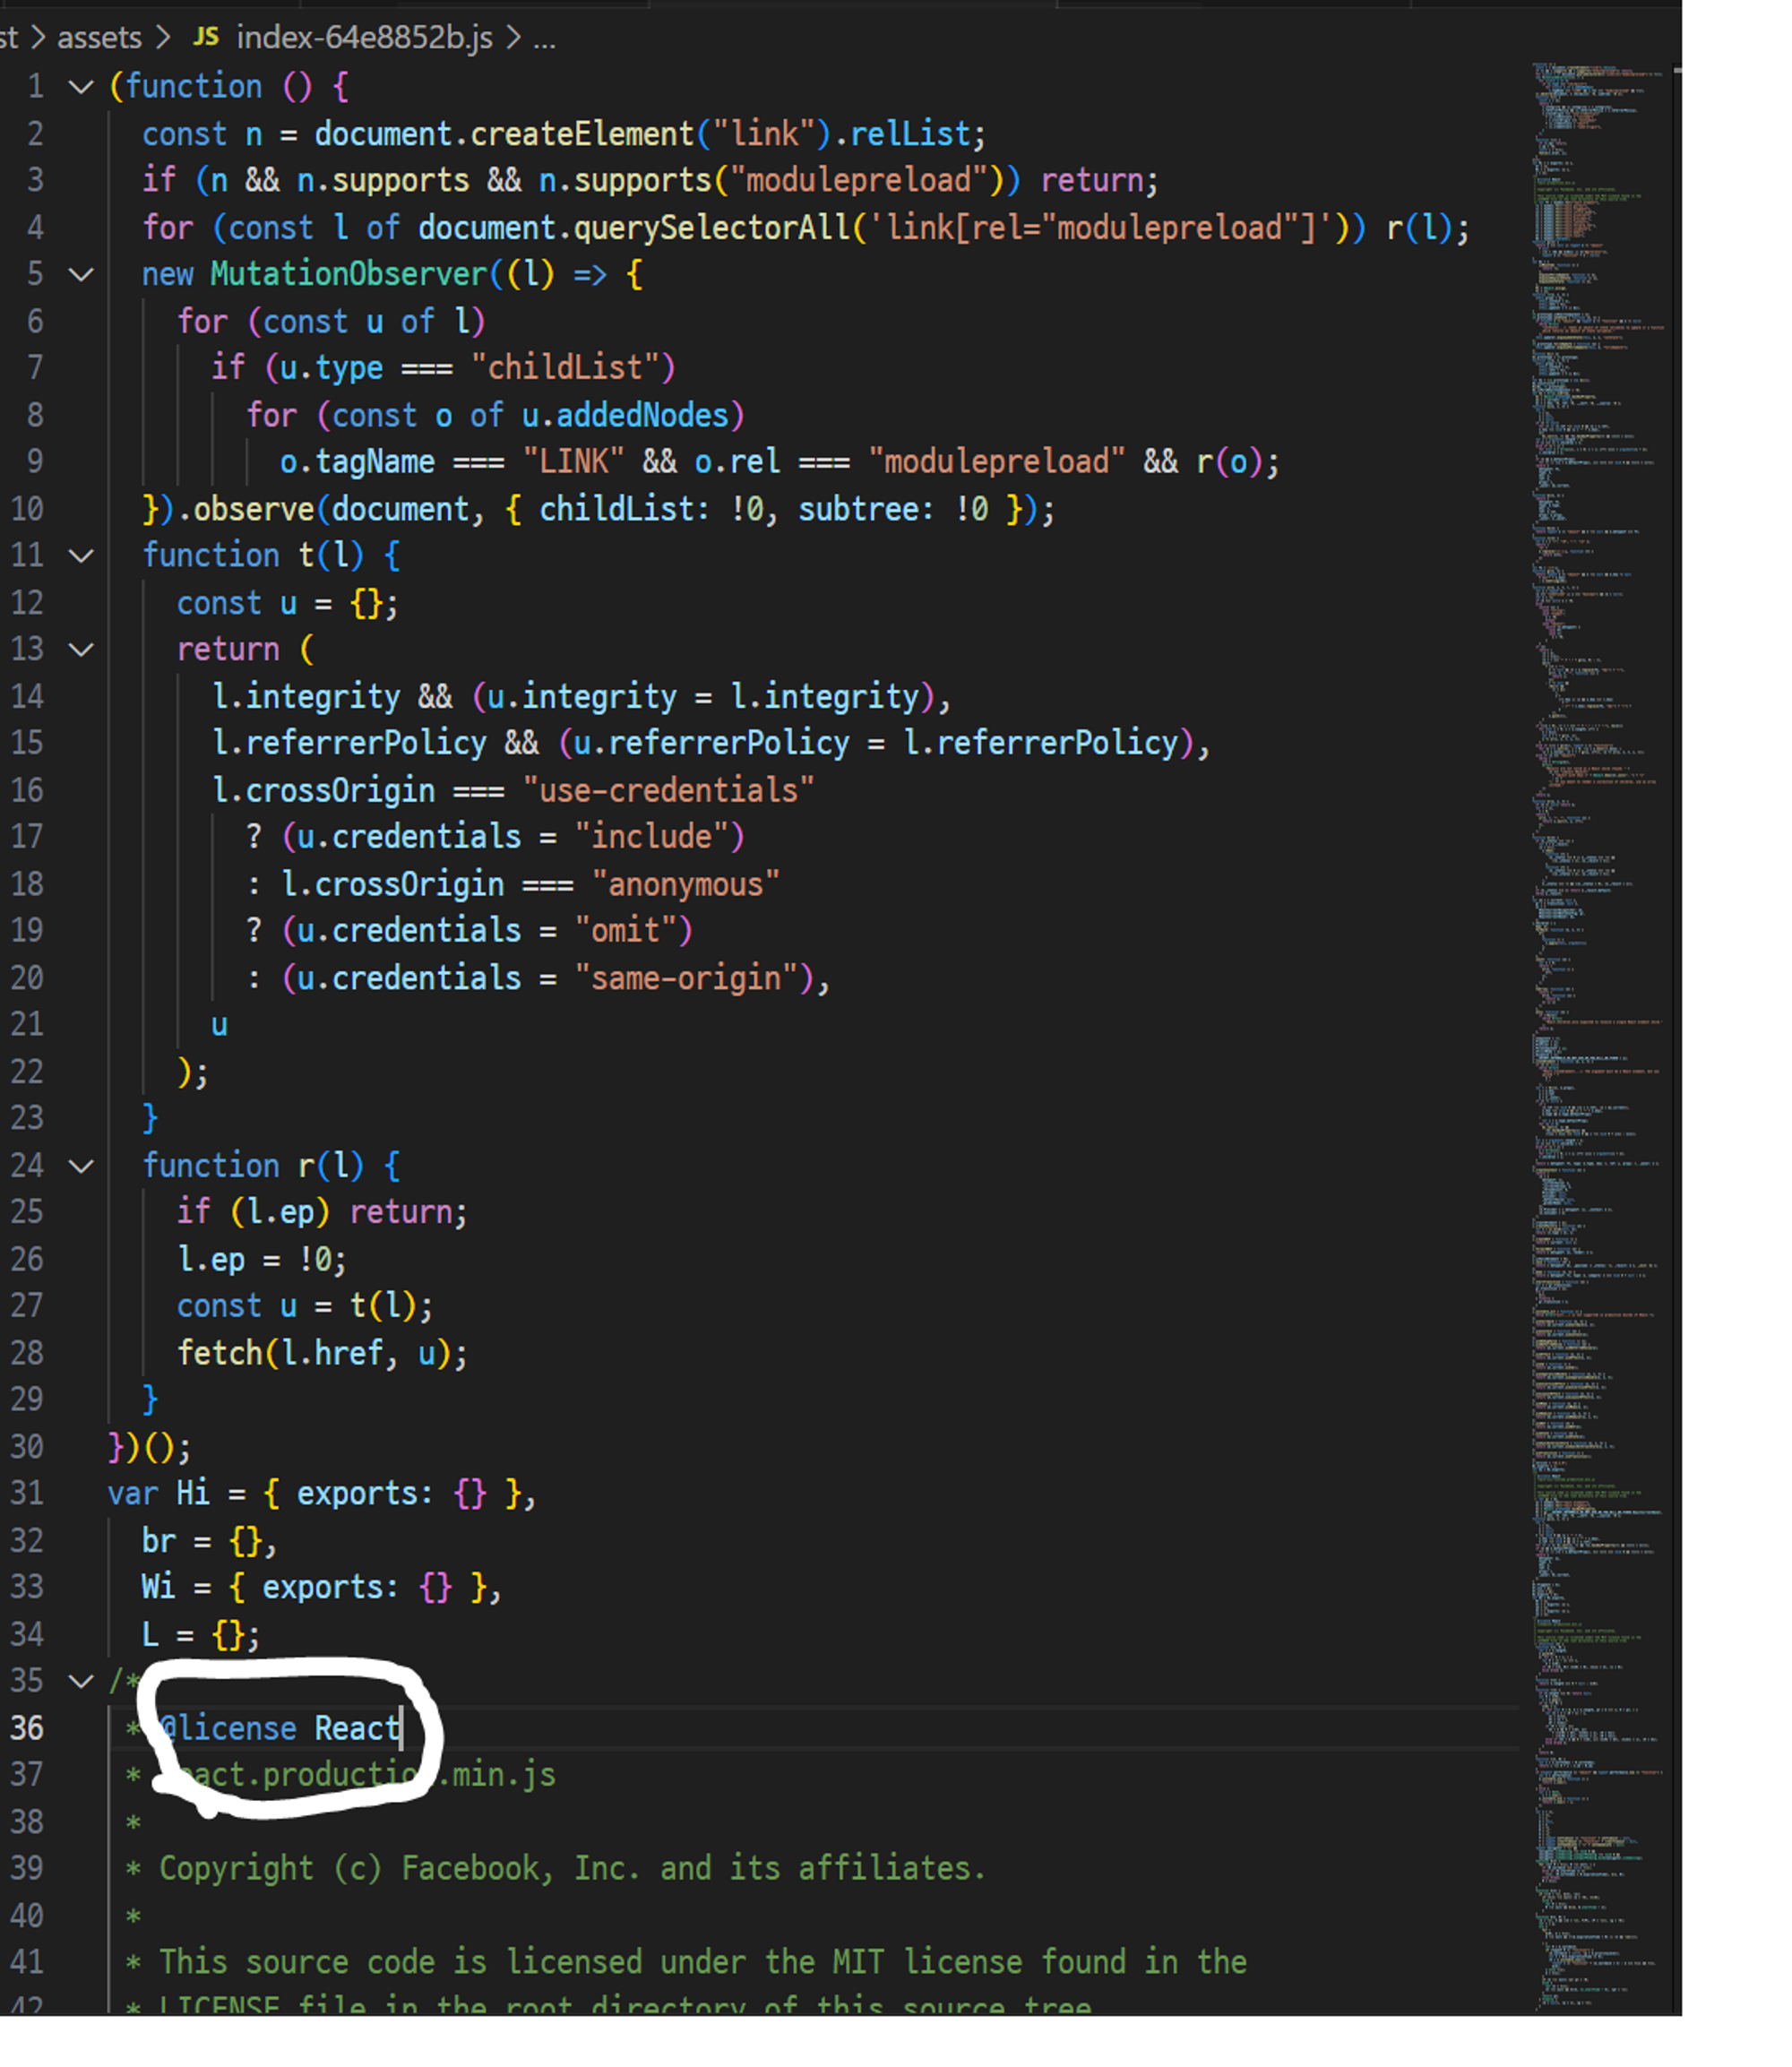
- 임의의 문자가 빌드된 파일명에 붙는다.
- 함수 스코프 단위로 모듈을 실행한다.
- React 플러그인을 통해 React 실행에 필요한 모듈이 로드된다.
index.css

SCSS, SASS는 CSS로 파싱되어 저장된다
vite.config.js
root: "src",- root : index.html 파일이 있는 폴더를 의미한다. 해당 폴더의 index.html 파일을 기준으로 html, js, css 등을 번들링한다.
	build: {
      outDir: "../dist",
},- build : build시 필요한 옵션을 설정한다. (CSS 옵션, 이미지 등 포함)
- target : 번들 시 목표로 하는 브라우저를 설정한다. 기본값은 ESM을 지원하는 범위인 ['es2020', 'edge88', 'firefox78', 'chrome87', 'safari14'] 이다.
- outDir : 번들이 완료된 내용물을 내보낼 위치이다. (root에서 지정한 위치를 기준으로 하는 상대경로 입력)
	server: {
      port: 8080,
    },
    preview: {
      port: 8080,
},- server : 개발 서버를 실행하는데 필요한 옵션을 설정한다.
- preview : Production 빌드된 파일을 실행하는데 필요한 옵션을 설정한다.
import react from "@vitejs/plugin-react";
//...
	plugins: [
      react({
        include: "**/*.{ts,js,tsx}",
      }),
],- plugins : 번들링 과정에서 번들링의 형태, 파일을 실행하기 위한 로직 등에 영향을 미치는 plugin들을 삽입할 수 있다. 플러그인은 앞에서 부터 순서대로 적용된다.
