
리액트로 애플리케이션 설계 시 사용자가 볼 수 있는 요소는 여러 컴포넌트로 구성.
컴포넌트는 단순한 템플릿 이상의 기능
컴포넌트의 속성 값 props, 상태 값 state
컴포넌트 선언 방식은 1.함수형 컴포넌트, 2.클래스형 컴포넌트
App 컴포넌트는 함수형 컴포넌트.
// App 컴포넌트는 다음과 같은 형태
function App() {
  const name = '리액트';
  return <div className = 'react'>{name}</div>;
}
export default App;- 클래스형 컴포넌트
import React, {Component} from 'react';

class App extends Component {
  render() {
    const name = 'myreact'
    return <div className = 'react'>{name}!!</div>
  }
}
클래스형 컴포넌트에는 render함수가 꼭 있어야 하고 내부에 보여줘야 할 jsx 반환해야 함.
클래스형 컴포넌트는 state 및 라이프사이클 기능 사용 가능하고 임의 메서드 정의 가능
언제 함수형 컴포넌트 사용해야 할까?
-> 선언 쉽다
-> 메모리 자원 덜 사용
-> but state와 라이프사이클 api 사용이 불가
- 모듈 내보내기 (export)
// 맨 아래 코드
export default MyComponent;
다른 파일에서 이 파일 import할 때 위에 선언한 MyComponent 클래스 불러오도록 설정
- 모듈 불러오기 (import)
import MyComponent from './MyComponent';-
props
props는 properties의 줄임으로 컴포넌트의 속성 설정시 사용하는 요소
props값은 해당 컴포넌트를 불러와 사용하는 부모 컴포넌트 (위와 같은 경우 App이 부모 컴포넌트)에서 설정 가능
ㄴ 불러오는 애가 부모. -
jsx 내부에서 props 렌더링
props 값은 컴포넌트 함수의 파라미터로 받아와 사용할 수 있다
// App.js
const App = () => {
  return <MyComponent name="React" />;
};

// MyComponent.js
const MyComponent = props => { // 파라미터로 받아와 사용
return <div>안녕하세요, 제 이름은 {props.name}입니다.</div>;
};- defaultProps
App.js에서 name값을 지정하지 않았을때 보여주는 기본값
// MyComponent.js
const MyComponent = props => {
  return <div>안녕하세요, 제 이름은 {props.name}입니다.</div>;
};

MyComponent.defaultProps = {
  name: '기본 이름'
};- children
컴포넌트 태그 사이의 내용 보여주는 props
// App.js
const App = () => {
  return <MyComponent>리액트</MyComponent>;
};
위 코드에서 MyComponent 태그 사이 문자열(리액트)를 MyComponent 내부에서 보여주려면 props.children 값을 불러와야 함.
// MyComponent.js
const MyComponent = props => {
  return (
    <div>
      children 값은 {props.children}입니다. // 리액트
    </div>
  );
};
위에서는 props 사용시 마다 props.name, props.children과 같이 props. 키워드를 앞에 붙여 사용
ES6의 비구조화 할당 문법 (destructuring assignment, 펼침, 구조 분해) 사용해 내부값 바로 추출 가능
const MyComponent = props => {
  const { name, children } = props;
  return (
    <div>
      // props 안쓰고 더 짧게 사용 가능
      안녕하세요, 제 이름은 {name}입니다. <br />
      children 값은 {children}입니다.
    </div>
  );
};

MyComponent.defaultProps = {
  name: '기본 이름'
};
함수의 파라미터 부분에도 사용 가능.
함수의 파라미터가 객체라면 그 객체를 비구조화 하여 사용
const MyComponent = ({ name, children }) => {
  return (
    <div>
...- propTypes
컴포넌트의 필수 props 지정하거나 props의 타입 지정할때 사용
컴포넌트의 propTypes 지정 방법은 defaultProp 설정과 비슷함
import PropTypes from 'prop-types';
    ...
MyComponent.propTypes = {
    name: PropTypes.string // name값은 무조건 문자열 형태로 전달해야 한다는 뜻
}
문자열이 아닌 숫자를 전달하면
// App.js
const App = () => {
  return <MyComponent name={3}>리액트</MyComponent>; // 문자열이 아닌 숫자 입력
};
개발자 도구에서 다음과 같은 오류 발생.

- isRequired
propTypes 지정하지 않았을때 경고 띄우기
propTypes 지정할때 뒤에 isrequired 붙이기
// MyComponent.js
MyComponent.propTypes = {
  name: PropTypes.string,
  favoriteNumber: PropTypes.number.isRequired // f값 전달하지 않으면 오류 뜸. isRequired 안붙이면 오류 안뜸
};
// App.js
const App = () => {
return <MyComponent name = {"Tom"} favoriteNumber={20}>리액트</MyComponent>;
}- 클래스형 컴포넌트에서 props 사용하기
render함수에서 this.props 조회하면 됨
defaultProps, propTypes는 똑같은 방식으로 설정
// MyComponent.js
class MyComponent extends Component {
    render() {
        const {name, favoriteNumber, children} = this.props;
        return (
            <div>
                my name is {name}, children is {children}, number is {favoriteNumber}
            </div>
        )
    }
}
클래스 내부에서 defaultProps와 propTypes 설정 가능
class MyComponent extends Component {
  static defaultProps = {
    name: ‘기본 이름‘
  };
  static propTypes = {
    name: PropTypes.string,
    favoriteNumber: PropTypes.number.isRequired
  };
  render() {
    const { name, favoriteNumber, children } = this.props; // 비구조화 할당
    return (…);
  }
}- state
state: 컴포넌트 내부에서 바뀔 수 있는 값. 두 가지 종류
ㄴ 1. 클래스형 컴포넌트가 갖고 있는 state
ㄴ 2. 함수형 컴포넌트에서 useState라는 함수 통해 사용하는 state
props: 컴포넌트가 사용되는 과정에서 부모 컴포넌트(App)가 설정하는 값
// App.js
const App = () => {
  // 부모(App)에서 name과 favoriteNumber, children값 지정
  return <MyComponent name = "Tom" favoriteNumber = 3}>리액트</MyComponent>
}
컴포넌트 자신은 props 읽기 전용으로만 사용
바꾸려면 부모 컴포넌트에서 바꿔야 함. MyComponent에서는 직접 바꿀 수 없음
state 설정시 constructor 메서드 작성
// Counter.js
class Counter extends Component {
constructor(props) { // 컴포넌트의 생성자
super(props); // Component 클래스의 생성자
// state의 초깃값 설정
this.state = { // 컴포넌트의 state는 객체 형식
number: 0
};
}
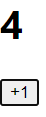
render() {
const {number} = this.state; // state 조회시 this.state
return (
<div>
<h1>{number}</h1>
<button onClick={()=>{ // 버튼 클릭 시 호출할 함수 설정 (이벤트 설정)
this.setState({number: number+1}); // this.setState사용해 state에 새로운 값 넣음
}} >
+1
</button>
</div>
);
}
}
- state객체 안에 여러 값
// Counter.js
this.state = {
      number: 0,
      fixedNumber: 0
    };
...
 return (
      <div>
        <h1>{number}</h1>
        <h2>바뀌지 않는 값: {fixedNumber}</h2>
...- state를 constructor에서 꺼내기
앞에서는 state의 초기값 지정위해 constructor 선언
사용하지 않고도 가능 ( state = {...} )
ㄴ 이 방법 사용
class Counter extends Component {
    /*constructor(props) {
        super(props);
        this.state = {
            number: 0,
            fixedNumber: 99
        };
    }*/

    state = {
        number: 0,
        fixedNumber: 0
};- this.setState에 객체 대신 함수 인자 전달하기
this.setState 사용하여 state값 업데이트하면 상태 비동기적 업데이트 됨
onClick에서 this.setstate 두번 호출해도 1씩 더해짐.
this.setState 사용할때 객체대신 함수 인자로 넣으면 됨. 다음과 같은 형태
this.setState((prevState, props) => { // prevState는 기존 상태
// props는 현재 지니고 있는 props. 업데이트 과정에 props 필요없다면 생략 가능
return {
  // 업데이트하고 싶은 내용
}
})
2씩 더해짐
// Counter.js
<button onClick={()=>{
    this.setState(prevState => {
        return {
            number: prevState.number + 1
        };
    });
    // 위 아래 코드는 같은 기능
    // 아래 코드는 함수에서 바로 객체 반환한다는 의미
    // 객체 반환시 소괄호 사용 (js)
    this.setState(prevState => ({
        number: prevState.number+1
    }))
}} >
    plus 1
</button>- this.setState가 끝난 후 특정 작업 실행하기
setState로 값을 업데이트한 뒤 특정 작업 하고 싶을때 setState의 두번째 파라미터로 콜백 함수 등록
// Counter.js
<button onClick={()=>{
    this.setState(
        { // 첫번째 파라미터: state 객체
            number: number+1
        },
        () => { // 두번째 파라미터: 콜백 함수
            // state값이 업데이트 된 뒤 실행됨
            console.log('방금 setState가 호출됨');
            console.log(this.state);
        }
    );
}} >
    plus 1
</button>- useState
이전엔 함수형 컴포넌트의에선 state 사용 못했음
리액트 16.8 이후부터 useState라는 함수 사용해 state 사용 가능
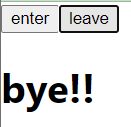
// Say.js
const Say = () => {
    // useState 함수의 인자에는 상태의 초기값
    // 클래스형 컴포넌트에는 state의 초기값은 객체 형태 넣어야 함
    // 함수형은 현태 상관 없음

    const [message, setMessage] = useState('처음'); // 함수 호출 시 배열 반환
    // 첫번째 원소는 현재상태, 두번째 원소는 상태 바꾸는 함수 (setter)s
    const onClickEnter = () => setMessage('hello!');
    const onClickLEave = () => setMessage('bye!!');

    return (
        <div>
            <button onClick = {onClickEnter}>enter</button>
            <button onClick = {onClickLEave}>leave</button>
            <h1>{message}</h1>
        </div>
    );
};
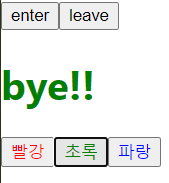
- useState 여러번 사용
const Say = () => {
    // useState 함수의 인자에는 상태의 초기값
    // 클래스형 컴포넌트에는 state의 초기값은 객체 형태 넣어야 함
    // 함수형은 현태 상관 없음

    const [message, setMessage] = useState('처음'); // 함수 호출 시 배열 반환
    // 첫번째 원소는 현재상태, 두번째 원소는 상태 바꾸는 함수 (setter)
    const onClickEnter = () => setMessage('hello!');
    const onClickLEave = () => setMessage('bye!!');

    const [color, setColor] = useState('black');

    return (
        <div>
            <button onClick = {onClickEnter}>enter</button>
            <button onClick = {onClickLEave}>leave</button>

            <h1 style = {{color}}>{message}</h1>
            <button style = {{color: 'red'}} onClick={()=>setColor('red')}>빨강</button>
            <button style = {{color: 'green'}} onClick={()=>setColor('green')}>초록</button>
            <button style = {{color: 'blue'}} onClick={()=>setColor('blue')}>파랑</button>


        </div>
    );
};
- state 사용시 주의 사항
state값 바꿀때 setState(클래스형) 혹은 useState(함수형) 통해 전달받은 세터함수를 사용해야 함
- 잘못된 코드
// 클래스형 컴포넌트에서…
this.state.number = this.state.number + 1;
this.state.array = this.array.push(2);
this.state.object.value = 5; // setState 사용해애 함

 // 함수형 컴포넌트에서…
const [object, setObject] = useState({ a: 1, b: 1 });
object.b = 2; // setObject 함수 사용해야 함- 배열/객체를 업데이트 해야 할 때
객체 사본을 만들고 그 사본에 값을 업데이트 후 그 상태를 setState/세터 함수 통해 업데이트
// 객체
const obj = {a:1, b:2, c:3};
const nextObj = {...obj, b:99};

// 배열
const arr = [
  {id:1, value:true},
  {id:2, value:true},
  {id:3, value:false},
];
let nextArr = array.concat({id:4}); // 새 항복 추가
nextArr.filter(item => item.id !== 2); // id가 2인 항목 제거
nextApp.map(item=>(item.id === 1 ? {...item, value:false} : item)); // id 1인 항목 value를 false로 설정
객체에 대한 사본 만들때는 spread 연산자(..., 전개 연산자) 사용
배열 사본은 배열 내장 함수 활용
-
props는 부모 컴포넌트가 설정. but props 사용한다고 해서 값이 무조건 고정적이지는 않음. 부모의 state를 자식의 props로 전달 후 자식에서 특정 이벤트가 발생 시 부모의 메서드를 호출하면 props도 유동적으로 사용 가능. 이후 일정 관리 앱에서 이러한 구조로 설계 예정
-
state는 컴포넌트 가체적으로 지닌 값. 내부에서 업데이트 가능
클래스형 컴포넌트의 setState, 함수형의 useState 중 useState 사용 권장.
코드 더 간결해지고 리액트 개발 팀에서 함수형 컴포넌트와 Hooks 사용이 주요 컴포넌트 개발 방식 될것이라고 공지.