소스코드
https://github.com/BLUEVERY8/OOM_Self-driving-car.git
ROS 배포판: ROS2 foxy
시뮬레이션 환경: gazebo 11
개발 환경: ubuntu 22.04
프로젝트 개요 | 문제 정의
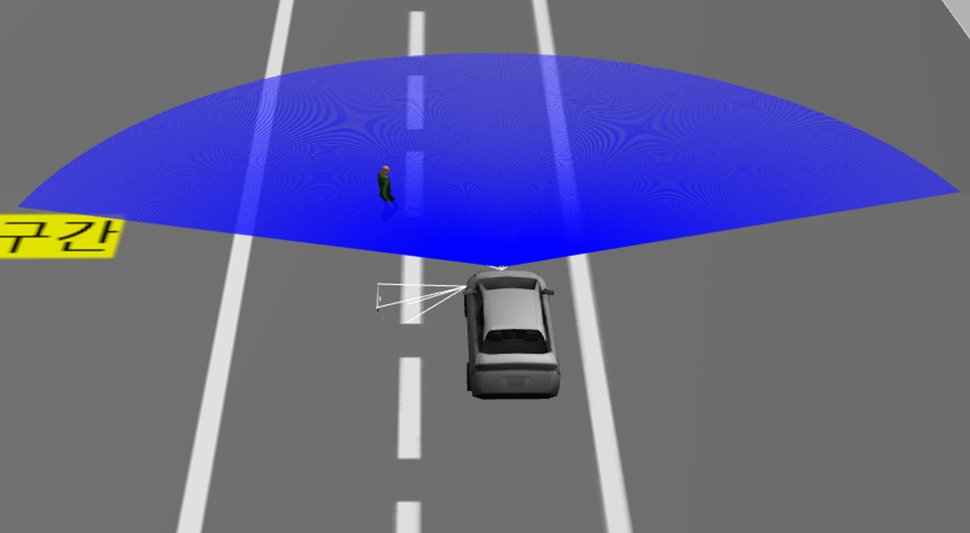
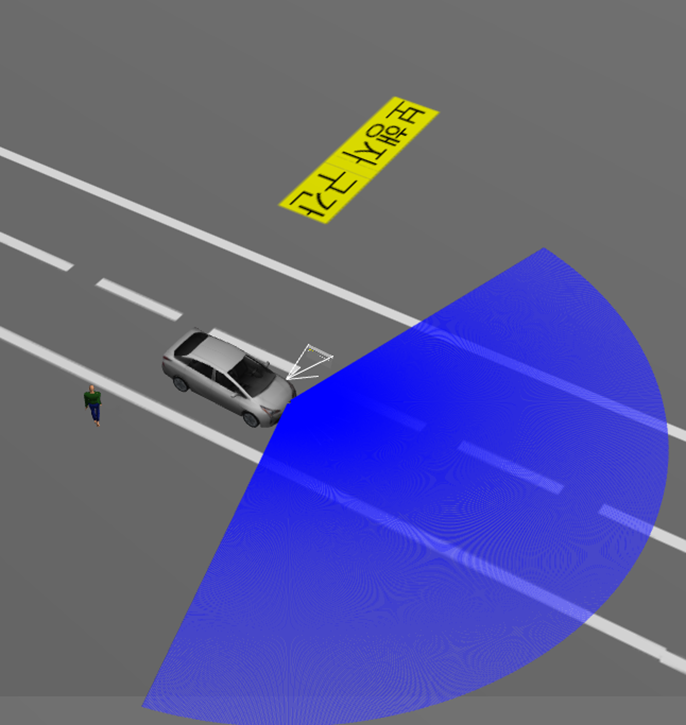
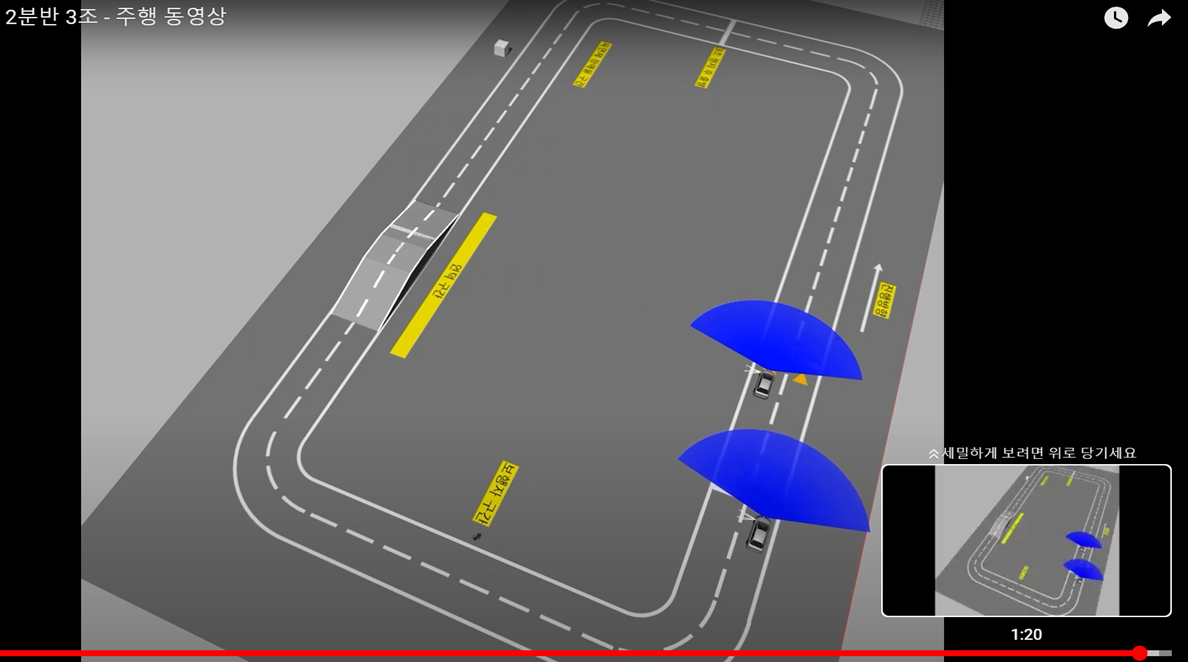
프로젝트 개요 | 시험장 환경
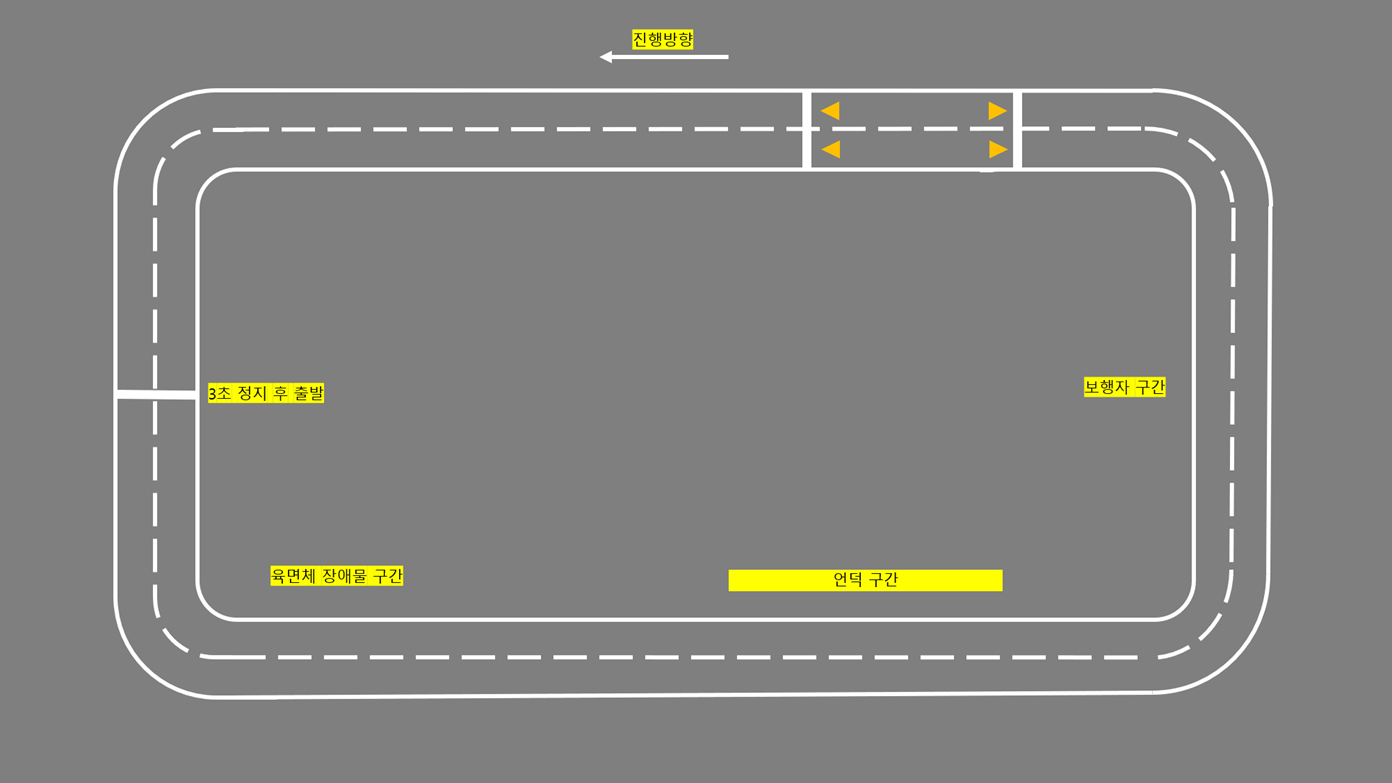
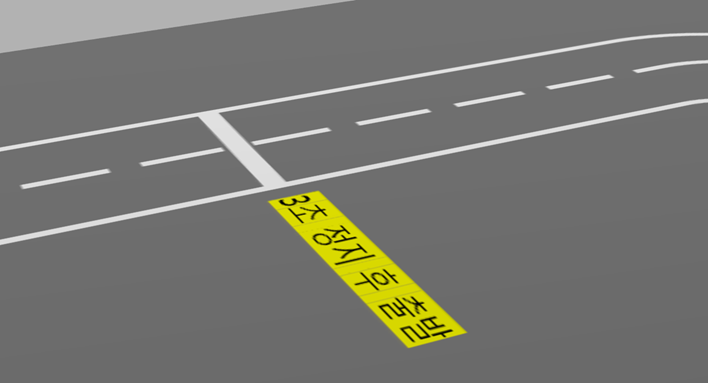
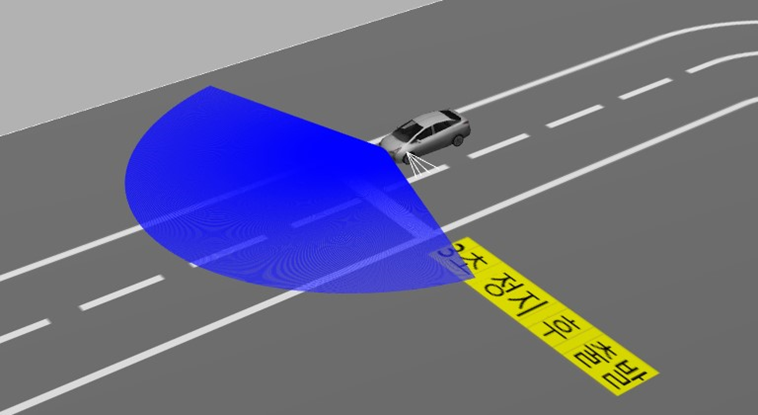
정지선
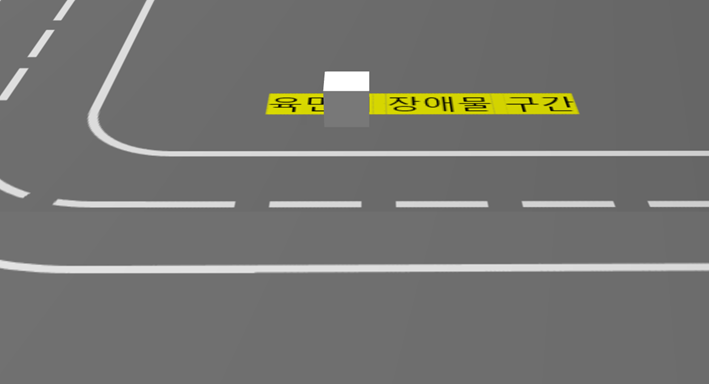
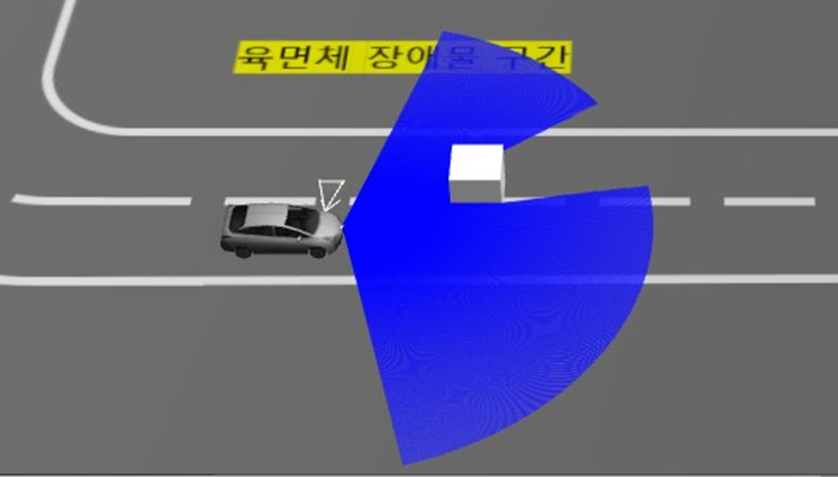
장애물
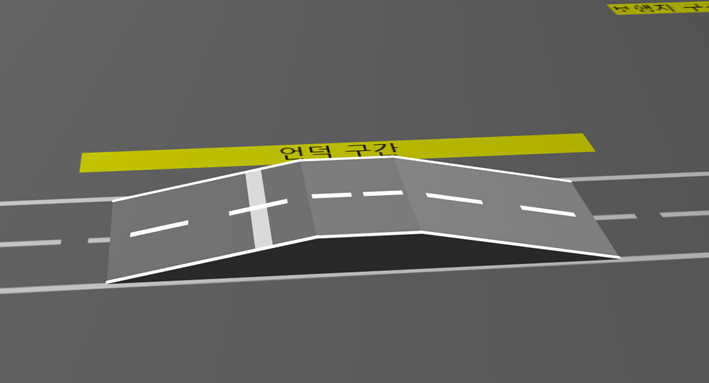
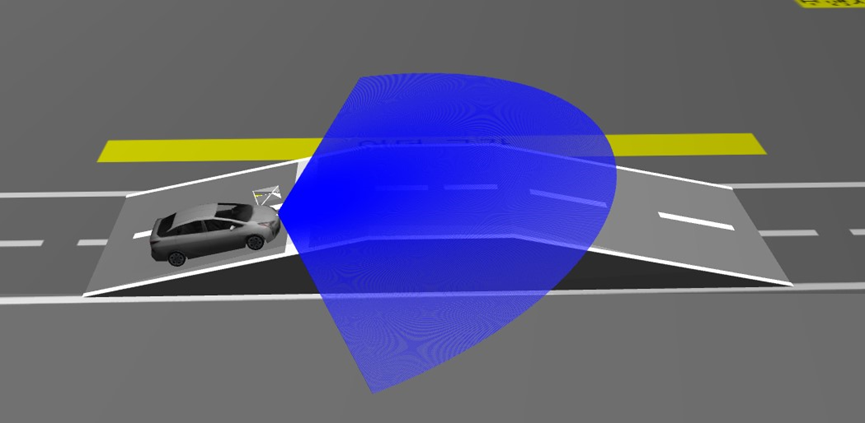
언덕 정지선
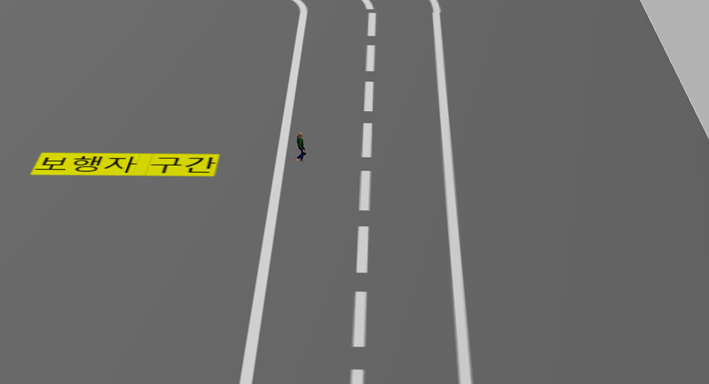
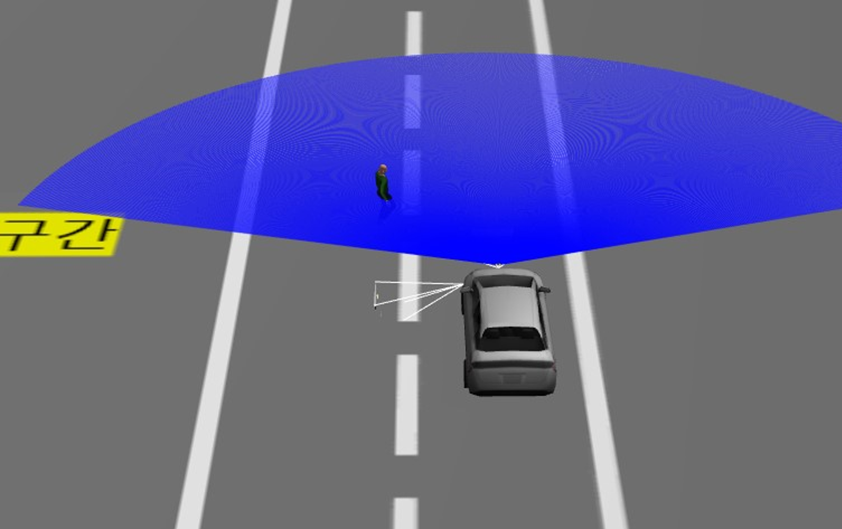
보행자
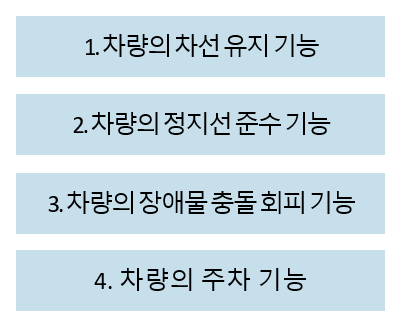
프로젝트 목표 | 기능 요구사항

<car_sim.launch.py>
# 차량 지정
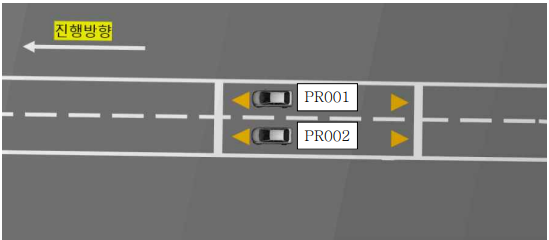
car = 'PR001'launch 파일에서 변수를 통해 차량을 지정한다.
    # 지정된 차량 정보를 전달하는 노드
    starter = Node(
        package='ros2_term_project',
        executable='starter',
        name='starter',
        arguments=[car],
        output='screen'
    )
<starter 노드>
 # 지정된 차량 정보가 올바른지 확인
        if self.test_car == 'PR001' or self.test_car == 'PR002':
            msg.car = self.test_car
            self.car_info_publisher_.publish(msg)
            self.get_logger().info('Publishing: "%s"' % msg.car)
        else:
           self.get_logger().error('"%s": 해당 차량이 존재하지 않습니다.' %self.test_car)
starter 노드가 받은 차량 정보를 토픽을 통해 controller 노드에 전달
    def car_info_listener_callback(self, msg: Target):
        # 지정 차량
        car = msg.car
        self.get_logger().info('I heard: "%s"' % msg.car)

        time.sleep(5)

        # 차량에 속도 정보를 전달할 publisher
        self.twist_publisher_ = self.create_publisher(Twist, '/demo/' + car + '_cmd_demo', 10)

        # 차량 출발
        twist = Twist()
        for i in range(200):
            twist.linear.x = 6.0
            self.twist_publisher_.publish(twist)
            time.sleep(0.01)

        # 카메라, 라이다 정보를 처리하는 노드들에 차량 정보 전달
        car_info_msg = String()
        car_info_msg.data = car
        self.car_info_publisher.publish(car_info_msg)
지정된 차량에 맞게 차량 제어할 publisher 생성

사이드 카메라를 통해 차선을 인식
<line_tracker.py>
def process(self, img: numpy.ndarray) -> None:
        hsv = cv2.cvtColor(img, cv2.COLOR_BGR2HSV)
        lower_white = numpy.array([0, 0, 200])
        upper_white = numpy.array([180, 255, 255])

        # 흰색 식별
        mask = cv2.inRange(hsv, lower_white, upper_white)

        h, w, d = img.shape
        search_top = int(h / 2)

        # 마스킹
        mask[0:search_top, 0:w] = 0

        # 차선 검출
        M = cv2.moments(mask)
        if M['m00'] > 0:
            cx = int(M['m10'] / M['m00'])
            cy = int(M['m01'] / M['m00'])
            cv2.circle(img, (cx, cy), 20, (0, 0, 255), -1)
            # BEGIN CONTROL
            err = cy - 3*h/4
            self._delta = err
            # END CONTROL
흰색 차선을 식별하고 차선의 위치를 통해 차량의 위치를 파악한다.
<line_follower 노드>
    def lane_image_callback(self, image: Image):
        # ros image를 opencv image로 변환
        img = self.bridge.imgmsg_to_cv2(image, desired_encoding='bgr8')

        # 이미지를 기반으로 차선 검출
        self.line_tracker.process(img)

        # 회전 속도 조절
        twist = Twist()
        msg = String()
        twist.angular.z = (-1) * self.line_tracker._delta / 110

        # 방향 조정 최대치 설정
        if twist.angular.z > 0.7:
            twist.angular.z = 0.7

        # 회전 인식
        if twist.angular.z > 0.08:
            msg.data = '회전'
        else:
            msg.data = '직진'

        # 회전 시 감속
        if twist.angular.z > 0.3:
            twist.linear.x = 3.0
        else:
            twist.linear.x = 6.0

        self.drive_issue_publisher_.publish(msg)
        self.twist_info_publisher_.publish(twist)
파악된 차량의 위치를 바탕으로 차량의 속도와 진행 방향을 조정한다.


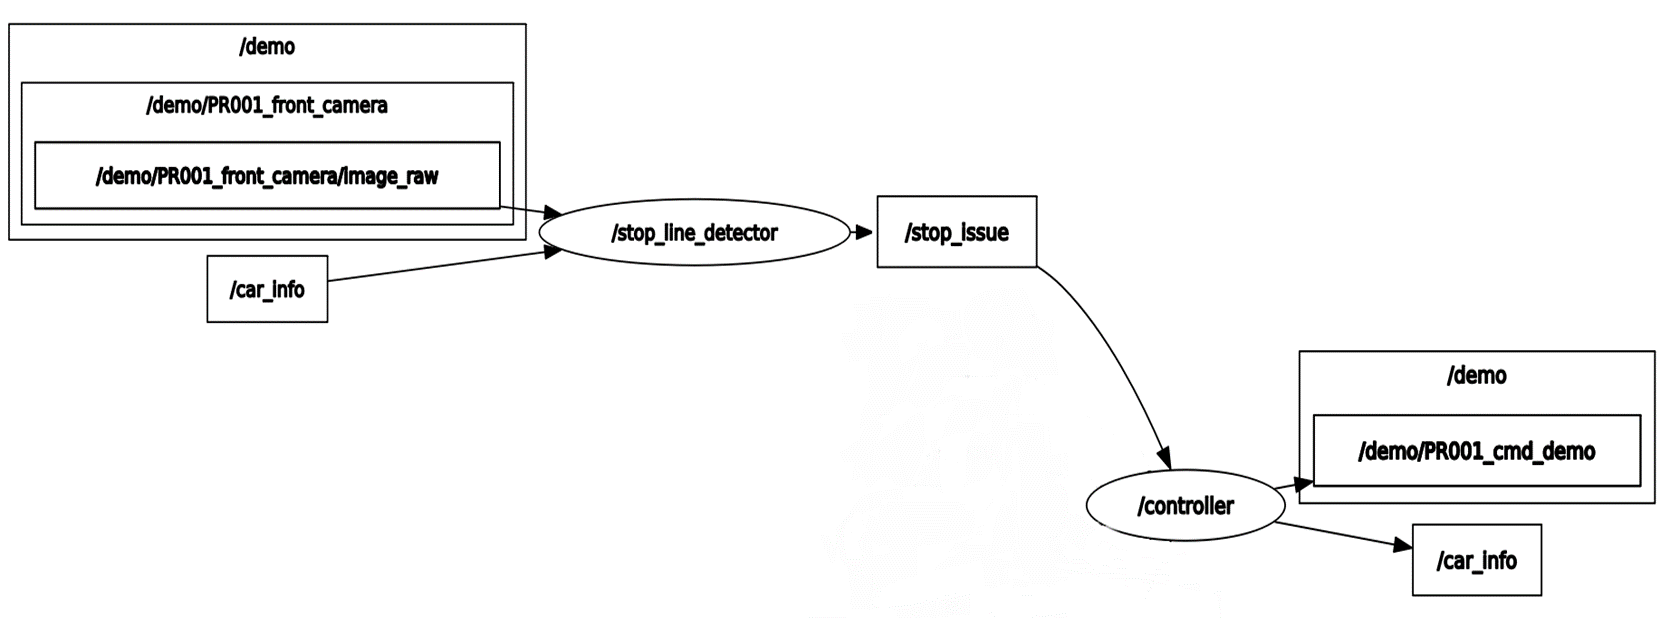
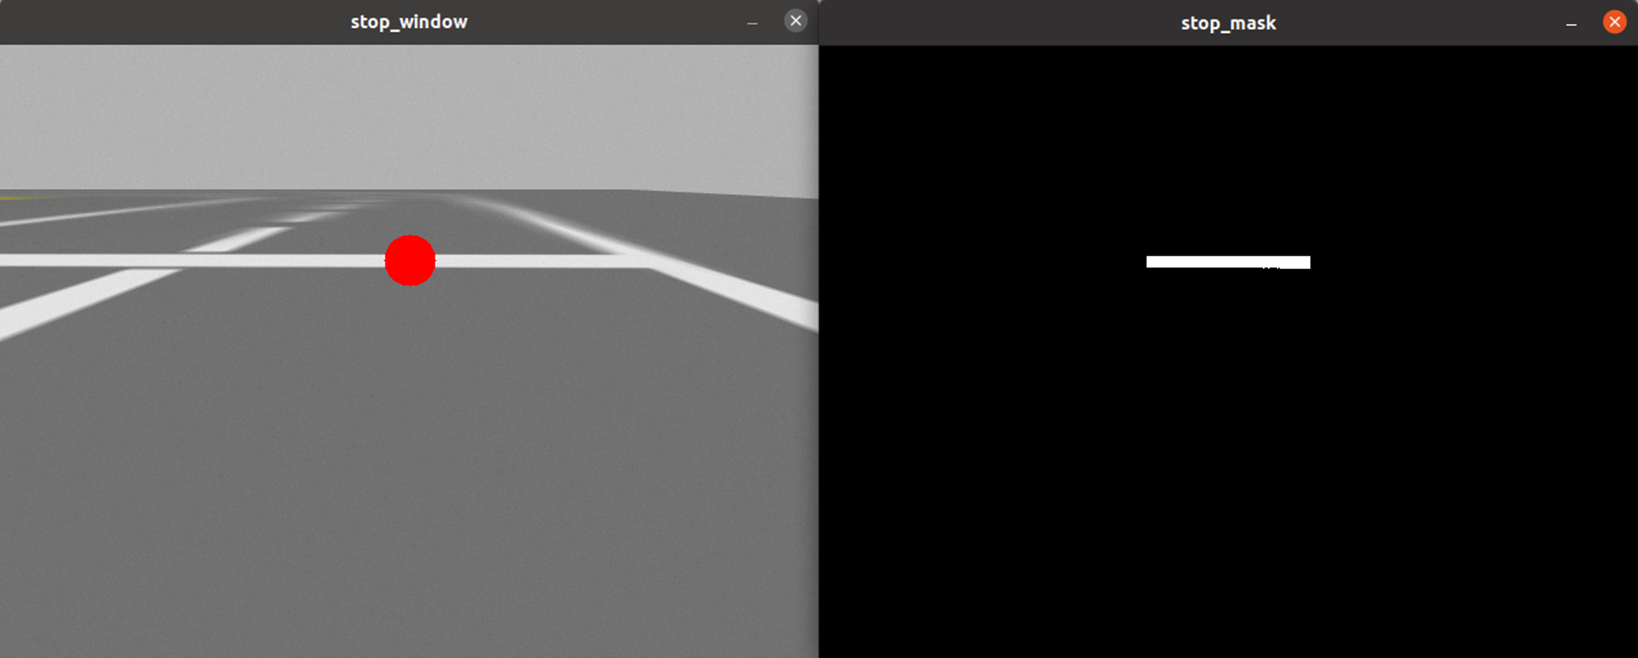
전방 카메라를 통해 정지선 인식
<line_tracker.py>
    def process(self, img: numpy.ndarray) -> None:
        hsv = cv2.cvtColor(img, cv2.COLOR_BGR2HSV)
        lower_white = numpy.array([0, 0, 200])
        upper_white = numpy.array([180, 255, 255])
        self._delta = None

        # 흰색 식별
        mask = cv2.inRange(hsv, lower_white, upper_white)

        h, w, d = img.shape
        search_top = int(13*h / 40)
        search_bot = int(25*h/40)

        # 마스킹
        mask[0:search_top, 0:w] = 0
        mask[search_bot:h, 0:w] = 0
        mask[0:h, 0:int(2 * w / 5)] = 0
        mask[0:h, int(3 * w / 5):w] = 0

        # 정지선 검출
        M = cv2.moments(mask)
        if M['m00'] > 0:
            cx = int(M['m10'] / M['m00'])
            cy = int(M['m01'] / M['m00'])
            cv2.circle(img, (cx, cy), 20, (0, 0, 255), -1)
            # BEGIN CONTROL
            err = abs(cx - w / 2)
            self._delta = err
            # END CONTROL
검출된 흰색 선의 중심이 카메라의 중심에 있는지로 정지선 인식
<stop_line_detector 노드>
def stop_line_image_callback(self, image: Image):
        # ros image를 opencv image로 변환
        img = self.bridge.imgmsg_to_cv2(image, desired_encoding='bgr8')

        # 이미지를 기반으로 정지선 검출
        self.stop_line_tracker.process(img)

        # 정지선 확인
        if self.stop_line_tracker._delta is not None and self.stop_line_tracker._delta < 3.0:
            msg = String()
            msg.data = '정지'
            self.stop_issue_publisher_.publish(msg)
        else:
            msg = String()
            msg.data = ''
            self.stop_issue_publisher_.publish(msg)
정지선 인식 결과를 바탕으로 controller 노드에게 메시지 전달
<controller 노드>
    def stop_issue_listener_callback(self, msg: String):
        # 언덕 정지선
        if msg.data == '정지' and not self.turn and not self.stop and self.count == 1:
            self.stop = True
            self.count += 1

            twist = Twist()
            twist.angular.y = 0.0

            # 차량이 밀리지 않도록
            for i in range(3500):
                twist.linear.x = 1.3
                self.twist_publisher_.publish(twist)
                time.sleep(0.001)

            self.stop = False

            # 차량 출발
            for i in range(2000):
                twist.linear.x = 6.0
                self.twist_publisher_.publish(twist)
                time.sleep(0.001)

        # 평지 정지선
        if msg.data == '정지' and not self.turn and not self.stop and self.count == 0:
            self.stop = True
            self.count += 1
            twist = Twist()

            # 3초간 정지
            for i in range(400):
                twist.linear.x = 0.0
                self.twist_publisher_.publish(twist)
                time.sleep(0.01)

            # 차량 출발
            for i in range(200):
                twist.linear.x = 6.0
                self.twist_publisher_.publish(twist)
                time.sleep(0.01)

            self.stop = False
테스트 트랙 한정으로 정지선 순서로 언덕구간 구분
언덕 구간에서는 차량이 뒤로 밀리지 않도록 계속하여 선속도를 1m/s로 전달
정지선 앞에서는 3초간 정지 후 출발


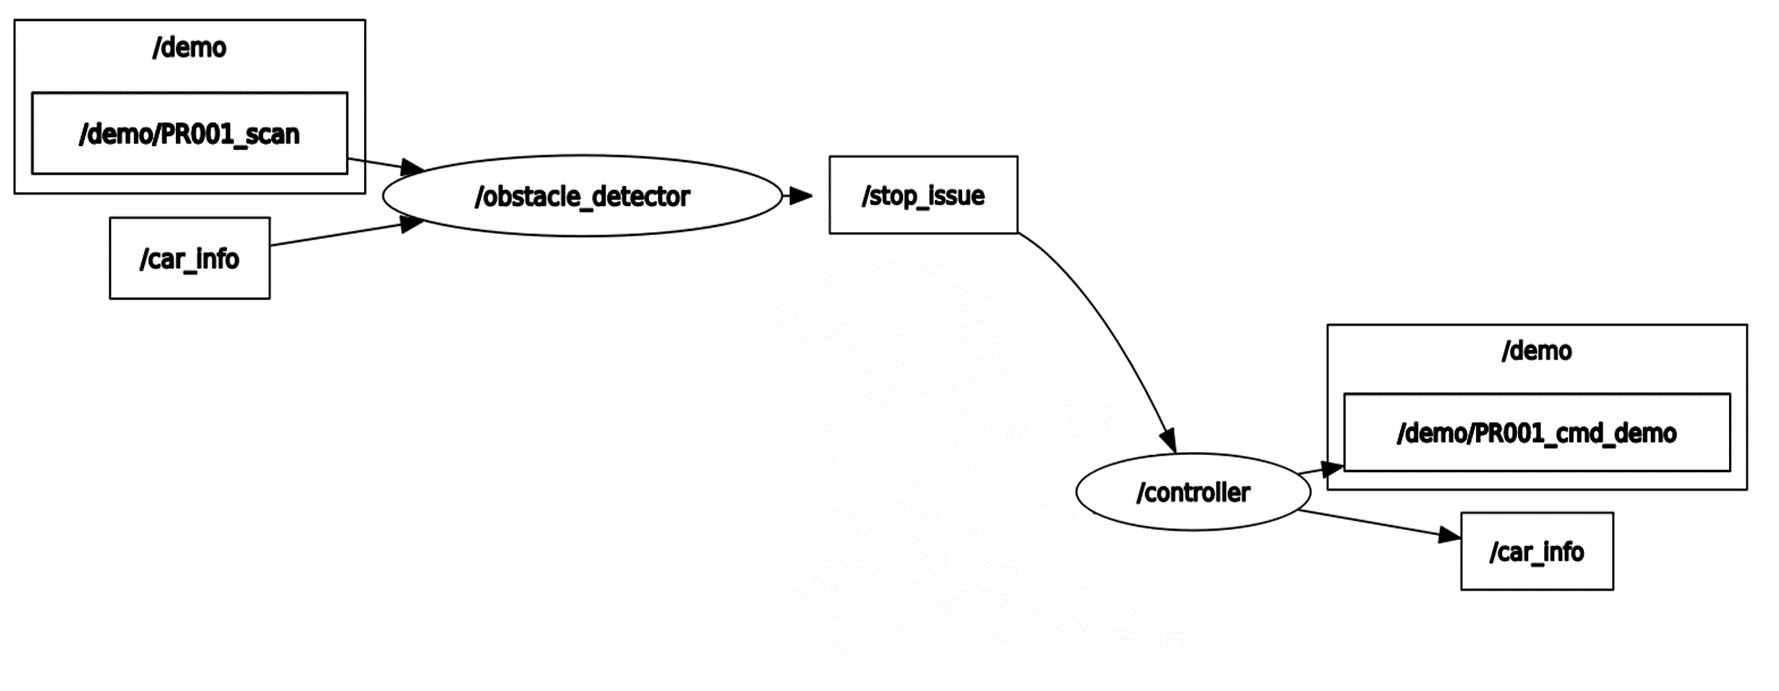
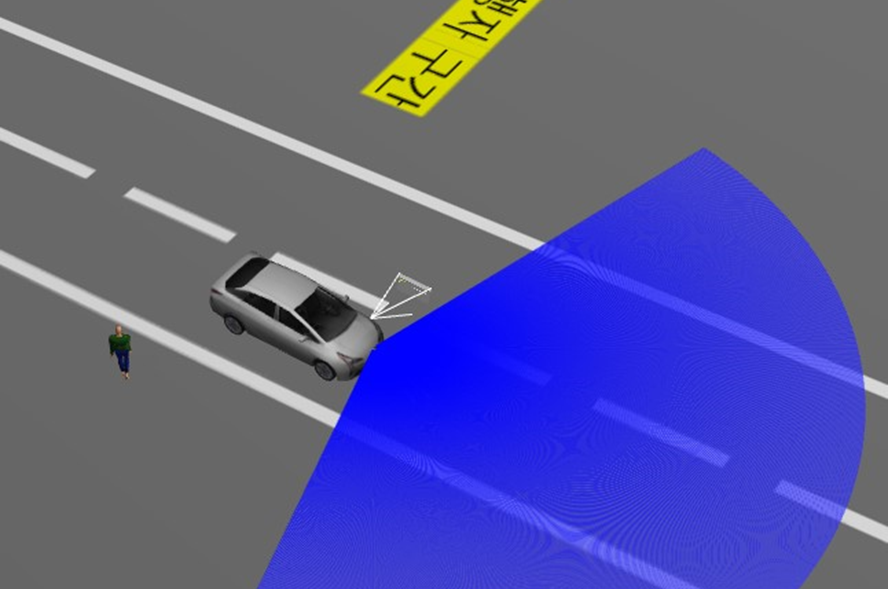
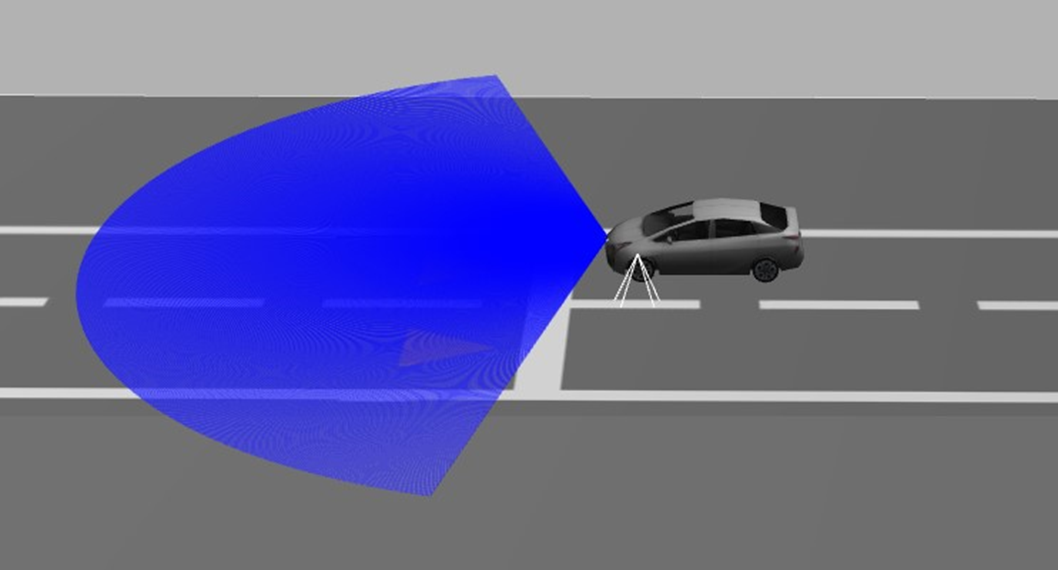
    def scan_callback(self, scan: LaserScan):
        msg = String()

        min_distance = min(scan.ranges)
        if min_distance < 12:
            self.get_logger().info('min_distance: %f' % min_distance)

        # 주행 범위에 장애물이 감지되면
        if min_distance <= 8.5:
            msg.data = '장애물 감지'
            self.obstacle_issue_publisher_.publish(msg)
            self.wait = True
            time.sleep(1)
            return

        if not self.wait:
            msg.data = ''
            self.obstacle_issue_publisher_.publish(msg)
            self.wait = False

        # 장애물이 지나갔을 시
        if self.wait and min_distance > 7.5:
            for i in range(20):
                msg.data = '이동 가능'
                self.obstacle_issue_publisher_.publish(msg)
                time.sleep(0.1)
            self.wait = False
            msg.data = ''
            self.obstacle_issue_publisher_.publish(msg)
            self.destroy_node()
            return
라이다를 통해 8.5m 이내에 물체가 감지되면 차량을 제어하는 controller 노드에 정지 메시지를 보내도록 했습니다.
정지 후 물체가 7.5m 밖으로 이동하게 되면 다시 이동할 수 있도록 하였습니다.
<controller 노드>
    def obstacle_issue_listener_callback(self, msg: String):
        # 장애물이 범위를 빠져나갔을 때
        if msg.data == '이동 가능' and self.obstacle_found:
            self.obstacle_found = False
            twist = Twist()
            for i in range(200):
                twist.linear.x = 6.0
                self.twist_publisher_.publish(twist)
                time.sleep(0.01)
            return
        if msg.data == '장애물 감지' and not self.obstacle_found:
            self.obstacle_found = True
            twist = Twist()
            for i in range(10):
                twist.linear.x = 0.0
                twist.angular.y = 0.0
                self.twist_publisher_.publish(twist)
                time.sleep(0.1)
controller 노드는 전달받은 메시지에 따라 차량을 제어한다.

<actor_detect.py>
    def process(self, img: np.ndarray) -> None:
        hsv = cv2.cvtColor(img, cv2.COLOR_BGR2HSV)
        # 보행자의 파란 바지
        lower_blue = np.array([110, 30, 30])
        upper_blue = np.array([130, 255, 255])

        self._delta = None

        # actor 식별
        mask = cv2.inRange(hsv, lower_blue, upper_blue)

        h, w, d = img.shape
        search_top = int(35*h / 120)

        # 마스킹
        mask[0:search_top, 0:w] = 0
        mask[0:h, 0:int(w / 15)] = 0
        mask[0:h, int(14 * w / 15):w] = 0


        # 보행자 위치 식별
        M = cv2.moments(mask)
        if M['m00'] > 0:
            cx = int(M['m10'] / M['m00'])
            cy = int(M['m01'] / M['m00'])
            cv2.circle(img, (cx, cy), 20, (0, 0, 0), -1)
            # BEGIN CONTROL
            err = abs(cx - w / 2)
            self._delta = err
            # END CONTROL
전방 카메라로 보행자의 파란 바지를 인식하여 보행자의 위치를 판단
<actor_detect_processor 노드>
    def actor_image_callback(self, image: Image):
        msg = String()

        # ros image를 opencv image로 변환
        img = self.bridge.imgmsg_to_cv2(image, desired_encoding='bgr8')

        # 이미지를 기반으로 보행자 감지
        self.actor_detector.process(img)

        # 보행자 감지
        if self.actor_detector._delta is not None and self.actor_detector._delta <= 230:
            msg.data = '보행자 감지'
            self.actor_issue_publisher_.publish(msg)
            self.wait = True

        if not self.wait:
            msg = String()
            msg.data = ''
            self.actor_issue_publisher_.publish(msg)
            self.wait = False

        # 보행자가 지나갔을 때
        if self.wait and self.actor_detector._delta is not None and self.actor_detector._delta > 230:
            for i in range(20):
                msg.data = '이동 가능'
                self.actor_issue_publisher_.publish(msg)
                time.sleep(0.1)

            self.wait = False

        if self.wait and self.actor_detector._delta is None:
            for i in range(20):
                msg.data = '이동 가능'
                self.actor_issue_publisher_.publish(msg)
                time.sleep(0.1)

            self.wait = False
보행자의 위치에 따라 정지 또는 주행에 대한 메시지를 차량을 제어하는 controller 노드에 전달
<controller 노드>
    def actor_issue_listener_callback(self, msg: String):
        #보행자가 지나갔을 시
        if self.obstacle_found and msg.data == '이동 가능':
            self.obstacle_found = False
            self.get_logger().info('보행자 통과')
            twist = Twist()
            for i in range(200):
                twist.linear.x = 6.0
                self.twist_publisher_.publish(twist)
                time.sleep(0.01)

        if msg.data == '보행자 감지' and not self.turn:
            self.obstacle_found = True
            twist = Twist()
            for i in range(10):
                twist.linear.x = 0.0
                self.twist_publisher_.publish(twist)
                time.sleep(0.1)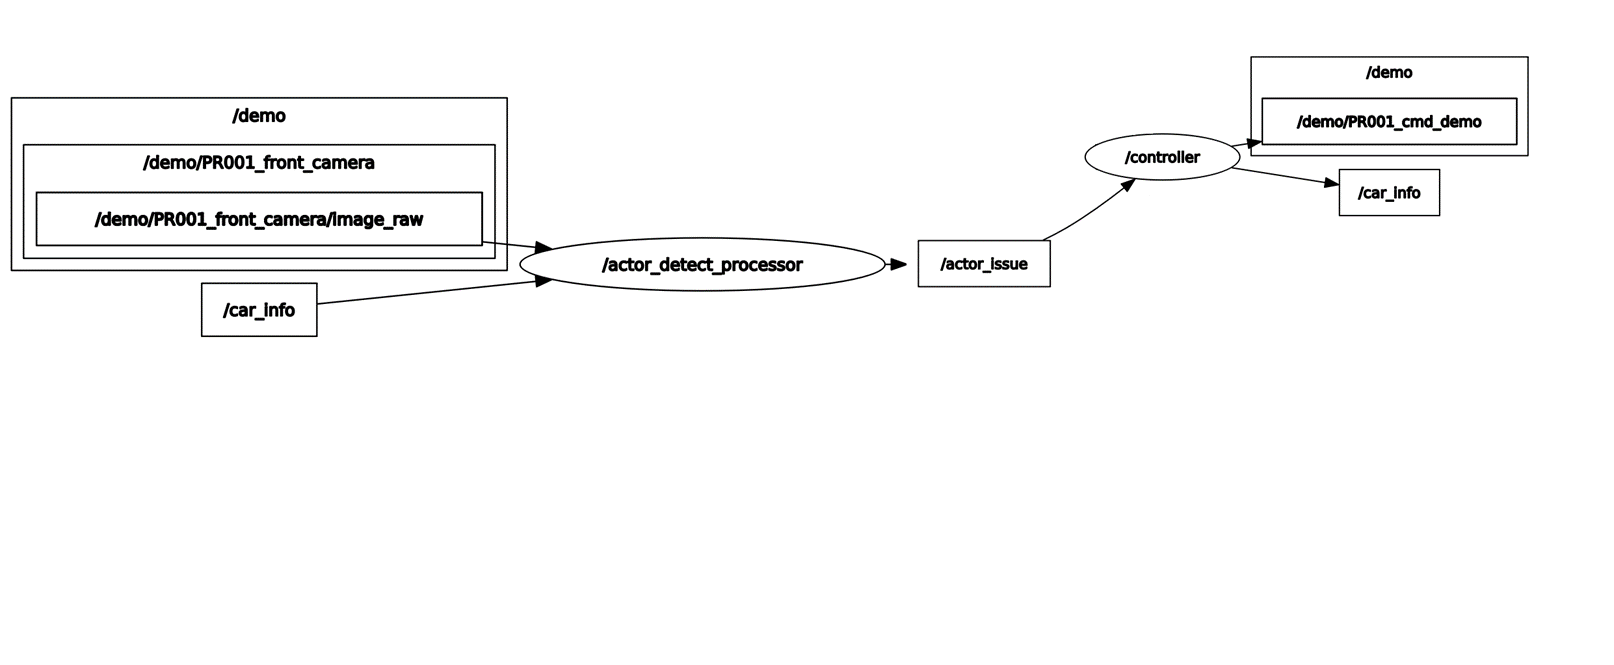

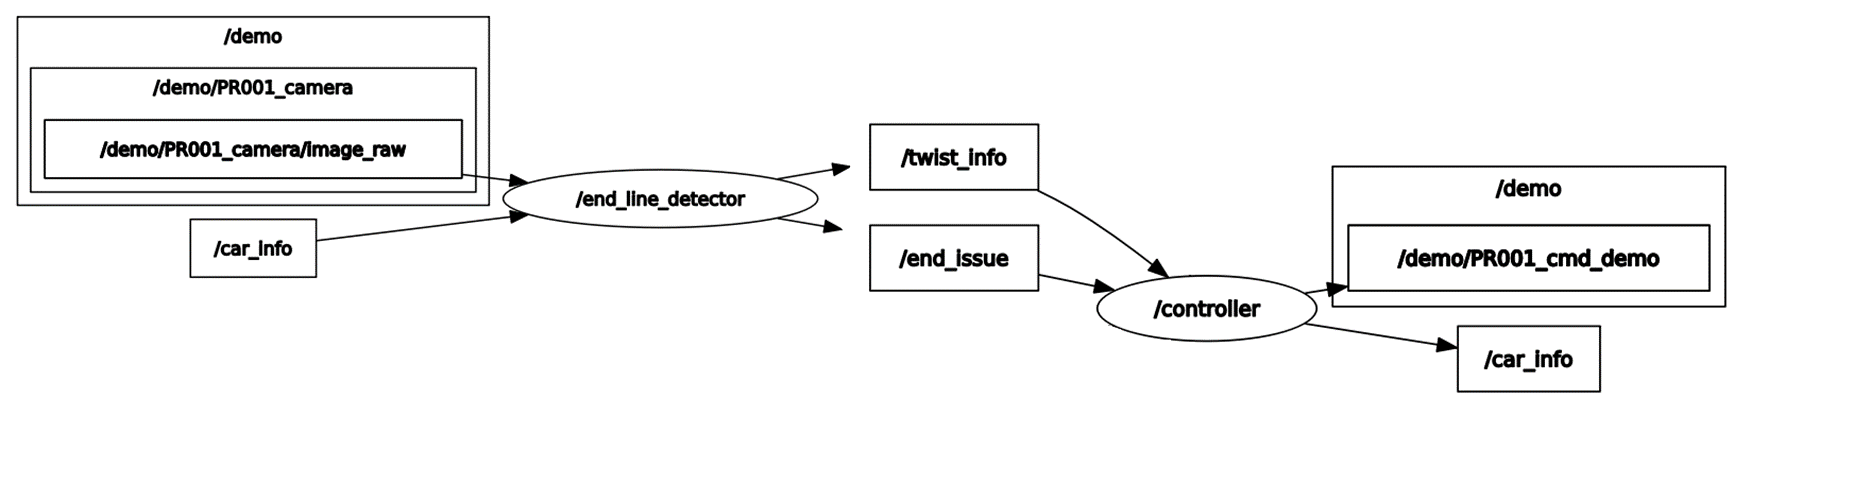
<end_line_tracker.py>
    def process(self, img: numpy.ndarray) -> None:
        hsv = cv2.cvtColor(img, cv2.COLOR_BGR2HSV)

        # 노란색 종료 지점 마크
        lower_yellow = numpy.array([20, 200, 200])
        upper_yellow = numpy.array([30, 255, 250])

        # 노란색 식별
        mask = cv2.inRange(hsv, lower_yellow, upper_yellow)

        h, w, d = img.shape
        search_bot = int(4*h / 7)

        # 마스킹
        mask[search_bot:h, 0:w] = 0
        mask[0:h, 0:int(w / 4)] = 0
        mask[0:h, int(2 * w / 3):w] = 0

        # 종료선 검출
        M = cv2.moments(mask)
        if M['m00'] > 0:
            cx = int(M['m10'] / M['m00'])
            cy = int(M['m01'] / M['m00'])
            cv2.circle(img, (cx, cy), 20, (255, 0, 0), -1)
            # BEGIN CONTROL
            err = abs(cx - w/2)
            self._delta = err
            # END CONTROL
전방 카메라를 통해 종료 지점에 있는 노란색 마크를 인식
<end_line_detector 노드>
    def end_line_image_callback(self, image: Image):
        # ros image를 opencv image로 변환
        img = self.bridge.imgmsg_to_cv2(image, desired_encoding='bgr8')

        # 이미지를 기반으로 종료선 검출
        self.end_line_tracker.process(img)

        #종료선 확인
        if self.end_line_tracker._delta is not None and self.end_line_tracker._delta < 30:
            msg = String()

            msg.data = '종료'
            self.end_issue_publisher_.publish(msg)
일정 거리에 종료 마크가 인식되면 차량을 제어하는 controller 노드에 종료 메시지를 전달
<controller 노드>
    def end_issue_listener_callback(self, msg: String):
        if msg.data == '종료' and not self.turn:
            self.stop = True
            twist = Twist()

            # 정지선 1m 이내 정차
            for i in range(200):
                twist.linear.x = 2.0
                self.twist_publisher_.publish(twist)
                time.sleep(0.01)

            twist.linear.x = 0.0
            twist.angular.z = 0.0
            self.twist_publisher_.publish(twist)
            self.get_logger().info('종료')

            # 테스트 종료
            self.destroy_node()
            return
정지선 1m 이내에 정차하고 controller 노드를 정지하며 테스트 종료


<test_track.world>
<plugin name='PR001_ackermann_drive' filename='libgazebo_ros_ackermann_drive.so’>
<max_speed>6</max_speed>
차량은 ackermann drive 방식을 사용하는 prius hybrid 모델을 사용하였으며 플러그인을 통해 최대 속도를 6m/s로 제한하였다.

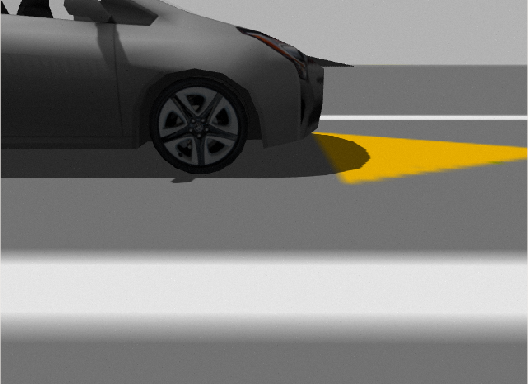
        <sensor name='PR002_camera' type='camera'>
          <always_on>1</always_on>
          <visualize>1</visualize>
          <update_rate>30</update_rate>
          <camera name='picam'>
            <horizontal_fov>1.0856</horizontal_fov>
            <image>
              <width>640</width>
              <height>480</height>
              <format>R8G8B8</format>
            </image>
            <clip>
              <near>0.03</near>
              <far>100</far>
            </clip>
            <noise>
              <type>gaussian</type>
              <mean>0</mean>
              <stddev>0.007</stddev>
            </noise>
          </camera>
          <plugin name='PR002_camera_driver' filename='libgazebo_ros_camera.so'>
            <ros>
              <namespace>demo</namespace>
              <remapping>image_raw:=PR002_image_raw</remapping>
              <remapping>camera_info:=PR002_camera_info</remapping>
            </ros>
            <cameraName>PR002_camera</cameraName>
            <frameName>camera_rgb_optical_frame</frameName>
            <hackBaseline>0.07</hackBaseline>
            <distortionK1>0.0</distortionK1>
            <distortionK2>0.0</distortionK2>
            <distortionK3>0.0</distortionK3>
            <distortionT1>0.0</distortionT1>
            <distortionT2>0.0</distortionT2>
          </plugin>
        </sensor>
카메라는 전방 카메라와 측면 카메라 2대로 구성했으며, 전방 카메라는 장애물 인식, 정지선 인식, 종료 지점 인식을 위해 사용되며, 측면 카메라는 차선 유지를 위해 사용되어진다.

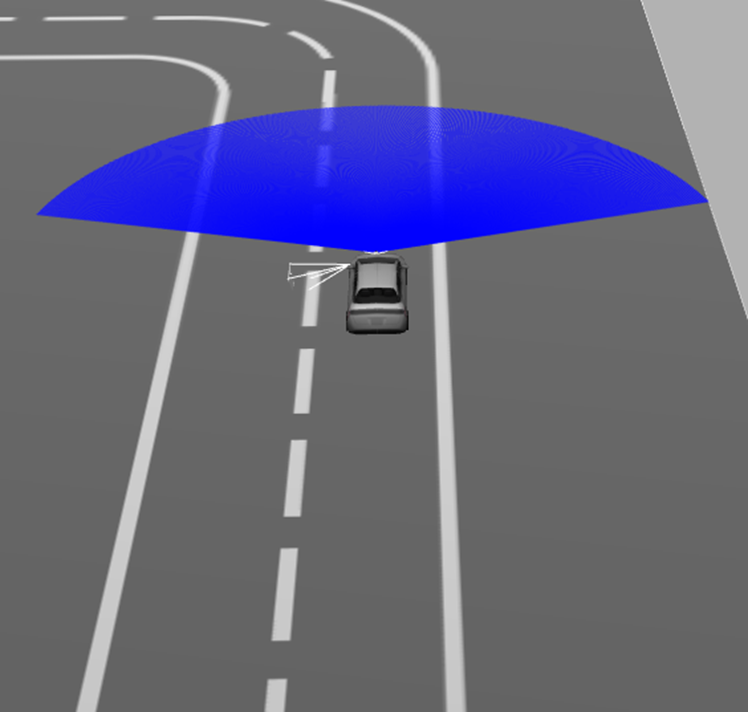
        <sensor name='laser' type='ray'>
          <ray>
            <scan>
              <horizontal>
                <samples>160</samples>
                <resolution>5</resolution>
                <min_angle>-1.3</min_angle>
                <max_angle>1.3</max_angle>
              </horizontal>
              <vertical>
                <samples>1</samples>
                <min_angle>0</min_angle>
                <max_angle>0</max_angle>
              </vertical>
            </scan>
            <range>
              <min>0.08</min>
              <max>12</max>
              <resolution>0.2</resolution>
            </range>
          </ray>
          <plugin name='PR002_laser' filename='libgazebo_ros_ray_sensor.so'>
            <ros>
              <namespace>demo</namespace>
              <remapping>~/out:=PR002_scan</remapping>
            </ros>
            <frame_name>hokuyo_link</frame_name>
            <output_type>sensor_msgs/LaserScan</output_type>
          </plugin>
          <always_on>1</always_on>
          <update_rate>5</update_rate>
          <visualize>1</visualize>
        </sensor>
라이다의 인식 좌우 범위는 -1.3에서 1.3으로 설정했으며 최소 0.08m 최대 12m까지 인식할 수 있게 했다.
가제보의 actor를 사용할 경우 즉, 이 프로젝트에서 보행자를 라이다로 인식하려는 경우 라이다의 타입을 gpu_ray로 사용하면 된다.

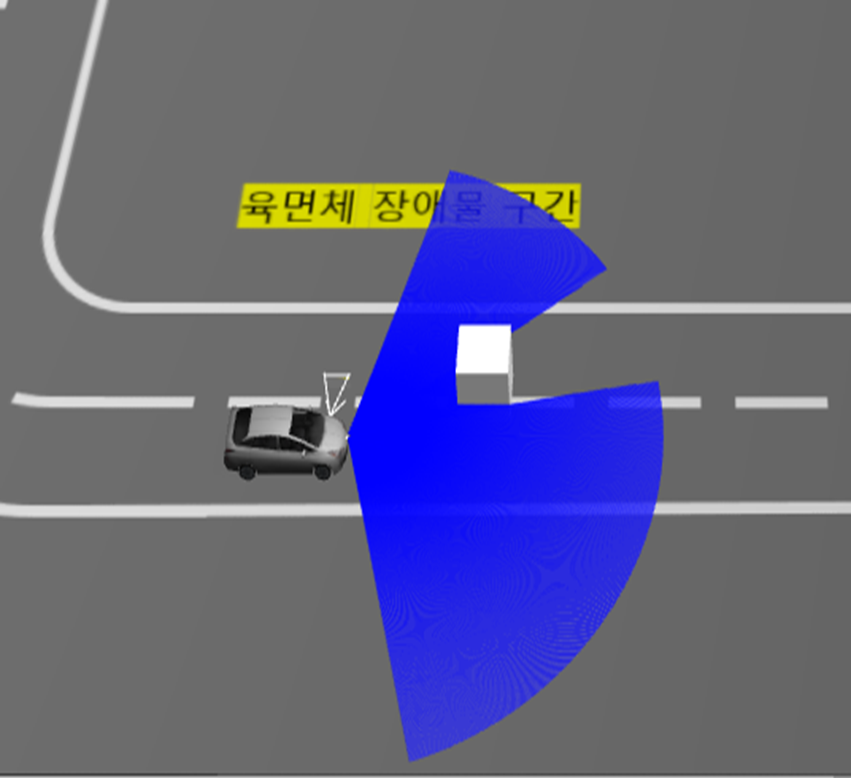
<test_track.world>
<model name="moving_box">
      <pose>40 -70.0 0.05 0 0 0</pose>
      <link name="link">
        <collision name= "collision">
          <geometry>
            <box>
              <size>2 2 2</size>
            </box>
          </geometry>
        </collision>
        <visual name="visual">
          <geometry>
            <box>
              <size>2 2 2</size>
            </box>
          </geometry>
        </visual>
      </link>
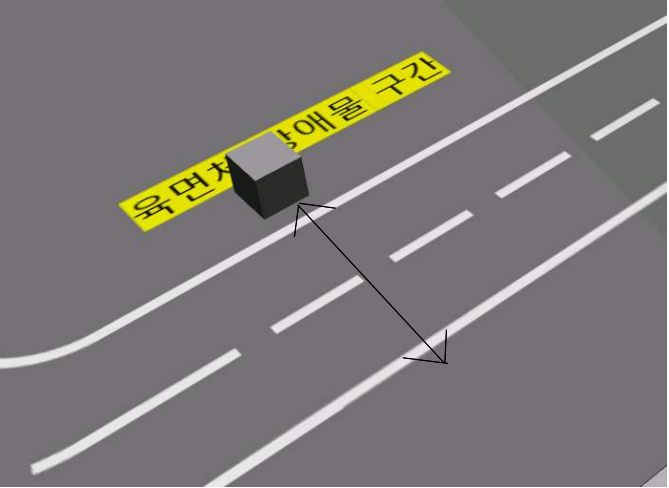
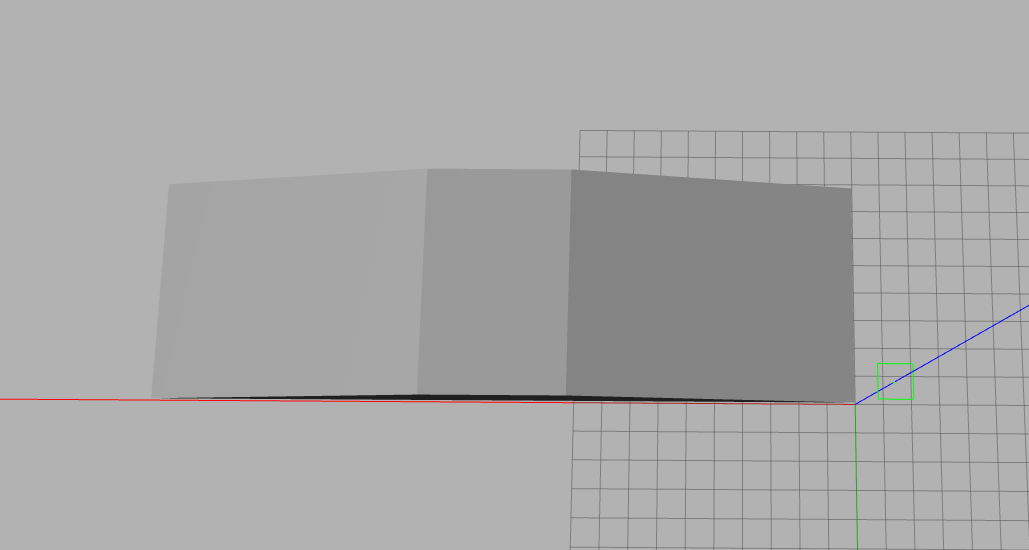
가로, 세로, 높이 각 2m로 육면체 장애물 모델을 구성하였다.
<plugin name='planar_move' filename='libgazebo_ros_planar_move.so'>
        <ros>
          <namespace>demo</namespace>
          <remapping>cmd_vel:=box_cmd_demo</remapping>
          <remapping>odom:=box_odom_demo</remapping>
        </ros>
</plugin>
planar_move 플러그인을 통해 육면체가 이동할 수 있게 하였고
<box_controller 노드>
class BoxController(Node):

    def __init__(self):
        super().__init__('box_controller')

        # 박스에 속도 정보를 전달할 publisher
        self.publisher_ = self.create_publisher(Twist, '/demo/box_cmd_demo', 10)

        # 박스의 위치 정보를 받을 subscription
        self.subscription_ = self.create_subscription(Odometry, '/demo/box_odom_demo', self.listener_callback, 10)

        timer_period = 0.1  # seconds
        self.timer = self.create_timer(timer_period, self.timer_callback)

        self.direction = 1
        self.msg = Twist()
        # 박스 위치
        self.y = None

    def listener_callback(self, odom: Odometry):
        self.y = odom.pose.pose.position.y

        # 박스가 차선을 왕복할 수 있도록
        if self.direction == 1 and self.y > -62:
            self.direction *= -1
        if self.direction == -1 and self.y < -79:
            self.direction *= -1

    def timer_callback(self):
        self.msg.linear.y = 2.0 * self.direction
        self.publisher_.publish(self.msg)
육면체가 2m/s의 속도 움직이게 하며 육면체의 odometry 정보를 받아와 차선을 왕복하는 것을 반복하게 하였다.


<test_track.world>
 <actor name="actor_walking">
          <skin>
            <filename>walk.dae</filename>
          </skin>
          <animation name="walk">
            <filename>walk.dae</filename>
            <interpolate_x>true</interpolate_x>
          </animation>
          <script>
            <trajectory id="0" type="walk" tension="0.6">
                <waypoint>
                    <time>0</time>
                    <pose>127 -41 0 0 0 0</pose>
                </waypoint>
                <waypoint>
                    <time>10</time>
                    <pose>138 -41 0 0 0 0</pose>
                </waypoint>
                <waypoint>
                    <time>11</time>
                    <pose>138 -41 0 0 0 -3.0</pose>
                </waypoint>
                <waypoint>
                    <time>21</time>
                    <pose>127 -41 0 0 0 -3.0</pose>
                </waypoint>
                <waypoint>
                    <time>22</time>
                    <pose>127 -41 0 0 0 0</pose>
                </waypoint>
            </trajectory>
          </script>
보행자는 가제보의 actor를 활용해 구성했으며 1.1m/s의 속도로 차선을 왕복하는 것을 반복하도록 하였다.

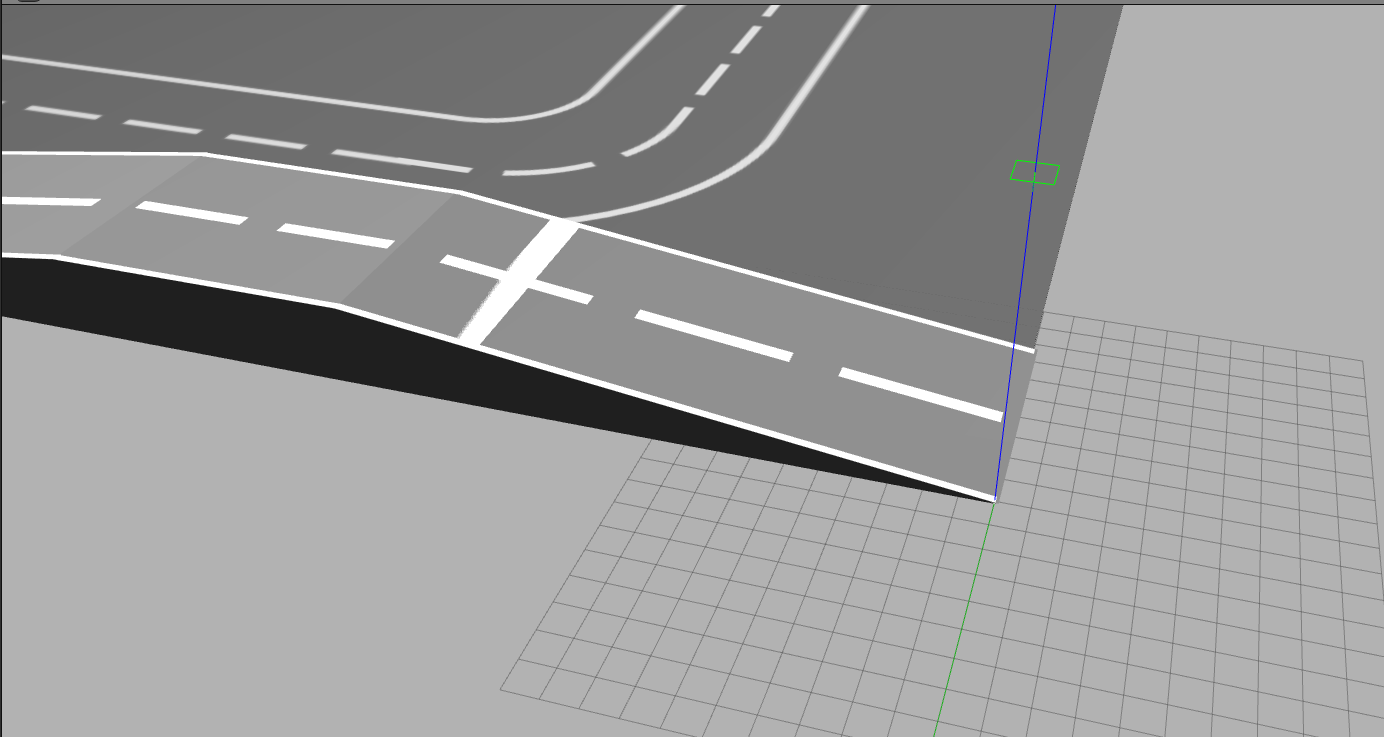
언덕 구간은 3D 모델링을 통해 STL 파일로 만든 뒤 차선과 정지선을 적용해서 가제보 시뮬레이션 환경 상에 추가하였습니다.

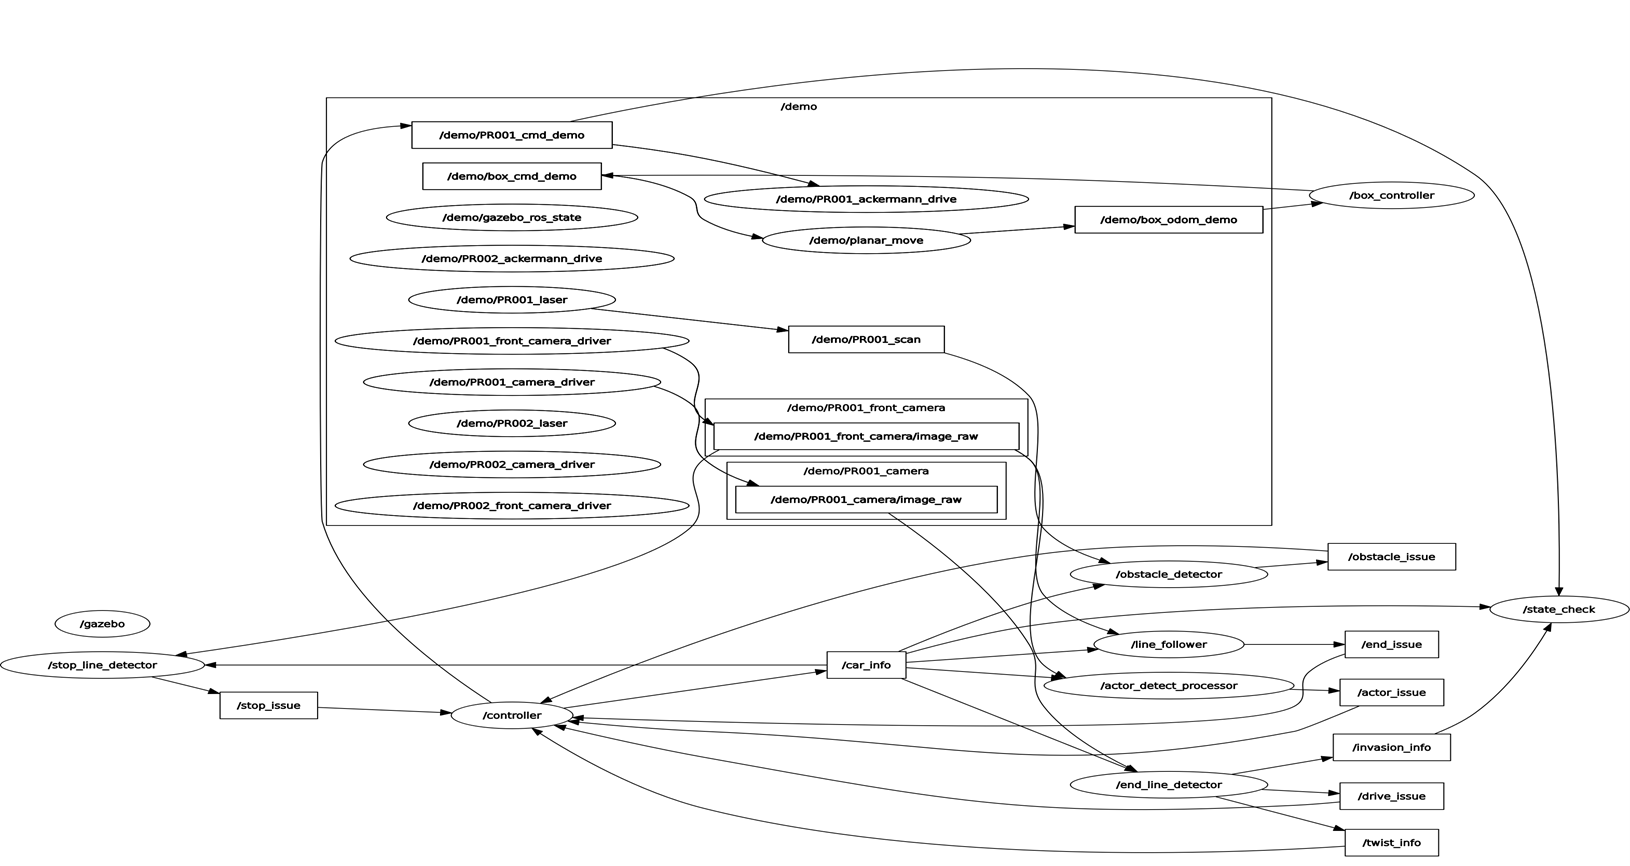
노드 구성도
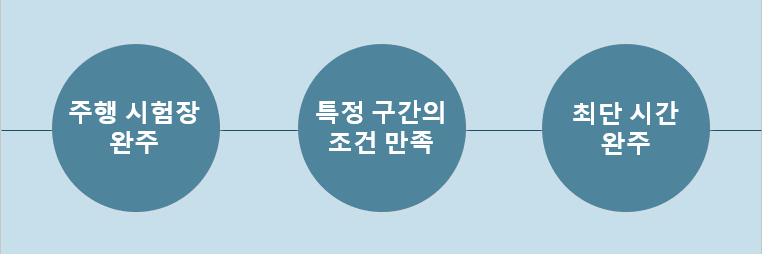
1. 주행 시험장 완주
주행 영상에서 볼 수 있듯이 차량은 모든 구간을 통과하여 종료 지점까지 완주하였다.
2. 특정 구간의 조건 만족
출발 및 차선 유지

지정된 차량이 출발할 수 있게 했으며 전체 구간동안 차선을 유지하며 주행할 수 있게 하였다.
정지선
평지 정지선, 언덕 정지선 모두 1m 이내에 정차 후 3초간 기다린 뒤 출발할 수 있게 하였다.
육면체 장애물
장애물을 인식하고 정차 후 장애물이 주행 경로 상에서 빠져나갔을 경우 이동하게 하였다.
보행자
보행자를 인식하고 정차 후 보행자가 주행 경로 상에서 빠져나갔을 경우 이동하게 하였다.
종료 지점
종료 마크를 인식하고 1m 이내에 정차 후 테스트를 종료할 수 있게 하였다.

주행 시간도 준수하게 기록하였다.

안녕하세요~ 저도 gazebo와 ros2를 사용해서 자율주행 시뮬레이션 프로젝트를 진행 중입니다. 궁금한 점이 있어 댓글 남깁니다.
혹시 가제보에서 제공하는 prius_hybrid 모델을 사용하신 거 같은데, 이 모델을 ros로 직접 제어하신 건가요? 저는 이 모델에 ros2 플러그인을 추가해서 키보드 명령으로 움직이는 것 말고, 터미널에서 ros2 topic pub ~ 명령어로 제어하는 걸 시도하고 있는데, 모델이 움직이지를 않아서요,,ㅎ
혹시 어떤 방식으로 차량 제어하셨는지 알려주실 수 있나요?