
Overview
리액트는 보는 디자인과 만드는 앱에 대한 당신의 생각을 바꿀 수 있다. 리액트로 사용자 인터페이스를 구축할 때 먼저 컴포넌트라는 조각으로 분리한다. 그리고 컴포넌트마다 다른 상태를 설명한다. 마지막으로 데이터가 컴포넌트를 통해 흐르도록 구성 요소를 함께 연결한다. 이 튜토리얼에서는 리액트로 검색 가능한 제품 데이터 테이블을 구축하는 사고 과정을 안내한다.
Start with the mockup
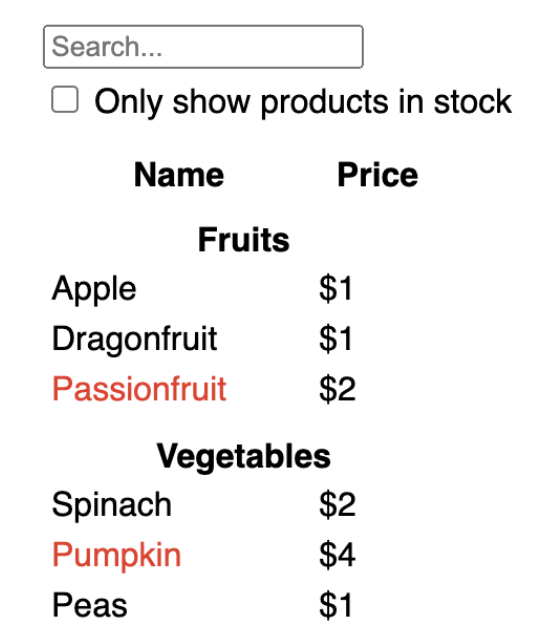
이미 JSON API와 목업을 디자이너한테 받았다고 상상해라
JSON API는 다음과 같이 생겼다
[
  { category: "Fruits", price: "$1", stocked: true, name: "Apple" },
  { category: "Fruits", price: "$1", stocked: true, name: "Dragonfruit" },
  { category: "Fruits", price: "$2", stocked: false, name: "Passionfruit" },
  { category: "Vegetables", price: "$2", stocked: true, name: "Spinach" },
  { category: "Vegetables", price: "$4", stocked: false, name: "Pumpkin" },
  { category: "Vegetables", price: "$1", stocked: true, name: "Peas" }
]
목업은 다음과 같이 생겼다
- 리액트로 UI를 구현하기 위해 5가지 과정을 거치게 된다.
Step 1: Break the UI into a component hierarchy
목업의 모든 컴포넌트와 서브 컴포넌트의 박스를 그리고 이름을 붙이는 거부터 시작한다. 만약 디자이너와 협업을 한다면 디자이너들은 이미 디자인 툴에 컴포넌트에 이름을 붙여놨을 것이다. 물어봐라.
경험에 따라 다양한 방법으로 컴포넌트들을 분리하여 디자인하는 방법을 생각할 것이다.
- Programming : 새로운 함수나 객체를 생성을 결정할 때 같은 기술을 사용한다. 이 기술들 중 하나는 단일 책임 원칙이다. 즉, 컴포넌트는 이상적으로 하나의 일만 한다는 것이다. 이게 끝나면 더 작은 서브 컴포넌트로 나눠야 한다.
- CSS - 클래스를 만들 대상을 고려해야한다. ( 하지만 컴포넌트들이 아직 덜 세분화 되었다. )
- Design - 디자인 레이어를 구성할 방법을 고려해라
JSON이 잘 구조화되었다면 자연스레 UI 컴포넌트에 매핑이 된다. 왜냐하면 UI와 데이터 모델은 보통 동일한 아키텍처, 동일한 현태를 갖기 때문이다. 각 구성 요소가 데이터 모델의 한 부분과 일치하는 구성 요소로 UI를 나눠라.
컴포넌트 다섯개로 나눌 수 있다
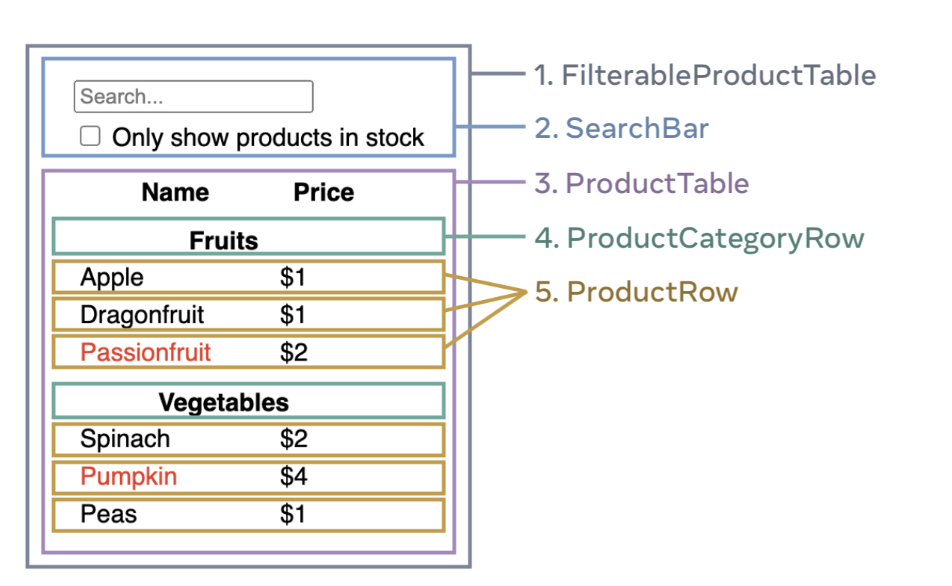
1. FilterableProductTable (grey) : 앱 전체를 감싸는 부분
2. SearchBar (blue) : 유저의 입력을 받는 부분
3. ProductTable (lavender) :사용자 입력에 따라 나열하고 필터링하는 부분
4. ProductCategoryRow (green) : 각 카테고리의 헤더
5. ProductRow (yellow) : 상품을 행으로 나열하는 부분
헤더에서 “Name”과 “Price” 라벨을 가지고 있는 ProductTable (lavender)은 자신의 컴포넌트가 없다. 이건 선호하는 방법의 차이이며 선택하면 된다. 예를 들어 ProductTable 의 일부로 보고 거기 포함시켜도 되고, 반대로 추 후 복잡해질 가능성(정렬을 추가하는 등)을 두고 ProductTableHeader 로 만들어도 된다.
목업에서 컴포넌트를 식별했으므로 계층 구조로 정렬한다. 목업의 컴포넌트 내에 나타나는 컴포넌트는 계층 구조에서 자식으로 나타나야한다
FilterableProductTableSearchBarProductTableProductCategoryRowProductRow
Step 2: Build a static version in React
계층 구조의 컴포넌트로 앱을 구현할 차례이다. 가장 간단한 접근 방법은 interactivity를 추가하지 않고 데이터 모델을 UI에 렌더링하는 버전을 빌드하는 것이다. 보통 일단 정적인 버전을 먼저 빌드하고 interactivity를 추가하는 것이 쉽다. 정적 버전을 빌드하는 것은 생각없이 많은 타이핑이 요구된다. 하지만 interactivity를 추가하는 건 많지 않은 타이핑과 많은 생각이 요구된다.
데이터 모델을 렌더링하는 앱의 정적 버전을 빌드하려면 컴포넌트를 재사용하고 데이터를 전달하는 prop를 빌드해야한다. Props는 데이터를 부모에서 자식으로 전달하는 방법이다. (만약, 너가 state 컨셉에 익숙하다면 정적 버전을 빌드하는데 state를 사용하지마라. State는 interactivity, 즉 시간에 따라 변경되는 데이터에 사용된다. 그래서 정적 버전에서는 필요없다.)
FilterableProductTable 부터 빌드하는 (계층 구조에서 높은 컴포넌트부터) “하향식” 빌드를 하거나 ProductRow 부터 빌드하는 (계층 구조에서 낮은 컴포넌트부터) “상향식” 빌드를 할 수 있다. 간단한 예로, 일반적으로 “하향식”으로 진행하는 것이 쉽고, 대규모 프로젝트에서는 “상향식”으로 진행하는 것이 더 쉽다.
function ProductCategoryRow({ category }) {
  return (
    <tr>
      <th colSpan="2">
        {category}
      </th>
    </tr>
  );
}

function ProductRow({ product }) {
  const name = product.stocked ? product.name :
    <span style={{ color: 'red' }}>
      {product.name}
    </span>;

  return (
    <tr>
      <td>{name}</td>
      <td>{product.price}</td>
    </tr>
  );
}

function ProductTable({ products }) {
  const rows = [];
  let lastCategory = null;

  products.forEach((product) => {
    if (product.category !== lastCategory) {
      rows.push(
        <ProductCategoryRow
          category={product.category}
          key={product.category} />
      );
    }
    rows.push(
      <ProductRow
        product={product}
        key={product.name} />
    );
    lastCategory = product.category;
  });

  return (
    <table>
      <thead>
        <tr>
          <th>Name</th>
          <th>Price</th>
        </tr>
      </thead>
      <tbody>{rows}</tbody>
    </table>
  );
}

function SearchBar() {
  return (
    <form>
      <input type="text" placeholder="Search..." />
      <label>
        <input type="checkbox" />
        {' '}
        Only show products in stock
      </label>
    </form>
  );
}

function FilterableProductTable({ products }) {
  return (
    <div>
      <SearchBar />
      <ProductTable products={products} />
    </div>
  );
}

const PRODUCTS = [
  {category: "Fruits", price: "$1", stocked: true, name: "Apple"},
  {category: "Fruits", price: "$1", stocked: true, name: "Dragonfruit"},
  {category: "Fruits", price: "$2", stocked: false, name: "Passionfruit"},
  {category: "Vegetables", price: "$2", stocked: true, name: "Spinach"},
  {category: "Vegetables", price: "$4", stocked: false, name: "Pumpkin"},
  {category: "Vegetables", price: "$1", stocked: true, name: "Peas"}
];

export default function App() {
  return <FilterableProductTable products={PRODUCTS} />;
}
컴포넌트 빌드 후 데이터 모델을 렌더링하는 재사용 가능한 라이브러리가 생긴다. 왜냐하면 JSX를 반환하는 정적인 앱이기 때문이다. 컴포넌트 계층에서 최상단 FilterableProductTable 컴포넌트는 prop으로 데이터 모델을 사용한다. 데이터가 최상위 컴포넌트에서 맨 아래로 흐르기 때문에 이라고 한다.
Step 3: Find the minimal but complete representation of UI state
UI를 대화형으로 만들려면 사용자가 기본 데이터 모델을 변경할 수 있도록 해야한다. 이때 state를 사용한다.
state는 앱이 기억해야 하는 최소한의 데이터 변경 세트라고 생각해라. state 구조화에서 가장 중요한 것은 DRY를 유지하는 것이다. 앱에서 필요한 state의 절대적 최소 표현을 파악하고 주문형으로 다른 모든 것들을 계산한다. 예를 들어, 쇼핑 리스트를 만들 때, state에 항목을 배열로 저장할 수 있다. 이 때 항목의 수를 표시하려면 다른 state에 항목 수를 저장하지말고 배열의 길이를 읽으면 된다.
이제 예제 앱의 모든 데이터 조각을 생각해봐라
- The original list of products (원래 제품 목록)
- The search text the user has entered (사용자가 입력한 검색 텍스트)
- The value of the checkbox (체크박스의 값)
- The filtered list of products (필터링된 상품들)
이 중 state는 어떤 것일까 그렇지 않은 것을 찾아라 :
- 시간이 지나도 변경되지 않는다? state가 아니다.
- props로 부모로부터 전달된다? state가 아니다
- 컴포넌트에서 state나 props 기반으로 계산할 수 있다? 그러면 확실히 state가 아니다
위를 제외하고 남은 것들이 state이다.
하나씩 살펴보면 :
- 제품 목록은 props로 전달되므로 state가 아니다
- 검색 텍스트는 시간이 지남에 따라 변경되고 어떤 것에서도 계산할 수 없기 때문에 state일 것 같다
- 체크박스 값도 시간이 지남에 따라 변경되고 어떤 것에서도 계산할 수 없기 때문에 state일 것 같다
- 필터링된 상품들은 원래 제품 목록에서 검색 텍스트와 체크박스 값에 따라 필터링하여 계산할 수 있기 때문에 state가 아니다
검색 텍스트와 체크박스 값만 state이다.
Step 4: Identify where your state should live
앱의 최소 state를 확인한 다음, state를 변경하거나 state를 소유하는 컴포넌트를 식별해야한다. 리액트는 부모에서 자식으로 데이터를 전달하는 단방향 데이터 흐름이란 것을 기억해라. 어떤 컴포넌트가 state를 소유해야하는지 명확하지 않을 수 있다. 이 컨셉이 처음이라면 어려울 수 있지만 다음 단계를 따르면 알아낼 수 있다.
해당 앱의 state :
- 해당 state를 기반으로 어떤 것을 렌더링하는 컴포넌트를 식별
- 계층 구조에서 가장 위에 있는 컴포넌트인 가장 가까운 공통 상위 컴포넌트를 찾는다.
- state를 어디 둬야할지 결정한다.
- 보통 공통 상위 컴포넌트에 state를 나둔다.
- 공통 부모 위에 있는 일부 컴포넌트에 넣을 수도 있다
- 만약 어디에 state는 넣어야할지 잘 모르겠다면 state를 넣은 새로운 컴포넌트를 만들고 공통 부모 컴포넌트 위 어딘가에 넣는다.
그 전에 이 앱에서 두가지 state를 찾았다. (입력 텍스트와 체크박스 값) 이 예시에서 항상 같이 출력되고, 그래서 같은 곳에 넣는게 좋다.
이제 어떻게 할지 전략을 짜보겠다.
- state를 사용하는 컴포넌트를 식별한다.
ProductTable은 입력 텍스트와 체크박스 값으로 필터링된 목록을 필요로 한다.SearchBar은 입력 텍스트와 체크박스 값을 나열한다.
- 공통 부모를 찾아라 : 첫 번째 공통 부모 컴포넌트는
FilterableProductTable이다. - state를 어디 정의할 지 결정해라 : 우리는 필터 텍스트와 체크된 state값을
FilterableProductTable에둘 것이다.
useState() 훅을 사용하여 state를 추가해라. 훅은 리액트에서 특별한 함수이다. FilterableProductTable 상단에 두개의 상태 변수를 추가하고 초기화해라.
function FilterableProductTable({ products }) {
  const [filterText, setFilterText] = useState('');
  const [inStockOnly, setInStockOnly] = useState(false);
그리고 props로 ProductTable 와SearchBar 에 filterText와 inStockOnly를 전달해라
<div>
  <SearchBar
    filterText={filterText}
    inStockOnly={inStockOnly} />
  <ProductTable
    products={products}
    filterText={filterText}
    inStockOnly={inStockOnly} />
</div>
앱이 어떻게 동작하는 지 확인할 수 있다. filterText에 초기값을 useState('')에서 useState('fruit')로 수정해라. 검색 입력 텍스트와 테이블 업데이트가 모두 표시된다.
import { useState } from 'react';

function FilterableProductTable({ products }) {
  const [filterText, setFilterText] = useState('');
  const [inStockOnly, setInStockOnly] = useState(false);

  return (
    <div>
      <SearchBar
        filterText={filterText}
        inStockOnly={inStockOnly} />
      <ProductTable
        products={products}
        filterText={filterText}
        inStockOnly={inStockOnly} />
    </div>
  );
}

function ProductCategoryRow({ category }) {
  return (
    <tr>
      <th colSpan="2">
        {category}
      </th>
    </tr>
  );
}

function ProductRow({ product }) {
  const name = product.stocked ? product.name :
    <span style={{ color: 'red' }}>
      {product.name}
    </span>;

  return (
    <tr>
      <td>{name}</td>
      <td>{product.price}</td>
    </tr>
  );
}

function ProductTable({ products, filterText, inStockOnly }) {
  const rows = [];
  let lastCategory = null;

  products.forEach((product) => {
    if (
      product.name.toLowerCase().indexOf(
        filterText.toLowerCase()
      ) === -1
    ) {
      return;
    }
    if (inStockOnly && !product.stocked) {
      return;
    }
    if (product.category !== lastCategory) {
      rows.push(
        <ProductCategoryRow
          category={product.category}
          key={product.category} />
      );
    }
    rows.push(
      <ProductRow
        product={product}
        key={product.name} />
    );
    lastCategory = product.category;
  });

  return (
    <table>
      <thead>
        <tr>
          <th>Name</th>
          <th>Price</th>
        </tr>
      </thead>
      <tbody>{rows}</tbody>
    </table>
  );
}

function SearchBar({ filterText, inStockOnly }) {
  return (
    <form>
      <input
        type="text"
        value={filterText}
        placeholder="Search..."/>
      <label>
        <input
          type="checkbox"
          checked={inStockOnly} />
        {' '}
        Only show products in stock
      </label>
    </form>
  );
}

const PRODUCTS = [
  {category: "Fruits", price: "$1", stocked: true, name: "Apple"},
  {category: "Fruits", price: "$1", stocked: true, name: "Dragonfruit"},
  {category: "Fruits", price: "$2", stocked: false, name: "Passionfruit"},
  {category: "Vegetables", price: "$2", stocked: true, name: "Spinach"},
  {category: "Vegetables", price: "$4", stocked: false, name: "Pumpkin"},
  {category: "Vegetables", price: "$1", stocked: true, name: "Peas"}
];

export default function App() {
  return <FilterableProductTable products={PRODUCTS} />;
}
form을 수정하는 건 아직 작동하지 않는다. 콘솔에 에러가 뜰 것이다.
You provided a `value` prop to a form field without an `onChange` handler. This will render a read-only field.ProductTable와 SearchBar에서filterText와 inStockOnly를 읽어 테이블, input, 체크박스를 렌더링한다. 예를 들어 SearchBar가 입력 값을 채우는 방법은 다음과 같다
function SearchBar({ filterText, inStockOnly }) {
  return (
    <form>
      <input
        type="text"
        value={filterText}
        placeholder="Search..."/>
그러나 입력과 같은 사용자 작업에 응답하는 코드는 아직 추가하지 않았습니다. 이것이 마지막 단계가 될 것이다.
Step 5: Add inverse data flow
현재 앱은 props와 state가 아래로 흐르면서 잘 렌더링되고 있다. 하지만 사용자의 입력에 따라 state를 바꾸기 위해 다른 방향으로 흐르는 데이터를 지원해야 한다: 깊게 있는 FilterableProductTable 컴포넌트에서 state를 업데이트 해야한다.
리액트는 이 데이터 흐름을 명시적으로 만들지만 양방향 데이터 바인딩보다 조금 더 많은 타이핑이 필요하다. 예시에서 타이핑하거나 박스를 체크를 하려고하면 리액트는 그 행동을 무시한다. 이건 의도적인 거다. <input value={filterText} / 를 작성하고 FilterableProductTable 에서 전달된 filterText state와 항상 동일하도록 value에 input을 설정하였다.filterText state가 설정되지 않으면 절대로 인풋이 변하지 않는다.
사용자가 입력 폼을 변경할 때마다 상태가 업데이트되어 해당 변경 사항을 반영되도록 하고 싶다. state는 FilterableProductTable 있고, 그래서 FilterableProductTable만 setFilterText와 setInStockOnly를 호출할 수 있다. SearchBar가 FilterableProductTable의 state를 업데이트 하려면 SearchBar에 다음과 같이 함수를 전달해야한다 :
function FilterableProductTable({ products }) {
  const [filterText, setFilterText] = useState('');
  const [inStockOnly, setInStockOnly] = useState(false);

  return (
    <div>
      <SearchBar
        filterText={filterText}
        inStockOnly={inStockOnly}
        onFilterTextChange={setFilterText}
onInStockOnlyChange={setInStockOnly} />SearchBar에선 onChange 이벤트 핸들러를 추가하고 부모 state를 설정한다.
<input
  type="text"
  value={filterText}
  placeholder="Search..."
  onChange={(e) => onFilterTextChange(e.target.value)} />
이제 작동된다.
import { useState } from 'react';

function FilterableProductTable({ products }) {
  const [filterText, setFilterText] = useState('');
  const [inStockOnly, setInStockOnly] = useState(false);

  return (
    <div>
      <SearchBar
        filterText={filterText}
        inStockOnly={inStockOnly}
        onFilterTextChange={setFilterText}
        onInStockOnlyChange={setInStockOnly} />
      <ProductTable
        products={products}
        filterText={filterText}
        inStockOnly={inStockOnly} />
    </div>
  );
}

function ProductCategoryRow({ category }) {
  return (
    <tr>
      <th colSpan="2">
        {category}
      </th>
    </tr>
  );
}

function ProductRow({ product }) {
  const name = product.stocked ? product.name :
    <span style={{ color: 'red' }}>
      {product.name}
    </span>;

  return (
    <tr>
      <td>{name}</td>
      <td>{product.price}</td>
    </tr>
  );
}

function ProductTable({ products, filterText, inStockOnly }) {
  const rows = [];
  let lastCategory = null;

  products.forEach((product) => {
    if (
      product.name.toLowerCase().indexOf(
        filterText.toLowerCase()
      ) === -1
    ) {
      return;
    }
    if (inStockOnly && !product.stocked) {
      return;
    }
    if (product.category !== lastCategory) {
      rows.push(
        <ProductCategoryRow
          category={product.category}
          key={product.category} />
      );
    }
    rows.push(
      <ProductRow
        product={product}
        key={product.name} />
    );
    lastCategory = product.category;
  });

  return (
    <table>
      <thead>
        <tr>
          <th>Name</th>
          <th>Price</th>
        </tr>
      </thead>
      <tbody>{rows}</tbody>
    </table>
  );
}

function SearchBar({
  filterText,
  inStockOnly,
  onFilterTextChange,
  onInStockOnlyChange
}) {
  return (
    <form>
      <input
        type="text"
        value={filterText} placeholder="Search..."
        onChange={(e) => onFilterTextChange(e.target.value)} />
      <label>
        <input
          type="checkbox"
          checked={inStockOnly}
          onChange={(e) => onInStockOnlyChange(e.target.checked)} />
        {' '}
        Only show products in stock
      </label>
    </form>
  );
}

const PRODUCTS = [
  {category: "Fruits", price: "$1", stocked: true, name: "Apple"},
  {category: "Fruits", price: "$1", stocked: true, name: "Dragonfruit"},
  {category: "Fruits", price: "$2", stocked: false, name: "Passionfruit"},
  {category: "Vegetables", price: "$2", stocked: true, name: "Spinach"},
  {category: "Vegetables", price: "$4", stocked: false, name: "Pumpkin"},
  {category: "Vegetables", price: "$1", stocked: true, name: "Peas"}
];

export default function App() {
  return <FilterableProductTable products={PRODUCTS} />;
}
Adding Interactivity에서 이벤트 처리 및 상태 업데이트에 대한 모든 내용을 알아볼 수 있다.

유익한 글이었습니다.