0. Intro
필자 회사의 추론 서버(Inference Server)로 이미지를 POST 요청해서 응답을 받아오는
Android Application을 제작하게 되었다.
나는 Android 개발이란 걸 단 한번도 해본 적이 없었고,
Java 보다는 C++와 Python을 주로 썼었다.
그래서 그런지 굉장히 많은 삽질을 하며 장장 1주일에 걸쳐서 개발을 완료했는데,
나에게는 너무 어렵고 중요했던 정보였기에 블로그 포스팅을 하게 되었다.
1. Before Development
우선, 어떠한 서버가 있고 거기에 AccessKey와 Image를 보내야 한다.
간단하게 Postman 으로 테스트를 해볼 수 있다.
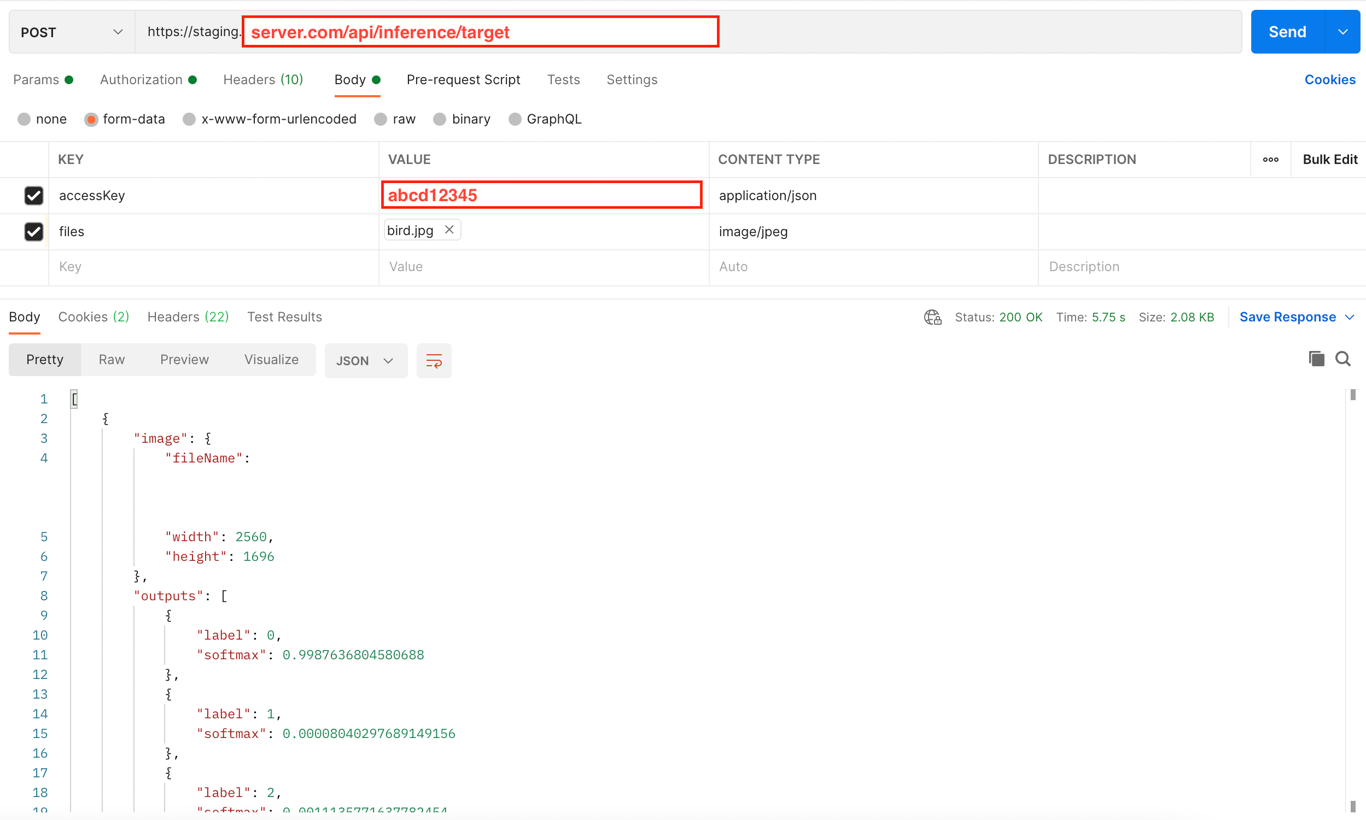
이렇게 POST method로 https://staging.server.com/api/inference/target 위치로
accessKey = "abcd12345"
files = "bird.jpg"
형식을 보내면 아래와 같이 응답이 온다.
[
    {
        "image": {
            "fileName": "어쩌구_저쩌구_파일이름1.jpg",
            "width": 2560,
            "height": 1696
        },
        "outputs": [
            {
                "label": 0,
                "softmax": 0.9987636804580688
            },
            {
                "label": 1,
                "softmax": 0.0012363195419311523
            }
        ]
    }
]
개발 전에, 알아야 할 정보는
- 어떤 Key 값을 보내야 하는가?
- 각각의 Key에 매핑되는 Value 타입. (String? Image? Bitmap? 등)
- (당연하지만) POST 요청을 보낼 서버 주소
- 헤더 정보
등이 있다.
헤더 정보는 Request 요청을 보낼 때 어긋나게 되면
1. 요청이 잘못 가거나 혹은 2. 응답이 이상하게 올 수 있기 때문에 반드시 확인해야 한다.
그럼 헤더 정보는 어떻게 알 수 있을까?
2. Checking header information
사실 코드 작성보다 헤더 확인이라는 부분이 엄청 힘들었다.
나는 네트워크나 서버 개발을 해 본 적이 없어서, 헤더의 중요성을 몰랐는데 이번 기회에 뼈저리게 느꼈다.
Swagger 라든지, DevTools(개발자 도구, 요소 점검) 라든지, 어떠한 방식으로든 웹페이지에서 헤더 정보를 확인할 수 있다.
필자는 개발자 도구를 사용해서 웹페이지에서 직접 헤더를 확인하였다.

이렇게 개발자 도구를 열고, 네트워크 탭 - XHR/Fetch 항목으로 들어가면 [요청, 응답, 요청 데이터] 등을 확인할 수 있다.
그리고 저기의 Content-Type, Accept-Language 등이 우리가 Connection을 할 때 설정해야 할 헤더 및 Key 정보들이다.
아래로 더 내리면 요청 데이터 항목이 있다.
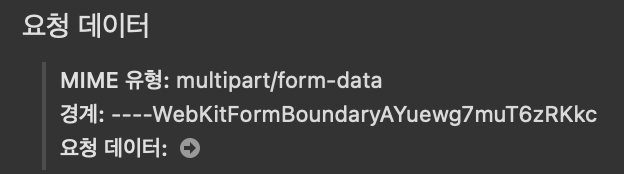
유형은 multipart/form-data 이고, boundary는 ----WebKitFormBoundaryAYuewg7muT6zRKkc 이다.
나는 boundary가 뭔지 엄청 헷갈렸는데, 쉽게 생각해서 "구분자" 라고 보면 된다.
POST로 데이터를 보내면, key-value pair가 1개든 10개든 하나의 String 타입으로 보낸다.
그러면 각 key-value pair를 구분할 수 있어야 하는데, boundary가 그 역할을 하게 된다.
개발자 도구에서 요청 데이터를 직접 볼 수 있다.
------WebKitFormBoundaryAYuewg7muT6zRKkc
Content-Disposition: form-data; name="files"; filename="bird.jpg"
Content-Type: image/jpeg


------WebKitFormBoundaryAYuewg7muT6zRKkc--
이렇게, two-hypens("--")과 줄바꿈(=crlf, Java에서는 "\r\n"을 쓴다.), boundary의 조합으로 볼 수 있다.
1개의 데이터가 아니라 여러 개의 image data를 보냈을 때의 요청 데이터는 어떨까?
------WebKitFormBoundary3d92ZiPrZIV3SDAy
Content-Disposition: form-data; name="files"; filename="bird1.jpg"
Content-Type: image/jpeg


------WebKitFormBoundary3d92ZiPrZIV3SDAy
Content-Disposition: form-data; name="files"; filename="cat1.jpg"
Content-Type: image/jpeg


------WebKitFormBoundary3d92ZiPrZIV3SDAy
Content-Disposition: form-data; name="files"; filename="deer1.jpg"
Content-Type: image/jpeg


------WebKitFormBoundary3d92ZiPrZIV3SDAy
Content-Disposition: form-data; name="files"; filename="dog1.jpg"
Content-Type: image/jpeg


------WebKitFormBoundary3d92ZiPrZIV3SDAy--
이렇게 나타난다. 우리가 Android 개발 시에 POST 데이터를 보내줄 때, 이러한 형식을 맞춰야 한다.
(보통 boundary는 웹 페이지에서 알아서 보내준다고 한다.
개발자가 임의로 작성해도 된다고 하지만, 필자는 웹페이지의 형식을 복사 붙여넣기 하였다.)
3. Development
이제 실제 코드부분을 작성해보자.
3-1. pre-setting
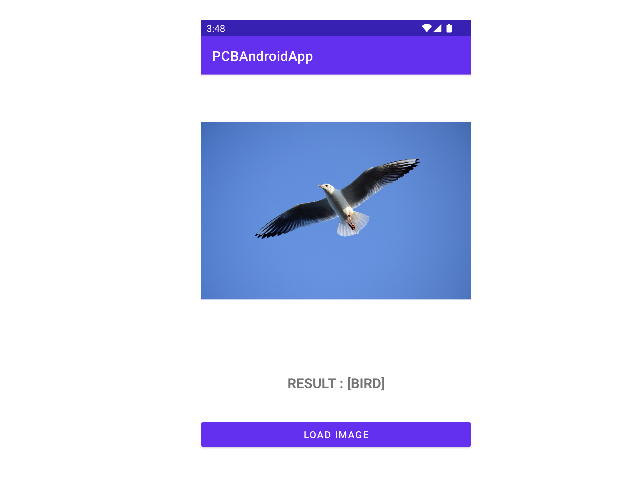
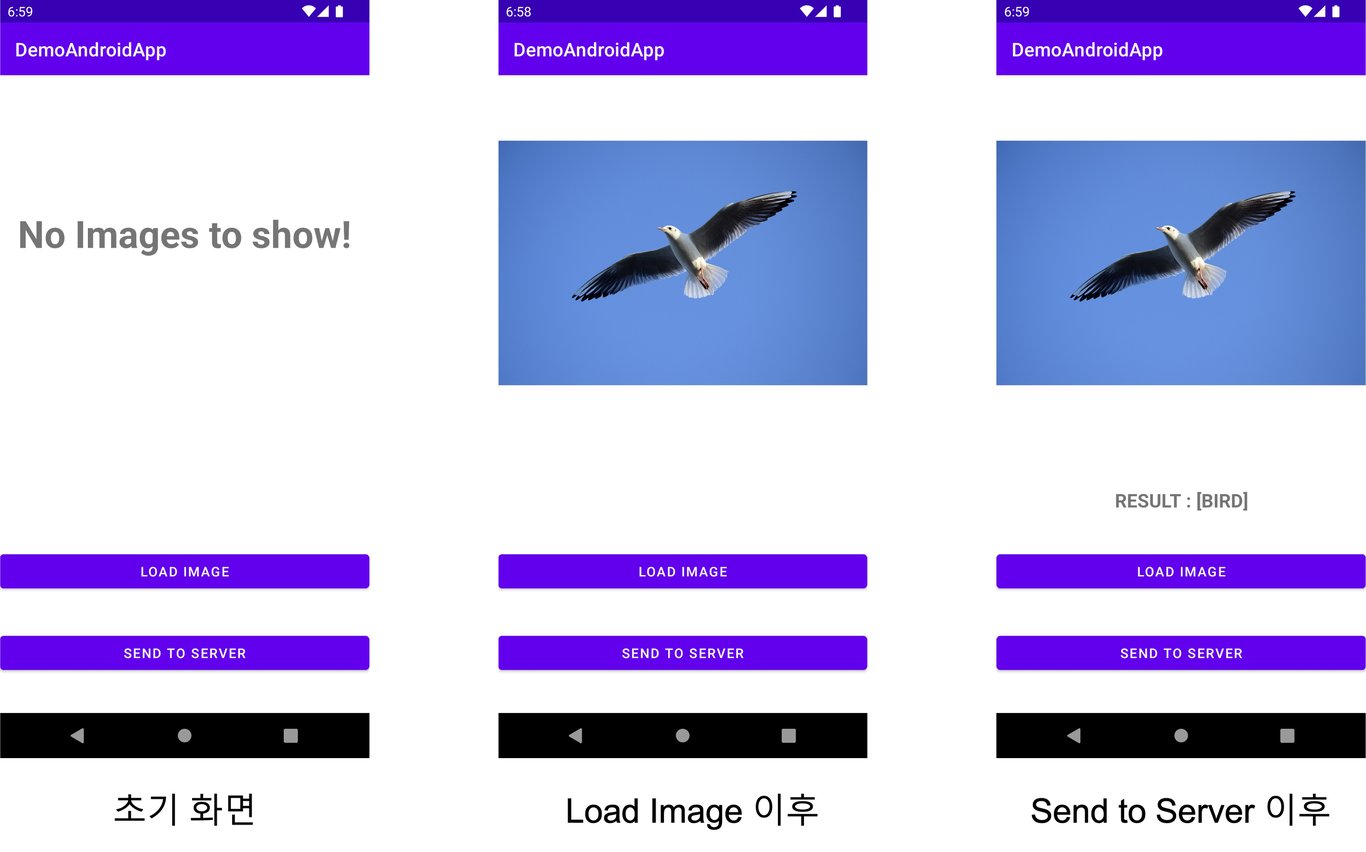
작동 방식은 다음과 같다:
- Load Image 버튼으로 ImageView에 이미지를 띄우고
- Send To Server 버튼으로 해당 이미지를 서버로 전송한다.
화면 구성은 다음과 같다:
버튼 및 String, ImageView, TextView 관련해서는 이후에 포스팅을 하고,
지금은 Http Request가 목적이므로 생략한다.
우선, STORAGE 및 Network permission을 적어줘야 한다.
app/manifests/AndroidManifest.xml 위치에 적는다.
- AndroidManifest.xml
<manifest xmlns:android="http://schemas.android.com/apk/res/android"
    package="com.example.demoandroidapp">
    <uses-permission android:name="android.permission.READ_EXTERNAL_STORAGE" />
    <uses-permission android:name="android.permission.WRITE_EXTERNAL_STORAGE" />
    <uses-permission android:name="android.permission.INTERNET" />
</manifest>
외부 Class는 사용하는 것이 없기 때문에, build.gradle 에는 수정할 것이 없다.
3-2. MainActivity
간단하게 MainActivity의 OnCreate 및 OnCreate 하위 buttonLoadImage.setOnClickListener 함수 코드만 보자.
- MainActivity.class
import androidx.appcompat.app.AppCompatActivity;
import android.annotation.SuppressLint;
import android.content.Intent;
import android.database.Cursor;
import android.os.AsyncTask;
import android.graphics.Bitmap;
import android.graphics.BitmapFactory;
import android.graphics.drawable.BitmapDrawable;
import android.net.Uri;
import android.os.Bundle;
import android.provider.MediaStore;
import android.view.View;
import android.widget.Button;
import android.widget.ImageView;
import android.widget.TextView;
import java.io.ByteArrayOutputStream;
import org.json.JSONArray;
import org.json.JSONObject;

public class MainActivity extends AppCompatActivity {
    private static final int RESULT_LOAD_IMAGE = 1;
    private static String output = "";
    private TextView resultTextView = null;

    @Override
    protected void onCreate(Bundle savedInstanceState) {
        super.onCreate(savedInstanceState);
        setContentView(R.layout.activity_main);

        // declaration button
        Button buttonLoadImage = (Button) findViewById(R.id.button);
        Button buttonSendToServer = (Button) findViewById(R.id.detect);
        resultTextView = findViewById(R.id.resultText);

        // permission
        requestPermissions(new String[]{android.Manifest.permission.READ_EXTERNAL_STORAGE}, 1);

        // Declaration TextView, ImageView, initialization resultTextView

        TextView NothingToShowTextView = findViewById(R.id.nothingToShowText);
        ImageView imageView = (ImageView) findViewById(R.id.image);
        resultTextView.setText("");

        buttonLoadImage.setOnClickListener(new View.OnClickListener() {

            @SuppressLint("SetTextI18n")
            @Override
            public void onClick(View arg0) {
                // reset TextView
                NothingToShowTextView.setText("");
                Intent i = new Intent(
                        Intent.ACTION_PICK,
                        MediaStore.Images.Media.EXTERNAL_CONTENT_URI);
                startActivityForResult(i, RESULT_LOAD_IMAGE);
            }
        });
그리고 OnCreate 내부에 이어서 buttonSendToServer.setOnClickListener 를 작성한다.
buttonSendToServer.setOnClickListener(new View.OnClickListener() {

    @SuppressLint("SetTextI18n")
    @Override
    public void onClick(View arg0) {
        Bitmap original_bitmap = null;

        String url_string = "https://staging.server.com/api/inference/target";
        String accessKey_string = "abcd12345";

        try {
            resultTextView.setText("Inference in progress...");

            // Getting the image from the image view
            // [1] Read the image as Bitmap
            original_bitmap = ((BitmapDrawable) imageView.getDrawable()).getBitmap();

            ByteArrayOutputStream blob = new ByteArrayOutputStream();
            original_bitmap.compress(Bitmap.CompressFormat.JPEG, 100, blob);
            byte[] imageBytes = blob.toByteArray();

            // [2] http connection
            NetworkTask networkTask = new NetworkTask(url_string,
                                                      accessKey_string,
                                                      imageBytes,
                                                      resultTextView);
            networkTask.execute();

        } catch (Exception e) {
            System.out.println("Failed to open image file.");
            finish();
        }

        imageView.setImageDrawable(new BitmapDrawable(getResources(), original_bitmap));
    }
});
String url_string 에는 Postman에서 봤던 "https://staging.server.com/api/inference/target" 을 적고,
String accessKey_string 에는 "abcd12345" 를 적어준다.
여기서 핵심은 2가지이다.
- Bitmap 타입의 이미지를 byte[] 타입으로 변환한다.
- AsyncTask 를 상속받은 NetworkTask를 execute() 한다.
byte[] 형태로 변환하는 것은, ImageView에서 이미지를 읽어서(bitmap) > toByteArray();를 적용하는 것이다.
3-3. NetworkTask
NetworkTask는 다음과 같이 작성했다:
public static class NetworkTask extends AsyncTask<Void, Void, String> {
    /**
     * AsyncTask start
     *
     * (single Worker Thread)
     * 1. onPreExecuted()
     * 2. doInBackground()
     *      - publishProgress() -> onProgressUpdate()
     *      - publishProgress() -> onProgressUpdate()
     *      - ...
     * 3. onPostExecuted()
     *
     */

    private final String url;
    private final String accessKey;
    private final byte[] values;
    @SuppressLint("StaticFieldLeak")
    private final TextView _resultView;

    // Constructor
    public NetworkTask(String url, String accessKey, byte[] values, TextView resultView) {
        this.url = url;
        this.accessKey = accessKey;
        this.values = values;
        this._resultView = resultView;
    }

    @Override
    protected String doInBackground(Void... params) {
        String result; // 요청 결과를 저장할 변수.
        RequestHttpsURLConnection requestHttpsURLConnection = new RequestHttpsURLConnection();
        result = requestHttpsURLConnection.request(url, accessKey, values);

        try {
            if (result != null) {
                System.out.println("[doInBackground] output : " + result.toString());
            } else {
                System.out.println("[doInBackground] output is null state.");
            }

        } catch (Exception e) {
            e.printStackTrace();
        }

        return result;
    }

    @SuppressLint("SetTextI18n")
    @Override
    protected void onPostExecute(String result) {
        super.onPostExecute(result);
        String outputs = "";
        String image = "";

        double maxSoftmax = 0.0F;
        String maxLabelName = "";

        String labelName = "";

        try {
            if (result != null) {
                JSONArray jsonArray = new JSONArray(result);

                for (int i = 0; i < jsonArray.length(); i++) {
                    JSONObject tempJsonObject = jsonArray.getJSONObject(i);
                    image = tempJsonObject.getString("image");
                    outputs = tempJsonObject.getString("outputs");

                    JSONArray jsonOutputsArray = new JSONArray(outputs);

                    for (int j = 0; j < jsonOutputsArray.length(); j++) {
                        JSONObject tempOutputsJsonObject = jsonOutputsArray.getJSONObject(j);
                        labelName = tempOutputsJsonObject.getString("label");
                        double tempSoftmaxValue = tempOutputsJsonObject.getDouble("softmax");

                        if (maxSoftmax < tempSoftmaxValue) {
                            maxSoftmax = tempSoftmaxValue;
                            switch (labelName) {
                                case "0":
                                    maxLabelName = "bird";
                                    break;
                                case "1":
                                    maxLabelName = "cat";
                                    break;
                                case "2":
                                    maxLabelName = "deer";
                                    break;
                                case "3":
                                    maxLabelName = "dog";
                                    break;
                                case "4":
                                    maxLabelName = "frog";
                                    break;
                                case "5":
                                    maxLabelName = "horse";
                                    break;
                            }
                        }

                    }
                }
            } else {
                System.out.println("[onPostExecute] output is null state.");
            }

        } catch (Exception e) {
            e.printStackTrace();
        }

        _resultView.setText("Result : [" + maxLabelName + "]");
    }
}
AsyncTask는 Http Connection을 위해서 반드시 상속받아야 된다고 한다.
(Android 실행의 main thread에서 network connection 동작을 하지 않는다고 한다.)
AsyncTask의 동작 방식은
- AsyncTask start
- onPreExecuted()
- doInBackground()
- publishProgress() -> onProgressUpdate()
- publishProgress() -> onProgressUpdate()
- ...
- onPostExecuted()
순서이다.
doInBackground() 이후에 onPostExecuted() 함수가 수행되는데,
doInBackground 함수의 return type이 String 이므로,
onPostExecuted() 함수의 입력 파라미터의 type 역시 String 이 된다.
doInBackground 에서 실제 POST request를 날리고, onPostExecuted 에서 POST response String에 대한 후처리가 이루어진다. (화면에 결과값 띄워주기 등)
실제 동작은 doInBackground() 함수 내부 중간의
RequestHttpsURLConnection requestHttpsURLConnection = new RequestHttpsURLConnection();
result = requestHttpsURLConnection.request(url, accessKey, values); // 해당 URL로 부터 결과물을 얻어온다.
부분에서 POST request를 날리게 된다.
생성자 파라미터는 없고, request 함수의 파라미터는:
- url : API Endpoint
- accessKey : key['accessKey']
- values : key['files'] (byte[] type.)
이렇게 3개로 설정하였다.
그러면 이제 핵심 부분인 RequestHttpsURLConnection class 코드를 보자.
3-4. RequestHttpsURLConnection
- RequestHttpsURLConnection.class 전체 코드
import java.io.BufferedReader;
import java.io.IOException;
import java.io.InputStreamReader;
import java.io.InputStream;
import java.io.BufferedInputStream;
import java.io.DataOutputStream;
import javax.net.ssl.HttpsURLConnection;
import java.net.URL;
import java.nio.charset.StandardCharsets;

public class RequestHttpsURLConnection {
    String strResponse = null;
    public String request(String _url, String accessKey, byte[] imageBytes){

        // HttpURLConnection 참조 변수.
        HttpsURLConnection urlConn = null;

        try{
            String crlf = "\r\n";     // carriage return + line feed
            String twoHyphens = "--";
            String boundary = "----WebKitFormBoundarynuXSuFo6d9f2xtbb";

            URL url = new URL(_url);
            urlConn = (HttpsURLConnection) url.openConnection();

            // [2-1]. urlConn 설정.
            urlConn.setRequestMethod("POST"); // URL 요청에 대한 메소드 설정 : POST.
            urlConn.setRequestProperty("USER-AGENT", "Mozilla/5.0");
            urlConn.setRequestProperty("ACCEPT-LANGUAGE", "en-us,en;0.5");
            urlConn.setDoInput(true);
            urlConn.setDoOutput(true);
            urlConn.setUseCaches(false);

            urlConn.setRequestProperty("Connection", "keep-alive");
            urlConn.setRequestProperty("User-Agent", "CodeJava Agent");
            urlConn.setRequestProperty("Content-Type", "multipart/form-data; boundary=" + boundary);

            // [2-2]. parameter 전달 및 데이터 읽어오기.
            DataOutputStream request = new DataOutputStream(urlConn.getOutputStream());

            // Write key and values
            // 1. Access Key
            request.writeBytes(twoHyphens + boundary + crlf);
            request.writeBytes("Content-Disposition: form-data; name=\"accessKey\"" + crlf);
            request.writeBytes("Content-Type: application/json" + crlf);
            request.writeBytes(crlf);
            request.writeBytes(accessKey + crlf);

            // 2. Image data
            request.writeBytes(twoHyphens + boundary + crlf);
            request.writeBytes("Content-Disposition: form-data; name=\"files\"; filename=\"elephants1.png\"" + crlf);
            request.writeBytes("Content-Type: image/jpeg" + crlf);
            request.writeBytes(crlf);
            request.write(imageBytes);

            request.writeBytes(crlf);
            request.writeBytes(twoHyphens + boundary + twoHyphens + crlf);
            request.flush();
            request.close();

            int response_code = urlConn.getResponseCode();
            System.out.println("Connection response code : [" + response_code + "]");

            // [2-3]. 연결 요청 확인.
            // 실패 시 null을 리턴하고 메서드를 종료.
            if (response_code != HttpsURLConnection.HTTP_OK){
                return "Response Code : " + Integer.toString(response_code);	// response 200
            } else {
                InputStream responseStream = new BufferedInputStream(urlConn.getInputStream());
                BufferedReader responseStreamReader = new BufferedReader(new InputStreamReader(responseStream, StandardCharsets.UTF_8));

                String outputResponse = "";
                StringBuilder stringBuilder = new StringBuilder();

                while ((outputResponse = responseStreamReader.readLine()) != null) {
                    stringBuilder.append(outputResponse).append("\n");
                }

                responseStreamReader.close();
                strResponse = stringBuilder.toString();

                return strResponse;
            }
        } catch (IOException e) {   // for URL.
            e.printStackTrace();
        }                           // for openConnection().
        finally {
            if (urlConn != null)
                urlConn.disconnect();
        }
        return null;
    }
}
달랑 request 함수 하나만 구현하였다. 이제부터는 각 구성 별 코드 블럭에 대한 설명과 참고사항들이다.
1. 우리가 아까 헤더 정보 찾기에서 봤었던 boundary와, crlf(줄바꿈), two-hypens 변수를 할당한다.
String crlf = "\r\n";     // carriage return + line feed
String twoHyphens = "--";
String boundary = "----WebKitFormBoundarynuXSuFo6d9f2xtbb";
boundary는 임의로 설정 가능하다고 하지만, 웹알못인 필자는 잘 몰라서 browser에서 보여준 것을 썼다.
2. URL 객체를 만들고, Connection을 활성화한다.
URL url = new URL(_url);
urlConn = (HttpsURLConnection) url.openConnection();
3. 헤더 정보를 입력한다.
urlConn.setRequestMethod("POST"); // URL 요청에 대한 메소드 설정 : POST.
urlConn.setRequestProperty("USER-AGENT", "Mozilla/5.0");
urlConn.setRequestProperty("ACCEPT-LANGUAGE", "en-us,en;0.5");
urlConn.setDoInput(true);
urlConn.setDoOutput(true);
urlConn.setUseCaches(false);

urlConn.setRequestProperty("Connection", "keep-alive");
urlConn.setRequestProperty("User-Agent", "CodeJava Agent");
urlConn.setRequestProperty("Content-Type", "multipart/form-data; boundary=" + boundary);
이전에 web-browser에서 살펴 본 헤더 정보들이다.
Content-Type은 "multipart/form-data" 형식이고, ; 이후에 boundary 정보를 위와 같이 넣어주면 된다.
또한, POST method이므로 urlConn.setRequestMethod() 의 파라미터로 "POST"를 넣어주었다.
이 외에
"USER-AGENT": web browser에서 확인 가능.
"ACCEPT-LANGUAGE": "en-us,en;0.5" 로 고정해줬다.
"Connection": web browser에서 확인 가능.
"User-Agent": "CodeJava Agent" 로 고정해줬다.
urlConn.setDoInput(true)
urlConn.setDoOutput(true)
urlConn.setUseCaches(false): 위 3개는 true / true / false 로 고정해주었다.
등을 적어준다.
4. form-data를 입력한다.
DataOutputStream request = new DataOutputStream(urlConn.getOutputStream());

// Write key and values
// 1. Access Key
request.writeBytes(twoHyphens + boundary + crlf);
request.writeBytes("Content-Disposition: form-data; name=\"accessKey\"" + crlf);
request.writeBytes("Content-Type: application/json" + crlf);
request.writeBytes(crlf);
request.writeBytes(accessKey + crlf);

// 2. Image data
request.writeBytes(twoHyphens + boundary + crlf);
request.writeBytes("Content-Disposition: form-data; name=\"files\"; filename=\"anything.png\"" + crlf);
request.writeBytes("Content-Type: image/jpeg" + crlf);
request.writeBytes(crlf);
request.write(imageBytes);

request.writeBytes(crlf);
request.writeBytes(twoHyphens + boundary + twoHyphens + crlf);
request.flush();
request.close();
사실상 이번 개발에서 가장 중요한 부분이다.
나는 이런 request를 처음보내서, 3일을 헤맸었다.
실제 request를 보낼 데이터들의 명세서(?)를 적어주는 부분이다.
아까 요청 데이터 항목에서 봤었던
------WebKitFormBoundaryAYuewg7muT6zRKkc (+ crlf)
Content-Disposition: form-data; name="files"; filename="bird.jpg" (+ crlf)
Content-Type: image/jpeg (+ crlf)
(+ crlf)
(+ crlf)
------WebKitFormBoundaryAYuewg7muT6zRKkc-- (+ crlf)
(+ crlf)
이 부분을 적어주는 것이다.
- 항상 시작은 twoHypens + boundary + crlf로 시작한다.
- Content-Disposition 을 적어준다. 문자열이므로 웹페이지에서 보이는 그대로 적어주면 된다. crlf 를 붙인다.
- Content-Type 을 적어준다. crlf 를 붙인다.
- crlf 를 붙인다.
- 실제로 보낼(POST) 데이터를 적어준다.
- String 일 경우 : request.writeBytes()
- byte[] (image)일 경우 : request.write()
- crlf 를 붙인다.
- 항상 마지막은 twoHypens + boundary + twoHypens + crlf 로 마무리한다.
- 더 이상 보낼 데이터가 없으면 :
request.flush()및request.close()로 POST를 종료한다.
이렇게 하면 실제 API Endpoint 서버에 POST 동작이 수행된다.
5. 응답 코드(Response Code) 및 응답 문자열을 확인한다.
int response_code = urlConn.getResponseCode();
System.out.println("Connection response code : [" + response_code + "]");

// [2-3]. 연결 요청 확인.
if (response_code != HttpsURLConnection.HTTP_OK){
    return "Response Code : " + Integer.toString(response_code);	// response 200
} else {
    InputStream responseStream = new BufferedInputStream(urlConn.getInputStream());
    BufferedReader responseStreamReader = new BufferedReader(new InputStreamReader(responseStream, StandardCharsets.UTF_8));

    String outputResponse = "";
    StringBuilder stringBuilder = new StringBuilder();

    while ((outputResponse = responseStreamReader.readLine()) != null) {
        stringBuilder.append(outputResponse).append("\n");
    }

    responseStreamReader.close();
    strResponse = stringBuilder.toString();

    return strResponse;
}
응답은 InputStream 과 BufferedReader 클래스에서 수행한다.
BufferedReader 클래스의 객체가 InputStream 클래스의 객체를 받는데, 이 InputStream 의 객체는 urlConn.getInputStream() 을 파라미터로 받는다.
(사실 response 부분은 아마 전 세계의 android http connection 모든 코드에서 동일하게 적용될 것이다.)
이렇게 해서, endline까지 while문으로 readline() 을 수행하여 StringBuilder 객체에 결과 문자열을 저장한다.
이렇게 나온 response 문자열은, 아까 MainActivity.class 소스 코드의 NetworkTask 클래스 내부
result = requestHttpsURLConnection.request(url, accessKey, values);
result 변수에 저장된다.
4. Finish
거의 다 왔다.
챕터 3의 request 함수는 doInBackground에서 수행되었고,
request 의 결과는 doInBackground 함수 내부의 result 변수에 저장되었으며,
해당 result 변수를 return 하면 onPostExecuted 함수에서 result 변수의 값을 받아올 수 있다.
(이건 정해진 구조이다.)
그러면 이제 onPostExecuted() 함수를 다시 살펴보자.
protected void onPostExecute(String result) {
    super.onPostExecute(result);
    String outputs = "";
    String image = "";

    double maxSoftmax = 0.0F;
    String maxLabelName = "";

    String labelName = "";

    try {
        if (result != null) {
            JSONArray jsonArray = new JSONArray(result);

            for (int i = 0; i < jsonArray.length(); i++) {
                JSONObject tempJsonObject = jsonArray.getJSONObject(i);
                image = tempJsonObject.getString("image");
                outputs = tempJsonObject.getString("outputs");

                JSONArray jsonOutputsArray = new JSONArray(outputs);

                for (int j = 0; j < jsonOutputsArray.length(); j++) {
                    JSONObject tempOutputsJsonObject = jsonOutputsArray.getJSONObject(j);
                    labelName = tempOutputsJsonObject.getString("label");
                    double tempSoftmaxValue = tempOutputsJsonObject.getDouble("softmax");

                    if (maxSoftmax < tempSoftmaxValue) {
                        maxSoftmax = tempSoftmaxValue;
                        switch (labelName) {
                            case "0":
                                maxLabelName = "bird";
                                break;
                            case "1":
                                maxLabelName = "cat";
                                break;
                            case "2":
                                maxLabelName = "deer";
                                break;
                            case "3":
                                maxLabelName = "dog";
                                break;
                            case "4":
                                maxLabelName = "frog";
                                break;
                            case "5":
                                maxLabelName = "horse";
                                break;
                        }
                    }

                }
            }
        } else {
            System.out.println("[onPostExecute] output is null state.");
        }

    } catch (Exception e) {
        e.printStackTrace();
    }

    _resultView.setText("Result : [" + maxLabelName + "]");
}
우리는 맨 처음에 Postman 으로 확인했을 때, json 형태의 응답이 오는 것을 알 수 있다.
그렇기 때문에 android에서 사용 가능한 JSON class를 import 하여 파싱하였다.
[ ] 로 시작하면 JSONArray로 객체를 만들고, { } 로 시작하면 JSONObject로 객체를 만들면 된다.
이렇게 파싱을 하고 나서, TextView 에 추론 결과 category를 적어주면 개발이 끝나게 된다.
- 버그 1 : AsyncTask로 수행하지 않으면, Android main thread에서 자체적으로 blocking을 한다.
- 버그 2 : 헤더를 잘못 적으면, response string 이 전부 깨져서 올 수 있다. 이럴 경우
헤더를 하나씩 소거하며 어떤 헤더를 잘못 적었는지 체크하고, 해당 헤더의 올바른 값을 찾거나 혹은 안써줘도 될 경우 그냥 쓰지말자...
- 참고 1 : 나의 경우에서는 AccessKey를 넣어주기 때문에 Https 서버여도 POST가 가능했다. (별도 인증이 필요없음.)
HTTP 통신의 경우 포스팅한 것처럼 하면 된다. 단, 클래스 import는
import javax.net.ssl.HttpsURLConnection;대신import java.net.HttpURLConnection;을 써주고HttpURLConnection urlConn = null; urlConn = (HttpURLConnection) url.openConnection();으로 바꿔주자.
- 참고 2 : Https의 경우 CA(인증서)와 같은 인증 정보가 별도로 필요하다고 한다.
- 참고 3 : AsyncTask는 반드시 상속받아야 한다.
- 참고 4 : POST가 제대로 이루어지지 않았을 경우(response 400 code처럼) web browser 혹은 API 문서를 보고, 어떤 형태인지, Content-Type, Content-Disposition 등을 반드시 확인하자.
