Prerequisite
- EC2 Linux 2 (WEB, WAS)
- Apache 설치
- Tomcat 설치
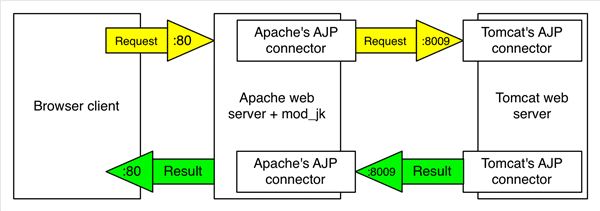
Mod_jk 연동
- Mod_jk는 Apache나 IIS 같은 웹 서버를 톰캣과 통합할 때 사용하는 AJP 커넥터
- 톰캣 전용 Binary Protocol 인 AJP(8009)를 사용함으로서 속도 측면에서 더 빠름
- 톰캣 전용 프로토콜이므로 WAS가 다른 제품으로 변경되면 사용 불가
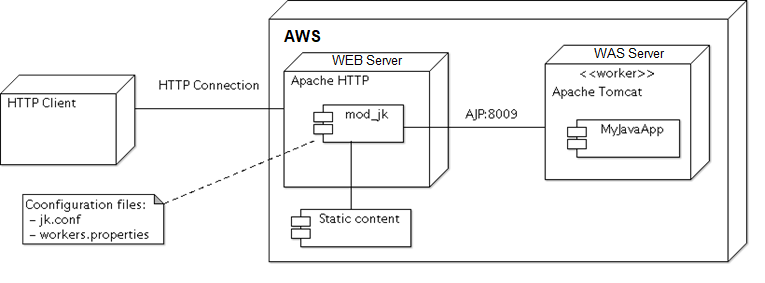
Part 1. Apache Configuration
Tomcat Connector는 WEB Server(Apache)에서 설치한다.
1-1. Tomcat Connector 설치
# ec2-user 디렉토리 이동
cd /home/ec2-user

# Tomcat Connector 설치 & 압축 해제
wget https://mirror.navercorp.com/apache/tomcat/tomcat-connectors/jk/tomcat-connectors-1.2.48-src.tar.gz
tar xvf tomcat-connectors-1.2.48-src.tar.gz

# tomcat connector native 폴더 이동
cd /home/ec2-user/tomcat-connectors-1.2.48-src/native

# native 폴더로 이동해서 ./buildconf.sh 실행
[root native]# ./buildconf.sh

# ./buildconf.sh 과정에서 autoconf 나 libtool 설치 요청이 오면 설치한다.
[root native]# yum install -y autoconf libtool

# apxs는 아파치 extention 설치를 도와주는 유틸리티이며 apxs의 절대경로를 설정해야 한다.
# apxs 설치 환경설정

[root native]# ./configure --with-apxs=/usr/local/apache2/bin/apxs

# make 를 통해 컴파일 & 설치 수행
[root@ip-172-31-4-237 native]# make && make install

----------------------------------------------------------------------
Libraries have been installed in:
   /home/ec2-user/apache/apache2.4.48/modules

If you ever happen to want to link against installed libraries
in a given directory, LIBDIR, you must either use libtool, and
specify the full pathname of the library, or use the '-LLIBDIR'
flag during linking and do at least one of the following:
   - add LIBDIR to the 'LD_LIBRARY_PATH' environment variable
     during execution
   - add LIBDIR to the 'LD_RUN_PATH' environment variable
     during linking
   - use the '-Wl,-rpath -Wl,LIBDIR' linker flag
   - have your system administrator add LIBDIR to '/etc/ld.so.conf'

See any operating system documentation about shared libraries for
more information, such as the ld(1) and ld.so(8) manual pages.
----------------------------------------------------------------------

# 정상적으로 설치되었는지 확인
[root@localhost native]# ls -lZ /usr/local/apache2/modules/mod_jk.so
-rwxr-xr-x root root ?    /home/ec2-user/apache/apache2/modules/mod_jk.so

# modules 디렉토리로 이동
[root@localhost modules]# cd /usr/local/apache2/modules

# 권한 설정
[root@localhost modules]# chmod 755 mod_jk.so
[root@localhost modules]# chown root:root mod_jk.so
1-2. mod_jk 설정
# 아파치 설정 파일 경로 이동
[root@ip-172-31-4-237 conf]# pwd
/usr/local/apache2/conf

# httpd.conf 파일 편집
[root@ip-172-31-4-237]# vim /usr/local/apache2/conf httpd.conf

# LoadModule version_module 항목을 찾아 다음 내용 추가 후 저장

# LoadModule = Apache를 시작할 때 모듈을 로드할 위치 정의
LoadModule version_module modules/mod_version.so
LoadModule jk_module modules/mod_jk.so

# 작업자 파일 위치 정의
<IfModule mod_jk.c>
 JkWorkersFile /usr/local/apache2/conf/workers.properties
 JkLogFile /usr/local/apache2/logs/mod_jk.log
 JkLogLevel info
 JkLogStampFormat "[%a %b %d %H:%M:%S %Y]"
 JkShmFile /usr/local/apache2/logs/mod_jk.shm
 JKMount /*.jsp worker1
 JKMount /*.css worker1
</IfModule>1-3. 연동설정 파일 생성
$ sudo vim /usr/local/apache2/conf/workers.properties

# 노드 이름
worker.list=worker1
# 톰캣의 AJP 포트 정보 (어떤 AJP 요청을 어떤 포트로 수락하는지)
worker.worker1.type=ajp13
worker.worker1.port=8009

# 톰캣 호스트 IP (톰캣 인스턴스가 실행중인 IP 주소)
worker.worker1.host=<<Was 서버 IP>>
Part 2. Tomcat Configuration
Tomcat Native Library 설치
- Apache 웹서버의 APR 라이브러리를 Tomcat에서 사용할 수 있게 하는 라이브러리
2-1. 의존성 설치
sudo yum -y install gcc make gcc-c++ pcre-devel openssl-devel expat-devel2-2. APR & APR-util 설치
# /tmp/lib 디렉토리 이동 웹에서 필요파일 다운로드
cd /tmp
mkdir lib

# APR 설치 & 압축해제
wget https://mirror.navercorp.com/apache//apr/apr-1.7.0.tar.gz
tar xvfz apr-1.7.0.tar.gz

# APR-util 설치 & 압축해제
wget https://mirror.navercorp.com/apache//apr/apr-util-1.6.1.tar.gz
tar xvfz apr-util-1.6.1.tar.gz

# 압축을 푼 2개 디렉터리를 /usr/local/src로 이동
mv apr-1.7.0 apr-util-1.6.1 /usr/local/src
2-3. APR 설치
# APR 설치
cd /usr/local/src/apr-1.7.0

# ./configure = 설치를 위한 환경 설정 | --prefix = 절대경로 --with 라이브러리 참조
# 절대경로 지정
./configure --prefix=/usr/local/src/apr-1.7.0

# make = configure에 의해 만들어진 makefile로 프로그램 컴파일
# make install = 컴파일된 프로그램, 환경파일, 데이터 파일을 지정된 위치에 복사하는 과정

make && make install

----------------------------------------------------------------------
Libraries have been installed in:
   /usr/local/src/apr-1.7.0/lib

If you ever happen to want to link against installed libraries
in a given directory, LIBDIR, you must either use libtool, and
specify the full pathname of the library, or use the '-LLIBDIR'
flag during linking and do at least one of the following:
   - add LIBDIR to the 'LD_LIBRARY_PATH' environment variable
     during execution
   - add LIBDIR to the 'LD_RUN_PATH' environment variable
     during linking
   - use the '-Wl,-rpath -Wl,LIBDIR' linker flag
   - have your system administrator add LIBDIR to '/etc/ld.so.conf'

See any operating system documentation about shared libraries for
more information, such as the ld(1) and ld.so(8) manual pages.
----------------------------------------------------------------------
2-4. APR-UTIL 설치
# 2-4-1. APR-UTIL 경로 이동
cd /usr/local/src/apr-util-1.6.1

# 2-4-2. 반드시 --with 뒤에 내가 설치한 APR 버전을 넣는다
./configure --prefix=/usr/local/src/apr-util-1.6.1 --with-apr=/usr/local/src/apr-1.7.0

# 2-4-3. 설치
make && make install
2-5. Tomcat native 설치 (소스컴파일)
# 2-5-1. Tomcat Native 설치

# 톰캣 위치 /bin 으로 이동
[root@localhost] cd /usr/local/tomcat8.5/bin

# Tomcat Native 설치 & 압축해제
[root@localhost bin]# wget https://mirror.navercorp.com/apache/tomcat/tomcat-connectors/native/1.2.30/source/tomcat-native-1.2.30-src.tar.gz
[root@localhost bin]# tar -xvf tomcat-native-1.2.30-src.tar.gz

# Tomcat Native / native 디렉토리 이동
[root@localhost bin] cd tomcat-native-1.2.30-src/native

# 2-5-2. Tomcat Native 컴파일 환경설정
[root@localhost native]# ./configure --with-apr=/usr/local/src/apr-1.7.0 --with-java-home=/usr/lib/jvm/java-1.8.0-openjdk-1.8.0.302.b08-0.amzn2.0.1.x86_64

# 2-5-3. 설치
[root@localhost native]# yum install -y apr-devel
[root@localhost native]# make && make install

----------------------------------------------------------------------
Libraries have been installed in:
   /usr/local/apr/lib

If you ever happen to want to link against installed libraries
in a given directory, LIBDIR, you must either use libtool, and
specify the full pathname of the library, or use the '-LLIBDIR'
flag during linking and do at least one of the following:
   - add LIBDIR to the 'LD_LIBRARY_PATH' environment variable
     during execution
   - add LIBDIR to the 'LD_RUN_PATH' environment variable
     during linking
   - use the '-Wl,-rpath -Wl,LIBDIR' linker flag
   - have your system administrator add LIBDIR to '/etc/ld.so.conf'

See any operating system documentation about shared libraries for
more information, such as the ld(1) and ld.so(8) manual pages.
----------------------------------------------------------------------
2-6. catalina.sh 설정
# Tomcat 시작시 해당 라이브러리를 불러올 수 있도록 catalina.sh 파일에 옵션을 추가하자.

# 2-6-1. catalina.sh 파일 설정
[root@localhost conf]# vim /usr/local/tomcat8.5/bin/catalina.sh

126 CATALINA_OPTS="-Djava.library.path=/usr/local/apr/lib"

# 2-6-2. /etc/profile에 환경변수 저장

[root@localhost]# vim /etc/profile
export LD_LIBRARY_PATH="/usr/local/tomcat8.5/lib"

# 2-6-3. 저장 후 적용

[root@localhost]# source /etc/profile

# 2-6-4. tomcat 재시작

[root@localhost]# /usr/local/tomcat8.5/bin/shutdown.sh
[root@localhost]# /usr/local/tomcat8.5/bin/startup.sh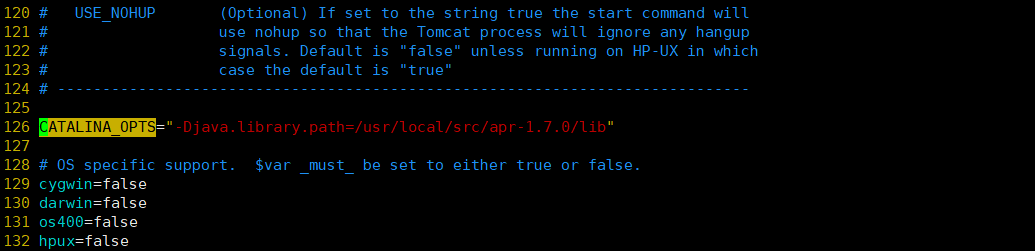
2-7. Native Library 정상 연동 확인
Tomcat 재시작 후 catalina.out 로그를 통해서 Native livrary가 정상적으로 연동 됬는지 확인
# tomcat log 디렉토리 이동
[root@localhost]# cd /usr/local/tomcat8.5/logs

# 로그 검출
[root@localhost logs]# grep -ai Native catalina.out

Loaded Apache Tomcat Native library [1.2.30] using APR version [1.7.0].
정상 연동

연동이 안될시

2-8. Tomcat server.xml 설정
# 톰캣 server.xml 파일 편집

[root conf]# pwd
/usr/local/tomcat8.5/conf

[root@ip-172-31-5-26 conf]# vim /usr/local/tomcat8.5/conf/server.xml

**# Connector port = 8080 주석제거 및 address 수정

# 수정 전
    <Connector port="8080" protocol="HTTP/1.1"
            URIEncoding="UTF-8"
            connectionTimeout="20000"
        redirectPort="8443" />

# 수정 후
<Connector port="8080" protocol="org.apache.coyote.http11.Http11AprProtocol"
               URIEncoding="UTF-8"
               connectionTimeout="20000"
               redirectPort="8443" />

# Connector port = 8009 주석제거 및 address 수정

# 수정 전
<Connector protocol="AJP/1.3"
               address="::1"
               port="8009"
               redirectPort="8443" />

# 수정 후
<Connector port="8009" address="0.0.0.0" protocol="org.apache.coyote.ajp.AjpAprProtocol"
            maxHttpHeaderSize="8192"
            tomcatAuthentication="false"
            maxThreads="150" minSpareThreads="25" maxSpareThreads="75"
            secretRequired="false"
            enableLookups="false" acceptCount="100" redirectPort="8443" />**
2-9. APR Connector 동작 확인
# tomcat log 디렉토리 이동
[root@localhost]# cd /usr/local/tomcat8.5/logs

# HTTP & AJP 검출
[root@localhost logs]# grep -ai http catalina.out

17-Aug-2021 05:23:40.881 INFO [main] org.apache.coyote.AbstractProtocol.init Initializing ProtocolHandler ["http-apr-8080"]
17-Aug-2021 05:23:42.166 INFO [main] org.apache.coyote.AbstractProtocol.start Starting ProtocolHandler ["http-apr-8080"]

[root@localhost logs]# grep -ai ajp catalina.out

17-Aug-2021 05:23:40.942 INFO [main] org.apache.coyote.AbstractProtocol.init Initializing ProtocolHandler ["ajp-apr-0.0.0.0-8009"]
17-Aug-2021 05:23:42.241 INFO [main] org.apache.coyote.AbstractProtocol.start Starting ProtocolHandler ["ajp-apr-0.0.0.0-8009"]
※ 정상적으로 연동이 되지 않을 시 NIO Connector가 기본으로 동작하게 된다.
[root@localhost logs]# grep -ai http catalina.out

04-Aug-2021 18:43:14.754 INFO [main] org.apache.coyote.AbstractProtocol.init Initializing ProtocolHandler ["http-nio-8080"]
04-Aug-2021 18:43:15.575 INFO [main] org.apache.coyote.AbstractProtocol.start Starting ProtocolHandler ["http-nio-8080"]

[root@localhost logs]# grep -ai ajp catalina.out

17-Aug-2021 01:35:40.648 INFO [main] org.apache.coyote.AbstractProtocol.init Initializing ProtocolHandler ["ajp-nio-0.0.0.0-8009"]
17-Aug-2021 01:35:42.033 INFO [main] org.apache.coyote.AbstractProtocol.start Starting ProtocolHandler ["ajp-nio-0.0.0.0-8009"]
2-10. Apache Web↔WAS 연동 확인
[root@WEB]# curl localhost/index.jsp

<!DOCTYPE html>
<html lang="en">
    <head>
        <meta charset="UTF-8" />
        <title>Apache Tomcat/8.5.69</title>
        <link href="favicon.ico" rel="icon" type="image/x-icon" />
        <link href="tomcat.css" rel="stylesheet" type="text/css" />
    </head>

    <body>
        <div id="wrapper">
            <div id="navigation" class="curved container">
                <span id="nav-home"><a href="https://tomcat.apache.org/">Home</a></span>
                <span id="nav-hosts"><a href="/docs/">Documentation</a></span>
                <span id="nav-config"><a href="/docs/config/">Configuration</a></span>
                <span id="nav-examples"><a href="/examples/">Examples</a></span>
                <span id="nav-wiki"><a href="https://wiki.apache.org/tomcat/FrontPage">Wiki</a></span>
                <span id="nav-lists"><a href="https://tomcat.apache.org/lists.html">Mailing Lists</a></span>
                <span id="nav-help"><a href="https://tomcat.apache.org/findhelp.html">Find Help</a></span>
                <br class="separator" />
            </div>
참조
리눅스에 apache tomcat9 jdk yum 으로 설치 및 연동
https://hoing.io/archives/178#comment-2329
Tomcat 7 에서 Tomcat 9 로 WAS 업데이트 하는 이유? APR 라이브러리!!
https://new-hero.tistory.com/29
tomcat 8.5 tomcat-native 설치 및 설정
Cloud 관련 개인 공부 지식들을 기록하는 공간입니다.